
Popular categories
Looking for a yarn?


Comments / Questions (18)
![]() Inger wrote:
Inger wrote:
Skal jeg strikke efter diagram 2a ved str. l.
07.01.2026 - 10:32DROPS Design answered:
Hei Inger. Man skal strikke etter A.2 i alle størrelser, men du må velge riktig A.2. I oppskriften er det A.2 for de som strikker str S og M. A.2 for de som strikker str. L og A.2 for de som strikker str. XL-XXL-XXXL. Se på diagtrammene over målskissen. mvh DROPS Design
19.01.2026 - 14:54
![]() Sylvie Bérard wrote:
Sylvie Bérard wrote:
Dans vôtre modèle vous passez des aiguilles 3 mm, aux 4 mm puis au 4.5 mm. Comme mon échantillon est fait avec des 4 mm pour 20 mailles devrait- je prendre des 3 mm pour le début mais avec moins de mailles? Ex 130 au lieu de 135 ? Et les rajouter après le premier 8 cm au changement d’aiguilles?
15.01.2024 - 14:52DROPS Design answered:
Bonjour Mme Bérard, l'échantillon se tricote en jersey, dans le pull, on tricote le jersey avec des aiguilles 4,5, s'il vous faut des aiguilles 4 pour l'échantillon utilisez respectivement 1 demi-numéro en moins: probablement 2,5 au lieu de 3, 3 au lieu de 3,5, 4 au lieu de 4,5. Bon tricot!
15.01.2024 - 16:28
![]() Sylvie Bérard wrote:
Sylvie Bérard wrote:
J’ai commencé par erreur avec des 4 mm au lieu de 3 mm pour les premiers 8 cm du modèle; est-ce un problème si je continue avec des 4 ( mon échantillon de 20 mailles est avec des 4 mm)
15.01.2024 - 02:39DROPS Design answered:
Cf réponse ci-dessous, les côtes risquent d'être trop larges si vous avez besoin des aiguilles 4 au lieu des 4,5, il est recommandé d'utiliser des 3,5 au lieu des 4 pour les côtes. Bon tricot!
15.01.2024 - 10:09
![]() Sylvie Bérard wrote:
Sylvie Bérard wrote:
Mon échantillon de vingt mailles est pour des aiguilles de 4 mm plutôt que 4,5 comme dans votre patron. Jusque là pas de problème, mais j’ai commencé les 8 premiers cm avec des 4 mm au lieu de 3 mm et je me demande si ça va causer un problème si je continue avec des 4 au lieu de prendre des aiguilles plus grosses…
15.01.2024 - 02:12DROPS Design answered:
Bonjour Mme Bérard, l'échantillon est en jersey avec les aiguilles les plus grosses, 4,5 pour nous. S'il vous faut des aiguilles 4 pour cet échantillon, tricotez les côtes avec des aiguilles 3,5 pour avoir la même proportion. Bon tricot!
15.01.2024 - 10:08
![]() Ann Joshage wrote:
Ann Joshage wrote:
På mitt mönster står inget A.1 . som nämns i beskrivningen Ska börja sticka efter halsresåren är 8 cm. storlek L var ska jag börja?
05.03.2023 - 16:56DROPS Design answered:
Hej Ann. Du hittar diagram A.1 till höger om måttskissen. Du stickar *A.1 + A.2* totalt 23 gånger på varvet och du börjar direkt på första maskan på varvet. Mvh DROPS Design
07.03.2023 - 13:59
![]() Stella wrote:
Stella wrote:
Salve, non capisco il digramma 1 devo farlo prima e poi A2? Oppure contemporaneamente A1+A2?
02.06.2022 - 16:56DROPS Design answered:
Buonasera Stella, deve ripetere i diagrammi A.1 e A.2 sullo stesso giro come indicato nel paragrafo "sprone". Buon lavoro!
02.06.2022 - 22:07
![]() Britta wrote:
Britta wrote:
Hallo! Ich verstehe leider nicht, wie ich nach den Diagrammen stricken soll. Werden A.1 und A.2 in derselben Runde nebeneinander gestrickt? A.1 geht über 12 Runden, A.2 (für Größe S/M) über 24 Runden. Höre ich dann nach Runde 12 mit A.1 auf und stricke nur noch nach A.2 oder fange ich bei A.1 wieder von unten an? Vielen Dank und viele Grüße, Britta
06.06.2021 - 20:42DROPS Design answered:
Liebe Britta, Sie werden die ganze Runde (A.1, A.2) wiederholen, die das Lochmuster (A.1) zwischen das Strukturmuster (A.2), wenn A.1 fertig in der Höhe ist, dann wiederholen Sie das Muster von der 1. Reihe. Viel Spaß beim stricken!
07.06.2021 - 07:53
![]() Heike Mitteregger wrote:
Heike Mitteregger wrote:
Liebes DROPS-Team, auf welche der drei angegebenen Nadelstärken bezieht sich bitte die Maschenprobe? Ich vermute, auf die 4,5. Bei dem Garn wären ja sonst 21 Maschen und 28 Reihen bei einer 4er Nadel angegeben. Vermute ich richtig? Liebe Grüße, Heike
18.05.2021 - 17:51DROPS Design answered:
Liebe Frau Mitteregger, ja genau die Maschenprobe sollen Sie mit den Nadeln 4,5 bekommen. Viel Spaß beim stricken!
19.05.2021 - 07:32
![]() Maria-Louise Galamba wrote:
Maria-Louise Galamba wrote:
Det undrer mig at man skal tage 40 masker UD, når ryg &forstykke måler 24 cm. efter delingen? Er det ikke en fejl?
29.03.2021 - 00:07DROPS Design answered:
Hei Maria-Louise. Nei, det er ikke feil. Om du øker masker før vrangborden og bytter til mindre pinne, får du en fin overgang fra bolen til vrangbord. Om man minsker maskeantallet før vrangborden og bytter til mindre pinnestørrelse får man en stram vrangbord, som man gjerne hadde på -80-tallet. mvh DROPS design
12.04.2021 - 13:31
![]() Violaine wrote:
Violaine wrote:
Bonjour, Je n'ai pas compris quand commencé les augmentations dans ce modèle. Cordialement
13.01.2021 - 17:54DROPS Design answered:
Bonjour Violaine, les augmentations de l'empiècement commencent par celles indiquées dans le diagramme A.2: on fait 1 jeté ( dernier symbole de la légende) dans chaque A.2. Lorsque A.2 est terminé, on est ainsi passé de 3 m au 1er rang à 8-9-10 m selon la taille (on a toujours 3 m dans A.1). Après A.2, on continue à tricoter les mailles comme dans A.2 mais cette fois, on ne fera plus les jetés. on augmentera en revanche 2 fois à espace réguliers avant de diviser l'ouvrage. Bon tricot!
14.01.2021 - 07:16
|
||||||||||||||||
Mayan Moon Shine Sweater#mayanmoonshinesweater |
||||||||||||||||
 |
 |
|||||||||||||||
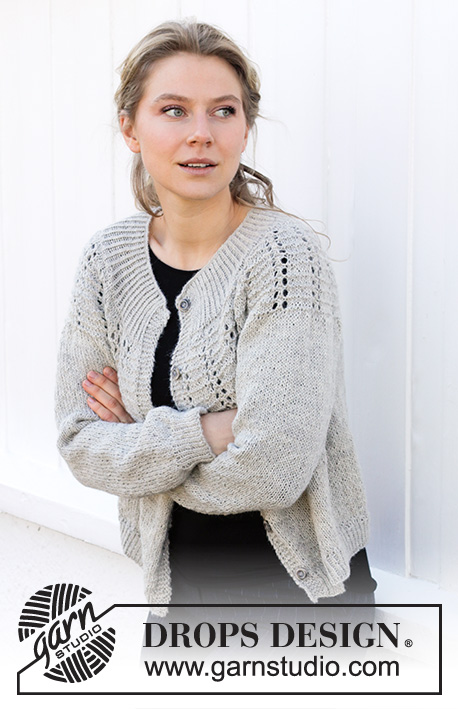
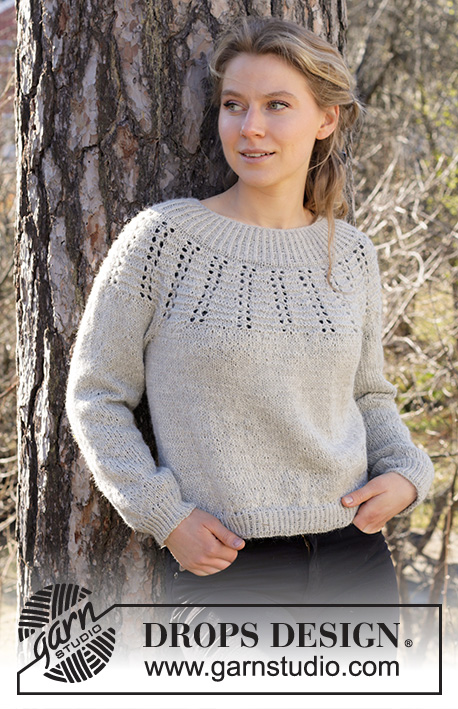
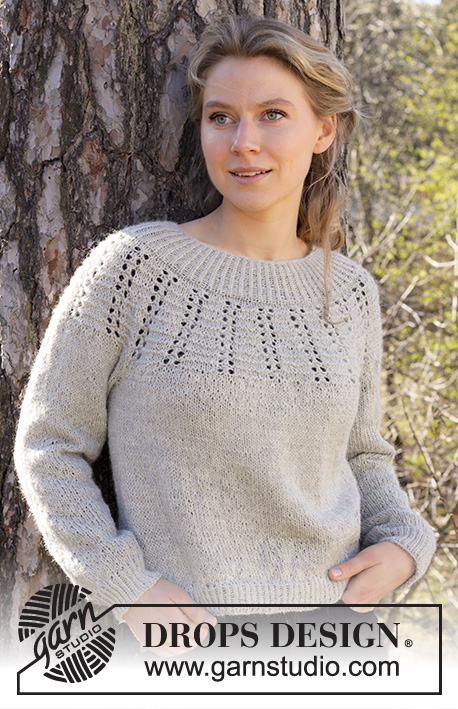
Knitted jumper in DROPS Puna. The piece is worked top down with round yoke, textured pattern and lace pattern. Sizes S - XXXL.
DROPS 217-34 |
||||||||||||||||
|
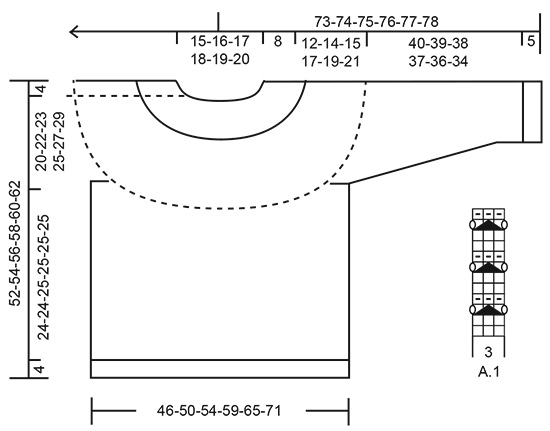
------------------------------------------------------- EXPLANATIONS FOR THE PATTERN: ------------------------------------------------------- PATTERN: See diagrams A.1 and A.2 (choose diagram for your size – applies to A.2). INCREASE TIP (evenly spaced): To work out how to increase evenly, count the total number of stitches on the needle (e.g. 231 stitches) and divide by the number of increases to be made (e.g. 24) = 9.6. In this example, increase by making 1 yarn over after alternately each 9th and 10th stitch. On the next round work the yarn overs twisted to avoid holes. DECREASE TIP (for sleeves): Decrease 1 stitch on either side of the marker thread as follows: Work until there are 3 stitches left before the marker thread, knit 2 together, knit 2 (marker thread sits between these 2 stitches), slip 1 stitch as if to knit, knit 1 and pass the slipped stitch over the knitted stitch. CASTING-OFF TIP: To avoid the cast-off edge being tight you can cast off with a larger size needle. If the edge is still tight, make 1 yarn over after approx. each 4th stitch at the same time as casting off; the yarn overs are cast off as normal stitches. ------------------------------------------------------- START THE PIECE HERE: ------------------------------------------------------- JUMPER – SHORT OVERVIEW OF THE PIECE: The neck and yoke are worked in the round with circular needle, top down from mid back. The yoke is divided for body and sleeves and the body continued in the round with circular needle. The sleeves are worked in the round with short circular needle/double pointed needles, top down. NECK: Cast on 126-132-138-144-150-156 stitches with circular needle size 3 mm and Puna. Purl 1 round, then work rib (= knit 1 twisted, purl 1) for 8 cm. When the rib is finished, knit 2 rounds. Change to circular needle size 4 mm. YOKE: Work pattern as follows: * A.1 (= 3 stitches), A.2 (= 3 stitches on the first round) *, work from *-* 21-22-23-24-25-26 times on the round. Continue this pattern. REMEMBER THE KNITTING TENSION! When A.2 has been completed in height there are 231-242-276-312-325-338 stitches on the needle. Continue the pattern (without further increases in A.2) until the yoke measures 17-19-20-22-24-26 cm from the cast-on edge – adjust so you finish on a row like the last row in A.2. Change to circular needle size 4.5 mm. Now work stocking stitch, AT THE SAME TIME on the first round increase 25-31-26-26-31-41 stitches evenly spaced – read INCREASE TIP = 256-273-302-338-356-379 stitches. When the piece measures 19-21-22-24-26-28 cm, increase 24-31-26-26-32-41 stitches evenly spaced = 280-304-328-364-388-420 stitches. Continue working until the yoke measures 20-22-23-25-27-29 cm from the cast-on edge. Now divide the piece for body and sleeves on the next round as follows: Knit 41-45-48-53-58-64 stitches (= half back piece), place the next 58-62-68-76-78-82 stitches on 1 thread for the sleeve and cast on 10-10-12-12-14-14 new stitches on the needle (= in side under sleeve), knit 82-90-96-106-116-128 stitches (= front piece), place the next 58-62-68-76-78-82 stitches on 1 thread for the sleeve and cast on 10-10-12-12-14-14 new stitches on the needle (= in side under sleeve) and knit 41-45-48-53-58-64 stitches (= half back piece). Body and sleeves are finished separately. THE PIECE IS NOW MEASURED FROM HERE! BODY: = 184-200-216-236-260-284 stitches. Work stocking stitch in the round. When the piece measures 24-24-25-25-25-25 cm from the division. increase 36-40-42-46-52-56 stitches evenly spaced = 220-240-258-282-312-340 stitches. Change to circular needle size 3 mm and work rib (= knit 1 twisted, purl 1) for 4 cm. Cast off with knit over knit and purl over purl – read CASTING-OFF TIP. The jumper measures approx. 52-54-56-58-60-62 cm from the shoulder down. SLEEVE: Place the 58-62-68-76-78-82 stitches from the thread on the one side of the piece on double pointed needles/short circular needle size 4.5 mm and knit up 1 stitch in each of the 10-10-12-12-14-14 stitches cast on under the sleeve = 68-72-80-88-92-96 stitches. Insert a marker thread in the middle of the new stitches under the sleeve (= 5-5-6-6-7-7 new stitches on each side of marker thread). Allow the marker thread to follow your work onwards; it will be used when decreasing under the sleeve. Work stocking stitch in the round. When the piece measures 4-4-4-4-4-3 cm from the division, decrease under the sleeve – read DECREASE TIP. Decrease like this every 3-3-2-1½-1½-1 cm a total of 11-12-15-18-19-20 times = 46-48-50-52-54-56 stitches. When the sleeve measures 40-39-38-37-36-34 cm (shorter measurements in larger sizes due to longer yoke), increase 6-6-8-8-10-10 stitches evenly spaced = 52-54-58-60-64-66 stitches. Change to double pointed needles size 3 mm and work rib (= knit 1 twisted, purl 1) for 5 cm. Cast off with knit over knit and purl over purl – remember CASTING-OFF TIP. The sleeve measures approx. 45-44-43-42-41-39 cm. Work the other sleeve in the same way. |
||||||||||||||||
Diagram explanations |
||||||||||||||||
|
||||||||||||||||
 |
||||||||||||||||
 |
||||||||||||||||
Have you finished this pattern?Tag your pictures with #dropspattern #mayanmoonshinesweater or submit them to the #dropsfan gallery. Do you need help with this pattern?You'll find 26 tutorial videos, a Comments/Questions area and more by visiting the pattern on garnstudio.com. © 1982-2026 DROPS Design A/S. We reserve all rights. This document, including all its sub-sections, has copyrights. Read more about what you can do with our patterns at the bottom of each pattern on our site. |
||||||||||||||||


With over 40 years in knitting and crochet design, DROPS Design offers one of the most extensive collections of free patterns on the internet - translated to 17 languages. As of today we count 324 catalogues and 12290 patterns translated into English (UK/cm). 12290
We work hard to bring you the best knitting and crochet have to offer, inspiration and advice as well as great quality yarns at incredible prices! Would you like to use our patterns for other than personal use? You can read what you are allowed to do in the Copyright text at the bottom of all our patterns. Happy crafting!
Post a comment to pattern DROPS 217-34
We would love to hear what you have to say about this pattern!
If you want to leave a question, please make sure you select the correct category in the form below, to speed up the answering process. Required fields are marked *.