
Popular categories
Looking for a yarn?


Comments / Questions (36)
![]() Katleen wrote:
Katleen wrote:
Goeiemorgen, ik ben bezig met het lijf van het truitje, maar bij het meerderen en minderen loopt het fout, ik ben nu waar ik wel nog een omslag kan maken maar geen mindering in het patroon, en daarom het ik nu iedere keer steken te veel, wat doe ik dan mis ? Wel een heel mooi truitje, ik zou het zo graag begrijpen en het afmaken, dank bij voorbaat Katleen
30.03.2026 - 08:50DROPS Design answered:
Dag Katleen,
Als je niet genoeg steken hebt om het hele patroon te breien, brei je wel zover mogelijk in patroon, maar als je geen mindering kan maken, maak je ook geen bijbehorende omslag.
04.04.2026 - 21:46
![]() Eliane wrote:
Eliane wrote:
Je n’ai besoin que des explications
15.12.2025 - 22:09
![]() Ksenya wrote:
Ksenya wrote:
Hello! I love this pattern. How can I modify it to make it a V-neck while keeping the lace design the same?
29.11.2025 - 06:42DROPS Design answered:
Dear Mrs Ksenya, you can take inspiration / help from sweaters with same tension and V neck, see here some examples. Happy knitting!
01.12.2025 - 07:39
![]() Betty Neill wrote:
Betty Neill wrote:
Lovely
14.06.2025 - 21:40
![]() Sine wrote:
Sine wrote:
Hej Drops, hvorfor besvarer I ikke på spørgsmålet stillet d.1/9/24 ?
28.09.2024 - 10:22
![]() Sine wrote:
Sine wrote:
Hej Drops. Jeg strikker denne i str. XL. Når sidste udt.er lavet før ærmer er der 394 msk. på omgangen. Indeholder denne omgang omslag eller sluttes der med en omgang uden omslag? mvh Sine
01.09.2024 - 08:09
![]() Francesca MAZZIOTTI wrote:
Francesca MAZZIOTTI wrote:
Si potrebbe inserire l'esecuzione anche in "modo tradizionale " dal basso verso l'alto? Grazie
05.06.2024 - 08:48DROPS Design answered:
Buonasera Francesca, non esistono lavorazioni "tradizionali" e altre che non lo sono: sono costruzioni e progettazioni diverse dei modelli. Puo seguire le istruzioni riportate e se trova difficoltà nell'esecuzione di qualche passaggio ci può scrivere. Buon lavoro!
05.06.2024 - 18:07
![]() Helene Kraayvanger wrote:
Helene Kraayvanger wrote:
How can I download or print off this pattern in a compact version???
19.11.2023 - 21:38DROPS Design answered:
Dear Mrs Kraayvanger, our patterns can only be printed using the button "print > pattern" - using a virtual printer will allow you to save them as a .PDF. Happy knitting!
20.11.2023 - 11:17
![]() Marie-Gabrielle wrote:
Marie-Gabrielle wrote:
Faut-il tricoter A3 et A4 en totalité (c'est-à-dire sur 10 tours) quelle que soit la taille du modèle? Merci
12.09.2023 - 11:16DROPS Design answered:
Bonjour Marie-Gabrielle, vous devez tricoter A.3 et A.4 jusqu'à ce que les augmentations des manches soient faites, et que vous avez bien le total de mailles pour votre taille, puis, au tour suivant, vous diviser l'empiècement pour terminer le dos/le devant et les manches séparément. A.3 et A.4 permettent de continuer les trous le long des raglans dos et devant, sans pour autant augmenter de mailles. Bon tricot!
12.09.2023 - 17:03
![]() Teston wrote:
Teston wrote:
J ai choisi le modeleM.quand les 24 tours sont terminés,je ne comprends pas comment on tricote A2(si on ne fait pas d'augmentations);d'autre part A3 et A4 se tricotent avant et aprés A2 mais combien de tours??est ce que ces mailles sont à la place des2 mailles envers du diagramme A2,???
04.05.2022 - 17:21DROPS Design answered:
Bonjour Mme Teston, lorsque les augmentations ont été faites 24 fois sur le devant et le dos (=soit 48 tours au total, car on augmente tous les 2 tours); vous continuez à augmenter sur les manches comme avant, mais vous tricotez maintenant A.3 /A.4 sur le dos/devant au lieu des augmentations avant/après A.2. cf RANG AJOURÉ:. Bon tricot!
05.05.2022 - 08:58
|
|||||||||||||||||||||||||
Sweet Heather#sweetheathersweater |
|||||||||||||||||||||||||
 |
 |
||||||||||||||||||||||||
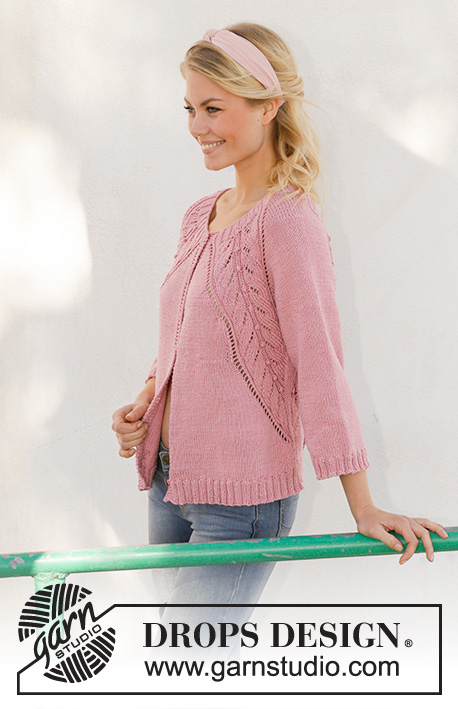
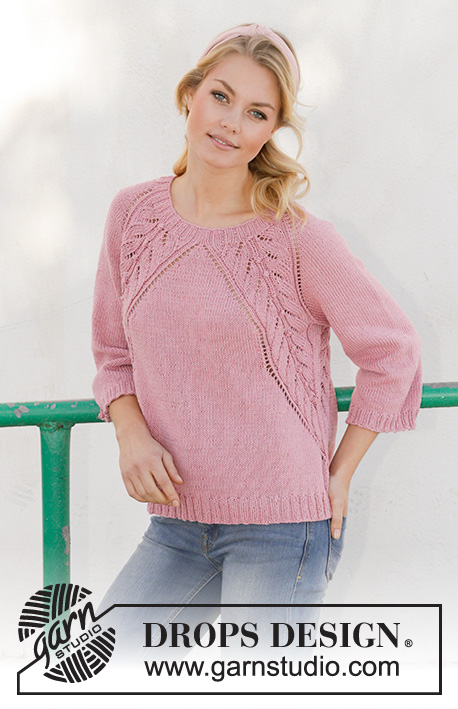
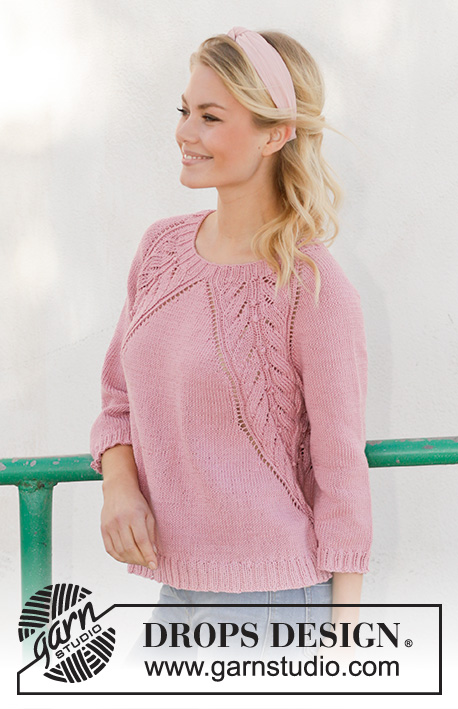
Knitted jumper with raglan in DROPS Merino Extra Fine. The piece is worked top down with lace pattern. Sizes S - XXXL.
DROPS 201-18 |
|||||||||||||||||||||||||
|
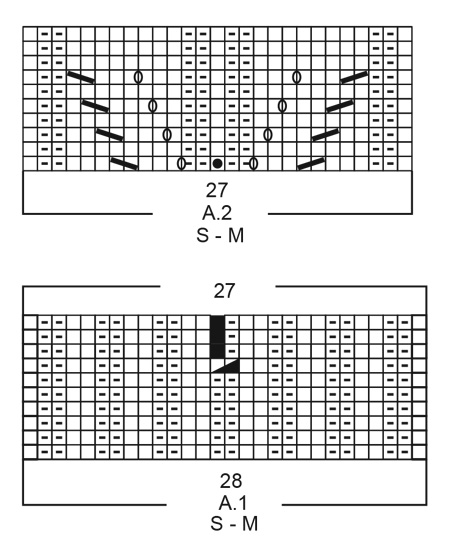
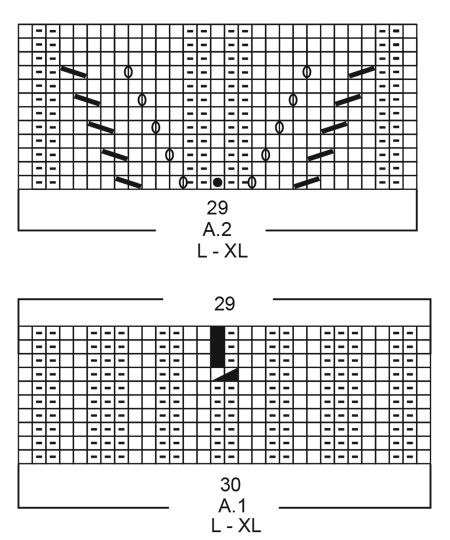
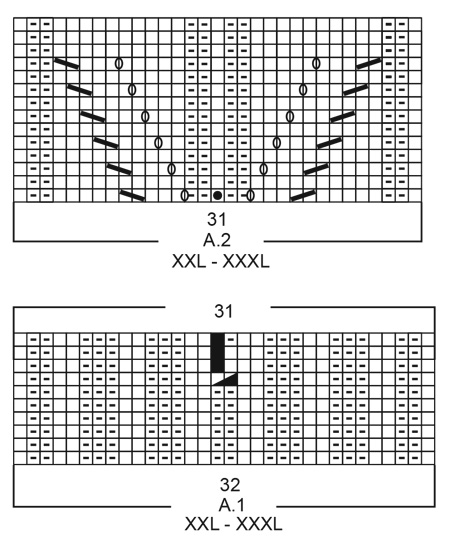
------------------------------------------------------- EXPLANATIONS FOR THE PATTERN: ------------------------------------------------------- PATTERN: See diagrams A.1 to A.4. Choose diagrams for your size (applies to A.1 and A.2). RAGLAN: Increase 1 stitch on each side of A.2 (= 8 stitches increased on round). Increase 1 stitch by making 1 yarn over; on the next round knit the yarn overs to leave holes. Then work the new stitches in stocking stitch. ROW OF HOLES: The increases to raglan on the front and back pieces are finished before the increases on the sleeves. So that the row of holes made by the increases inside A.2 continue, work a lace pattern as far as the body (A.3/A.4) inside A.2 as follows: Work A.3 when 2 stitches remain before A.2 and sleeve on the back piece and when 2 stitches remain before the last repeat of A.2 on the front piece. Work A.4 after the first repeat of A.2 on the front piece and after the sleeve and A.2 on the back piece. INCREASE TIP-1 (for body): Increase 1 stitch inside A.2 on back and front piece (= 4 stitches increased on round). On the next round knit the yarn overs to leave holes. Each time you increase, the number of stocking stitches is increased between the 2 repeats of A.2 on the back and front pieces. INCREASE TIP-2 (evenly spaced): To work out how to increase evenly, count the total number of stitches on the needle (e.g. 206 stitches) and divide by the number of increases to be made (e.g. 30) = 6.9. In this example, increase by making 1 yarn over after approx. each 7th stitch. On the next round work the yarn overs twisted to avoid holes. DECREASE TIP-1 (for sides of body): Work until there are 3 stitches left before the marker thread, knit 2 together, knit 2 (marker thread sits between these 2 stitches), slip 1 stitch as if to knit, knit 1 and pass the slipped stitch over the knitted stitch. Repeat on other side (= 4 stitches decreased on round). DECREASE TIP-2 (for sleeves): Decrease 1 stitch on each side of the marker thread as follows: Work until there are 3 stitches left before the marker thread, knit 2 together, knit 2 (marker thread sits between these 2 stitches), slip 1 stitch as if to knit, knit 1 and pass the slipped stitch over the knitted stitch. ------------------------------------------------------- START THE PIECE HERE: ------------------------------------------------------- JUMPER – SHORT OVERVIEW OF THE PIECE: The piece is worked in the round with circular needle, top down. The sleeves are worked in the round with short circular needle/double pointed needles. NECK: Cast on 138-138-146-146-154-154 stitches with circular needle size 3 mm and Merino Extra Fine. Knit 1 round then work rib as follows: Knit 1, A.1 (choose diagram for your size) over the first 28-28-30-30-32-32 stitches, knit 1, (purl 2 /knit 2) over the next 8 stitches, purl 2, knit 1, A.1 over the next 28-28-30-30-32-32 stitches, knit 1, A.1 over the next 28-28-30-30-32-32 stitches, knit 1, (purl 2 /knit 2) over the next 8 stitches, purl 2, knit 1, A.1 over the next 28-28-30-30-32-32 stitches. Continue like this in the round until A.1 has been completed in height = 134-134-142-142-150-150 stitches. YOKE: Change to circular needle size 4 mm and work pattern as follows: Knit 1 (= mid-stitch on back piece), 1 yarn over, A.2 (choose diagram for your size) over the next 27-27-29-29-31-31 stitches (= half back piece), 1 yarn over, knit 12, 1 yarn over (= sleeve), A.2 over the next 27-27-29-29-31-31 stitches, 1 yarn over, knit 1 (= mid-stitch on front piece), 1 yarn over, A.2 over the next 27-27-29-29-31-31 stitches (= front piece), 1 yarn over, knit 12 , 1 yarn over (= sleeve), A.2 over the next 27-27-29-29-31-31 stitches, 1 yarn over, (= half back piece). You have now increased 8 stitches to RAGLAN – read description above. Continue this pattern in the round and increase to raglan every 2nd round a total of 20-24-26-30-35-38 times = 294-326-350-382-430-454 stitches. REMEMBER THE KNITTING TENSION! Continue with increases to raglan on the sleeves 4-4-5-3-0-1 more times (= a total 24-28-31-33-35-39 increases on sleeves). On the front and back pieces work patterns A.3 and A.4 so that you continue the ROW OF HOLES – read description above, every 2nd round as before without increasing. The other stitches are worked in pattern as before. When all increases are finished there are 310-342-370-394-430-458 stitches on the round. The piece measures approx. 21-23-25-27-29-31 cm from the cast-on edge and down mid back. The next round is worked as follows: Work the first 48-52-56-60-67-70 stitches (= half back piece), place the next 60-68-74-78-82-90 stitches on a thread (= sleeve), cast on 8-8-10-10-12-14 new stitches on needle (= in side under sleeve), work the next 95-103-111-119-133-139 stitches (= front piece), place the next 60-68-74-78-82-90 stitches on a thread (= sleeve), cast on 8-8-10-10-12-14 new stitches on needle (= in side under sleeve) and work the remaining 47-51-55-59-66-69 stitches on round (= half back piece). THE PIECE IS NOW MEASURED FROM HERE! BODY: = 206-222-242-258-290-306 stitches. Insert a marker thread in the middle of the new stitches under each sleeve (= 4-4-5-5-6-7 new stitches on each side of marker thread). Allow the threads to follow your work onwards. Continue the pattern in the round as before; i.e. work as follows: Stocking stitch as far as A.2, 1 yarn over, work A.2 over the next 27-27-29-29-31-31 stitches, stocking stitch over the next 8-8-10-10-12-14 stitches and decrease at the same time 1 stitch on each side of the marker thread in the side – read DECREASE TIP-1, work A.2 over the next 27-27-29-29-31-31 stitches, 1 yarn over, stocking stitch as far as the next repeat of A.2, 1 yarn over, work A.2 over the next 27-27-29-29-31-31 stitches, stocking stitch over the next 8-8-10-10-12-14 stitches and decrease at the same time 1 stitch on each side of the marker thread - remember DECREASE TIP-1, A.2 over the next 27-27-29-29-31-31 stitches, 1 yarn over and stocking stitch over the remaining stitches on the round. You have now increased 1 stitch on the inside of A.2 on the front and back pieces – read INCREASE TIP-1 (= 4 stitches increased) and decreased 1 stitch on each side of both marker threads in the sides (= 4 stitches decreased); i.e. the number of stitches remains the same. Continue to increase and decrease like this every 2nd round a total of 31-31-34-34-37-38 times until the whole pattern has disappeared into the sides. As the stitches in the pattern decrease work as many stitches in the pattern as there is room for; i.e. when there is not room to work the decrease and yarn over in the lace pattern in A.2 work stocking stitch over these stitches. When the whole pattern has gone, the piece measures approx. 22-22-24-24-26-27 cm from the division. Now work stocking stitch in the round until the piece measures 28 cm from the division (= approx. 6-6-4-4-2-1 cm stocking stitch after the pattern in the sides). Now increase 30-34-38-38-42-46 stitches evenly spaced = 236-256-280-296-332-352 stitches. Change to circular needle size 3 mm and work rib (= knit 2 / purl 2) for 4 cm. Cast off with knit over knit and purl over purl. Make sure the cast-off edge is not tight; you can use a size larger needle when casting off if necessary. The jumper measures approx. 56-58-60-62-64-66 cm from the shoulder down. SLEEVE: Place the 60-68-74-78-82-90 stitches from the thread on the one side of the piece on short circular needle/double pointed needles size 4 mm and knit up 1 stitch in each of the 8-8-10-10-12-14 new stitches cast on under the sleeve = 68-76-84-88-94-104 stitches. Insert a marker thread in the middle of the new 8-8-10-10-12-14 stitches (= 4-4-5-5-6-7 new stitches on each side of the marker thread). Work stocking stitch in the round. When the sleeve measures 4-4-4-3-3-2 cm, decrease 1 stitch on each side of the marker thread – read DECREASE TIP-2. Decrease like this every 0-4-2-1½-1-1 cm a total of 1-4-7-7-9-12 times (only 1 decrease in size S) = 66-68-70-74-76-80 stitches. When the sleeve measures 29-28-26-25-23-22 cm, increase 6-8-6-6-8-8 stitches evenly spaced = 72-76-76-80-84-88 stitches. Change to double pointed needles size 3 mm and work rib (= knit 2 / purl 2) for 3 cm. Cast off with knit over knit and purl over purl. Make sure the cast-off edge is not tight; you can use a size larger needle when casting off if necessary. The sleeve measures approx. 32-31-29-28-26-25 cm. Work the other sleeve in the same way. |
|||||||||||||||||||||||||
Diagram explanations |
|||||||||||||||||||||||||
|
|||||||||||||||||||||||||
 |
|||||||||||||||||||||||||
 |
|||||||||||||||||||||||||
 |
|||||||||||||||||||||||||
 |
|||||||||||||||||||||||||
Have you finished this pattern?Tag your pictures with #dropspattern #sweetheathersweater or submit them to the #dropsfan gallery. Do you need help with this pattern?You'll find 25 tutorial videos, a Comments/Questions area and more by visiting the pattern on garnstudio.com. © 1982-2026 DROPS Design A/S. We reserve all rights. This document, including all its sub-sections, has copyrights. Read more about what you can do with our patterns at the bottom of each pattern on our site. |
|||||||||||||||||||||||||


With over 40 years in knitting and crochet design, DROPS Design offers one of the most extensive collections of free patterns on the internet - translated to 17 languages. As of today we count 324 catalogues and 12290 patterns translated into English (UK/cm). 12290
We work hard to bring you the best knitting and crochet have to offer, inspiration and advice as well as great quality yarns at incredible prices! Would you like to use our patterns for other than personal use? You can read what you are allowed to do in the Copyright text at the bottom of all our patterns. Happy crafting!
Post a comment to pattern DROPS 201-18
We would love to hear what you have to say about this pattern!
If you want to leave a question, please make sure you select the correct category in the form below, to speed up the answering process. Required fields are marked *.