
Popular categories
Looking for a yarn?


Comments / Questions (9)
![]() Ellen Magnus wrote:
Ellen Magnus wrote:
Jeg velger samme farger som på bildet
05.01.2025 - 20:57
![]() Ellen Magnus wrote:
Ellen Magnus wrote:
Jeg ønsker samme farger som på bildet.
05.01.2025 - 20:56
![]() Karin Beiermann wrote:
Karin Beiermann wrote:
Hei
05.10.2024 - 21:53
![]() Thérèse Robinson wrote:
Thérèse Robinson wrote:
Why am I seeing ‘symbols’ instead of the symbol signifying a colour? I have updated my iPad but it’s still the same. Thank you for advice.
01.03.2022 - 19:16DROPS Design answered:
Dear Mrs Robinson, this might have been due to a temporary bug, the symbols appear now properly. Happy knitting!
02.03.2022 - 09:28
![]() Maggie wrote:
Maggie wrote:
Would it be possible to knit two hats with the amount of wool given for the hat??
13.02.2021 - 18:17DROPS Design answered:
Dear Maggie, yes, in theory it is possible, but it always depends on the exact size, and especially the gauge each knitter knits with . Happy Knitting!
13.02.2021 - 21:49
![]() Helma wrote:
Helma wrote:
Kan drops karisma ook gebruikt worden voor het vilten?
01.11.2019 - 20:42DROPS Design answered:
Dag Helma,
Jazeker, DROPS Karisma kan je vilten. Via deze link vind je een lijst van alle viltbare garens.
05.11.2019 - 10:25
![]() Tammy Valentine wrote:
Tammy Valentine wrote:
Hello, I am going to make both the hat and mittens for Happy Winter. I am confused and need to know how many skeins of Karisma to get for each color. The pattern says 2 for both and 3 for the hat only, so I got a little confused. Can you help? Thanks! Tammy
10.05.2019 - 20:00DROPS Design answered:
Dear Mrs Valentine, you need 50 g (= 1 ball Karisma) in each of the 9 color = 50 g each colour are required in all sizes for hat and for mittens. (color 47 is used only for mittens). Happy knitting!
13.05.2019 - 08:41
![]() Tina Møller wrote:
Tina Møller wrote:
Jeg synes ikke det er helt nemt at forstå hvordan man påbegynder tommelfinger og hvordan der tages masker ud til tommelfingeren
20.12.2018 - 16:14
![]() Monique wrote:
Monique wrote:
Die Mütze hat einen tollen Schnitt und sehr schöne Farben. Die würde ich gerne stricken.
12.07.2018 - 14:10
|
|||||||||||||||||||||||||||||||
Winter Carnival Set#wintercarnivalset |
|||||||||||||||||||||||||||||||
 |
 |
||||||||||||||||||||||||||||||
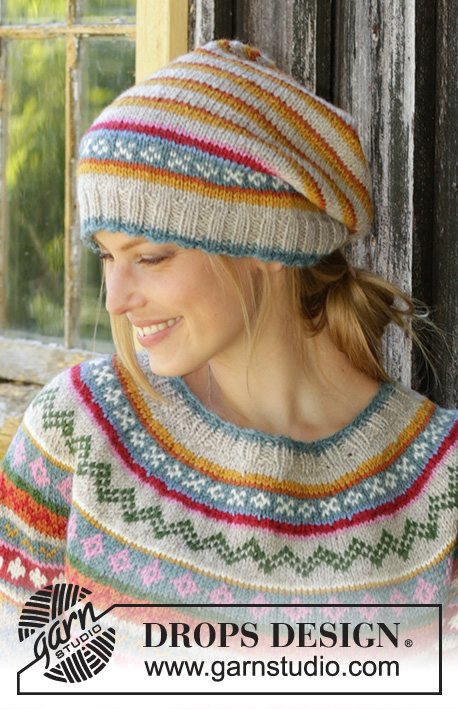
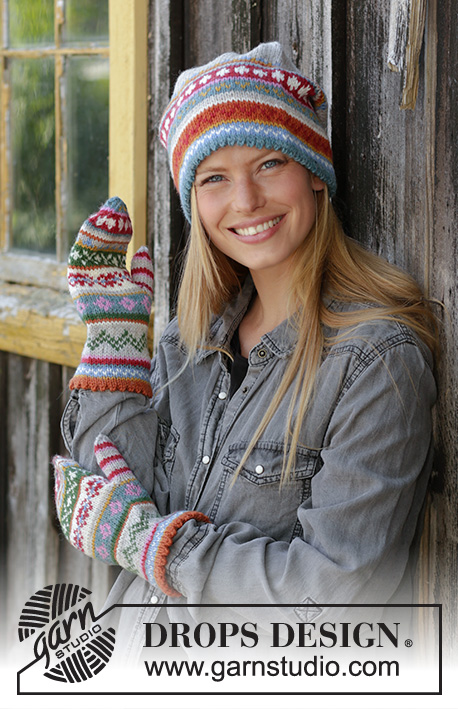
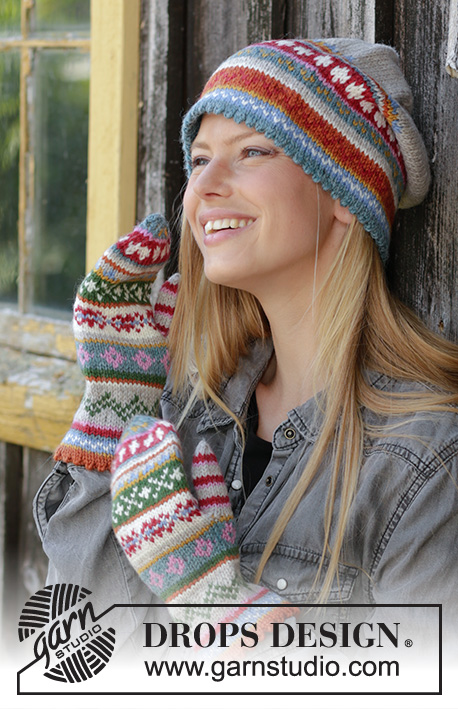
Knitted hat in DROPS Karisma. The piece is worked with folded edge and Nordic pattern. Knitted mittens in DROPS Karisma. The piece is worked with a folded edge and Nordic pattern.
DROPS 196-8 |
|||||||||||||||||||||||||||||||
|
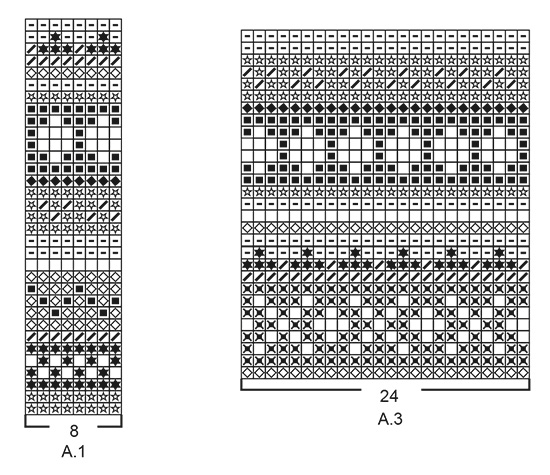
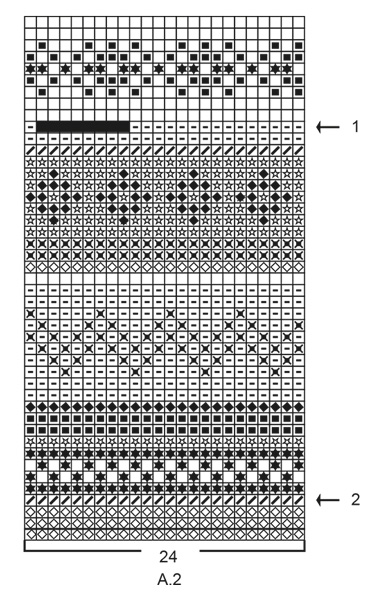
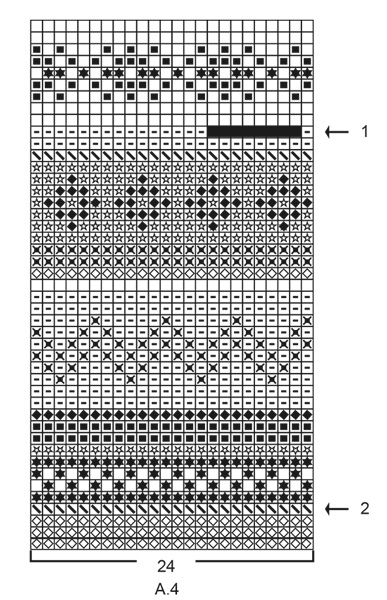
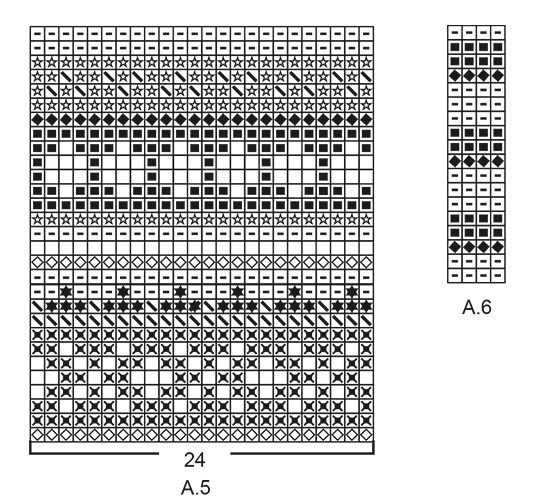
EXPLANATIONS FOR THE PATTERN: ------------------------------------------------------- PATTERN: Hat: See diagram A.1. Mittens: See diagrams A.2 to A.6. The whole pattern is worked in stocking stitch. KNITTING TIP-1: If you would like mittens with a wider circumference, you can work them with a half or whole needle size larger. A half needle size will give you 1 cm more in circumference and a whole needle size will give you 2 cm more. KNITTING TIP-2: To avoid the knitting tension becoming tighter when working pattern, it is important that the strands are not tight at the back. You can work pattern with a needle size larger if this is a problem. KNITTING TIP-3: The length of the mitten before the opening for the thumb can be adjusted by working less or more rounds before working the marker for the thumb opening. DECREASE TIP-1 (for top of hat): Start 2 stitches before the marker thread and knit 2 together (= 1 stitch decreased). DECREASE TIP-2 (for top of mitten): Decrease 1 stitch on each side of the marker thread as follows: Start 3 stitches before the marker thread, knit 2 together, knit 2 (the marker thread sits in the middle of these 2 stitches), slip 1 stitch as if to knit, knit 1, pass the slipped stitch over the knitted stitch (= 2 stitches decreased). DECREASE TIP-3 (for thumb): Decrease 1 stitch on each side of the marker thread as follows: Start 2 stitches before the marker thread, knit 2 together, marker thread, slip 1 stitch as if to knit, knit 1, pass the slipped stitch over the knitted stitch (= 2 stitches decreased). ------------------------------------------------------- START THE PIECE HERE: ------------------------------------------------------- HAT - SHORT OVERVIEW OF THE PIECE: The piece is worked in the round with short circular needle, bottom up. Change to double pointed needles when necessary. HAT: Cast on 104-112 stitches with short circular needle size 3 mm and sea green. Work 6 rounds of stocking stitch for the lining. Change to circular needle size 3.5 mm and work the next round as follows: * Knit 2 together, 1 yarn over *, work from *-* to end of round (= folding edge). THE PIECE IS NOW MEASURED FROM HERE! Work A.1 in the round (= 13-14 repeats of 8 stitches). When A.1 has been completed in height, continue with light oak to finished length. REMEMBER THE KNITTING TENSION! When the piece measures 19-21 cm from the folding edge, insert 8 marker threads in the piece as follows: The first marker thread is inserted at the beginning of the round. The next 7 marker threads are inserted with 13-14 stitches between each one. On the next round, decrease 1 stitch before each of the 8 marker threads – read DECREASE TIP-1 = 8 stitches decreased. Decrease like this every 2nd round a total of 5 times and then every round a total of 5 times = 24-32 stitches left on the needle. Knit 2 rounds where all the stitches are knitted together 2 and 2 on both rounds = 6-8 stitches left. Cut the strand, pull it through the remaining stitches, tighten and fasten well. The hat measures approx. 24-26 cm from the top and down to the folding edge. Fold the edge at the bottom in towards the wrong side and sew down with small stitches – make sure the seam is not tight. ------------------------------------------------------- MITTENS – SHORT OVERVIEW OF THE PIECE: The piece is worked in the round with double pointed needles, bottom up. The mittens have the same circumference in both sizes, but different lengths. The circumference can be adjusted if you wish – read KNITTING TIP-1! LEFT MITTEN: Cast on 48-48 stitches with double pointed needles size 3 mm and dark mustard. Work 6 rounds of stocking stitch for the lining. Change to orange and work 2 rounds of stocking stitch. The next round is worked as follows: * Knit 2 together, 1 yarn over *, work from *-* to end of round (= folding edge). THE PIECE IS NOW MEASURED FROM HERE! Read KNITTING TIP-2 and work A.2 in the round (= 2 repeats of 24 stitches). REMEMBER THE KNITTING TENSION! AT THE SAME TIME on the row marked with arrow-1 in A.2 work a marker for the thumb-opening as follows – read KNITTING TIP-3: Work 15 stitches stocking stitch with light oak, work 8 stitches stocking stitch for thumb-opening in another colour which stands out from the rest of the piece, then work the remaining 25 stitches in stocking stitch and light oak. Continue the pattern as before over all stitches. When A.2 has been completed, work A.3 in the round over all stitches. When A.3 has been completed, work A.2 to finished length; but the second time A.2 is worked start on the round marked with arrow-2. When the piece measures 21-23 cm from the folding edge, insert 1 marker thread at the beginning of the round and 1 marker thread after 24 stitches (there is now approx. 3 cm left to finished length; you can try the mitten on and continue working to desired length). On the next round decrease on each side of these 2 marker threads - read DECREASE TIP-2 = 4 stitches decreased. Decrease like this every round a total of 10 times in both sizes = 8 stitches left on the needles. Cut the strand, pull it through the remaining stitches, tighten and fasten well. The mitten measures approx. 24-26 cm from the top down to the folding edge. THUMB: Pull out the thread which was worked over the 8 stitches for the thumb-opening. Knit up 8 stitches on each side of the opening for the thumb with light oak = 16 stitches. Place these stitches evenly on double pointed needles size 3 mm. Work A.6 in the round. When the thumb measures approx. 5-5½ cm insert 1 marker thread in each side of the thumb (there is now approx. 1 cm left to finished length; you can try the mitten on and continue working to desired length). On the next round decrease on each side of both marker threads - read DECREASE TIP-3 = 4 stitches decreased. Decrease like this every round a total of 3 times = 4 stitches left. Cut the strand, pull it through the remaining stitches, tighten and fasten well. The thumb measures approx. 6-6½ cm from the top down. RIGHT MITTEN: Cast on 48-48 stitches with double pointed needles size 3 mm and dark mustard. Work 6 rounds stocking stitch for the lining. Change to orange and work 2 rounds of stocking stitch. The next round is worked as follows: * Knit 2 together, 1 yarn over *, work from *-* to end of round (= folding edge). THE PIECE IS NOW MEASURED FROM HERE! Read KNITTING TIP-2 and work A.4 in the round (= 2 repeats of 24 stitches). REMEMBER THE KNITTING TENSION! AT THE SAME TIME on the row marked with arrow-1 in A.4 work a marker for the thumb-opening as follows – read KNITTING TIP-3. Work 25 stitches stocking stitch with light oak, work 8 stitches stocking stitch with another colour which stands out from the rest of the piece and then work the remaining 15 stitches in stocking stitch and light oak. Then continue the pattern as before over all stitches. When A.4 has been completed, work A.5 in the round over all stitches. When A.5 has been completed, work A.4 to finished length, but the second time A.4 is worked start on the round marked with arrow-2. When the piece measures 21-23 cm from the folding edge, insert 1 marker thread at the beginning of the round and 1 marker thread after 24 stitches (there is now approx. 3 cm left to finished length; you can try the mitten on and continue working to desired length). On the next round decrease on each side of these 2 marker threads - read DECREASE TIP-2 = 4 stitches decreased. Decrease like this every round a total of 10 times in both sizes = 8 stitches left on the needles. Cut the strand, pull it through the remaining stitches, tighten and fasten well. The mitten measures approx. 24-26 cm from the top down to the folding edge. Work the thumb in the same way as on the left mitten. ASSEMBLY: Fold the edge at the bottom of each mitten in towards the wrong side and sew down with small stitches – make sure the seam is not tight |
|||||||||||||||||||||||||||||||
Diagram explanations |
|||||||||||||||||||||||||||||||
|
|||||||||||||||||||||||||||||||
 |
|||||||||||||||||||||||||||||||
 |
|||||||||||||||||||||||||||||||
 |
|||||||||||||||||||||||||||||||
 |
|||||||||||||||||||||||||||||||
Have you finished this pattern?Tag your pictures with #dropspattern #wintercarnivalset or submit them to the #dropsfan gallery. Do you need help with this pattern?You'll find 21 tutorial videos, a Comments/Questions area and more by visiting the pattern on garnstudio.com. © 1982-2026 DROPS Design A/S. We reserve all rights. This document, including all its sub-sections, has copyrights. Read more about what you can do with our patterns at the bottom of each pattern on our site. |
|||||||||||||||||||||||||||||||


With over 40 years in knitting and crochet design, DROPS Design offers one of the most extensive collections of free patterns on the internet - translated to 17 languages. As of today we count 324 catalogues and 12290 patterns translated into English (UK/cm). 12290
We work hard to bring you the best knitting and crochet have to offer, inspiration and advice as well as great quality yarns at incredible prices! Would you like to use our patterns for other than personal use? You can read what you are allowed to do in the Copyright text at the bottom of all our patterns. Happy crafting!
Post a comment to pattern DROPS 196-8
We would love to hear what you have to say about this pattern!
If you want to leave a question, please make sure you select the correct category in the form below, to speed up the answering process. Required fields are marked *.