
Popular categories
Looking for a yarn?


Comments / Questions (34)
![]() Mireille wrote:
Mireille wrote:
Bonjour. Pour la partie DOS pouvez-vous m’expliquer comment monter une maille lisière à la fin des 2 rangs suivants ? Et aussi les 2 rangs suivants, ce sont les 2ème et 3ème rang ?
24.08.2024 - 21:51DROPS Design answered:
Bonjour Mireille, procédez comme indiqué dans cette vidéo ou bien dans cette leçon à la fin des 2 rangs suivants, autrement dit à la fin d'un rang sur l'endroit puis à la fin du rang suivant sur l'envers. Bon tricot!
26.08.2024 - 07:55
![]() Mireille wrote:
Mireille wrote:
Bonjour, j’aimerai faire ce pull, j’aime beaucoup ce grand décolleté mais plusieurs personnes se sont retrouvés avec un col trop étroit. Cela a t-il été corrigé dans les instructions ?
09.05.2024 - 07:35DROPS Design answered:
Bonjour Mireille, la dernière correction faite date de mars 2024, et concerne les tailles M à XXXL - si vous avez imprimé les explications auparavant; n'hésitez pas à les imprimer à nouveau. Bon tricot!
10.05.2024 - 08:22
![]() Laubeova Kristyna wrote:
Laubeova Kristyna wrote:
This sweater is definitely not what’s on picture. V- neck is much higher !
19.11.2023 - 17:12
![]() Karin Almström wrote:
Karin Almström wrote:
Hej, fick svar att det stämmer med 125 g till Flamenco i Stl S men det är ju ORIMLIGT! skulle alltså 5 garnnystan räcka till en långärmad tröja? Ringde två slumpmässigt utvalda återförsäljare och frågade om åtgång till en långärmad V-ringad tröja i stl S och fick svaret av båda 8-9 nystan. Vad gäller?
10.11.2023 - 11:57
![]() Karin Almström wrote:
Karin Almström wrote:
Hej, stämmer verkligen den angivna garnåtgången 125 g för flamenco i storlek S?
06.11.2023 - 11:43DROPS Design answered:
Hej Karin, ja det stemmer :)
09.11.2023 - 15:05
![]() Sophia wrote:
Sophia wrote:
Picture shows nothing like garter stich. Your descriptions are becoming very lousy, I can\'t trust them anymore.
14.01.2023 - 23:30
![]() Irene wrote:
Irene wrote:
Bij de rechterkant van het voorpand moet ik een afgekante steek midden voor op de linkernaald zetten. Hoe werkt dat? Ik kan er niets over vinden. Bij voorbaat dank voor jullie reactie!
27.06.2022 - 12:08DROPS Design answered:
Dag Irene,
Het is de bedoeling dat je de afgekante steek (dus de afgekante steek die gelijk naast de eerste steek van de eerste steek op de linker naald zit) op de linker naald zet en deze gelijk samen breit met de eerste steek.
12.07.2022 - 21:25
![]() Gitte Meisner wrote:
Gitte Meisner wrote:
Hej Jeg bøvler med ærmet på denne. Kan det passe at der skal slås 38 masker op til ærmer. Det passer jo ikke med rib 2 ret/2 vrang. Kan slet ikke få det til at passe…
08.01.2022 - 13:25DROPS Design answered:
Hej Gitte, det har du ret i, det skal slåes 40 masker op i de 2 største størrelser og der skal kun tages 4 og 6 masker ud i de 2 størrelser - tak for info :)
13.01.2022 - 12:24
![]() Barbara wrote:
Barbara wrote:
It’s a nice sweater, however, the knitted piece looks completely different than the picture. It’s see through (the pictured sweater looks like it was knit with 2 strands), the neckline is a lot higher and the amount of yarn used is also more (I had to order 2 extra balls of yarn to finish it, which I found very annoying since I always have almost a whole ball left when I follow your patterns). Maybe this pattern should be checked and corrected if I’m not the only one who noticed these.
02.12.2021 - 12:42
![]() Chiki wrote:
Chiki wrote:
Hallo, klopt het dat het patroon met 1 draad gebreid wordt. Op de foto lijkt het dicht gebreid. Bij mij is het met naald 5,5 te doorzichtig ondanks dat ik strak brei. Hoe kan ik het breien dat je er niet doorheen kan kijken. Ik hoor het graag. Groet, Chiki
12.09.2021 - 01:41
|
|
Flamenco#flamencosweater |
|
 |
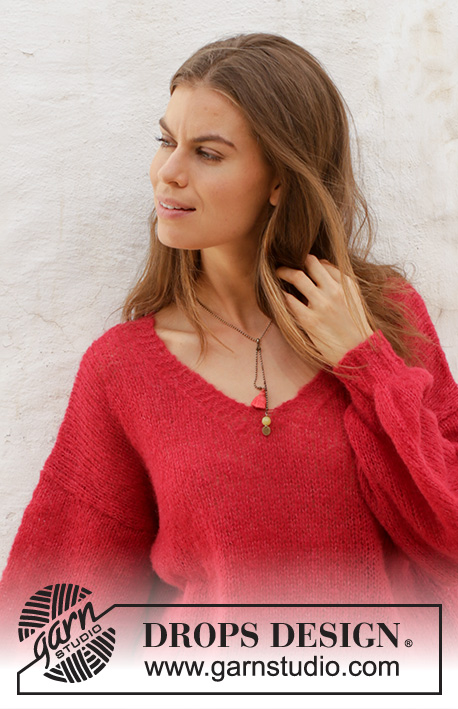 |
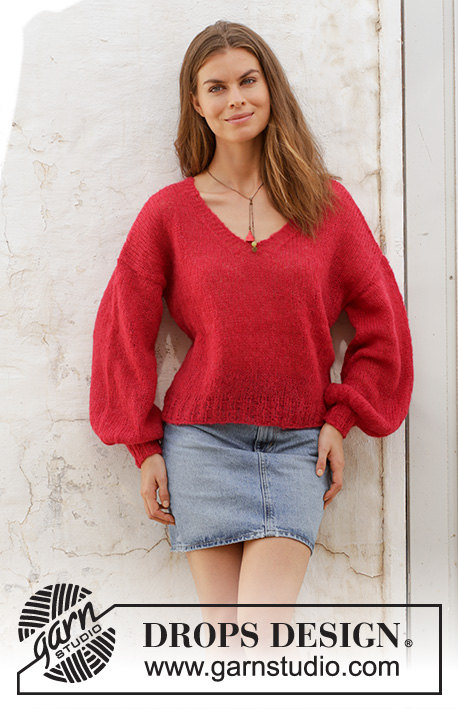
Knitted shaped jumper with V-neck. Sizes S - XXXL. The piece is worked in DROPS Brushed Alpaca Silk.
DROPS 187-6 |
|
|
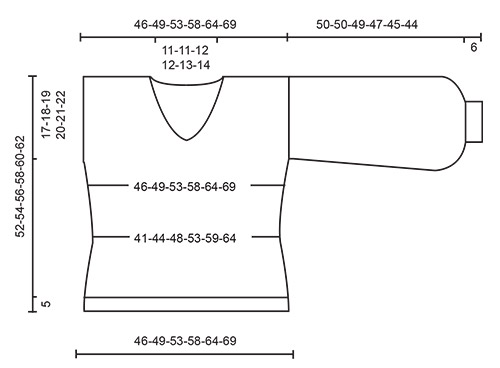
INFORMATION FOR THE PATTERN: RIDGE/GARTER STITCH (worked back and forth): 1 ridge = Knit 2 rows. DECREASE/INCREASE TIP (evenly spaced) To work out how to decrease/increase evenly, count the total number of stitches on the round (e.g. 176 stitches) and divide by the number of decreases/increases to be made (e.g. 30) = 5.9. In this example, decrease by knitting approx. every 5th and 6th stitch together. When increasing in this example, make 1 yarn over after approx. every 6th stitch; on the next round knit the yarn overs twisted to avoid holes. DECREASE TIP-1 (for body): * Work until there are 2 stitches left before the first marker thread, knit 2 together, work until there are 2 stitches left before the next marker thread, knit 2 together, work to next marker thread, slip 1 stitch as if to knit, knit 1, pass the slipped stitch over the knitted stitch, work to next marker thread, slip 1 stitch as if to knit, knit 1, pass the slipped stitch over the knitted stitch (= 4 stitches decreased) *, work from *-* a total of 2 times (= 8 stitches decreased on the round). INCREASE TIP (for body): * Work to first marker thread, make 1 yarn over before the marker thread, work to next marker thread, make 1 yarn over before the marker thread, work to next marker thread, make 1 yarn over after marker thread, work to next marker thread, make 1 yarn over after marker thread (= 4 stitches increased) *, work from *-* a total of 2 times (= 8 stitches increased on round). On the next round work the yarn overs twisted to avoid holes. DECREASE TIP-2 (for neck): Decrease for neck inside the 5 edge stitches in garter stitch. All decreases are worked from the right side! Decrease as follows after the 5 edge stitches: slip 1 stitch, knit 1, pass the slipped stitch over the knitted stitch (= 1 stitch decreased). Decrease as follows before the 5 edge stitches: Start 2 stitches before the 5 edge stitches and knit 2 stitches together (= 1 stitch decreased). CASTING OFF TIP: To avoid the cast-off edge being tight, you can cast off with a ½ needle size larger. DECREASE TIP-3 (for mid under sleeve): Start 3 stitches before the marker thread: Knit 2 stitches together, knit 2 stitches (the marker thread sits in the middle of these 2 stitches), slip 1 stitch, knit 1, pass the slipped stitch over the knitted stitch. ---------------------------------------------------------- JUMPER: The jumper is worked in the round with circular needle, bottom up as far as the armholes. Then the front and back pieces are worked separately, back and forth on circular needle. The sleeves are worked in the round with double pointed needles/short circular needle. BODY: Cast on 176-188-204-224-248-268 stitches with circular needle size 4.5 mm and Brushed Alpaca Silk. Knit 1 round, then work rib (= knit 2 / purl 2) for 5 cm. Change to circular needle size 5.5 mm and knit 1 round where you decrease 30-30-34-38-42-46 stitches evenly on round - read DECREASE/INCREASE TIP = 146-158-170-186-206-222 stitches. Then work stocking stitch - REMEMBER THE KNITTING TENSION! When the piece measures 10-10-11-11-12-12 cm insert 8 marker threads in the piece as follows: * Work 10 stitches, insert 1 marker thread, work 10 stitches, insert 1 marker thread, work 33-39-45-53-63-71 stitches, insert 1 marker thread, work 10 stitches, insert 1 marker thread, work 10 stitches *, work from *-* a total of 2 times. Now decrease 1 stitch by each marker thread (= 8 stitches decreased) - read DECREASE TIP-1. Repeat the decreases when the piece measures 15-15-16-16-17-17 cm = 130-142-154-170-190-206 stitches. When the piece measures 21-21-22-22-23-23 cm increase 1 stitch by each marker thread (= 8 stitches increased) - read INCREASE TIP. Repeat the increases when the piece measures 26-26-27-27-28-28 cm = 146-158-170-186-206-222 stitches. Insert 2 new marker threads in the piece, 1 at the beginning of the round and 1 after 73-79-85-93-103-111 stitches (= the sides). When the piece measures 35-36-37-38-39-40 cm divide the piece by the new marker threads and each piece is finished separately. BACK PIECE: = 73-79-85-93-103-111 stitches. Continue with stocking stitch as before and cast on 1 edge stitch at the end of the next 2 rows = 75-81-87-95-105-113 stitches. The edge stitches are worked in GARTER STITCH - see description above. When the piece measures 48-50-52-54-56-58 cm, work 2 ridges over the middle 25-25-27-27-29-31 stitches; the other stitches are worked as before. On the first row from the right side after the 2 ridges cast off the middle 15-15-17-17-19-21 stitches for neck. Place the 30-33-35-39-43-46 stitches on the right-hand side of the piece (seen from the right side) on 1 thread or leave them un-worked on a needle. Continue to work stocking stitch back and forth over the remaining 30-33-35-39-43-46 stitches with 5 stitches in garter stitch towards the neck at the back and 1 edge stitch in garter stitch at the side - AT THE SAME TIME on the next row from the right side decrease 1 stitch for the neck - read DECREASE TIP-2 = 29-32-34-38-42-45 stitches on the shoulder. Continue working until the piece measures 52-54-56-58-60-62 cm. Then loosely cast off - read CASTING OFF TIP. Work the other shoulder in the same way. FRONT PIECE: = 73-79-85-93-103-111 stitches. Continue with stocking stitch as before and cast on 1 edge stitch at the end of the next 2 rows = 75-81-87-95-105-113 stitches. The edge stitches are worked in garter stitch. When the piece measures 36-37-38-40-41-42 cm, work 2 ridges over the middle 11 stitches on the row; the other stitches are worked as before. After the 2 ridges work the next row as follows from the right side: Knit 37-40-43-47-52-56 stitches, knit 2, pass the first of these 2 stitches over the second (= 1 stitch cast off mid front), knit 36-39-42-46-51-55 stitches. Place the 37-40-43-47-52-56 stitches on the right-hand side of the piece (seen from the right side) on 1 thread or leave them un-worked on a needle. Continue to work stocking stitch back and forth over the remaining 37-40-43-47-52-56 stitches with 5 stitches in garter stitch towards mid front and 1 edge stitch in garter stitch in the side - when you have worked 1 row after the division and the next row is from the right side, decrease for V-neck towards mid front - remember DECREASE TIP-2. Decrease like this every 2nd row a total of 5-5-6-6-7-7 times then on every 4th row a total of 3-3-3-3-3-4 times = 29-32-34-38-42-45 stitches on the row. Continue working until the piece measures 52-54-56-58-60-62 cm. Then loosely cast off. Continue working over the stitches on the right-hand side of the piece in the same way as the left side, but reversed. In other words, the first row is worked from the wrong side: Place the cast off stitch mid front on the left needle and knit it together with the next stitch on the left needle (this is to avoid a “jump” at the bottom of the V-neck), work 4 stitches garter stitch, 31-34-37-41-46-50 stitches stocking stitch and 1 edge stitch in garter stitch. Continue stocking stitch back and forth over these 37-40-43-47-52-56 stitches with 5 stitches in garter stitch towards mid front and 1 edge stitch in garter stitch in the side - when you have worked 1 row after the division and the next row is from the right side, decrease for V-neck towards mid front. Decrease like this every 2nd row a total of 8-8-9-9-10-11 times = 29-32-34-38-42-45 stitches on the row. Continue working until the piece measures 52-54-56-58-60-62 cm. Then loosely cast off. SLEEVE: The sleeve is worked in the round with double pointed needles. Cast on 32-32-36-36-40-40 stitches with double pointed needles size 4.5 mm and Brushed Alpaca Silk. Knit 1 round, then work rib (= knit 2 / purl 2) until the piece measures 6 cm. Change to double pointed needles size 5.5 mm and knit 1 round where you increase 3-5-3-6-4-6 stitches evenly - remember DECREASE/INCREASE TIP = 35-37-39-42-44-46 stitches. Knit 1 round. Then knit 1 round where you increase 35-37-39-42-44-46 stitches (i.e. make 1 yarn over after each stitch) = 70-74-78-84-88-92 stitches. Insert 1 marker thread at the beginning of the round = mid under sleeve. Then work stocking stitch, the yarn overs are worked twisted to avoid holes. When the piece measures 9 cm decrease 2 stitches mid under sleeve - read DECREASE TIP-3. Decrease like this every 5½-5½-4½-4-3½-3 cm a total of 8-8-9-10-10-11 times = 54-58-60-64-68-70 stitches. Continue working until the piece measures 50-50-49-47-45-44 cm (shorter measurements in larger sizes due to wider shoulders). Then loosely cast off. Work the other sleeve in the same way. ASSEMBLY: Sew shoulder seams. Sew in sleeves inside the 1 edge stitch. |
|
 |
|
Have you finished this pattern?Tag your pictures with #dropspattern #flamencosweater or submit them to the #dropsfan gallery. Do you need help with this pattern?You'll find 27 tutorial videos, a Comments/Questions area and more by visiting the pattern on garnstudio.com. © 1982-2026 DROPS Design A/S. We reserve all rights. This document, including all its sub-sections, has copyrights. Read more about what you can do with our patterns at the bottom of each pattern on our site. |
|


With over 40 years in knitting and crochet design, DROPS Design offers one of the most extensive collections of free patterns on the internet - translated to 17 languages. As of today we count 324 catalogues and 12290 patterns translated into English (UK/cm). 12290
We work hard to bring you the best knitting and crochet have to offer, inspiration and advice as well as great quality yarns at incredible prices! Would you like to use our patterns for other than personal use? You can read what you are allowed to do in the Copyright text at the bottom of all our patterns. Happy crafting!
Post a comment to pattern DROPS 187-6
We would love to hear what you have to say about this pattern!
If you want to leave a question, please make sure you select the correct category in the form below, to speed up the answering process. Required fields are marked *.