
Popular categories
Looking for a yarn?


Comments / Questions (6)
![]() Michelle wrote:
Michelle wrote:
Jeg er i gang med bagstykket, og kan ikke finde ud af, om jeg skal til at tage ud til ærmer. Det er ikke 53 cm (L/XL) men kun ca 40, men til gengæld passer det med forstykkerne, som har den længde opskriften skriver. Når jeg ligger det op mod hinanden passer bagstykket nu til forstykkerne, lige inden der tages ud til ærme på forstykkerne, og jeg kan ikke forstå hvordan der 'mangler' ca 13 cm på bagstykket.
21.05.2020 - 15:15DROPS Design answered:
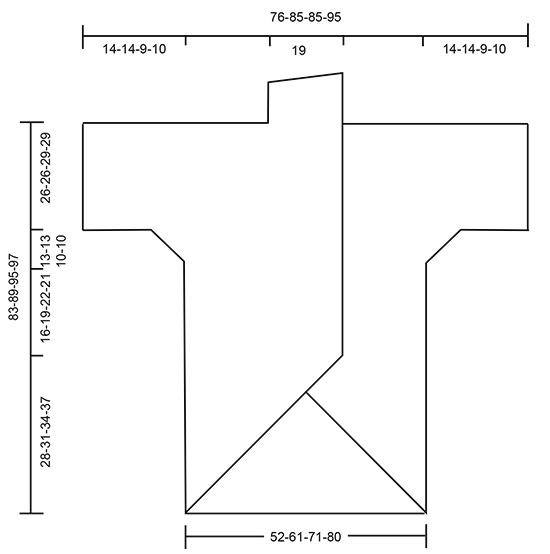
Hej Michelle, hvis du kigger på måleskitsen nederst i opskriften, så kan du se at siderne skal være lige lange. Forstykket er skråt, så du er nødt til at måle det langs siden. God fornøjelse!
29.05.2020 - 09:43
![]() BEVERLY K KELLER wrote:
BEVERLY K KELLER wrote:
Are there written instructions for this pattern? I find following a diagram very confusing but I LOVE the pattern. Thank you so much!
04.12.2017 - 02:49DROPS Design answered:
Dear Mrs Keller, there are only diagrams to this pattern. Each symbol represents 1 stitch. Start reading RS rows from the bottom corner on the right side towards the left and WS rows from the left towards the right. Should you need any further assistance by reading diagrams you are welcome to contact your DROPS store. Happy crocheting!
04.12.2017 - 10:30
![]() Christina Tuhy wrote:
Christina Tuhy wrote:
Really want to make this pattern but there are no diagrams.
05.09.2017 - 14:43DROPS Design answered:
Dear Mrs Tuhy, thanks for your feedback, they will be added soon. Happy crocheting!
05.09.2017 - 15:38
![]() Martina Lang wrote:
Martina Lang wrote:
Ich kann keine Diagramme und auch nicht das Schnittmuster sehen. Ist nicht nur bei dieser Anleitung sondern generell so. Als ich mir das letzte Mal Anleitungen angeschaut habe war noch alles korrekt.
28.08.2017 - 07:43DROPS Design answered:
Liebe Frau Lang, Diagramme sowie Schnittmuster sind immer noch da, aktualisieren Sie die Seite. Viel Spaß beim häkeln!
29.08.2017 - 09:15
![]() Kathy wrote:
Kathy wrote:
The schematic and diagrams are not showing in the US English version. (They are shown in the Norwegian version.)
18.08.2017 - 20:02DROPS Design answered:
Hello Kathy. We will get it fixed as soon as possible. Thank you for pointing it out. Happy knitting!
19.08.2017 - 15:54Veviticusmjhw wrote:
Where is the diagram? How do you download it?
18.08.2017 - 18:11DROPS Design answered:
Hi, the diagram is at the bottom of the pattern, just before the schematic drawing. Happy crocheting!
18.08.2017 - 19:03
|
|||||||||||||||||||||||||||||||||||||
Cobalt Net#cobaltnetjacket |
|||||||||||||||||||||||||||||||||||||
 |
 |
||||||||||||||||||||||||||||||||||||
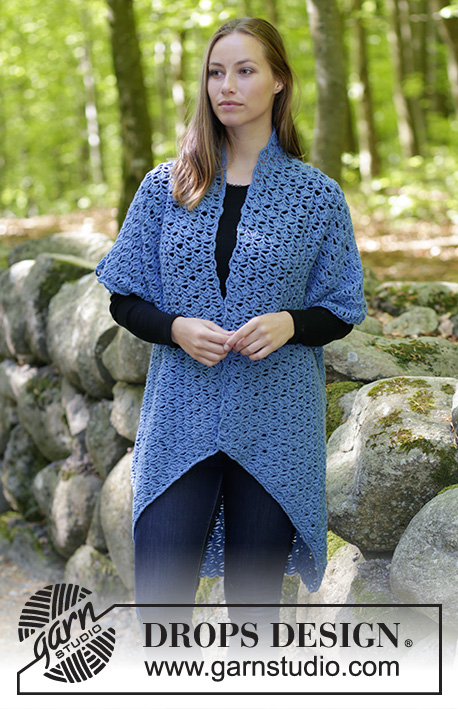
Crochet jacket with lace pattern and shawl collar. Size: S - XXXL Piece is crocheted in DROPS Merino Extra Fine.
DROPS 184-31 |
|||||||||||||||||||||||||||||||||||||
|
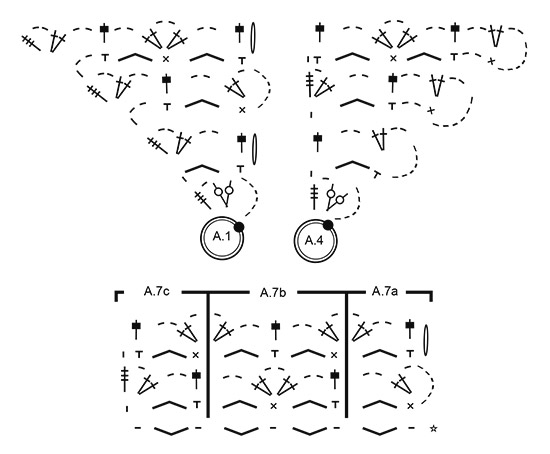
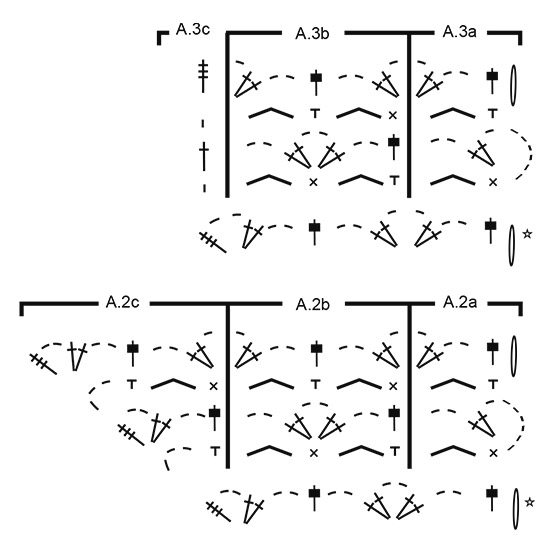
INFORMATION FOR PATTERN: PATTERN: See diagrams A.1 to A.7. ---------------------------------------------------------- JACKET: Worked back and forth in pieces, and are sewn together afterwards. Begin at the bottom with a tip on front piece and increase up towards mid front on jacket. Then increase out for sleeve in opposite side. LEFT FRONT PIECE: Begin with hook size 5 mm and Merino Extra Fine and work pattern according to diagram A.1. When diagram has been worked vertically, work as follows from wrong side: Work A.2c, A.2b, finish with A.2a. When A.2 has been worked vertically, increase 1 repetition in width, i.e. now work as follows from wrong side: A.2c, A.2b 2 times in total in width, finish with A.2a. Then repeat A.2 vertically, after each repeat of A.2 in height, work A.2b 1 more time in width - REMEMBER THE CROCHET TENSION! Continue this increase until last row in A.2 has been worked as follows: A.2c 1 time, A.2b is worked 6-7-8-9 times in width and A.2a 1 time. Piece measures approx. 28-31-34-37 cm from chain stitch ring and up along A.2a. The diagonal piece is done. Insert 1 marker after last row. NOW MEASURE PIECE FROM HERE! Then work as follows from wrong side: A.3c, A.3b 7-8-9-10 times in total in width, finish with A.3a. Repeat A.3 vertically. When piece measures approx. 16-19-22-21 cm from marker - adjust after one whole repetition vertically, begin increase for sleeve. SLEEVE INCREASE (left front piece): Now work as follows from wrong side: A.3c, A.3b 7-8-9-10 times in total in width, finish with A.5a. Continue until diagrams have been worked vertically. Now work as follows from wrong side: A.3c, A.3b 8-9-10-11 times in total in width, finish with A.5a. Continue until diagrams have been worked vertically. The increase in size XXL and XXXL is done. In size S/M and L/XL work as follows: SIZE S/M - L/XL: Now work as follows from wrong side: A.3c, A.3b 9-10 times in total in width, finish with A.5a. Continue until diagrams have been worked vertically. ALL SIZES: Then work as follows from wrong side: A.3c, A.3b 10-11-11-12 times in total in width, finish with A.6a. Repeat A.3c/A.3b/A.6a vertically. When piece measures 55-58-61-60 cm from marker - adjust after one whole repetition vertically, work shawl collar. SHAWL COLLAR (left front piece): Now work as follows from wrong side: A.3c, A.3b 3-3-3-3 times in total in width, finish with A.3a. Then repeat A.3 vertically until collar measures approx. 10 cm - finish after a row from right side. Fasten off. RIGHT FRONT PIECE: Work piece the same way as left front piece until increase for sleeve but swap diagram A.1 with A.4, swap A.2 with A.5 and swap A.3 with A.6. SLEEVE INCREASE: Now work as follows from wrong side: A.2c, A.6b 7-8-9-10 times in total in width, finish with A.6a. Continue until diagrams have been worked vertically. Now work as follows from wrong side: A.2c, A.6b 8-9-10-11 times in total in width, finish with A.6a. Continue until diagrams have been worked vertically. The increase in size XXL and XXXL is done. In size S/M and L/XL work as follows: SIZE S/M - L/XL: Now work as follows from wrong side: A.2c, A.6b 9-10 times in total in width, finish with A.6a. Continue until diagrams have been worked vertically. ALL SIZES: Then work as follows from wrong side: A.3c, A.6b 10-11-11-12 times in total in width, finish with A.6a. Repeat A.3c/A.6b/A.6a vertically. When piece measures 55-58-61-60 cm from marker - adjust after one whole repetition vertically and adjust according to left front piece, fasten off. SHAWL COLLAR: Now work over the last 10 chain spaces from wrong side as follows: A.6c, A.6b 3-3-3-3 times in total in width, finish with A.6a. Then repeat A.6 vertically until collar measures approx. 10 cm - adjust according to shawl collar on left front piece. Fasten off. BACK PIECE: Work 133-157-181-205 chain stitches on hook size 5 mm with Merino Extra Fine. Work as follows from wrong side: Work A.7c, A.7b 10-12-14-16 times in total in width, finish with A.7c. Then repeat A.7 vertically. When piece measures approx. 47-53-53-55 cm, begin increase for sleeves and adjust after one whole repetition vertically and adjust according to front piece. SLEEVE INCREASE: Now work as follows from wrong side: A.2c, A.6b 10-12-14-16 times in total in width, finish with A.5a. Continue until diagrams have been worked vertically. Now work as follows from wrong side: A.2c, A.6b 12-14-16-18 times in total in width, finish with A.5a. Continue until diagrams have been worked vertically. The increase in size XXL and XXXL is done. In size S/M and L/XL work as follows: SIZE S/M - L/XL: Now work as follows from wrong side: A.2c, A.6b 14-16 times in total in width, finish with A.5a. Continue until diagrams have been worked vertically. ALL SIZES: Then work as follows from wrong side: A.3c, A.6b 16-18-18-20 times in total in width, finish with A.6a. Repeat A.6c/A.6b/A.3a vertically. When piece measures 80-86-92-94 cm - adjust after one row from right side and adjust according to front piece, work shoulders separately. The middle 3 repetitions = neck, do not work over these stitches. LEFT SHOULDER: Now work as follows from wrong side: A.3c, A.3b 6-7-7-8 times in total in width, finish with A.3a. Continue until diagram has been worked vertically. Fasten off. RIGHT SHOULDER: Now work as follows from wrong side: A.6c, A.6b 6-7-7-8 times in total in width, finish with A.6a. Continue until diagram has been worked vertically. Fasten off. ASSEMBLY: Sew shoulder seams and sew side seams. Sew collar tog mid back and sew collar to neckline at the back of neck. |
|||||||||||||||||||||||||||||||||||||
Diagram explanations |
|||||||||||||||||||||||||||||||||||||
|
|||||||||||||||||||||||||||||||||||||
 |
|||||||||||||||||||||||||||||||||||||
 |
|||||||||||||||||||||||||||||||||||||
 |
|||||||||||||||||||||||||||||||||||||
 |
|||||||||||||||||||||||||||||||||||||
Have you finished this pattern?Tag your pictures with #dropspattern #cobaltnetjacket or submit them to the #dropsfan gallery. Do you need help with this pattern?You'll find 6 tutorial videos, a Comments/Questions area and more by visiting the pattern on garnstudio.com. © 1982-2026 DROPS Design A/S. We reserve all rights. This document, including all its sub-sections, has copyrights. Read more about what you can do with our patterns at the bottom of each pattern on our site. |
|||||||||||||||||||||||||||||||||||||


With over 40 years in knitting and crochet design, DROPS Design offers one of the most extensive collections of free patterns on the internet - translated to 17 languages. As of today we count 324 catalogues and 12290 patterns translated into English (UK/cm). 12290
We work hard to bring you the best knitting and crochet have to offer, inspiration and advice as well as great quality yarns at incredible prices! Would you like to use our patterns for other than personal use? You can read what you are allowed to do in the Copyright text at the bottom of all our patterns. Happy crafting!
Post a comment to pattern DROPS 184-31
We would love to hear what you have to say about this pattern!
If you want to leave a question, please make sure you select the correct category in the form below, to speed up the answering process. Required fields are marked *.