
Popular categories
Looking for a yarn?


Comments / Questions (14)
![]() KM wrote:
KM wrote:
Hvordan kan man undgå, at picotkanten ruller?
02.02.2025 - 21:12DROPS Design answered:
Hei KM. Fukt kanten lett og legg den i form, evnt damp lett over med strykjern uten å legge strykjernet ned på sjalet. mvh DROPS Design
10.02.2025 - 14:19
![]() Jenna wrote:
Jenna wrote:
Hi, I have 2 questions: 1. Which row of the stockinette portion am I supposed to work last before moving on to row 1 (WS) of the eyelet portion, row 14 (WS) or row 13 (RS)? I think I'm supposed to end by working row 13, but I'm not sure. 2. The stockinette portion increases on the RS rows 4-6-4-6-4-6 by repeating rows 11-14, but if I work the 3 RS rows in the eyelet portion as 4-6-4 and move back to rows 11-14 it ends up as 4-6-4-4-6-4-6-4-6. Am I missing something here? Thanks!
09.02.2020 - 22:27DROPS Design answered:
Dear Jenna, the first row in the eyelet pattern is worked from WS, so that previous row should be a RS row. I'm sorry I don't understand your 2nd question, could you please tell more?
10.02.2020 - 09:53
![]() Elsje wrote:
Elsje wrote:
Aan het eind van het breiwerk brei ik een picotrand. Wat er dan gebeurt is heel jammer: het breiwerk krult om! Ik heb het - met veel moeite! - weer uitgehaald en probeer het omkrullen nu te voorkomen door eerst maar een paar regels boordsteek te breien. Of hebben jullie een andere tip?
17.01.2020 - 11:51DROPS Design answered:
Dag Elsje,
Het kan zijn dat je de picotrand iets te strak maakt, waardoor hij omkrult. Als dat niet het geval is en hij krult nog steeds om, dan zou je de rand op kunnen persen door het werk op de strijkplank te leggen, daarover heen een natte theedoek en dan heel, heel voorzichtig deppen met het strijkijzer. Je kan het werk ook blocken, zie deze video
18.01.2020 - 12:01
![]() DUCHENE wrote:
DUCHENE wrote:
S'il vous plait : Pour le modèle 173-35 quelles couleurs commandées pour approcher le plus des couleurs de la photo ? (les n° que vous indiquez ne correspondent pas à la photo du châle) Je voudrais de l'orange. Merci bcp d'avoir rétabli la rubrique : "mes modèles préférés"
07.02.2019 - 16:30DROPS Design answered:
Bonjour Mme Duchene, les couleurs indiquées dans les explications sont bien celles du châle, toutefois, lors de la prise de photo, la luminosité peut donner un effet différent aux couleurs. Votre magasin DROPS pourra vous aider à choisir les couleurs, même par mail ou téléphone, n'hésitez pas à le contacter. Bon tricot!
08.02.2019 - 08:33
![]() Blume wrote:
Blume wrote:
Ist es richtig, dass abwechselnd einmal beidseitig der markierten Maschine und einmal nur einseitig zugenommen wird. Danke, Ute
23.12.2017 - 17:08DROPS Design answered:
Liebe Blume, wenn Sie Reihe 11 wiederholen, nehmen Sie 1 M vor der 1. + vor der 2. Markierung auf. Wenn Sie Reihe 13 wiederholen, nehmen Sie 1 M beidseitig jeder den 2 Markierungen auf. Viel Spaß beim stricken!
02.01.2018 - 08:13
![]() Gina Von Staden wrote:
Gina Von Staden wrote:
Hallo, ich freue mich an den Farben und dem Muster dieses Tuches, komme aber mit den Maßen nicht klar. Wenn ich die Streifen zusammenzähle komme ich auf 52cm (20+6+12+4+6+4=52) in der hinteren Mitte, bei der Beschreibung steht jedoch, dass das Tuch in der hinteren Mitte 62cm lang sein soll. Wie erklärt sich diese Diskrepanz? Mir ist es wichtig, dass das Tuch am Ende groß genug ist. Vielen Dank! Gina
21.12.2017 - 18:40DROPS Design answered:
Liebe Frau Van Staden, die Streifen werden in Strickrichtung gemessen, dann bei den Zunahmen wird es etwas länger sein. Viel Spaß beim stricken!
22.12.2017 - 07:52
![]() Antonella wrote:
Antonella wrote:
Guardando la foto sembrerebbe che il motivo con i buchini sia in fondo ad ogni striscia di colore e non solo in fondo ad alcune. È così? Anche se purtroppo ormai sono già andato dritto seguendo le istruzioni.
08.12.2017 - 17:22
![]() Erika Klarner wrote:
Erika Klarner wrote:
Guten Tag, seit langer Zeit verarbeite ich drops-Garne und die kostenlosen Anleitungen Momentan stricke ich das Tuch DRAGON FIRE. Mir scheint, dass die Streifenreihen auf der Abbildung nicht der Anleitung entsprechen. Stimmt das? Mit freundlichen Grüßen und herzlichen Dank im Vorraus Erika Klarner
28.05.2017 - 11:12DROPS Design answered:
Liebe Frau Klarner, Anleitung stimmt, bitte nicht vergessen, die Streifen in Strickrichtung messen. Viel Spaß beim stricken!
29.05.2017 - 09:48
![]() Bodil wrote:
Bodil wrote:
Hej! De ränder man skall göra hålvarv i, stickar man det antal cm som står och sedan kommer hålvarvet, som t ex första randen, man stickar 20 cm och sedan kommer hålvarvet? Tänker jag rätt då? Tack på förhand./Bodil
09.11.2016 - 20:59DROPS Design answered:
Hej Bodil, Ja du har helt rätt :)
16.03.2017 - 11:49
![]() Friederike wrote:
Friederike wrote:
Ich habe zu diesem schicken Tuch ein paar Fragen: Man fängt mit 3 M an und dann wird zugenommen. Oder? Wird dann das Tuch von unten nach oben gestrickt? Ansonsten habe ich doch an der oberen langen Kante keine gerade Kante. Oder habe ich da in der Anleitung etwas falsch verstanden? Ansonsten stricke ich ab der 14. Reihe immer das Lochmuster und die ersten zwei und letzten zwei M einer Reihe kraus rechts. Oder? Danke für eine Rückmeldung. Viele Grüße, Friederike
07.08.2016 - 21:47DROPS Design answered:
Liebe Friederike, man beginnt mit 3 Maschen und strickt wie angegeben von oben nach unten. Die Form (auch die obere Kante) ergibt sich durch die Zunahmen.
08.08.2016 - 08:50
|
|
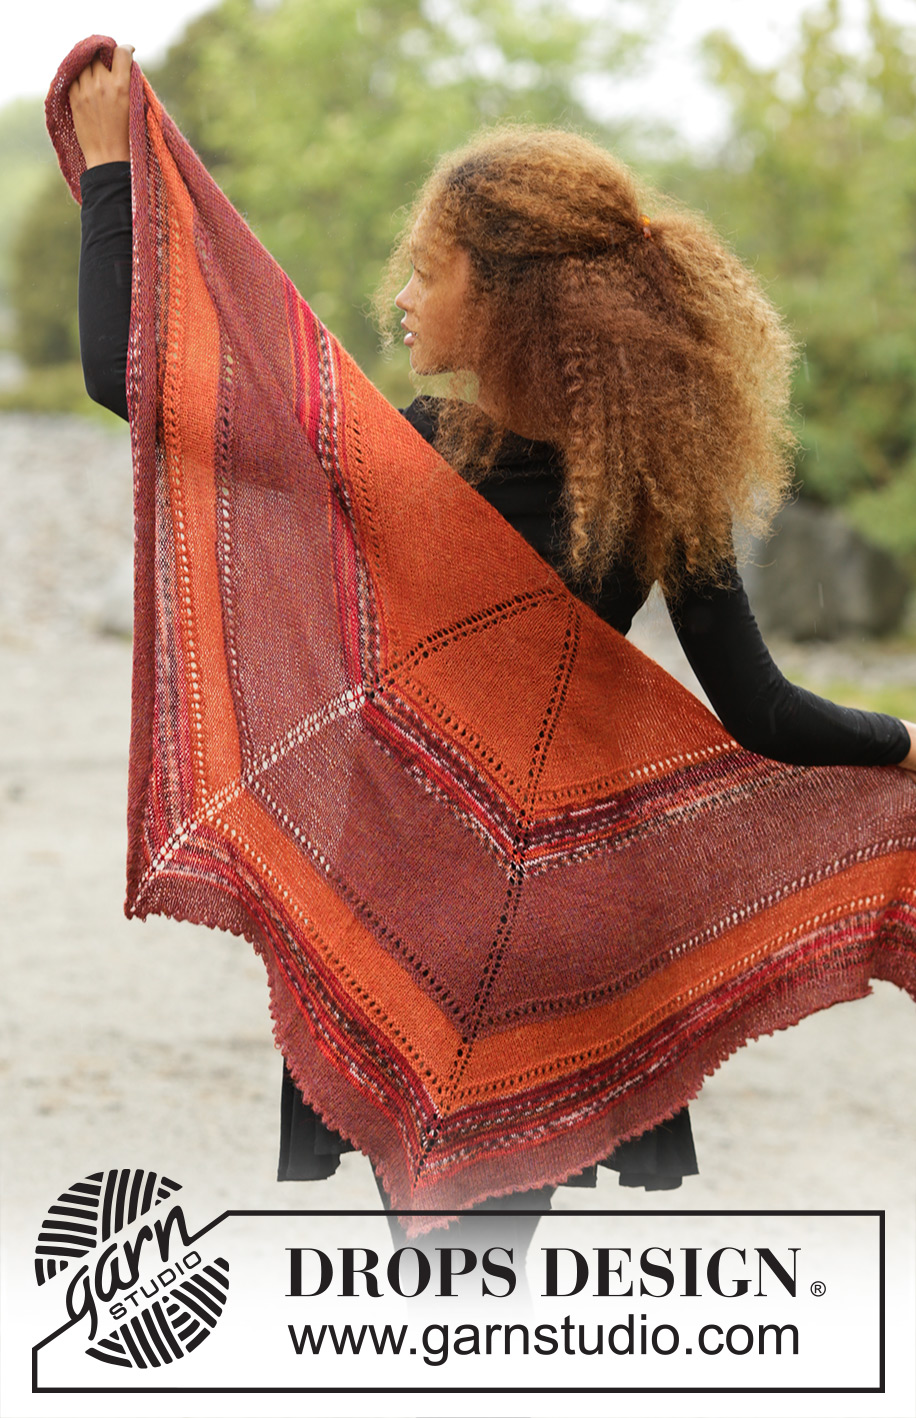
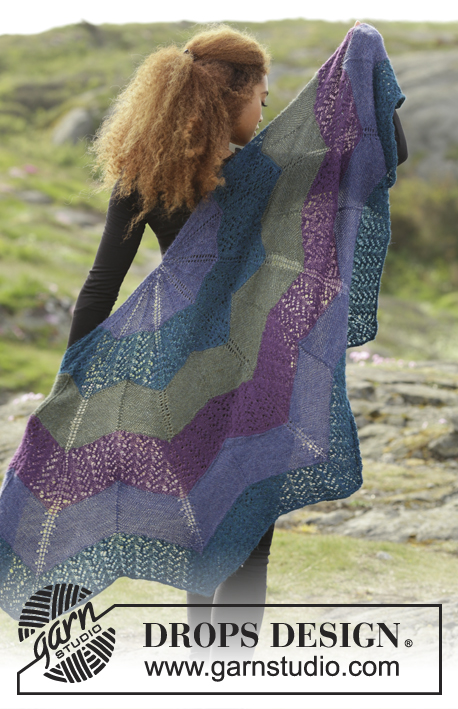
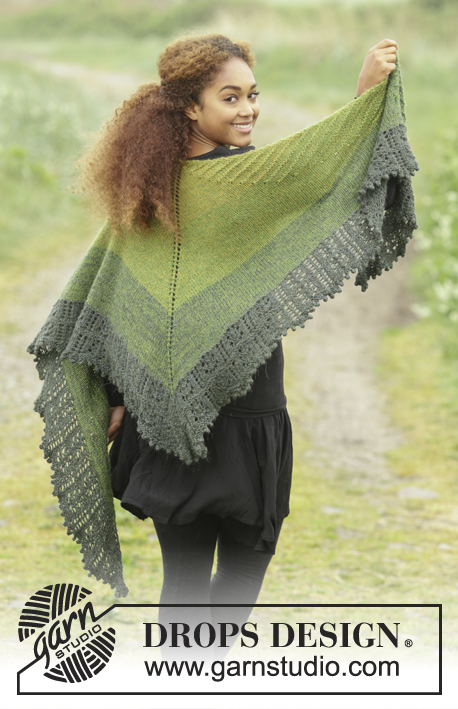
Dragon Fire#dragonfirescarf |
|
|
|
|
Knitted DROPS shawl with lace pattern, stripes and stocking st, worked top down in ”Alpaca” and ”Fabel”.
DROPS 173-35 |
|
|
GARTER ST (back and forth): K all rows. 1 ridge = 2 rows K. STRIPES: Measure all stripes in knitting direction. 20 cm with rust Alpaca and work EYELET PATTERN - see explanation below. 6 cm with bourgogne Fabel. 12 cm with bourgogne Alpaca and work EYELET PATTERN. 4 cm with rust Alpaca and work EYELET PATTERN. 6 cm with bourgogne Fabel. 4 cm with bourgogne Alpaca. EYELET PATTERN: Work eyelet pattern, beg from WS as follows: ROW 1: K from WS. ROW 2: K from RS inc as before in the sides and at markers. ROW 3: 2 edge sts in garter st in each side, P all other sts and YOs from WS. ROW 4: Work 2 edge sts in garter st, 1 YO, K 1, * K 2 tog, 1 YO *, repeat from *-* and stop repetition at least 1 st before st with marker and work in stocking st as before and inc at marker, work in stocking st at least 1 st past marker. Repeat from *-* and stop repetition at least 1 st before st with marker and work in stocking st as before and inc at marker, work in stocking st at least 1 st past marker. Repeat from *-* until at least 3 sts remain, K 1, 1 YO and 2 sts in garter st. NOTE: Make sure to make equal number of (K 2 tog, 1 YO) so that the number of sts only inc at the markers and in the sides. ROW 5: 2 edge sts in garter st in each side, P all other sts and YOs from WS. ROW 6: K from RS inc as before in the sides and at markers. ROW 7: K from WS and switch colour to next STRIPE - see explanation above. ---------------------------------------------------------- SHAWL: The piece is worked top down. Cast on 3 sts on circular needle size 3 mm with rust Alpaca. Work in stocking st and inc as follows: ROW 1: (= RS) K 1, 1 YO, K 1, 1 YO, K 1 = 5 sts. ROW 2: (= WS) K all sts. ROW 3: K 1, 1 YO, K 1, 1 YO, K 1, 1 YO, K 1, 1 YO, K 1 = 4 sts inc and 9 sts on needle. ROW 4 and all rows from WS: Work 2 edge sts in garter st each side and P all sts and YOs, YO should make holes. ROW 5: K 2, * 1 YO, K 1 *, repeat from *-* 6 times and K 1 = 6 sts inc and 15 sts on needle. ROW 7: 2 edge sts in GARTER ST - see explanation above, 1 YO, K 5, 1 YO, K 1, 1 YO, K 5, 1 YO and 2 edge sts in garter st = 4 sts inc and 19 sts on needle. ROW 9: 2 edge sts in garter st, 1 YO, K 5, 1 YO, K 1 and insert a marker in this st, 1 YO, K 3, 1 YO, K 1 and insert a marker in this st, 1 YO, K 5, 1 YO and 2 edge sts in garter st = 6 sts inc and 25 sts on needle. ROW 11: 2 edge sts in garter st, 1 YO and K until first marker, 1 YO, K 1 (= st with marker), K until st with marker, K 1 (= st with marker), 1 YO, K until 2 sts remain, 1 YO and 2 edge sts in garter st = 4 sts inc and 29 sts on needle. ROW 13: 2 edge sts in garter st, 1 YO, K until first marker, 1 YO, K 1 (= st with marker), 1 YO, K until second marker, 1 YO, K 1 (= st with marker), 1 YO, K until 2 sts remain on needle, 1 YO and 2 edge sts in garter st = 6 sts inc and 35 sts on needle. REMEMBER THE KNITTING TENSION Repeat 11th-14th ROW while working STRIPES AND EYELET ROWS - see explanation above. After last stripe bourgogne Alpaca do not cut the yarn but cast off a picot edge - see explanation below. CAST-OFF WITH PICOT: Loosely cast off with K from RS with rust Alpaca as follows: K 1, ((** insert right needle in between the first 2 sts on left needle (i.e. between sts on needle, not through sts), make 1 YO on right needle, pull YO forwards between sts and slip YO on left needle **, repeat from **-** 2 more times (= 3 new sts on left needle). * K first st on left needle, pass first st on right needle over last st worked *)), repeat from *-* 6 times in total and repeat from ((-)) along the entire shawl until 1 st remains, cut the yarn and pull it through last st. |
|
Have you finished this pattern?Tag your pictures with #dropspattern #dragonfirescarf or submit them to the #dropsfan gallery. Do you need help with this pattern?You'll find 12 tutorial videos, a Comments/Questions area and more by visiting the pattern on garnstudio.com. © 1982-2026 DROPS Design A/S. We reserve all rights. This document, including all its sub-sections, has copyrights. Read more about what you can do with our patterns at the bottom of each pattern on our site. |


With over 40 years in knitting and crochet design, DROPS Design offers one of the most extensive collections of free patterns on the internet - translated to 17 languages. As of today we count 324 catalogues and 12290 patterns translated into English (UK/cm). 12290
We work hard to bring you the best knitting and crochet have to offer, inspiration and advice as well as great quality yarns at incredible prices! Would you like to use our patterns for other than personal use? You can read what you are allowed to do in the Copyright text at the bottom of all our patterns. Happy crafting!
Post a comment to pattern DROPS 173-35
We would love to hear what you have to say about this pattern!
If you want to leave a question, please make sure you select the correct category in the form below, to speed up the answering process. Required fields are marked *.