
Popular categories
Looking for a yarn?


Comments / Questions (8)
![]() Laurence wrote:
Laurence wrote:
Bonjour, je ne comprends pas....puisqu'on tricote en rond cela me fait un tube comme pour un pull...je ne vois pas non plus où est le trou pour la tête.. merci
16.02.2018 - 22:32DROPS Design answered:
Bonjour Laurence, vous avez commencé par tricoté le dos et les manches (les mailles du montage et ces mêmes mailles reprises dans l'autre sens - cf flèches dans le schéma). Vous tricotez ensuite en rond les 31 m du haut et du bas du schéma, ce sera la bordure qui va faire le col, les devants et le bas du dos. Bon tricot!
19.02.2018 - 08:56
![]() Ria De Groot-van Der Elst wrote:
Ria De Groot-van Der Elst wrote:
Patroon 0-1181 Vest met zigzagpatroon. Bij het begin wordt de eerste heen en weer gebreid. Wanneer begin ik met rondbreien? Is dat de derde naald? of pas bij de meerderingen?
02.03.2016 - 20:30DROPS Design answered:
Hoi Ria. Nee, je begint met in de rondte breien als het staat in het patroon (na 224-288-320 st): Brei dan in de rondte. MEET NU HET WERK VANAF HIER!
09.03.2016 - 09:44
![]() Martina wrote:
Martina wrote:
Die Jacke ist toll. Ich habe sie gerade fertig gestrickt. Mag sie gar nicht mehr ausziehen. So kuschelig und warm. Habe XL gestrickt und die Streifen doppelt so breit gemacht (aus Versehen). Sieht aber klasse aus. Vom Hellgrau hab ich nur 2 Knäuel gebraucht.
13.02.2016 - 15:43
![]() Pamela wrote:
Pamela wrote:
Bonjour, je vais commencer à tricoter en rond, je me demande sur le rang 2 je dois tricot en maille endroit ou en maille envers ? Merci d'avance
22.01.2016 - 14:29DROPS Design answered:
Bonjour Pamela, quand on tricote en rond, on tricote toujours sur l'endroit = tricotez les m à l'end à chaque tour. Bon tricot!
22.01.2016 - 17:27
![]() Pamela wrote:
Pamela wrote:
Bonjour Je voudrais faire ce modèle mais j'aimerais savoir comment choisir ma taille. Je fais un 48 en haut mais j'ai une poitrine assez importante. Pouvez vous me conseiller???
02.01.2016 - 20:25DROPS Design answered:
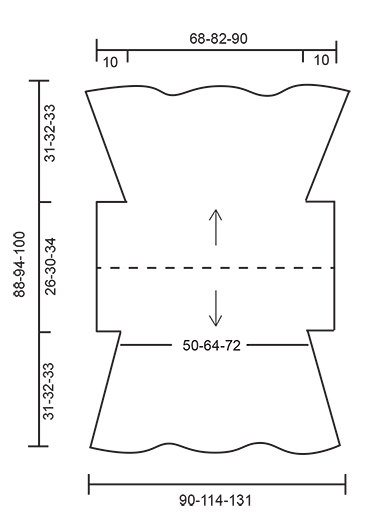
Bonjour Pamela, vous trouverez à la fin des explications un schéma avec toutes les mesures prises à plat - comparez ces mesures à un vêtement similaire que vous avez et dont vous aimez la forme pour trouver la taille idéale - vous pouvez toujours ajuster la longueur du devant/du dos (= partie tricotée en rond). Bon tricot!
04.01.2016 - 09:19
![]() Vera Bartkowiak wrote:
Vera Bartkowiak wrote:
Danke für die schnelle Antwort ! MfG V. Bartkowiak
30.11.2015 - 17:37
![]() Vera Bartkowiak wrote:
Vera Bartkowiak wrote:
Hallo liebes Drops Team In der Anleitung zu diesem Modell steht in Runden weiterstricken, das verstehe ich nicht. Die Jacke muss doch 'offen' bleiben. Bis zu diesem Punkt ist alles klar verständlich. Ich bedanke mich schon mal im voraus für ihre Hilfe. MfG Vera Bartkowiak
28.11.2015 - 18:34DROPS Design answered:
Die Jacke bleibt trotzdem offen, Sie stricken die Jacke quasi wie eine Kreisjacke. Die Abkettkante bildet den äußeren Rand der Vorderteile, den Halsausschnitt und den unteren Rand des Rückens. Sie beginnen die Jacke also mit dem Rückenteil in der hinteren Mitte und stricken zuerst nach oben und nach unten, die Ärmel werden mitgestrickt und die Ärmel-M dann abgekettet. Wenn Sie in Runden stricken, stricken Sie um dieses Rückenteil herum, dadurch werden die Vorderteile gebildet.
29.11.2015 - 23:10
![]() Catharina Duden wrote:
Catharina Duden wrote:
Meines Erachtens nach müsste es in der Zeichenerklärung 1 M zunehmen, indem man 2 M aus einer M strickt. heißen.
17.11.2015 - 16:21DROPS Design answered:
Das steht ja so da, nur etwas anders formuliert: 2 M aus derselben M herausstricken heißt nichts anderes, als dass man 2 M aus einer M herausstrickt, d.h. die Masche wird verdoppelt.
19.11.2015 - 16:35
|
||||||||||||||||
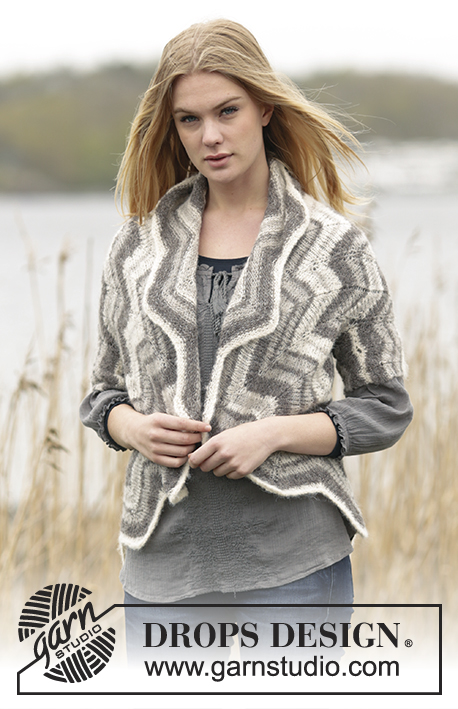
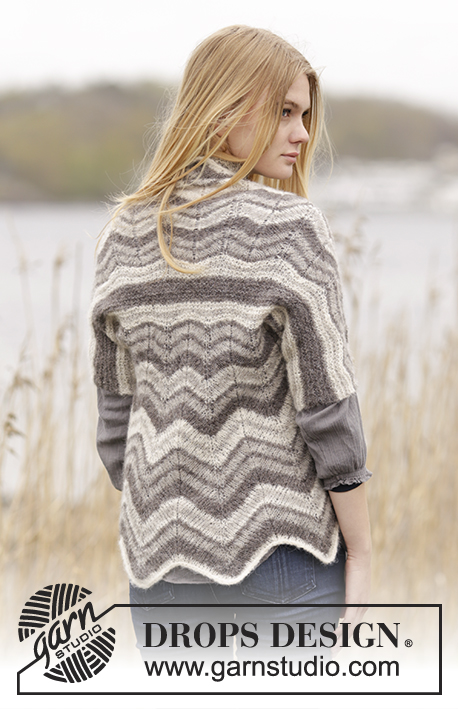
Silver Rays |
||||||||||||||||
 |
 |
|||||||||||||||
Knitted DROPS jacket with zig-zag pattern and stripes in ”Brushed Alpaca Silk”. Size: S - XXL.
DROPS Extra 0-1181 |
||||||||||||||||
|
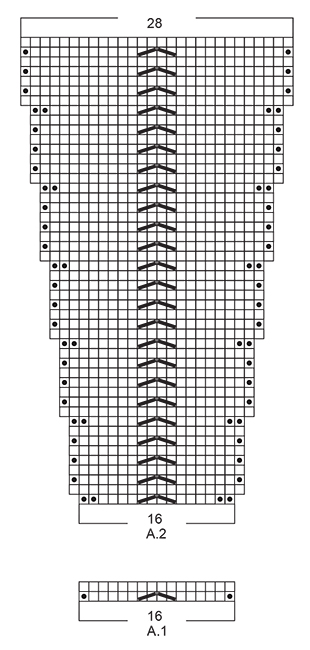
GARTER ST (back and forth on needle): K all rows. 1 ridge = 2 rows K. KNITTING TIP: Cast on with 1 strand grey and 1 help strand as follows: Hold the help strand with your thumb and the grey strand with your index finger. Then cast on as usual so that the grey strand becomes a st on the needle. Keep the help strand in the piece when working, then use this to slip sts from cast-on edge back on needle. PATTERN: See diagrams A.1 and A.2. The diagrams show all rows in pattern seen from RS. STRIPES: Piece is worked in stripes as follows: 6 rows/rounds grey 4 rows/rounds off white 2 rows/rounds light grey 4 rows/rounds off white 2 rows/rounds grey 4 rows/rounds light grey 2 rows/rounds grey 4 rows/rounds light grey 6 rows/rounds grey 2 rows/rounds off white 4 rows/rounds light grey 2 rows/rounds off white 2 rows/rounds grey 4 rows/rounds light grey Repeat stripes until finished measurements. ---------------------------------------------------------- JACKET: First worked back and forth on needle, then work in the round on circular needle. Cast on 119-143-156 sts on circular needle size 5 mm with 1 strand grey + 1 help strand - READ KNITTING TIP. Work in GARTER ST and STRIPES for 5 cm - see explanation above, on next row inc 35-43-46 sts evenly = 154-186-202 sts. REMEMBER THE KNITTING TENSION Work A.1 (= 9-11-12 repetitions in width) with 5 sts in garter st in each side until piece measures 13-15-17 cm. On next row cast off the outermost 21 sts in each side = 112-144-160 sts. Slip sts on a stitch holder. Slip sts from cast-on edge back on needle size 5 mm (pull at the same time out the help strand). Work in garter st and stripes for 5 cm, on next row inc 35-43-46 sts evenly = 154-186-202 sts. Work A.1 (= 9-11-12 repetitions in width) with 5 sts in garter st in each side until piece measures 13-15-17 cm. On next row cast off the outermost 21 sts in each side = 112-144-160 sts. Slip sts from stitch holder in the other side back on needle = 224-288-320 sts. Then work in the round. NOW MEASURE PIECE FROM HERE! Continue with A.1 (= 14-18-20 repetitions in width) and stripes over all sts until piece measures 11-12-13 cm. Now work A.2 over all sts. When A.2 has been worked one time vertically, there are 392-504-560 sts on needle. Loosely cast off with 2 strands. ASSEMBLY: Sew the opening under the sleeves. |
||||||||||||||||
Diagram explanations |
||||||||||||||||
|
||||||||||||||||
 |
||||||||||||||||
 |
||||||||||||||||
Have you finished this pattern?Tag your pictures with #dropspattern or submit them to the #dropsfan gallery. Do you need help with this pattern?You'll find 20 tutorial videos, a Comments/Questions area and more by visiting the pattern on garnstudio.com. © 1982-2026 DROPS Design A/S. We reserve all rights. This document, including all its sub-sections, has copyrights. Read more about what you can do with our patterns at the bottom of each pattern on our site. |
||||||||||||||||


With over 40 years in knitting and crochet design, DROPS Design offers one of the most extensive collections of free patterns on the internet - translated to 17 languages. As of today we count 324 catalogues and 12290 patterns translated into English (UK/cm). 12290
We work hard to bring you the best knitting and crochet have to offer, inspiration and advice as well as great quality yarns at incredible prices! Would you like to use our patterns for other than personal use? You can read what you are allowed to do in the Copyright text at the bottom of all our patterns. Happy crafting!
Post a comment to pattern DROPS Extra 0-1181
We would love to hear what you have to say about this pattern!
If you want to leave a question, please make sure you select the correct category in the form below, to speed up the answering process. Required fields are marked *.