
Popular categories
Looking for a yarn?


Comments / Questions (92)
![]() Annika Forss wrote:
Annika Forss wrote:
Hej! Jättefin modell, men vad är färdigt mått på rektangeln i cm? Vill sticka tröjan i annat mönster. Mvh, Annika
28.01.2016 - 10:16
![]() Gerd Brodén wrote:
Gerd Brodén wrote:
I diagrammet är blank ruta beskrivet fel. Om det är ett klipp/klistra-fel. Behöver ändras!!
20.01.2016 - 13:22DROPS Design answered:
Tack för info, detta är nu rättat!
27.01.2016 - 12:15
![]() Christin Nilsson wrote:
Christin Nilsson wrote:
Tänkte sticka denna vackra modell med annan mönsterstickning. Vilker är det färdiga måttet i cm på ett stycke?
29.12.2015 - 07:18
![]() Meylan Zoe wrote:
Meylan Zoe wrote:
Bonjour, je ne sais pas comment choisir entre du xs-s et m. Prendre mon tour de poitrine me semble bizarre si on a une petite poitrine mais des épaules larges. Je suis un peu perdue..
07.12.2015 - 21:27DROPS Design answered:
Bonjour Mme Meylan, comparez les mesures d'un pull/gilet de ce même catalogue avec un vêtement identique pour trouver la taille idéale. Votre magasin DROPS saura également vous aider et vous renseigner. Bon tricot!
08.12.2015 - 08:47
![]() Catherine Mann wrote:
Catherine Mann wrote:
I'm a doll collector, Asian Ball Jointed dolls made from resin, and all vinyl dolls, but love my porcelain reproduction of Bluette from an artist in British Columbia. I got raw alpaca fiber to make a wig for her and she loves the dark color I found. Super soft and very durable. Love the merino blend with alpaca yarn concoction here :) and can't wait to try the wheat color. Great coziness of lines and form fitting shoulder piece. Very unique.
30.11.2015 - 16:33
![]() Mimi wrote:
Mimi wrote:
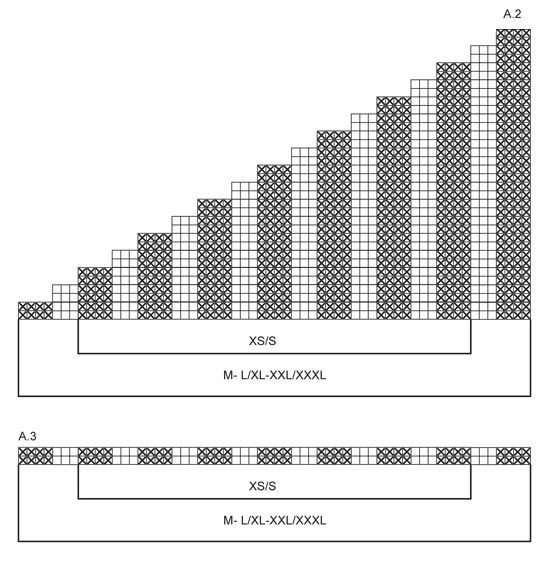
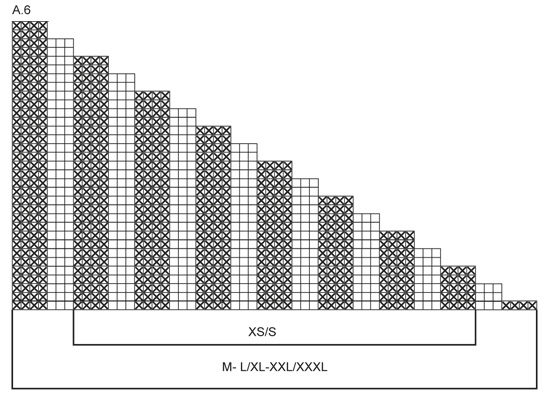
Bonjour je ne sais pas comment faire le diagramme 2 et 6 car il manque des cases a quels points correspondent elle?
29.11.2015 - 02:28DROPS Design answered:
Bonjour Mimi, les diagrammes A.2 et A.6 correspondent aux rangs raccourcis, tricotez uniquement les mailles (cases) représentées. Bon tricot!
30.11.2015 - 10:37
![]() TOCHE wrote:
TOCHE wrote:
Bonjour pouvez vous me dire la longueur des bandes merci
23.11.2015 - 09:09DROPS Design answered:
Bonjour Mme Toche, vous pouvez calculer la longueur totale de chaque bande pour votre taille à l'aide des explications du modèle et de l'échantillon indiqué pour 10 cm. Pour toute assistance personnalisée, merci de bien vouloir vous adresser à votre magasin DROPS, il saura vous aider et vous conseiller. Bon tricot!
23.11.2015 - 11:03
![]() Clare wrote:
Clare wrote:
How many balls of brushed alpaca silk would be needed to make the medium size? Also, what size needles? Many thanks
18.11.2015 - 00:25DROPS Design answered:
Dear Mrs Clare, you will find all requested material under tab "materials" at the right side of the picture - if you like to use an alternative, read more about this here, and remember your DROPS store has tips & advices for you. Happy knnitting!
18.11.2015 - 09:39Eirini wrote:
Hello, I wanted to ask about the left side; it says "Now turn in the middle of a row from WS and work 3 rows over all sts at the end of diagram." Does it mean at the end of A6(even after the last 3 rows on the diagram for size M?) or at the end of the entire piece with garter stitch? On a side note, A1 should include one more row above, or A2 starts from WS :)
28.10.2015 - 22:28DROPS Design answered:
Dear Mrs Eirini, on left front piece and A.6 short rows are worked from WS, ie you will start short rows from WS - see also A.6: 1st row is worked from RS (read from the right towards the left), and 2nd row (1st short row) is worked from WS turn when you have worked the number of sts for this row. When all short rows are worked, finish with the last 3 rows in A.6 (last row in A.6 is worked from WS). Happy knitting!
29.10.2015 - 09:13
![]() Eva wrote:
Eva wrote:
Mein soeben fertig gestellter Bolero ist sehr schön geworden und sieht exakt so aus wie auf der Abbildung. Etwas problematisch war das Zusammennähen. Es hat ein wenig gedauert, bis ich es geschafft hatte, die beiden Teile korrekt übereinander zu legen und richtig zu verkreuzen. Eine Zeichung wäre hierfür recht hilfreich gewesen. Auch das Anziehen des Kleidungsstückes will erst einmal gelernt sein, aber dann sieht es sehr schick aus.
21.10.2015 - 12:10
|
|||||||||||||||||||
Infinity#infinityshoulderpiece |
|||||||||||||||||||
 |
 |
||||||||||||||||||
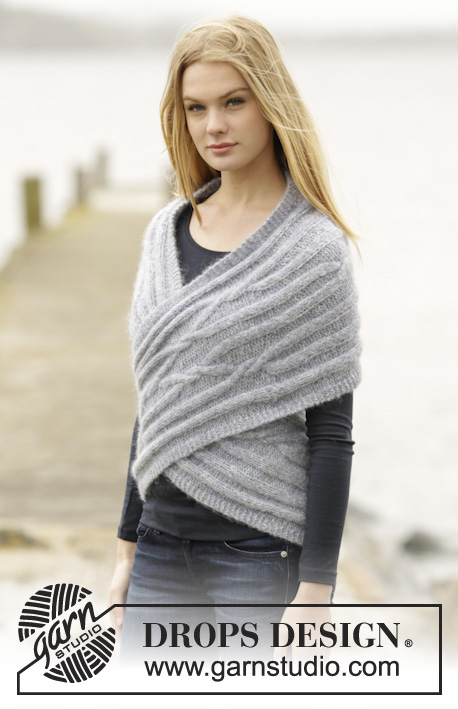
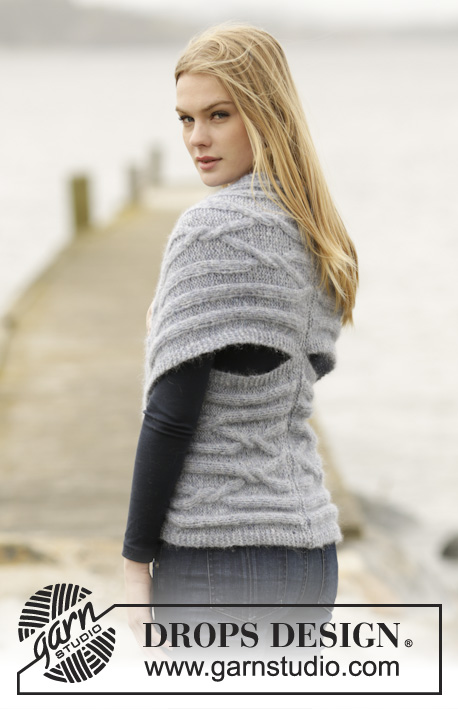
Knitted DROPS shoulder piece with cables and short rows in ”Air”. Size: XS - XXXL.
DROPS 165-47 |
|||||||||||||||||||
|
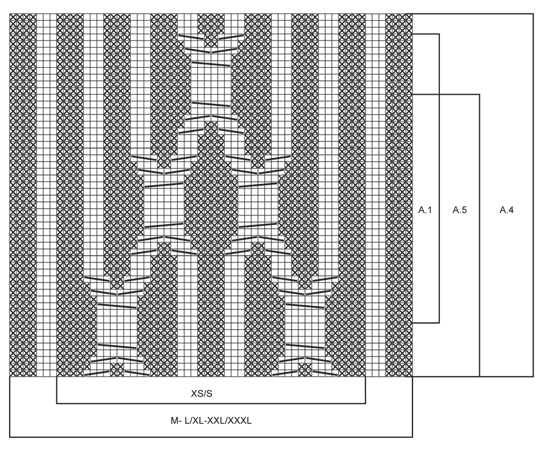
GARTER ST (back and forth): K all rows. 1 ridge = 2 rows K. PATTERN: See diagrams A.1 to A.6. The diagrams show all rows in pattern seen from RS. ---------------------------------------------------------- SHOULDER PIECE: Worked in two parts that are sewn tog mid back. RIGHT SIDE: Work from mid back of neck, around the body and finish mid back on back. Cast on 46-60-60-60 sts on needle size 5 mm with Air. Work 2 ridges in GARTER ST - see explanation above, on last row inc 8 sts evenly = 54-68-68-68 sts. Then work as follows from RS: 4 sts in garter st, A.1 (= 46-60-60-60 sts) and 4 sts in garter st. REMEMBER THE KNITTING TENSION When A.1 has been worked one time vertically, work A.3 for 0-0-4-8 cm. Then work short rows as follows: 4 sts in garter st, A.2 and 4 sts in garter st. Work A.2 as follows: Work the first 2 rows, work next row from RS but turn when 8 sts remain (the last 4 sts in A.2 + 4 sts in garter st), tighten yarn and work back. Work 5th row in A.2 but turn when 11 sts remain on row, tighten yarn and work back. Continue like this until 2 rows have been worked only over the first 8 sts on row (4 sts in garter st + the first 4 sts in A.2). Work A.3 over all sts for 1-1-4-8 cm. Then work as follows from RS: 4 sts in garter st, A.4 and 4 sts in garter st. Work A.4 1-2-2-2 times vertically, last time finish when 2 rows remain in A.4. Work A.3 for 1-1-4-8 cm. Then work as follows: 4 sts in garter st, A.2, 4 sts in garter st (work A.2 with short rows as the last time). When A.2 has been worked one time vertically, work A.3 for 0-0-4-8 cm, then work as follows: 4 sts in garter st, A.5 and 4 sts in garter st. When A.5 has been worked one time vertically, work 2 ridges, on first row dec 8 sts evenly = 46-60-60-60 sts. Cast off. LEFT SIDE: Cast on and work as right side but now work A.6 instead of A.2 so that short rows are in the opposite side. NB! Work 1 row from WS over all sts after A.6 before working A.3. ASSEMBLY: Sew tog cast-on edge from right side towards cast-on edge on left side, cross the sides and sew tog cast-off edges. Sew a small stitch in the back so that the two parts are fastened tog. |
|||||||||||||||||||
Diagram explanations |
|||||||||||||||||||
|
|||||||||||||||||||
 |
|||||||||||||||||||
 |
|||||||||||||||||||
 |
|||||||||||||||||||
Have you finished this pattern?Tag your pictures with #dropspattern #infinityshoulderpiece or submit them to the #dropsfan gallery. Do you need help with this pattern?You'll find 13 tutorial videos, a Comments/Questions area and more by visiting the pattern on garnstudio.com. © 1982-2026 DROPS Design A/S. We reserve all rights. This document, including all its sub-sections, has copyrights. Read more about what you can do with our patterns at the bottom of each pattern on our site. |
|||||||||||||||||||


With over 40 years in knitting and crochet design, DROPS Design offers one of the most extensive collections of free patterns on the internet - translated to 17 languages. As of today we count 324 catalogues and 12290 patterns translated into English (UK/cm). 12290
We work hard to bring you the best knitting and crochet have to offer, inspiration and advice as well as great quality yarns at incredible prices! Would you like to use our patterns for other than personal use? You can read what you are allowed to do in the Copyright text at the bottom of all our patterns. Happy crafting!
Post a comment to pattern DROPS 165-47
We would love to hear what you have to say about this pattern!
If you want to leave a question, please make sure you select the correct category in the form below, to speed up the answering process. Required fields are marked *.