
Popular categories
Looking for a yarn?


Comments / Questions (9)
![]() Sandra wrote:
Sandra wrote:
Er der en fejl i beskrivelsen af række 3, at man skal lave dobbelt stangmaske i stedet for stangmaske? Jeg har fulgt opskriften og lavet stangmasker, men mønstret ligner ikke billedet. Pft.
10.03.2022 - 23:06DROPS Design answered:
Hej Sandra, vi har brugt stangmasker, har du set videoen?
11.03.2022 - 15:03
![]() Laura wrote:
Laura wrote:
Hvor mange gram bruger man til én dækkeserviet? Kan se man skal købe 100g, men hvis man kun bruger fx 75g ser regnestykket jo anderledes ud når man skal hækle mange. Fx: 10*100g = 20 nøgler 10*75g = 15 nøgler
20.11.2018 - 12:28DROPS Design answered:
Hei Laura, Vi har sagt 100 g for en serviett fordi man kan ikke kjøpe 75g. Men hvis du skal lage mange er det riktig med 75g per serviett. God fornøyelse!
21.11.2018 - 08:02
![]() Patricia Newman wrote:
Patricia Newman wrote:
Does it take 3 balls of yarn just for one placemat? or is it for 4 placemats? I need to calculate how many balls I will need to purchase for 8 place mats. Thank you so much for your help.
28.07.2018 - 02:35DROPS Design answered:
Dear Mrs Newman, you need 100 g Bomull-Lin for 1 place mat, ie 2 balls Bomull-Lin. Happy crocheting!
31.07.2018 - 08:52
![]() Cowé wrote:
Cowé wrote:
Bonjour, Je voudrais savoir le nombre de pelotes nécessaire pour crocheter 10 sets de table de ce modèle. Merci pour votre réponse, Régine Cowé
01.08.2016 - 13:55DROPS Design answered:
Bonjour Mme Cowé, nous n'avons pas le poids exact d'un set, il vous faudra 10 fois le poids d'un set, et peut-être un peu moins. Bon crochet!
02.08.2016 - 09:00
![]() Sara wrote:
Sara wrote:
Extra 0-1111 ?
29.06.2016 - 13:43
![]() Grosbot wrote:
Grosbot wrote:
Merci de votre réponse pour le châle !!!le numéro du châle c'est 111_17
29.06.2016 - 13:06DROPS Design answered:
Bonjour Mme Grosbot, le châle 111-17 se tricote de haut en bas. Bon tricot!
29.06.2016 - 17:50
![]() Grosbot wrote:
Grosbot wrote:
Merci de me répondre pour le châle au point mousse numero 111 comment le débuter de haut ou bas .??je n'arrive pas à le débuter !dommage il me plaît beaucoup !!! Merci à bientôt j'espère
28.06.2016 - 20:29DROPS Design answered:
Bonjour Mme Grosbot, pouvez-vous poser votre question sur le modèle concerné, je ne suis pas certaine de savoir de quel modèle il s'agit. Merci.
29.06.2016 - 08:39
![]() Magda wrote:
Magda wrote:
Witam serdecznie, jak należy rozumieć opis do wykonania pierwszego rzędu - najpierw oczka ścisłe co 2 oł, a potem w co 4oł? to ma być jeden, czy 2 rzędy? Jestem początkująca i nie do końca rozumiem ten zapis. Czy ewentualnie mogłabym poprosić o wzór graficzny - jako wzrokowcowi byłoby mi łatwiej zrozumieć taki schemat.
18.02.2016 - 15:13DROPS Design answered:
Witam. Dla początkujących dziewiarek najlepiej sprawdzają się filmiki video, na których dokładnie jest pokazane jak wykonać dany wzór. Proszę kliknąć na zakładkę VIDEO na górze tego wzoru (pod tytułem wzoru) i wybrać video zatytułowane 'Szydełko: podkładka pod nakrycie i pierścień na serwetkę'. Proszę napisać jak wyszło. POWODZENIA!
18.02.2016 - 22:46
![]() Els Van Zomeren wrote:
Els Van Zomeren wrote:
TOER 2 (verkeerde kant): 4 l in eerste v (vervangen eerste stk en eerste l) Wat wordt bedoeld met: 4 l in eerste v? Hoe kun je losse in vaste haken?
26.11.2015 - 19:18DROPS Design answered:
Hoi Els. Je begint gewoon met 4 l in de v die je in staat.
27.11.2015 - 11:16
|
|
Festive Dinner |
|
|
|
|
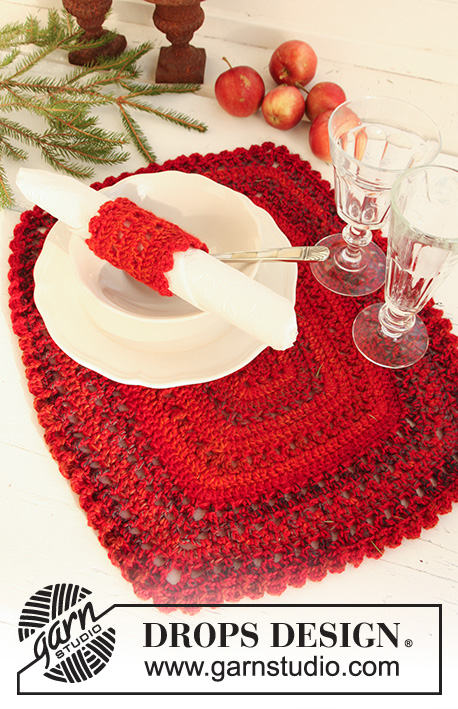
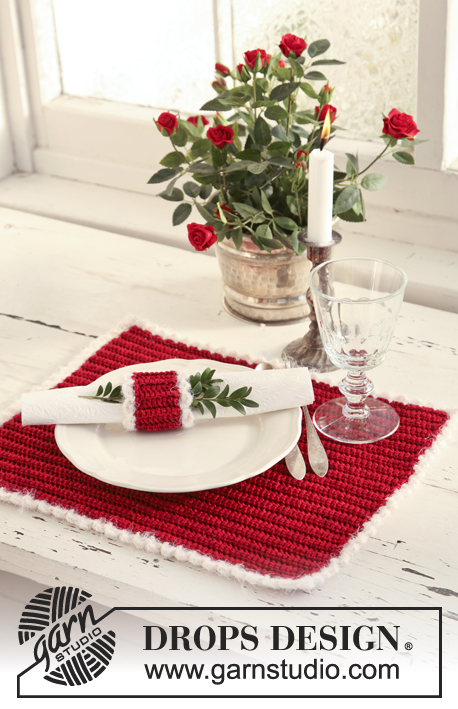
DROPS Christmas: Crochet DROPS placemat and napkin ring in "Bomull-Lin".
DROPS Extra 0-1060 |
|
|
PLACEMAT: Work 84 ch on hook size 4 mm with Bomull-Lin. ROW 1 (RS): Work 1 dc in 2nd ch from hook, 1 dc in each of the next 2 ch, * skip 1 ch, 1 dc in each of the next 4 ch *, repeat from *-* the entire row = 67 dc. ROW 2 (WS): 4 ch in first dc (replace first tr and first ch), skip 1 dc, work 1 tr in next dc, * 1 ch, skip 1 dc, 1 tr in next dc *, repeat from *-* the entire row = 34 tr. ROW 3: 4 ch in first tr (replace first tr and first ch), 1 tr in next tr, * 1 ch, 1 tr in next tr *, repeat from *-* until last tr on row 2 (i.e. 3rd ch at beg). Then work 1 ch and 1 tr in 3rd ch on 2nd row = 34 tr. Repeat 3rd row 21 more times (= 22 times in total). LAST ROW (from RS): Work 1 ch and 1 dc in first ch-space, * 1 dc in next tr, 1 dc in next ch-space *, repeat from *-* the entire row, finish with 1 dc in 3rd ch from previous row (= 67 dc). REMEMBER THE CROCHET TENSION! Then work around the entire placemat as follows: First work down along one short side as follows: 2 ch (= corner), 2 dc in every ch-space = 44 dc (= short side). Then work along one long side(= cast on edge) as follows: 2 ch (= corner), 1 dc in each of the first 4 ch, * skip 1 ch, 1 dc in each of the next 4 ch *, repeat from *-* 14 more times (= 15 times in total). Skip 1 ch, 1 dc in each of the next 3 dc = 67 dc. Then work along the other short side as follows: 2 ch (= corner), 2 dc in every ch-space = 44 dc (= short side). Then work along the other long side as follows: 2 ch (= corner), 1 dc in every dc = 67 dc. Then work the edge in the round as follows: Work along one short side as follows: 1 ch (= corner), skip 2 dc, in next dc work as follows: 1 dc, 3 tr, 1 dc, * skip 3 dc, in next dc work as follows: 1 dc, 3 tr, 1 dc *, repeat from *-* 10 more times (= 11 times in total). Then work along the first long side as follows: 1 ch (= corner), skip 2 dc, in next dc work as follows: 1 dc, 3 tr, 1 dc, * skip 3 dc, in next dc work as follows: 1 dc, 3 tr, 1 dc *, repeat from *-* 15 more times (= 16 times in total). Then work along the other short side as follows: 1 ch (= corner), * skip 3 dc, in next dc work as follows: 1 dc, 3 tr, 1 dc *, repeat from *-* 10 more times (= 11 times in total). Then work along the last long side as follows: 1 ch (= corner), skip 2 dc, in next dc work as follows: 1 dc, 3 tr, 1 dc, * skip 3 dc, in next dc work as follows: 1 dc, 3 tr, 1 dc *, repeat from *-* 15 more times (= 16 times in total). Finish with 1 sl st in first ch. ---------------------------------------------------------- NAPKIN RING: Work 47 ch on hook size 4 mm with 1 strand Bomull-Lin. ROW 1: Work in 3rd ch as follows: 1 dc, 3 tr, 1 dc, * skip 3 ch, in next ch work as follows: 1 dc, 3 tr, 1 dc *, repeat from *-* the entire row. Work 1 sl st in first ch on row 1. Then work a ch-chain of approx. 10 cm. Fasten off. In opposite side work a ch-chain of approx. 10 cm in last ch on row. Fasten off. |
|
Have you finished this pattern?Tag your pictures with #dropspattern or submit them to the #dropsfan gallery. Do you need help with this pattern?You'll find 5 tutorial videos, a Comments/Questions area and more by visiting the pattern on garnstudio.com. © 1982-2026 DROPS Design A/S. We reserve all rights. This document, including all its sub-sections, has copyrights. Read more about what you can do with our patterns at the bottom of each pattern on our site. |


With over 40 years in knitting and crochet design, DROPS Design offers one of the most extensive collections of free patterns on the internet - translated to 17 languages. As of today we count 324 catalogues and 12290 patterns translated into English (UK/cm). 12290
We work hard to bring you the best knitting and crochet have to offer, inspiration and advice as well as great quality yarns at incredible prices! Would you like to use our patterns for other than personal use? You can read what you are allowed to do in the Copyright text at the bottom of all our patterns. Happy crafting!
Post a comment to pattern DROPS Extra 0-1060
We would love to hear what you have to say about this pattern!
If you want to leave a question, please make sure you select the correct category in the form below, to speed up the answering process. Required fields are marked *.