
Popular categories
Looking for a yarn?


Comments / Questions (127)
![]() Miranda wrote:
Miranda wrote:
Tot slot vraag ik mij af of het uitmaakt of je met de klok mee haakt of tegen de klok in het armsgat rond. Volgens mij maakt het, in dit geval, niet uit zolang je maar aan de goede kant haakt, maar weet het niet zeker als beginnende haakster. Ik hoop dat mijn vragen duidelijk zijn en ik zie uit naar een antwoord, zodat ik het vest kan afmaken. Bij voorbaat hartelijk dank!
25.08.2014 - 09:52
![]() Miranda wrote:
Miranda wrote:
Mijn tweede vraag gaat over het einde en begin van de toeren. Je moet eindigen met 1hv in de 3e l. In welke 3e losse wordt bedoelt? In de 3e losse van dezelfde lus waar het laatste stokje in zit of in de 3e losse van de volgende lus? Je moet de toeren beginnen met 5 en 6 lossen. Waar is dit precies voor (het afsluiten met hv en weer beginnen met 5/6 lossen)? Ik krijg zo vrij grote gaten in mijn werk.
25.08.2014 - 09:51
![]() Miranda wrote:
Miranda wrote:
Ik ben bezig met de mouwen. Er staat bij toer 1 en 2 dat je 17x (m) moet hh, maar dan ben ik het armsgat nog niet rond. Ik heb 26 lusgaten rond het armsgat. Dus kom ik steeds op een ander beginpunt uit. Klopt dit?
25.08.2014 - 09:49DROPS Design answered:
Dit klopt niet. Als u de mouw begint en de eerste keer rond het hele armsgat haakt, zou het aantal herhalingen moeten kloppen met de beschrijving.
01.09.2014 - 17:00
![]() Åsa Andersson wrote:
Åsa Andersson wrote:
Hur ska man göra ärmhålet. hur många lm ska jag göra och hur många ska jag hoppa över
23.08.2014 - 20:02DROPS Design answered:
Når du har målet for din størrelse hækles således: Nå hekles det lm frem til midten av neste side (dvs midt mellom 1.og 2.hjørne) slik: hekle 1 lm for hver lm/st det hoppes over. Fortsæt med mønster som før!
02.09.2014 - 14:53
![]() Åsa Andersson wrote:
Åsa Andersson wrote:
Hej. Det står inte hur många lm man ska göra och hur mångs man ska hoppa över när ärmhålet ska göras..jag får inte rätt på det. ..mvh åsa
23.08.2014 - 19:56
![]() Ingrid wrote:
Ingrid wrote:
Ik snap niet wat de l betekent om de armsgaten te maken. Haal l tot de helft van het vierkant??
12.08.2014 - 20:31DROPS Design answered:
Hoi Ingrid. l = lossen. Je haakt lossen tot het begin van de toer als volgt: haak 1 losse voor elke overgeslagen losse/stokje.
13.08.2014 - 17:44
![]() Tina wrote:
Tina wrote:
Hallo :) ich komm leider überhaupt nicht mit dem armloch klar :( ich versteh nicht WIEVIEL maschen ich überspringen (dafür LM machen) muss?! bin komplett verwirrt... Da steht immer nur "M überspringen" ja aber wieviele oder wieweit steht doch nicht oder? bitte HILFE :) Danke im Voraus Lg tina
12.08.2014 - 20:10DROPS Design answered:
Doch, es steht da - Sie überspringen alle M bis zur Mitte der Seite des Vierecks, die sich zwischen der 1. und 2. Ecke befindet. D.h. Sie überspringen die Hälfte dieser M. Dann häkeln Sie bis zur Mitte der vierten Seite, d.h. bis zu der Seite des Vierecks, die sich zwischen der 3. und 4. Ecke befindet und überspringen alle M ab der Mitte bis zur 4. Ecke.
12.08.2014 - 22:01
![]() Sonja wrote:
Sonja wrote:
Ik moet met de voorpanden niet meerderen.. maar hoe doe ik dat? 1 stokje drie losse.. dan krijg je van die hokjes zeg maar.. maar dan meerder je automatisch.
11.08.2014 - 12:45DROPS Design answered:
Hoi Sonja. Nee, je moet niet meerderen. Dus je haakt de 3 stk in de hoek en de boogjes. Maar sla je in elke tweede toer het stk in de eerste boog over, dan meerder je niet, maar je hebt dan om en om 2 boogjes meer aan elke zijkant. Ik hoop dat het duidelijk is, of probeer het uit te tekenen (heb ik gedaan)
11.08.2014 - 16:12
![]() Cottet wrote:
Cottet wrote:
Bonjour, pensez vous je peux faire ce modèle avec la laine eskimo. je vous remercie. Cordialement.
07.08.2014 - 14:10DROPS Design answered:
Bonjour Mme Cottet, vous pouvez tout à fait réaliser ce modèle en Eskimo, mais il vous faudra recalculer différentes choses (quantité fil, etc..) pour adapter à votre échantillon. Bon crochet!
07.08.2014 - 15:35
![]() Lisa wrote:
Lisa wrote:
Where can I find the finished measurements for sizes. Not sure if I need a Med. Lg or XL. Not sure how this run. A video tutorial on the sleeves would be helpful as well. Thank you1
01.08.2014 - 08:30DROPS Design answered:
Dear Lisa, you will find a measurement chart at the bottom of the pattern, this gives measurements in cm taken flat from side to side. Compare these to a similar garment you like the shape to find the matching size. Your request has been forwarded, inbetween you are welcome to request help from your Drops store. Happy crocheting!
01.08.2014 - 09:08
|
||||||||||||||||||||||
Around the World#aroundtheworldcardigan |
||||||||||||||||||||||
 |
 |
|||||||||||||||||||||
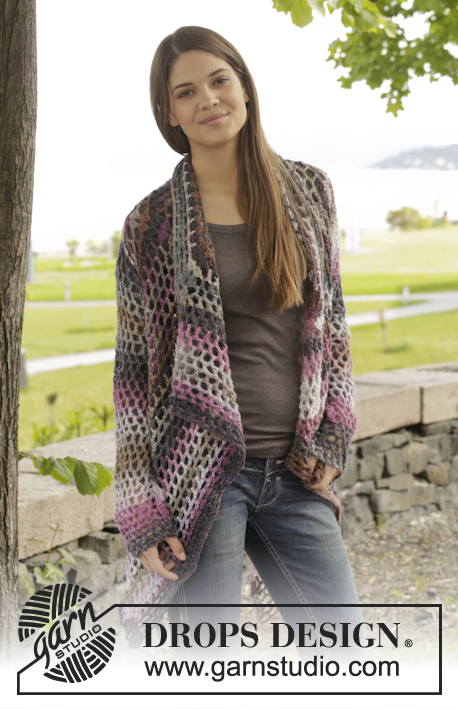
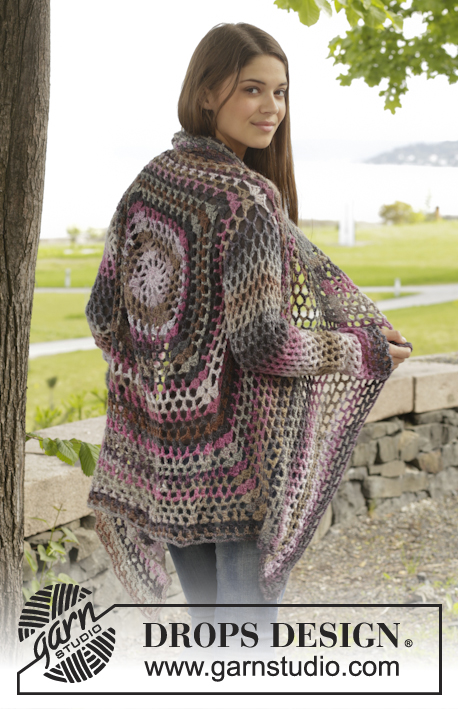
Crochet DROPS jacket with lace pattern in ”Big Delight”. Size: S - XXXL
DROPS 156-42 |
||||||||||||||||||||||
|
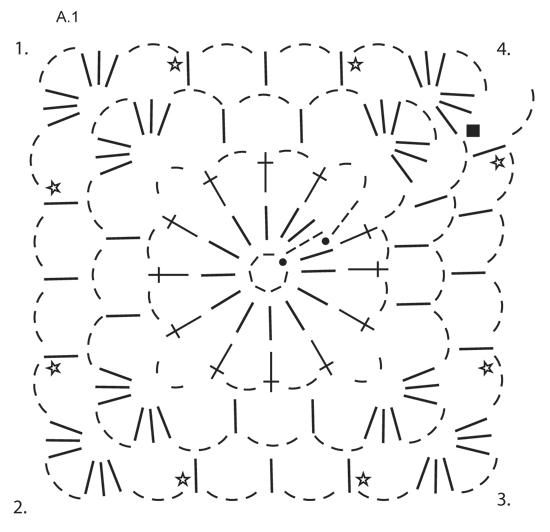
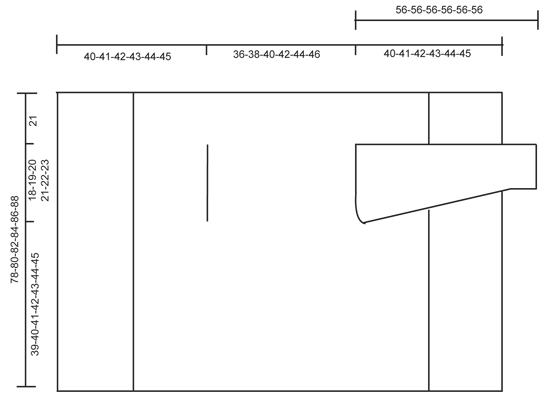
PATTERN: See diagram A.1. DECREASE TIP (applies to sleeves): Dec 1 repetition (= 1 tr + 3 ch) by not working ch, but work 2 tr into 1 tr as follows: Work 1 tr but wait with last pull through (= 2 strands on hook), then work next tr but on last pull through, pull yarn through all sts on hook. ---------------------------------------------------------- BODY: Worked in the round from mid back on the back. Work 6 ch on hook size 5 mm with Big Delight and form a ring with 1 sl st in first ch. Work according to diagram A.1, i.e. work as follows: ROUND 1: Work 3 ch, 13 tr in ch-ring, finish with 1 sl st in 3rd ch from beg of round. ROUND 2: 5 ch, skip 1 tr, 1 tr in next tr, * 2 ch, 1 tr in next tr *, repeat from *-* the entire round, finish with 2 ch = 12 tr + 2 ch. ROUND 3: Now work the circle into a square, i.e. work as follows: Work 3 tr + 3 ch + 3 tr (= corner) in first ch-space, 3 ch, 1 tr in next ch-space, 3 ch, 1 tr in next ch-space, 3 ch, * 3 tr + 3 ch + 3 tr (= corner) in next ch-space, 3 ch, 1 tr in next ch-space, 3 ch, 1 tr in next ch-space, 3 ch *, repeat from *-* 3 times in total, 1 tr in next ch-space (= last 2 ch from previous round), 3 ch. ROUND 4: Work 3 tr + 3 ch + 3 tr (= corner) in first ch-space, * 3 ch, 1 tr in next ch-space, 3 ch, 1 tr in next ch-space, 3 ch, 1 tr in next ch-space, 3 ch, 3 tr + 3 ch + 3 tr (= corner) in next ch-space *, repeat from *-* 3 times in total, 3 ch, 1 tr in next ch-space, 3 ch, 1 tr in next ch-space, 3 ch, 1 tr in next ch-space, 3 ch, 1 tr in next ch-space, 3 ch. REMEMBER THE CROCHET TENSION! Repeat 4th round with inc, i.e. work 1 tr + 3 ch more between each corner on every round (= 4 inc per round) AT THE SAME TIME on every 6th round inc 1 tr + 3 ch extra on each side of each corner – see star in diagram (= 8 extra inc per round). Continue like this until square measures 36-38-40-42-44-46 cm x 36-38-40-42-44-46 cm. Now work armhole as follows: Work as before until first corner, work 3 tr + 3 ch + 3 tr in ch-space in the corner. Now work ch until the middle of next side (i.e. in the middle between 1st and 2nd corner) as follows: Work 1 ch for every ch/tr skipped. Then work pattern as before until the middle between 3rd and 4th corner. Now work ch until beg of round as follows: Work 1 ch for every ch/tr skipped. On next round work pattern and inc as before over all sts, also in ch for armholes. Continue like this until square measures 78-80-82-84-86-88 cm x 78-80-82-84-86-88 cm (i.e. 21 cm in all sizes from armhole). Fasten off. FRONT PIECE: Now work back and forth between first and second corner. NOTE! Work front piece without inc. 1st ROW: Work from first corner as follows: 3 tr in ch-space in the corner, * 3 ch, 1 tr in ch-space *, repeat from *-* ending with 3 ch and 3 tr in the corner. 2nd ROW: Turn and work like this: 1 tr in each of the first 3 tr, * 1 tr in the ch-space, 3 ch *, repeat from *-* ending with 1 tr in the last ch-space and 1 tr in each of the 3 tr. 3rd ROW: Turn and work like this: 1 tr in each of the first 3 tr, * 3 ch, 1 tr in the ch-spance *, repeat from *-* and end with 3 ch and 1 tr in each of the last 3 tr. Continue repeating 2nd and 3rd row. Continue working like this until 19-20-21-22-23-24 cm have been worked back and forth, fasten off. Repeat on the other side, now work back and forth from third to fourth corner. Finally work a round around the entire square, work pattern as before but in ch-space in each corner work 6 tr. Fasten off. SLEEVE: Work in the round, top down from armhole, beg from mid under sleeve from RS. ROUND 1: Work 6 ch (= 1 tr + 3 ch), * 1 tr in next ch-space, 3 ch *, repeat from *-* 16-17-18-19-20-21 times in total, finish with 1 sl st in 3rd ch. ROUND 2: Work 5 ch, * 1 tr in next ch-space, 3 ch *, repeat from *-* 16-17-18-19-20-21 times in total, work 1 ch, finish with 1 sl st in 3rd ch at beg of round. Repeat 1st and 2nd ROUND - AT THE SAME TIME dec 1 tr + 3 ch at beg of 4th-6th-6th-8th-8th-6th round by working 2 tr tog – READ DECREASE TIP – mid under sleeve. Repeat dec every 6th-6th-6th-4th-4th-4th round = 12-12-13-13-14-14 tr. Repeat round without dec until sleeve measures approx. 56 cm in all sizes. Fasten off. Work another sleeve. |
||||||||||||||||||||||
Diagram explanations |
||||||||||||||||||||||
|
||||||||||||||||||||||
 |
||||||||||||||||||||||
 |
||||||||||||||||||||||
Have you finished this pattern?Tag your pictures with #dropspattern #aroundtheworldcardigan or submit them to the #dropsfan gallery. Do you need help with this pattern?You'll find 7 tutorial videos, a Comments/Questions area and more by visiting the pattern on garnstudio.com. © 1982-2026 DROPS Design A/S. We reserve all rights. This document, including all its sub-sections, has copyrights. Read more about what you can do with our patterns at the bottom of each pattern on our site. |
||||||||||||||||||||||


With over 40 years in knitting and crochet design, DROPS Design offers one of the most extensive collections of free patterns on the internet - translated to 17 languages. As of today we count 324 catalogues and 12290 patterns translated into English (UK/cm). 12290
We work hard to bring you the best knitting and crochet have to offer, inspiration and advice as well as great quality yarns at incredible prices! Would you like to use our patterns for other than personal use? You can read what you are allowed to do in the Copyright text at the bottom of all our patterns. Happy crafting!
Post a comment to pattern DROPS 156-42
We would love to hear what you have to say about this pattern!
If you want to leave a question, please make sure you select the correct category in the form below, to speed up the answering process. Required fields are marked *.