
Popular categories
Looking for a yarn?


Comments / Questions (317)
![]() Lisa Wilson wrote:
Lisa Wilson wrote:
I've measured a sweater of mine to determine the size I need in this, but I don't know which measurement to use on the pattern. Since this drapes and is without side seams. Which set of numbers best goes with a my measurement between the side seams of my sweater?
30.10.2024 - 22:26DROPS Design answered:
Dear Mrs Wilson, you can use measurements between armholes (32-36-39), total length and all other finished measurements to check/adjust the length. if you are still unsure, you can also work to the armhole and then decide which size fits the most. Happy crocheting!
31.10.2024 - 09:23
![]() Linda wrote:
Linda wrote:
Bonjour je suis en train de faire le gilet en taille L/XL. Je suis au du placement des emmanchures et je voulais combien faut il compter de brides pour 1 Motif = 6 brides ? Merci de votre réponse.
29.10.2024 - 18:36DROPS Design answered:
Bonjour Linda, je ne comprends pas bien votre question désolée; en taille L/XL pour les emmanchures vous sautez (sur l'envers) 2 groupes de brides + 2 groupes de motifs que vous remplacez par 54 ml, vous crochetez les 126 brides suivantes comme avant et sautez de nouveau 2 groupes de brides + 2 groupes de motifs pour la 2ème emmanchure que vous remplacez par 54 ml et vous terminez le tour comme avant. Au rang suivant, vous crochetez le point fantaisie de la même façon dans les chaînettes, comme si vous aviez crocheté les mailles pour toujours avoir le bon nombre de brides entre chaque groupe de motifs. Bon crochet!
30.10.2024 - 08:03
![]() Luanne C wrote:
Luanne C wrote:
Hi, I have question with the Drops design pattern # z-684. I'm on row 30 for size XXL/XXXL. The directions said to chain 58 for the arm holes on row 29. My stitches for the chain part are not fitting on the 58 chains. Was I supposed to have made 60 chains instead? Thank you in advance for any help!
20.10.2024 - 09:38DROPS Design answered:
Dear Luanne, you should have 58 stitches: 12 tr, skip 1 ch, 13 tr, skip 1 ch, 1 pattern group (in 1 stitch), skip 1 ch, 13 tr, skip 1 ch, 12 tr, skip 1 ch, 1 pattern group (in 1 stitch) and skip 1 ch. 12+1+13+1+1+1+13+1+12+1+1+1 = 58 stitches. Happy crochetting!
20.10.2024 - 22:24
![]() Cornelia wrote:
Cornelia wrote:
Hallo, Ich habe 13 Mustergruppen und komme mit den Markierer nicht symmetrisch hin….. Was mach ich falsch Liebe Grüße
10.06.2024 - 14:45DROPS Design answered:
Liebe Cornelia, was meinen Sie genau? Wenn Sie 13 Mustergruppen haben wird der Markierung am Anfang der Runden nicht genau symmetrisch sein, die Runden beginnen von einer Seite (dh jeder 2. Runde) mit 1 Mustergruppe und von der anderen Seite mit den Stäbchengruppen (jeder 2. andere Runde). Oder mißverstehe ich was Sie hier meinen?
11.06.2024 - 07:50
![]() Camilla wrote:
Camilla wrote:
För ärmhålet står det att mellan höger o vänster ärmhål ska man virka 114/126/138 st ( i resp. storlek). Jag förstår inte det antalet. Med tanke på vad som ska hoppas över för resp. ärmhål blir det ska virkas över 5 st-grupper och 5 mönster-grupper. Hur kan det bli 114/126/138 st? St-grupperna borde bli 100/110/120 st. Vad är då resterande 14/16/18 st?
20.09.2023 - 11:41DROPS Design answered:
Hej Camilla, har du også talt udtagningerne med?
18.10.2023 - 10:29
![]() Camilla Ternegren wrote:
Camilla Ternegren wrote:
Efter de första 5 varven står det att man ska kontrollera virkfastheten. Men virkfastheten finns ju angiven för när man virkar raka varv, här virkar man runt. Det jag behöver veta för att kontrollera virkfastheten år rimligen vilken diameter mitt arbete förväntas ha efter de 5 varven. Eller hur mäta annars?
11.09.2023 - 11:29DROPS Design answered:
Hei Camilla. Regner med at du heklet en prøvelapp for å sjekke din heklefasthet før du startet og at du har riktig nål for å oppnå 22 staver x 12 rader på 10 x 10 cm, og at du hekler like stramt/løst når du starter å hekle rundt og rundt. Er litt vanskelig å sjekke 22 staver i lengden (på 10 cm), men hvor mange staver har du på 5 cm (11?) og du kan fint sjekke hvor mange rader du har i høyden. Stemmer det med heklefastheten? mvh DROPS Design
18.09.2023 - 10:24
![]() Bea wrote:
Bea wrote:
Mistake in tour 26/28/30! The stitches for the first chain are ment for the second chain. The first chain is in reverse. Start with skip 1, 1 pattern group,..
26.08.2023 - 15:07
![]() Bea wrote:
Bea wrote:
Fout in toer 26/28/30! Toer 28: haak in de eerste ketting (linker armsgat), sla 1 over, 1 patroongroep, sla 1 over, 11stk, sla 1 over, 12stk, sla 1 over, 1 patroongroep, sla 1 over, 12stk, sla 1 over, 11stk. In de tweede ketting (rechter armsgat) haak je omgekeerde volgorde: 11stk, 1 overslaan, 12stk, 1 overslaan, 1 patroongroep enz. Het eind van de ketting is dan 1 patroongroep en 1 overslaan. In het patroon staat het precies verkeerd om vermeld. Na 3 keer uithalen had ik het door.
26.08.2023 - 15:01
![]() Bea wrote:
Bea wrote:
Voor degenen die ook worstelen met de positie van de armsgaten, toer 25/27/29: haak stk-gr, patroongr, stk-gr, ketting 50/54/58 losse. Sla over: 2x *patroongr, stk-gr, *. Ketting vasthaken in lus van patroon-groep, 6x * patroongr, stk-gr *, patroongr, ketting. Sla over: 2x *stk-gr, patroongr *. Ketting vasthaken in 1e stk van stk-gr. Stk-gr, patroongr, stk-gr. Einde toer.
26.08.2023 - 14:50
![]() Resi Kleinherenbrink wrote:
Resi Kleinherenbrink wrote:
Om de mouwen LXL te haken staat er, minder 1st aan elke kant vh werk afwisselend elke 3e en 2e toer. Wat betekent dit precies, 1st minderen toer 2 èn 3? Of eerst de 2de toer en dan in volgende set van 3 toeren de 3de toer?
05.05.2023 - 12:56DROPS Design answered:
Dag Resi,
Je mindert 1 steek aan elke kant van het werk en je doet dit na 3 toeren, dan na 2 toeren, dan na 3 toeren, enzovoort.
08.05.2023 - 20:52
|
|
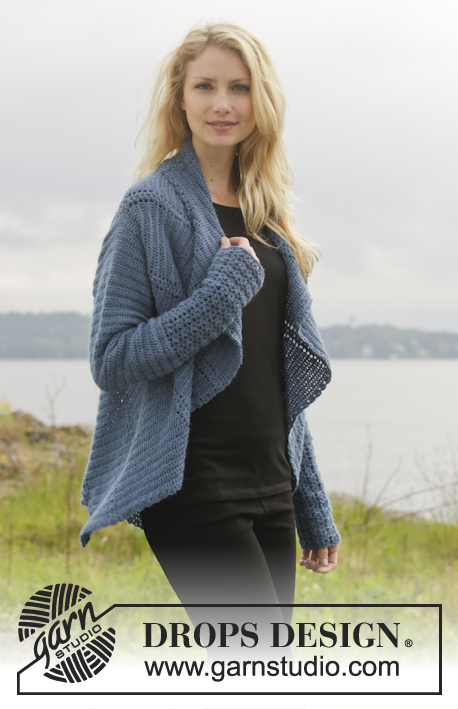
Winter Solstice#wintersolsticecardigan |
|
 |
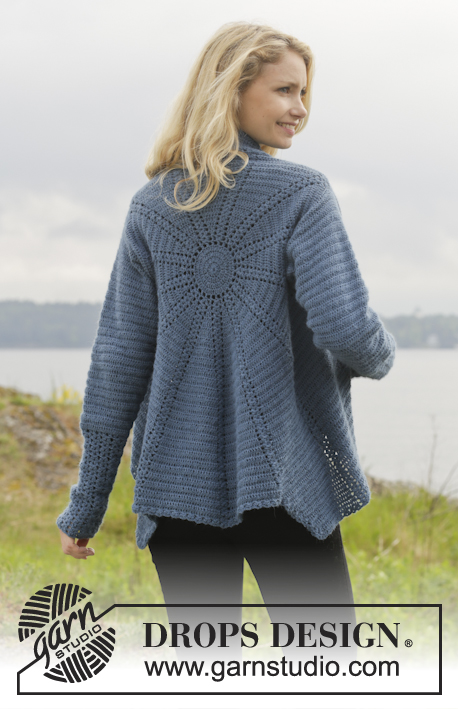 |
Crochet DROPS jacket worked in a circle in "Alpaca". Size: S - XXXL.
DROPS 158-10 |
|
|
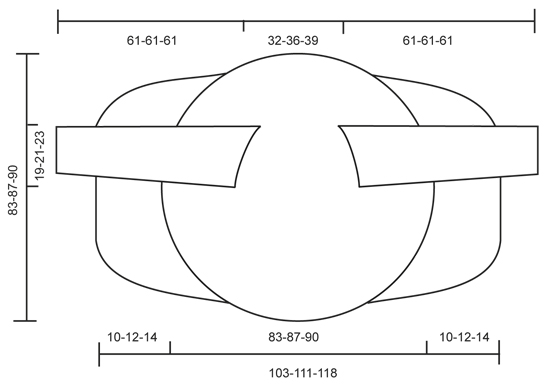
CROCHET INFO: Beg every round/row with 3 ch that replace 1st tr and finish every round/row with 1 sl st in 3rd ch from beg of round/row. PATTERN GROUP: Each pattern group consists of: 1 ch, 2 TR WORKED TOG - see explanation below, 2 ch, 2 tr worked tog and 1 ch. TR WORKED TOG: * Make 1 YO, insert hook in ch-space, get yarn, make a YO, pull through 2 of the sts on hook *, repeat from *-* one more time, make 1 YO and pull yarn through all 3 sts on hook. CROCHET 3 TR TOG: Work 3 tr into 1 tr at beg of row as follows: Work 2 ch (= replace 1 tr), work 1 tr, but wait with last pull through (= 2 strands on hook), then work next tr but on last pull through, pull yarn through all sts on hook. DECREASE TIP (applies to sleeves): Dec at beg of row by working 1 sl st over the tr to be dec. Dec at end of row by working until 1 tr to be dec remains, turn piece. -------------------------------------------------------- CIRCLE: Work 5 ch on hook size 3.5 mm with Alpaca and form a ring with 1 sl st in first ch. READ CROCHET INFO. ROUND 1: Work 13 tr in ch-ring. ROUND 2: Work * 2 tr in every tr*, repeat from *-* the entire round = 26 tr. ROUND 3: Work * 2 tr in first tr, then 1 tr in next tr *, repeat from *-* the entire round = 39 tr. ROUND 4: Work * 2 tr in first tr, then 1 tr in each of the next 2 tr *, repeat from *-* the entire round = 52 tr. ROUND 5: Work * 1 tr in next tr, then 2 ch, skip 1 tr *, repeat from *-* the entire round = 26 ch-spaces and 26 tr. REMEMBER THE CROCHET TENSION! ROUND 6: In first tr work PATTERN GROUP - see explanation above, * 1 tr in next tr, 1 pattern group in next tr *, repeat from *-* until 1 tr remains, 1 tr in last tr = 13 pattern groups with 1 tr between each. Then work piece back and forth. Work every row tog at the end of row with 1 sl st in first st on row. Turn piece. ROW 7 (= from WS): 2 tr in first tr, * 1 pattern group in next pattern group, 2 tr in next tr (= tr-group) *, repeat from *-* until 1 pattern group from previous row remains, 1 pattern group = 13 pattern groups with 13 tr-groups between each. Turn piece. ROW 8: 1 pattern groups in first pattern group, * 2 tr in first tr, 1 tr in each of the next tr in tr-group, 1 pattern group in next pattern group *, repeat from *-* until 1 tr-group remains, 2 tr in first tr, 1 tr in each of the next tr in tr-group = 13 groups with 3 tr between each. Turn piece. ROW 9: 2 tr in first tr, 1 tr in each of the next tr in tr-group, * 1 pattern group in pattern group, 2 tr in first tr of tr-group, 1 tr in each of the next tr *, repeat from *-* until 1 pattern group from previous row remains, 1 pattern group = 13 groups with 4 tr between each. Turn piece. Then repeat 8th and 9th row until 6 rounds + 18-20-22 rows have been worked (= 19-21-23 tr between every pattern group) = 247-273-299 tr and 13 pattern group. Piece measures approx. 20-22-23 cm from centre and outwards. Now work armholes as follows in the different sizes: SIZE S/M: ROW 25 (= from WS): Inc in every group with tr as before. Work 20 tr, 1 pattern group, 20 tr, work 50 loose ch (= right armhole), skip 2 tr-groups and 2 pattern groups. Then work tr-groups and pattern groups as before over the next 114 tr, work 50 loose ch (= left armhole), skip 2 tr-groups and 2 pattern groups, work as before the rest of row, finish with 1 sl st in first tr on row = 180 tr and 100 ch. Turn piece. ROW 26: Continue with pattern and inc as before but work first ch-row (= left armhole) as follows: 10 tr, skip 1 ch, 11 tr, skip 1 ch, 1 pattern group, skip 1 ch, 11 tr, skip 1 ch, 10 tr, skip 1 ch, 1 pattern group and skip 1 ch. I next ch-row (= right armhole) work the same way but in opposite order, i.e. beg by skipping 1 ch, 1 pattern group and finish with tr = 273 tr. ROW 27-50: Work pattern as before but now inc only on even numbered rows until 50 rows have been worked in total = 429 tr (33 tr in every tr-group). Piece measures approx. 42 cm from centre and outwards. SIZE L/XL: ROW 27 (= from WS): Inc in every group with tr as before. Work 22 tr, 1 pattern group, 22 tr, work 54 loose ch (= right armhole), skip 2 tr-groups and 2 pattern groups. Then work pattern as before over the next 126 tr, work 54 loose ch (= left armhole), skip 2 tr-groups and 2 pattern groups, work as before the rest of row, finish with 1 sl st in first tr on row = 198 tr and 108 ch. Turn piece. ROW 28: Continue with pattern and inc as before but work first ch-row (= left armhole) as follows: 11 tr, skip 1 ch, 12 tr, skip 1 ch, 1 pattern group, skip 1 ch, 12 tr, skip 1 ch, 11 tr, skip 1 ch, 1 pattern group and skip 1 ch. I second ch-row (= right armhole) work the same way but in opposite order, i.e. beg by skipping 1 ch, 1 pattern group and finish with tr = 299 tr. ROW 29-52: Work pattern as before but now inc only on even numbered rows until 52 rows have been worked in total = 455 tr (35 tr in every tr-group). Piece measures approx. 43 cm from centre and outwards. SIZE XXL/XXXL: ROW 29 (= from WS): Inc in every group with tr as before. Work 24 tr, 1 pattern group, 24 tr, work 58 loose ch (= right armhole), skip 2 tr-groups and 2 pattern groups. Then work pattern as before over the next 138 tr, work 58 loose ch (= left armhole), skip 2 tr-groups and 2 pattern groups, work as before the rest of row, finish with 1 sl st in first pattern group on row = 216 tr and 116 ch. Turn piece. ROW 30: Continue with pattern and inc as before but work first ch-row (= left armhole) as follows: 12 tr, skip 1 ch, 13 tr, skip 1 ch, 1 pattern group, skip 1 ch, 13 tr, skip 1 ch, 12 tr, skip 1 ch, 1 pattern group and skip 1 ch. I second ch-row (= right armhole) work the same way but in opposite order, i.e. beg by skipping 1 ch, 1 pattern group and finish with tr = 325 tr. ROW 31-54: Work pattern as before but now inc only on even numbered rows until 54 rows have been worked in total = 481 tr and 37 tr in every tr-group. Piece measures approx. 45 cm from centre and outwards. ALL SIZES: Insert 4 markers in the piece as follows from WS: Work 16-17-18 tr, insert 1st marker here, work 17-18-19 tr, * 1 pattern group, 33-35-37 tr *, repeat from *-* 3 more times, insert 2nd marker here (1st-2nd marker = right front piece). Work 1 pattern group, 33-35-37 tr, 1 pattern group, 33-35-37 tr and 1 pattern group, insert 3rd marker here. * Work 33-35-37 tr, 1 pattern group *, repeat from *-* 3 more times, 17-18-19 tr, insert 4th marker. (3rd-4th marker = left front piece). Work the rest of row. Sts between 1st and 4th marker are up towards neck. Cut the yarn and fasten. RIGHT FRONT PIECE: Now work right front piece between 1st and 2nd marker, beg from 2nd marker (i.e. from RS) = 149-158-167 tr and 4 pattern groups. Continue inc on every row in tr-groups as before BUT do not inc in tr-groups in each side of front piece - AT THE SAME TIME dec 2 tr at beg of every row by CROCHET 3 TR TOG - see explanation above. Continue to work until 12-14-16 rows have been worked over front piece. Cut the yarn and fasten. LEFT FRONT PIECE: Work left front piece between 3rd and 4th marker the same way as right front piece, beg from 4th marker (i.e. from RS). SLEEVES: Work back and forth from armhole and down, work every row tog with 1 sl st at the end of row. Use hook size 3.5 mm and Alpaca. Beg by working 86-94-102 tr around the opening for sleeve, beg of row should be under sleeve. Then work 3 rows with 1 tr in every tr. Continue with 1 tr in every tr - AT THE SAME TIME dec in the different sizes as follows: READ DECREASE TIP! SIZE S/M: Dec 1 st in each side of piece every other row 4 times and then every 3rd row 12 times (= 16 times in total) = 54 tr. SIZE L/XL: Dec 1 st in each side of piece alternately every 3rd and 2nd row 18 times in total = 58 tr. SIZE XXL/XXXL: Dec 1 st in each side of piece every other row 17 times and then every 3rd row 4 times (= 21 times in total) = 60 tr. Then work pattern groups as follows: ROW 1: 2 tr, 1 ch * work the next 2 tr tog, 1 ch *, repeat from *-* and finish with 2 tr. ROW 2: Work 2 tr, * in next ch work 1 pattern group, skip 1 ch *, repeat from *-*, and finish with 1 tr in each of the last 2 tr. Turn piece. ROW 3: Work 2 tr, 1 pattern group in each of the next pattern groups until 2 tr remain, work 1 tr in each of these. Turn piece. Repeat 3rd row until piece measures approx. 61 cm in all sizes. Cut the yarn and fasten. CROCHET EDGE: Work 1 round with around the entire jacket as follows: * 1 pattern group, skip 2 tr/1 row *, repeat from *-* the entire round. |
|
 |
|
Have you finished this pattern?Tag your pictures with #dropspattern #wintersolsticecardigan or submit them to the #dropsfan gallery. Do you need help with this pattern?You'll find 8 tutorial videos, a Comments/Questions area and more by visiting the pattern on garnstudio.com. © 1982-2026 DROPS Design A/S. We reserve all rights. This document, including all its sub-sections, has copyrights. Read more about what you can do with our patterns at the bottom of each pattern on our site. |
|


With over 40 years in knitting and crochet design, DROPS Design offers one of the most extensive collections of free patterns on the internet - translated to 17 languages. As of today we count 324 catalogues and 12290 patterns translated into English (UK/cm). 12290
We work hard to bring you the best knitting and crochet have to offer, inspiration and advice as well as great quality yarns at incredible prices! Would you like to use our patterns for other than personal use? You can read what you are allowed to do in the Copyright text at the bottom of all our patterns. Happy crafting!
Post a comment to pattern DROPS 158-10
We would love to hear what you have to say about this pattern!
If you want to leave a question, please make sure you select the correct category in the form below, to speed up the answering process. Required fields are marked *.