
Popular categories
Looking for a yarn?


Comments / Questions (84)
![]() Anita wrote:
Anita wrote:
Förstår ej hur jag läser mönstret diagrammet. Läser man från höger till vänster ..eller börjar man läsa från höger och följer mönstret uppåt? Mycket tacksam för svar. Med vänlig hälsning, Anita
08.04.2015 - 15:31DROPS Design answered:
Hej Anita, du börjar nederst till höger i diagrammet, när du är klar med första varvet fortsätter du runt på andra varvet. Lycka till!
13.05.2015 - 15:58
![]() Noomie wrote:
Noomie wrote:
Hej, jag som flera andra sitter helt förbryllad över diagramet. Jag förstår inte hur jag ska läsa/tyda den. Ni svarade att man börjar läsa den från nedre höger hörn...ok, fortsätter jag då rakt upp..eller från höger till vänster? Dessutom hur jag än försöker ( vilket jag har gjort) så ligger vissa direktiv både inom ruta 1 och 2. Jag behöver verkligen hjälp med denna. Kanske är det så att jag är för ny...men jag älskar verkligen hatten och vill hemskt gärna få den gjord. mvh Noomie
09.01.2015 - 21:43DROPS Design answered:
Hej Noomie, Jo du virkar runt enligt beskrivningen, men börjar først diagrammet när arb mäter 9 (10 cm), du börjar nederst i höger hörn och virkar runt, när du har virkat 1:a varv fortsätter du med nästa. Du ser i höger sida på diag hur du "kommer upp" till nästa varv. Fråga gärna i butiken där du har köpt garnet. Lycka till!
02.02.2015 - 15:31
![]() Dan wrote:
Dan wrote:
Bonjour je ne comprends pas comment lire le diagramme, pourriez vous me l'expliquer merci
31.08.2014 - 13:55
![]() Danielle wrote:
Danielle wrote:
Bonjour, aidez-moi, je ne comprends pas comment lire le diagramme et le travailler. merci
30.08.2014 - 06:46DROPS Design answered:
Bonjour Danielle, dans le diagramme, chaque maille est représentée par un symbole dont la légende figure au-dessus du diagramme. Crochetez A.1 sur les 3 premières m du tour, puis répétez A.2 jusqu'à ce qu'il reste 4 m avant la fin du tour et terminez par A.3. Bon crochet !
01.09.2014 - 09:08Tina wrote:
Answer to Peggy: I think the answer you got is all wrong, it should be from the middle and out to the edge. If you look at the guidelines that they gave for the crochet hook size (DROPS CROCHET HOOK size 4 mm / G/6 – or size needed to get 18 dc x 9 rows = 4'' x 4'' (10 x 10 cm)), it shows here that 9 rows should be 4''. So, YES, it should be 7-8'' across in diameter as you suggested, NOT 3.5 as the other person told you. That would just be impossible over 9 rows!
13.08.2014 - 14:08
![]() Sandra wrote:
Sandra wrote:
Hallo Drops Design, Ik vind het mutsje erg mooi daarom wil ik het ook graag maken. Ik begrijp alleen het telpatroon niet helemaal, de symbolen begrijp ik wel, maar waar moet ik beginnen bij de dubbele stokjes, rechts onder in ? Ik hoor graag van jullie, alvast bedankt. Groetjes, Sandra
03.08.2014 - 21:36DROPS Design answered:
U begint rechtsonder en haakt dan elke toer in de rondte, van rechts naar links.
03.08.2014 - 21:45
![]() Peggy wrote:
Peggy wrote:
After round 8, the measurement is to be 3-1/2". Is that from the center for a total circumference of 7"? Doesn't seem to correspond with the picture. Please help.
29.07.2014 - 06:36DROPS Design answered:
Dear Peggy, the measurement after round 8 should be 3½" accross (in diameter) with a tension of 18 dc = 4". Happy crocheting!
29.07.2014 - 10:02
![]() Camilla wrote:
Camilla wrote:
Hej förstår inte alls hur ni har byggt upp diagrammet och andra jag har frågat förstår inte heller. Skulle man kunna få diagrammet i text istället? Med vänlig hälsning, camilla
14.07.2014 - 21:10DROPS Design answered:
Hej Camilla. Vi har desværre ikke ressourcerne til at skrive mønstret ud for dig. Men du kan se her hvordan du skal læse vores diagrammer og jeg hjælper dig gerne med at forklare den del du ikke forstår. Du kan også altid kontakte vores DROPS butikker for personlig hjælp.
16.07.2014 - 17:34
![]() Jessyca wrote:
Jessyca wrote:
Grazie per la spiegazione. Non avevo proprio capito il passaggio. Ora è chiaro. Grazie mille!
03.06.2014 - 19:31
![]() Jessyca wrote:
Jessyca wrote:
Buongiorno al giro 5/8 non tornano i conti delle maglie. Ne ho 40 e ne devo aum 10 nei giri 5/8. Arrivo a 80+5 nel giro 8=85 come indicato. Allora è errata l'indicazione di lavorare 1 m.a.in più tra ogni aum x ogni giro perché andrei a tot.89. Può gentilmente confermare? Grazie
02.06.2014 - 22:52DROPS Design answered:
Buongiorno Jessyca. Si lavora una m alta in più prima di lavorare 2 m.a nella stessa m. Quindi: giro 5: * 1 m.a in ognuna delle 3 m.a successive, 2 m.a nella m.a successiva* su tutto il giro; giro 6: * 1 m.a in ognuna delle 4 m.a succ., 2 m.a nella m.a succ. *; giro 7 : * 1 m.a in ognuna delle 5 m.a succ., 2 m.a nella m.a succ.*; giro 8: 1 m.a in ognuna delle 6 m.a succ., 2 m.a nella m.a succ.* + 5 m.a aggiuntive= 85 m.a. Buon lavoro!
03.06.2014 - 15:21
|
||||||||||||||||
Glimpse of Spring#glimpseofspringhat |
||||||||||||||||
|
|
||||||||||||||||
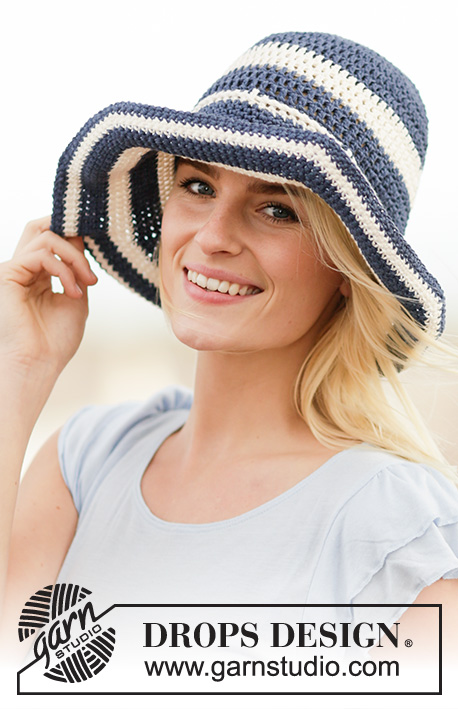
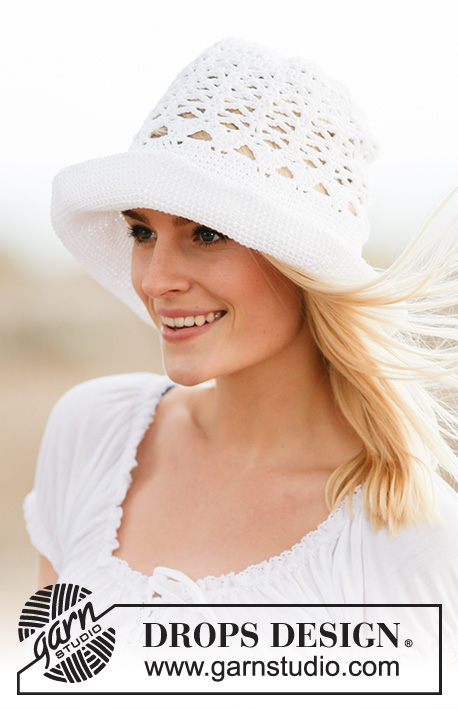
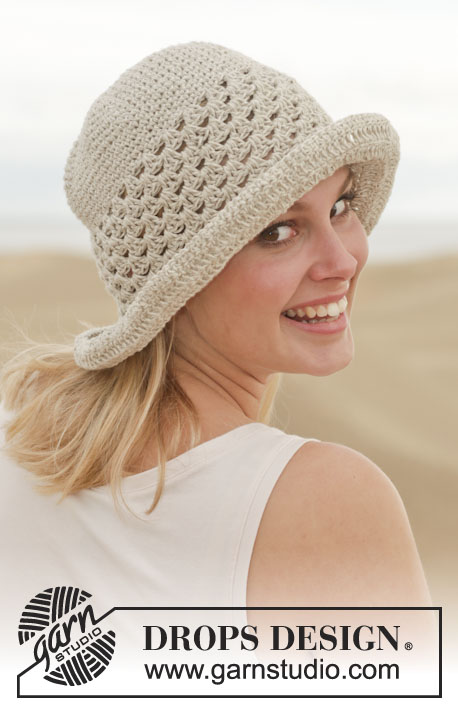
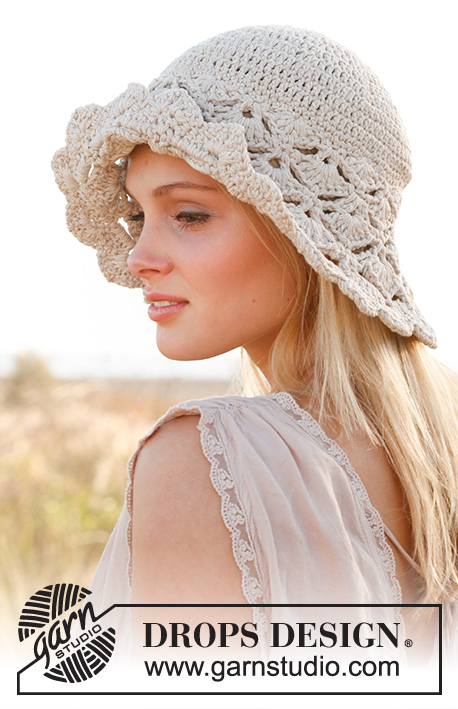
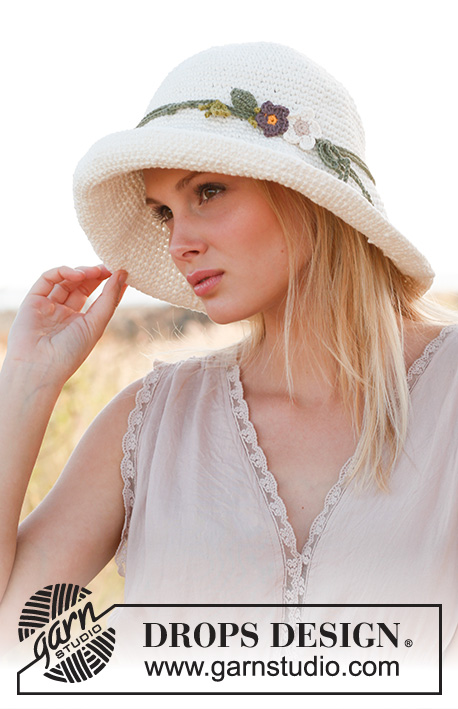
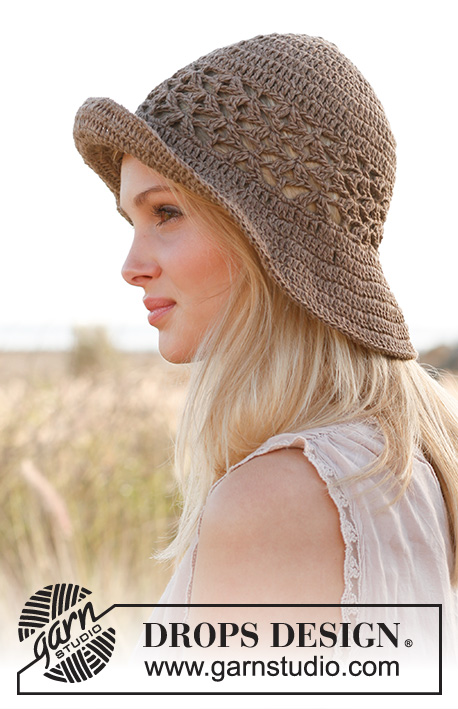
Crochet DROPS hat in "Muskat".
DROPS 153-36 |
||||||||||||||||
|
CROCHET INFO: Replace first tr at beg of a tr round with 3 ch. Finish every tr round with 1 sl st in 3rd ch from beg of round (= in first tr). Replace first dc at beg of a dc round with 1 ch. Finish every dc round with 1 sl st in ch from beg of round. INCREASE TIP: Inc 1 tr or 1 dc by working 2 tr/dc in same st. PATTERN: See diagrams A.1 to A.3. ---------------------------------------------------------- HAT: Crochet 5 ch on hook size 4 mm with 1 strand Muskat and form a ring with 1 sl st in first ch. READ CROCHET INFO! ROUND 1: Work 10 (10) tr in ch-ring. ROUND 2: Work 2 tr in every tr = 20 (20) tr. ROUND 3: * 1 tr in first tr, 2 tr in next tr *, repeat from *-* = 30 (30) tr. ROUND 4: * 1 tr in each of the first 2 tr, 2 tr in next tr *, repeat from *-* = 40 (40) tr. ROUND 5-8 (5-9): Continue inc the same way, i.e. inc 10 tr on every round, inc the same place as on previous round, i.e. 1 tr more between every inc on every round. Inc as before by working 2 tr in 1 tr, AT THE SAME TIME on round 8 (9) inc in addition 5 (1) tr evenly – READ INCREASE TIP = 85 (91) tr. Piece measures 9 (10) cm. ROUND 9-10 (10-11): Then work PATTERN as follows: Work A.1, then work A.2 13 (14) times in total, and finish with A.3. On next round work as follows: ROUND 1: Work 1 dc in first dc from previous round, skip 1 dtr, 1 dc in each of the next 2 dtr, * 1 dc in each of the next 3 dtr, skip 1 dtr, 1 dc in next dc, skip 1 dtr, 1 dc in each of the next 2 dtr*, repeat from *-* until 4 dtr remain on round, 1 dc in each of the last 4 dtr = 85 (91) dc on round. ROUND 2: Work 1 ch, * 1 dc in next dc, 1 ch, skip 1 dc *, repeat from *-* the entire round and finish with 1 sl st in 1st ch from beg of round. ROUND 3: Work 1 dc in next ch, * 1 dc in next dc, 1 dc in next ch *, repeat from *-* the entire round, at the same time inc 6 (12) dc evenly on round = 91 (103) dc. Finish with 1 sl st in 1 dc from beg of round. BRIM: Continue to crochet the brim as follows: ROUND 1: Then work PATTERN as follows: Work A.1, then work A.2 14 (16) times in total, and finish with A.3. ROUND 2-5: Continue with pattern A.1, A.2 and A.3, AT THE SAME TIME inc 1 dtr in every dtr-group (i.e. on 2nd round work 8 dtr in dtr-groups). Continue the same way and inc 1 dtr in every dtr-group on every round. When 5th round of brim has been worked, work 1 dc in every dtr from previous round. Fasten off. TWINED STRING: Cut 8 lengths of 3 metres each. Twine the strands tog until they resist, fold the string double so that it twines again. Tie a knot in one end, thread the string without knot up and down between the small holes worked on 2nd round after first section with tr-groups. Adjust the length of string to desired length and tie a knot in other end. |
||||||||||||||||
Diagram explanations |
||||||||||||||||
|
||||||||||||||||
 |
||||||||||||||||
Have you finished this pattern?Tag your pictures with #dropspattern #glimpseofspringhat or submit them to the #dropsfan gallery. Do you need help with this pattern?You'll find 11 tutorial videos, a Comments/Questions area and more by visiting the pattern on garnstudio.com. © 1982-2026 DROPS Design A/S. We reserve all rights. This document, including all its sub-sections, has copyrights. Read more about what you can do with our patterns at the bottom of each pattern on our site. |
||||||||||||||||


With over 40 years in knitting and crochet design, DROPS Design offers one of the most extensive collections of free patterns on the internet - translated to 17 languages. As of today we count 324 catalogues and 12290 patterns translated into English (UK/cm). 12290
We work hard to bring you the best knitting and crochet have to offer, inspiration and advice as well as great quality yarns at incredible prices! Would you like to use our patterns for other than personal use? You can read what you are allowed to do in the Copyright text at the bottom of all our patterns. Happy crafting!
Post a comment to pattern DROPS 153-36
We would love to hear what you have to say about this pattern!
If you want to leave a question, please make sure you select the correct category in the form below, to speed up the answering process. Required fields are marked *.