
Popular categories
Looking for a yarn?


Comments / Questions (2)
![]() Irene wrote:
Irene wrote:
Hei! Jeg visste ikke hvordan løklemasker skulle hekles og fulgte dermed instruksjonsvideoen. However, der jeg felte, begynte maskene å gå opp, og jeg så at de andre maskene heller ikke tålte mye trykk før de rakna. Fant ut at instruksjonsvideoen deres er feil, og at i stedet for å bare ta den bakerste tråden gjennom når man lager løkka, skal man ta begge (!) trådene gjennom. Om ikke vil ikke sauen holde seg sammen og alt vil rakne. Viktig at dere legger ut korrekte videoer!
18.07.2020 - 11:23
![]() Doris wrote:
Doris wrote:
Das Schaf ist ja super-knuffig, aber leider verschwinden bei mir während des Strickens immer die Schlingen, d.h. die Schlingen der Schlingenmaschen werden immer kürzer und das Gewebe lockerer (der Faden der Schlinge verschlupft also im Häkelstück). Selbst wenn ich versuche ganz fest zu häkeln tritt dieser Effekt auf.
20.04.2015 - 18:10DROPS Design answered:
Liebe Doris, schauen Sie sich doch am besten mal das Video "Häkelschlaufen" an, das Sie im Kopf neben dem Foto unter "Videos" finden. Dort ist ganz gut zu sehen, wie die Schlaufen "fixiert" werden. Ich hoffe, das hilft Ihnen weiter, damit das Schaf ein schön wolliges Fell bekommt und nicht geschoren aussieht... ;-)
23.04.2015 - 23:15
|
|
Shaun |
|
 |
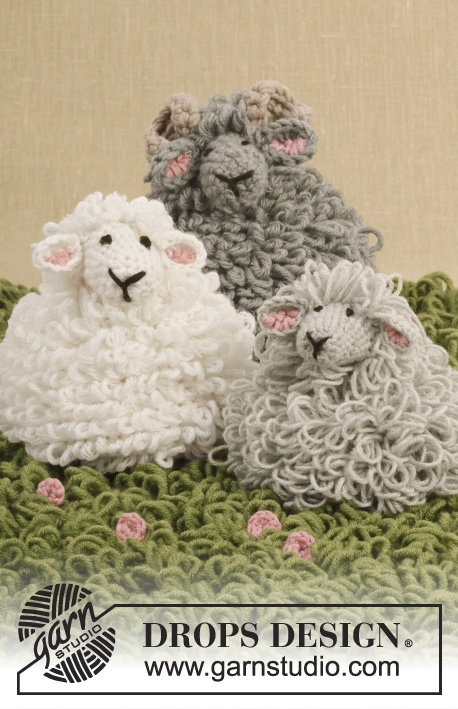 |
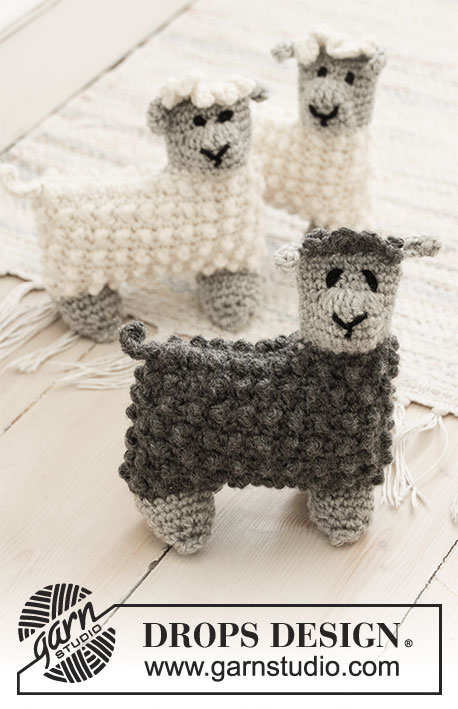
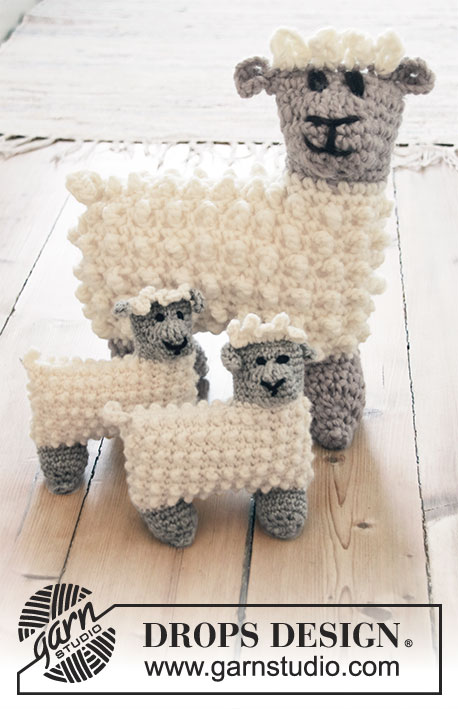
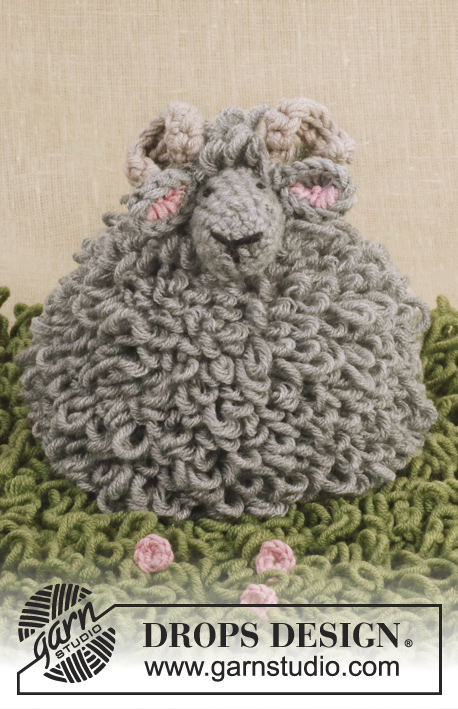
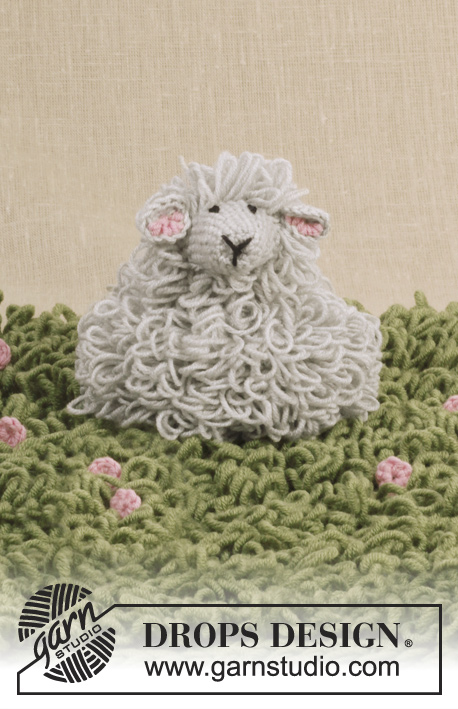
Crochet DROPS lamb with loop sts in "BabyMerino"
DROPS Extra 0-948 |
|
|
CROCHET INFO: Beg every round with 1 ch (this does not replace first st but is extra). Finish with 1 sl st in first st from beg of round. DECREASE TIP: Dec 1 dc by working 2 dc tog as follows: * Insert hook in next dc, get yarn *, repeat from *-* one more time, make 1 YO and pull yarn through all 3 sts on hook. LOOP STS: Work as follows: * Pull out some yarn with your left finger, insert hook through st, get the yarn behind the finger and pull it through the st, there are now 2 sts on hook and a loop on your finger. Pull yarn end to make loop the right size. Get yarn end and pull it through both sts on hook the regular way *, repeat from *-*. MAGIC CIRCLE: When piece is worked in the round, start with this technique to avoid holes in the middle (instead of ch-ring): Hold the yarn end and wind the yarn one time around the index finger to make a loop. Hold the loop with left thumb and middle finger, place the yarn over left index finger. Insert hook through the loop, make a YO and pull yarn through loop, work 1 ch, then work dc around the loop. When the desired no of dc have been reached, pull the yarn end to tighten the loop. ---------------------------------------------------------- LAMB: Piece is worked from bottom up, work from inside of piece so that loop sts are on the outside of piece. Work a base to be under the lamb, fasten this to the lamb when finished. BODY AND HEAD: Work 50 ch with grey Baby Merino on hook size 3 mm. Form a ring with 1 sl st into first ch. ROUND 1: READ CROCHET INFO! Work 1 dc in every ch the entire round. ROUND 2: Work LOOP STS - read explanation above, in all dc on round = 50 loop sts. ROUND 3-12: Work as 2nd round. ROUND 13: Work 1 loop st in first st, * skip 1 st, work 1 loop st in next st *, repeat from *-* the entire round = 25 loop sts. ROUND 14: Work loop sts in every loop st on round = 25 loop sts. ROUND 15: * Work 1 loop st in each of the first 3 sts, skip 1 st, work 1 loop st in each of the next 2 sts, skip 1 st *, repeat from *-* 2 more times and finish with 1 loop st in each of the last 4 sts = 19 loop sts. ROUND 16: Work loop sts in every loop st on round = 19 loop sts. Now work back and forth to make neck on lamb. ROW 17: (= inside) Work 12 loop sts from where previous round ended, turn piece. ROW 18: (= outside) Work 12 loop sts. Place loops towards you so that loops are on the outside. Or work as before and pull loops on to outside with a crochet hook afterwards. Turn piece. ROW 19: (= inside) Work 12 loop sts, turn piece. ROW 20: (= outside) Work 12 loop sts. Place loops towards you so that loops are on the outside. Or work as before and pull loops on to outside with a crochet hook afterwards. Turn piece. ROW 21: (= inside) Work 12 loop sts, turn piece. ROW 22: (= outside) Work 1 loop st in first st, * skip 1 st, work 1 loop st in next st *, repeat from *-* the entire row = 6 loop sts. Fasten off. Now work in the round to make the head on lamb. Continue to work with light grey from inside, beg on left side of neck. ROUND 23: * Work loop sts in the side of loop sts worked back and forth on neck (= 6 loop sts) *. Work 1 sl st in each of the loop sts at the front of neck (= 7 sl sts). Repeat from *-* up along the other side of neck and finish with 1 loop st in each of the 6 loop sts from 22ND ROUND = 25 sts around the head. ROUND 24: Work loop sts in all loop sts and sl sts in all sl sts the entire round. ROUND 25-26: Work loop sts in all sts on round = 25 loop sts. Now work the snout with dc as follows: ROUND 27: READ DECREASE TIP! Work 1 dc in each of the next 4 dc, dec 1 dc, work 1 dc in each of the next 7 dc, dec 1 dc, work 1 dc in each of the next 10 dc = 23 dc on round. ROUND 28-30: Work 1 dc in every dc the entire round. ROUND 31: Work 1 dc in each of the next 4 dc, dec 1 dc, work 5 dc, dec 1 dc, work 1 dc in each of the next 10 dc = 21 dc on round. ROUND 32: * Work 1 dc in each of the next 3 dc, dec 1 dc *, repeat from *-* 3 more times, work 1 in last dc = 17 dc. ROUND 33: Work 1 dc in every dc the entire round. ROUND 34: * Work 1 dc in each of the next 3 dc, dec 1 dc *, repeat from *-* 2 more times and finish with 1 dc in each of the last 2 dc = 14 dc. ROUND 35: Work dc tog 2 by 2 the entire round = 7 dc. ROUND 36: Work 1 dc in every dc the entire round. Cut the yarn, baste it around the opening and the front on snout and tighten tog. Fasten the strand and embroider eyes, nose and mouth with black. BASE: Worked in the round in a circle. Loop sts are looser than regular dc and to make the base fit, do not tighten too much when working the base. ROUND 1: Beg by making a MAGIC CIRCLE – see explanation above, with 6 dc in circle. ROUND 2: Work 2 dc in every dc the entire round = 12 dc. ROUND 3: * Work 1 dc in next dc, 2 dc in next dc *, repeat from *-* the entire round = 18 dc. ROUND 4: * Work 1 dc in each of the next 2 dc, then 2 dc in next dc *, repeat from *-* the entire round = 24 dc. ROUND 5: * Work 1 dc in each of the next 3 dc, then 2 dc in next dc *, repeat from *-* the entire round = 30 dc. ROUND 6: * Work 1 dc in each of the next 4 dc, then 2 dc in next dc *, repeat from *-* the entire round = 36 dc. ROUND 7: * Work 1 dc in each of the next 5 dc, then 2 dc in next dc *, repeat from *-* the entire round = 42 dc. ROUND 8: * Work 1 dc in each of the next 6 dc, then 2 dc in next dc *, repeat from *-* the entire round = 48 dc. ROUND 9: Work 1 dc in every dc while AT THE SAME TIME inc 2 sts on round = 50 dc. Fill the lamb with some cotton wool. Place the base under the lamb. Work parts tog with sl sts through dc from the base and ch on underside of lamb. Fasten off. If the base is too small, you can continue to inc evenly the same way as before after 8TH ROUND, but then you must sew the base on the underside. EAR: Work 4 ch on hook size 3 mm with light grey and form a ring with 1 sl st in first ch. Work 3 ch and 13 tr in ch-ring, finish with 1 sl st in 3rd ch from beg of round. Embroider small sts inside the ear with pink. Fasten strands and fasten ear on the side of head. Work another ear the same way. LAWN: Work 66 ch on hook size 5 mm double strand olive Big Merino, turn piece. Work 1 dc in every ch the entire row. READ LOOP STS! Then work loop sts back and forth. NOTE! Make sure to place the loops towards the same side the entire way. Or work as before and pull loops on to one side with a crochet hook afterwards. Work until piece measures approx. 35 cm or desired measurements. Fasten off. |
|
Have you finished this pattern?Tag your pictures with #dropspattern or submit them to the #dropsfan gallery. Do you need help with this pattern?You'll find 7 tutorial videos, a Comments/Questions area and more by visiting the pattern on garnstudio.com. © 1982-2026 DROPS Design A/S. We reserve all rights. This document, including all its sub-sections, has copyrights. Read more about what you can do with our patterns at the bottom of each pattern on our site. |
|


With over 40 years in knitting and crochet design, DROPS Design offers one of the most extensive collections of free patterns on the internet - translated to 17 languages. As of today we count 324 catalogues and 12290 patterns translated into English (UK/cm). 12290
We work hard to bring you the best knitting and crochet have to offer, inspiration and advice as well as great quality yarns at incredible prices! Would you like to use our patterns for other than personal use? You can read what you are allowed to do in the Copyright text at the bottom of all our patterns. Happy crafting!
Post a comment to pattern DROPS Extra 0-948
We would love to hear what you have to say about this pattern!
If you want to leave a question, please make sure you select the correct category in the form below, to speed up the answering process. Required fields are marked *.