
Popular categories
Looking for a yarn?


Comments / Questions (103)
![]() Inger Olsson Sikora wrote:
Inger Olsson Sikora wrote:
Just FYI. I started the hat using instructions for the smaller size of DROPS 151-24. Having knitted Patent strikning before, I realized on row 2 that the stitch number given is incorrect. It needs to be an uneven number for the instructions to work. I fixed it by just knitting the first 2 stitches together. I have used several of your patterns over the last several years and have always been very happy with them. They are beautiful and very well written.
05.08.2017 - 21:39DROPS Design answered:
Dear Mrs Olsson Sikora, number of sts is correct, just work on row 2: 1 edge st in garter st, then repeat from *-* until 2 sts remain, finish with K tog YO ans slipped st, and 1 edge st in garter st = uneven number of sts. Happy knitting!
07.08.2017 - 11:58
![]() Claudia Carolina wrote:
Claudia Carolina wrote:
Spett.le Drops, grazie per i modelli fantastici. Desidero lavorare il collo con questo modello ma con Karisma (gruppo B) Per la taglia L/XL quante maglie dovrei avviare al posto delle 99 del Big Delight del gruppo C? Grazie mille. Claudia
23.04.2017 - 11:58DROPS Design answered:
Buongiorno Claudia Carolina. Deve preparare un campione a coste inglesi con il filato Karisma e contare quante maglie le servono per avere 10 cm in larghezza. Riproporziona poi il numero delle maglie indicate in base a questo numero. Per ogni aiuto personalizzato, può rivolgersi al suo rivenditore Drops di fiducia. Buon lavoro!
23.04.2017 - 15:11
![]() Simona wrote:
Simona wrote:
Mi sembra che la spiegazione del motivo a coste contenta un errore. Il 5 ferro si lavora no due maglie insieme a diritto e non a rovescio. Siete d'accordo?
25.02.2017 - 20:11DROPS Design answered:
Buonasera Simona. Abbiamo corretto il testo: le maglie si lavorano insieme a diritto. La ringraziamo per la segnalazione. Buon lavoro!
25.02.2017 - 21:43
![]() Maren wrote:
Maren wrote:
LUE: Er det et visst antall masker man på legge opp, altså partall/oddetall e.l. for at det skal stemme? Synes dessuten at det ser ut som den grå kanten blir mye bredere enn på bildet..? Og har jeg forstått det riktig at 1 m rille = 1 rett maske?
20.10.2016 - 23:23DROPS Design answered:
Hei Maren. Umiddelbart saa ville jeg sige at antallet skal vaere deleligt med 3 for at gaa op i patenten. Du kan hurtigt regne efter ved at gennemgaa p 1 og 2 og se om de stemmer. Ja, 1 m rille er ret paa alle p
27.10.2016 - 16:00
![]() Mimi Routh wrote:
Mimi Routh wrote:
My completed hat and neck warmer weigh 116 gr! I bought 100 gr of each color for each item! I have enough yarn for two sets plus -- almost three sets! PLEASE INDICATE ON THE PATTERN THAT 100 GR OF EACH COLOR WILL BE SUFFICIENT FOR THE SET! [With enough left over for a striped hat! Thanks for an interesting and fun design!
07.04.2016 - 22:02
![]() Eva wrote:
Eva wrote:
Hej! Tack för videon om hur man stickar denna modell utan söm. För mig som är ovan: ska man då utesluta de två kantmaskorna och alltså lägga upp 91 m för halsvärmare i S/M?
28.02.2016 - 12:22DROPS Design answered:
Hej Eva, ja om du väljer att sticka runt tar du bort de två kantmaskorna. Gör gärna ett litet prov först så du ser hur det blir. Lycka till!
29.02.2016 - 12:09
![]() Anne Mari Ness wrote:
Anne Mari Ness wrote:
Stemmer oppskriften? Blir veldig liten med 51 m..........?
10.02.2016 - 19:53DROPS Design answered:
Hej Anne Mari. Jo, oppskriften skulle vaere i orden. Kontroleer evt at din strikkefasthed er i orden.
11.02.2016 - 10:17Shari wrote:
Im trying to understand why you cast on 72 stitches for the hat brim, but then immediately decrease the stitches? 49 stitches is surely too small when using a medium weight yarn?
28.12.2015 - 21:44DROPS Design answered:
Dear Shari, you first cast on more st to avoid a tight edge, and dec on first round to get correct number of sts. Pattern is quite loose and fit then perfectly head - make sure to check your tension! Happy knitting!
02.01.2016 - 15:06
![]() Claudia wrote:
Claudia wrote:
Im Patentmuster 2. und 4. Reihe wird nicht beschrieben bis zu welcher Masche (*) diese zu wiederholen sind. Ich habe leider noch kein Patentmuster gestrickt. Diese Mütze gefällt mir aber ausnehmend gut. Ich bitte deshalb um baldige Antwort. Vielen Dank!
04.12.2015 - 14:29DROPS Design answered:
Sie haben Recht, das "Endsternchen" fehlt, das wird gleich ergänzt, dann wissen Sie, wie Sie das Muster stricken müssen.
08.12.2015 - 22:31
![]() Marta wrote:
Marta wrote:
Dzień dobry! Jak zmodyfikować projekt komina aby uzyskać tę samą kolejność kolorów, co na czapce - żeby pionowe kolumny wychodziły szare, a nie różowe? Oczywiście zachowując szarą krawędź, czyli rozpoczynając od nabrania oczek kolorem szarym. Nie wystarczy zamienić kolorów, trzeba coś pokombinować na początku robótki - tylko co? :)
06.11.2015 - 16:23DROPS Design answered:
Witam. Komin robimy dokładnie jak w opisie. Na zdjęciu jest założony po prostu na odwrót (albo takie było zamierzenie projektanta). Po odwróceniu go na drugą stronę, będzie wyglądał dokładnie tak samo jak czapka. Gratuluję wyboru wzoru - zawsze robi wrażenie! POWODZENIA
06.11.2015 - 18:00
|
|
Phoenix#phoenixset |
|
|
|
|
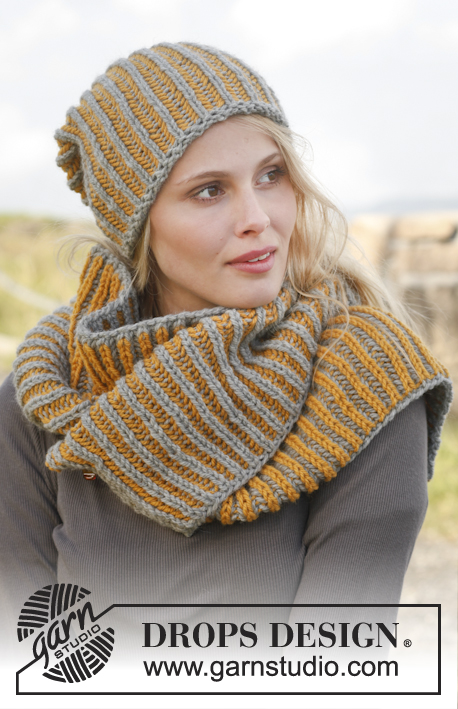
Knitted DROPS hat and neck warmer with English rib in two colours in ”Big Delight”.
DROPS 151-24 |
|
|
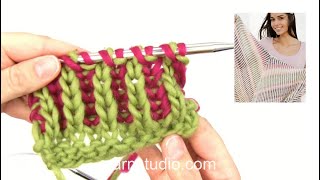
GARTER ST (back and forth on needle): K all rows. 1 ridge = 2 rows K. ENGLISH RIB IN TWO COLOURS: ROW 1 (= WS): Worked with colour 13 grey 1 st in garter st, * 1 YO, slip 1 st as if to P, K 1 *, repeat from *-* until 2 sts remain, 1 YO, slip 1 st as if to P, 1 st in garter st. Turn piece. ROW 2 (= RS): Worked with colour 13 grey 1 st in garter st, * K tog YO and slipped st, 1 YO, slip 1 st as if to P *, repeat from *-* until 1 yo and 2 sts remain, K tog YO and slipped st, 1 st in garter st. Move sts back on circular needle to work from same side one more time and switch colour (read KNITTING TIP 1 and 2). ROW 3 (= RS): Worked with colour 01 rose garden 1 st in garter st, * 1 YO, slip 1 st as if to P, P tog YO and slipped st *, repeat from *-* until 2 sts remain, 1 YO, slip 1 st as if to P, 1 st in garter st. Turn piece. ROW 4 (= WS): Worked with colour 13 grey 1 st in garter st, * P tog YO and slipped st, 1 YO, slip 1 st as if to P *, repeat from *-* until 1 yo and 2 sts remain, P tog YO and slipped st, 1 st in garter st. Move sts back on circular needle to work from same side one more time and switch colour. ROW 5 (= WS): Worked with colour 01 rose garden 1 st in garter st, * 1 YO, slip 1 st as if to P, K tog YO and slipped st *, repeat from *-* until 2 sts remain, finish with 1 YO, slip 1 st as if to P, 1 st in garter st. Turn piece. Repeat rows 2- 5. KNITTING TIP 1: To make an English rib in stripes work back and forth on a circular needle as follows: Work 1st and 2nd row as explained above. Move all sts on circular needle to the other end of circular needle so that next row can be worked with a new colour from same side as 2nd row. Then turn piece and work the next 2 rows from the other side the same way as 2nd and 3rd row. That means that 1 row is worked with every colour from same side before turning the piece. KNITTING TIP 2: If you are in doubt, see what colour the previous row was worked with on the colour of edge st. ---------------------------------------------------------- HAT: Cast on 72-81 sts on circular needle size 5 mm with grey and work back and forth on needle. K 1 row. Work next row as follows from RS: 1 edge st in GARTER ST - see explanation above -, * P 1, P 2 tog *, repeat from *-* until 2 sts remain, finish with P 1 and 1 edge st in GARTER ST = 49-55 sts. Then work ENGLISH RIB IN TWO COLOURS - see explanation above. REMEMBER THE KNITTING TENSION! When piece measures 23-24 cm – adjust to finish after 5th row and work next row in grey as follows: 1 st in garter st, * K tog YO and slipped st, P 1 *, repeat from *-* until 3 sts remain, K tog YO and slipped st and 1 st in garter st. Turn and continue with rib K 1/P 1 with 1 edge st in garter st in each side with grey until rib measures approx. 3 cm. K 1 row from RS while AT THE SAME TIME working all sts tog 2 by 2. Piece measures approx. 27-28 cm. Tighten tog the last sts at the top and sew hat tog mid back, garter st against garter st. ---------------------------------------------------------- NECK WARMER: The piece is worked top down. Cast on 93-99 sts on circular needle size 5 mm with grey and work back and forth on circular needle. K 1 row. Work next row as follows from RS: 1 edge st in GARTER ST - see explanation above -, * P 1, P 2 tog *, repeat from *-* until 2 sts remain, finish with P 1 and 1 edge st in GARTER ST = 63-67 sts. Then work ENGLISH RIB IN TWO COLOURS - see explanation above. REMEMBER THE KNITTING TENSION! When piece measures approx. 12-14 cm - adjust to finish after 2nd row. Cut the yarn, do not turn piece, move sts to the other end of circular needle and work next row from RS as follows with rose garden: 1 edge st in garter st, * K 1, K YO twisted and P slipped st *, repeat from * - * until 2 sts remain, K 1 and finish with 1 edge st in garter st. Then work K over K and P over P until piece measures approx. 14-16 cm. When piece is done, RS becomes WS, so the pink sts (V's) that have been worked in English rib will be on the RS of piece. Loosely cast off. Cut the yarn and sew neck warmer tog with small stitches, sew in front loop of outermost st and fasten the yarn. |
|
Have you finished this pattern?Tag your pictures with #dropspattern #phoenixset or submit them to the #dropsfan gallery. Do you need help with this pattern?You'll find 16 tutorial videos, a Comments/Questions area and more by visiting the pattern on garnstudio.com. © 1982-2026 DROPS Design A/S. We reserve all rights. This document, including all its sub-sections, has copyrights. Read more about what you can do with our patterns at the bottom of each pattern on our site. |


With over 40 years in knitting and crochet design, DROPS Design offers one of the most extensive collections of free patterns on the internet - translated to 17 languages. As of today we count 324 catalogues and 12290 patterns translated into English (UK/cm). 12290
We work hard to bring you the best knitting and crochet have to offer, inspiration and advice as well as great quality yarns at incredible prices! Would you like to use our patterns for other than personal use? You can read what you are allowed to do in the Copyright text at the bottom of all our patterns. Happy crafting!
Post a comment to pattern DROPS 151-24
We would love to hear what you have to say about this pattern!
If you want to leave a question, please make sure you select the correct category in the form below, to speed up the answering process. Required fields are marked *.