
Popular categories
Looking for a yarn?


Comments / Questions (37)
![]() Kathy wrote:
Kathy wrote:
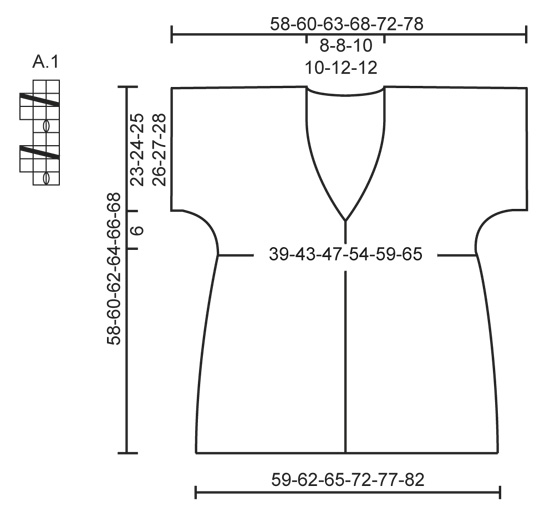
I am at the Increase and Decrease in textured pattern after 34cm section of the back and at a loss as to how to proceed. I cannot understand exactly where to place marker A and B and to me it seems that if I was to decrease 15 stitches each side, I would love 2 full textured patterns. However this does not coincide with the photo of the back. Could you please help me out here.
22.10.2024 - 02:43DROPS Design answered:
Dear Kathy, the marker A was previously after the 2nd repeat of A.1 in the 3 first sizes or the 3rd repeat of A.1 in the 3 larger sizes + P3, K1 and the marker B was previously before K1, P3 before the 2nd - 3rd repeat of A.1 from the end of the row - you should now place the marker A before the first P3 before first A.1 and the marker B after the last P3 after the last A.1 at the end of the row. So you will now increase the number of stotcking stitch on either side of the pattern (of all repeats of A.1), and at the same time increase in the P-sections between each A.1 (= 6 or 8 sts increased in total). Happy knitting!
22.10.2024 - 09:52
![]() Lori wrote:
Lori wrote:
Right front for size XL states to cast on 92. But when I stitch the first garter stitch row, I have 6 stitches left over. When I add up the stitches of the row, they don't add up to 92. K1 P3 K2 =5 P3 K1 x 6 =24 P3 K2 P3 K2 P3 K2 P3 K2 P3 = 23 K1 P3 x 8 = 32 K1 Total stitches 85, not 92.
22.01.2022 - 17:34DROPS Design answered:
Dear Lori, For size XL we have: 5 stitches in garter stitch + K1, P3, K2 (= 6 stitches) + (P3,K1) 6 times (= 24 stitches) + P3,K2, P3, K2, P3, K2, P3, K2, P3 (= 23 stitches) + (K1, P3) 8 times (= 32 stitches) + K1 + K1 (edge stitch). In total, that's 5+6+24+23+32+2 = 92 stitches. Happy knitting!
23.01.2022 - 20:34
![]() Stephanie wrote:
Stephanie wrote:
Hei, hva betyr neste P strikkes fra " retten" ?
09.03.2018 - 21:10
![]() Natalia G. wrote:
Natalia G. wrote:
Bonjour! Il y a déjà un bon moment que je fais et défais le devant. Je n'arrive pas à comprendre comment tricoter l'encolure et surtout quand est ce qu'on arrête le raccourcis. Serait il possible de préciser combien de fois il faut répéter le raccourcis? L'explication donnée ne m'aide pas du tout. Merci par avance
28.06.2017 - 07:49DROPS Design answered:
Bonjour Natalia, les rangs raccourcis du col se répètent jusqu'à ce que le col mesure 6-7-8 cm (cf taille) côté épaule (= côté le plus court) et environ 12-14-16 cm côté le plus large (= sur l'extérieur de la veste). Cette vidéo montre comment tricoter un col châle sans rangs raccourcis, on va procéder ici de la même façon mais en tricotant plus de rangs sur une partie des mailles pour un joli retombé du col. Bon tricot!
28.06.2017 - 08:22
![]() Ornella wrote:
Ornella wrote:
Ho realizzato il modello con Baby Merino colore Erica ed applicato bottoni rosa. Chiare le istruzioni vi faccio i complimenti e mi faccio i complimenti.
14.03.2015 - 20:55
![]() Vivi Møller Gjanderup wrote:
Vivi Møller Gjanderup wrote:
Jeg er i gang med denne top i str XXL og har fundet en lille fejl i en ellers imponerende udregnet opskrift. Det er i beskrivelsen af HØJRE FORSTYKKE under UDTAGNING OG INDTAGNING I STRUKTURMØNSTERET. I 2. afsnit står der: ''Videre tages der 1 m ud i hver af de 2 vrang-partier efter mærke A – læs UDTAGNINGSTIPS (= 2-2-2-3-3-3 m taget ud)....'' På størrelserne XL, XXL og XXXL skal der altså tages ud i 3 vrangpartier! Håber, det kan bruges. Og tak for vidunderlige opskrifter.
21.10.2014 - 09:40
![]() Margareta Wiklund wrote:
Margareta Wiklund wrote:
Skall det vara 6 st A1 mönster på stl xl-xxxl på bakstycket ? 3 st på var sida om mittpartiet. och på framst. enl. mönstret blir det 1 st A1 mitt fram och 2 st A1 vid sidan.? Tack på förhand Margareta
12.10.2014 - 23:37DROPS Design answered:
Det står såhär: STL XL + XXL + XXXL: 1 rätst kantm, 32-40-44 m slätst, 3 am, 2 rm, 3 am, A.1 (= 2 m), 3 am, 2 rm, 3 am, A.1 (= 2 m), 3 am, 1 rm, 3 am, A.1 (= 2 m), 3 am, 1 rm, sätt 1 markör (= A), * 3 am, 1 rm *, upprepa *-* totalt 9 ggr, 3 am, sätt 1 markör (= B), 1 rm, 3 am, A.1 (= 2 m), 3 am, 1 rm, 3 am, A.1 (= 2 m), 3 am, 2 rm, 3 am, A.1 (= 2 m), 3 am, 2 rm, 3 am, 32-40-44 m slätst och 1 rätst kantm. Om du följer beskrivningen får du 3 x A.1 på var sida om mittpartiet. Lycka till!
23.10.2014 - 10:32
![]() Julia wrote:
Julia wrote:
Sehr schöne anleitung. Wolle ist bestellt. Ich mag nur nicht so gerne nähen. Kann ich die arbeit auch in einem teil stricken. Also die maschen für die vorderteile mit aufnehmen.
15.05.2014 - 12:46DROPS Design answered:
Liebe Julia, ja, theoretisch ist es möglich, bis zu den Armausschnitten alles in einem Stück zu stricken, Sie lassen dann die beiden Rand-M am Rückenteil weg und jeweils die eine Rand-M an der Seite des Vorderteils. Es dürfte allerdings recht kompliziert zu koordinieren sein, am besten drucken Sie sich die Anleitung aus und markieren sich genau die Stellen, die Sie dann am Rückenteil und den Vorderteilen gleichzeitig stricken müssen.
15.05.2014 - 16:54
![]() Linda Van Verdegem wrote:
Linda Van Verdegem wrote:
Ik heb net het rugpand opgezet en ik wou het telpatroon breien maar volgens mijn berekening klopt dit niet. Ik kom aan een totaal van 123 steken en het zijn er 159 zonder de kantsteek. Is een verschil van 36 steken die ik niet weet hoe ze moeten gebreid worden.
18.03.2014 - 13:46DROPS Design answered:
Hoi Linda. Het aantal st is incl. de kantsteken (159 st voor maat L). Voor maat L wordt het dan: 1 kantst, 36 st tricotst, 3 av, 2 r, 3 av, A.1 (= 2 st), 3 av, 1 r, 3 av, A.1 (= 2 st), 3 av, 1 r, plaats 1 markeerder (= A), * 3 st av, 1 st r *, herhaal van *-* 9 keer in totaal, 3 av, plaats 1 markeerder (= B), 1 r, 3 av, A.1 (= 2 st), 3 av, 1 r, 3 av, A.1 (= 2 st), 3 av, 2 r, 3 av, 36 tricotst en 1 ribbelst. Volgens mijn berekening kom ik dan wel uit op 159 st.
18.03.2014 - 15:58
![]() Dominique METRAL wrote:
Dominique METRAL wrote:
J'ai un problème avec le modèle 149-20 entre les augmentations et les diminutions pour la taille S au lieu d'arriver à 158 M j'arrive à 161 je ne comprends pas la NOTE au dessous des explications des dim. 1 des côtes au milieu dos; merci d'avance si vous pouvez me renseigner
23.12.2013 - 17:19DROPS Design answered:
Bonjour Mme Metral, en taille S, vous allez (dans l'ordre des explications):1)diminuer 2x 18m (=36 dim) + 2)diminuer 4x2 m (=8 dim) + 3)monter/augm pour les manches 28 m x 2 manches= 56 m + 4) dim. 2x 15 m (30 dim) et 5) augm. 6x 6 m (=36 augm). On a donc : 143 m - 36 - 8 + 56 - 30 + 36 = 161 m. La "Note" indique comment faire les dernières dim de cette section. Bon tricot!
27.12.2013 - 14:39
|
||||||||||
Morning Fog#morningfogcardigan |
||||||||||
 |
 |
|||||||||
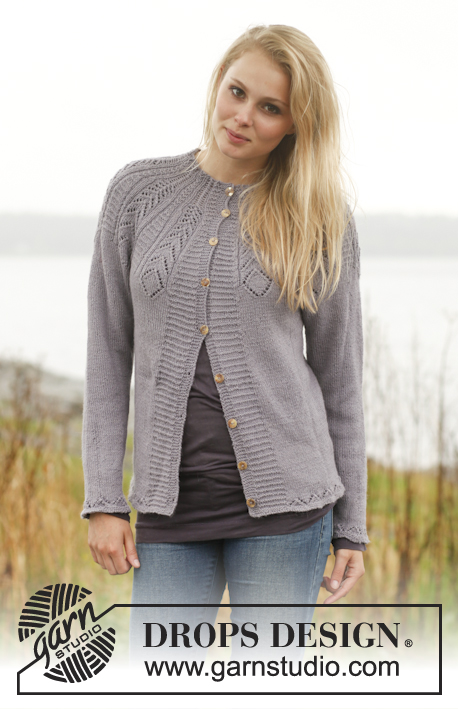
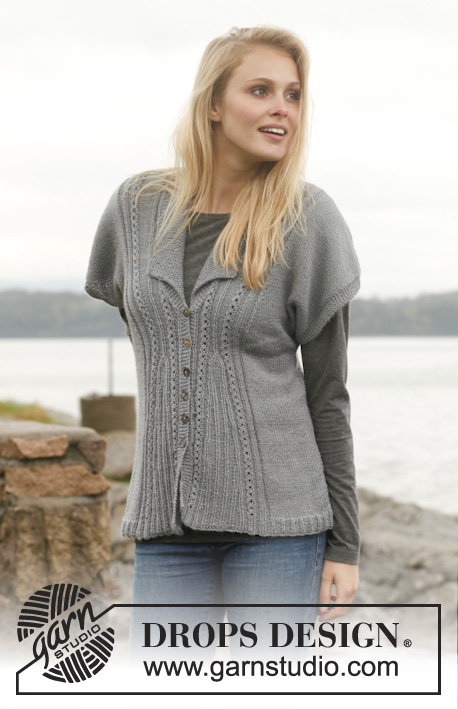
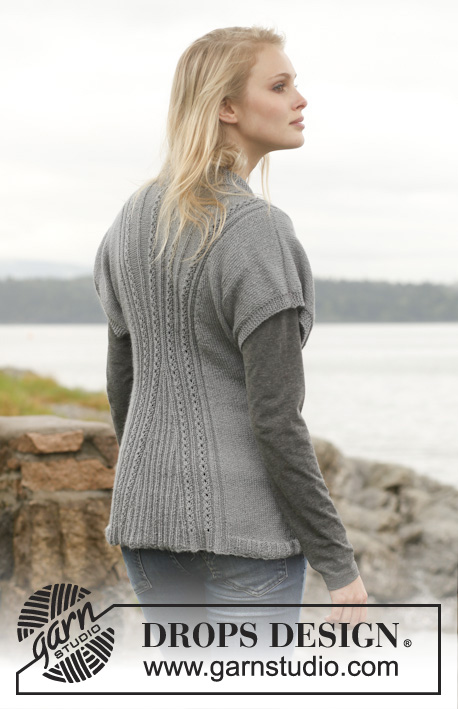
Knitted DROPS jacket with textured pattern, collar and short sleeves in ”BabyAlpaca Silk”. Size: S - XXXL.
DROPS 149-20 |
||||||||||
|
GARTER ST (back and forth on circular needle): K all rows. 1 ridge = 2 rows K. PATTERN: See diagram A.1. Diagram shows all rows in pattern from RS. DECREASE TIP 1 (applies to rib-section mid back and on each front piece): All dec are done from RS! Dec as follows after marker A: P 2 twisted tog. Dec as follows before marker B: P 2 tog. DECREASE TIP 2 (applies to dec in the sides on front and back piece): All dec are done from RS! Dec as follows after 1 edge st in the side: Slip 1 st as if to K, K 1, psso. Dec as follows before 1 edge st in the side: K 2 tog. DECREASE TIP 3 (applies to dec on outside of textured pattern front and back): All dec are done from RS! Dec as follows before marker A: K 2 tog. Dec as follows after marker B: Slip 1 st as if to K, K 1, psso. DECREASE TIP 4 (applies to neck dec at the front): Dec for neck inside 25-25-27-27-29-29 sts in garter st. All dec are done from RS. Dec as follows after sts in garter st: Slip 1 st as if to K, K 1, psso. Dec as follows before sts in garter st: K 2 tog. INCREASE TIP: Inc 1 st by making 1 YO, on next row work YO twisted to avoid holes. BUTTONHOLES: Cast off for buttonholes on right band. 1 buttonhole = cast off third and fourth st from mid front and cast on 2 new sts on next row over these sts. Cast off for buttonholes when piece measures: SIZE S: 8, 13, 18, 23, 28 and 33 cm. SIZE M: 9, 14, 19, 24, 29 and 34 cm. SIZE L: 10, 15, 20, 25, 30 and 35 cm. SIZE XL: 11, 16, 21, 26, 31 and 36 cm. SIZE XXL: 12, 17, 22, 27, 32 and 37 cm. SIZE XXXL: 13, 18, 23, 28, 33 and 38 cm. ---------------------------------------------------------- BACK PIECE: Worked back and forth on circular needle. READ ALL OF THE FOLLOWING SECTION BEFORE CONTINUING! Cast on 143-151-159-171-187-195 sts (incl 1 edge st in each side) on circular needle size 3 mm with BabyAlpaca Silk. P 1 row from WS. Work next row as follows from RS: Size S + M + L: 1 edge st in GARTER ST – see explanation above, * P 3, K 1 *, repeat from *-* 7-8-9 times in total, P 3, K 2, P 3, K 2, P 3, K 1, P 3, K 2, P 3, K 1, * P 3, K 1 *, repeat from *-* 9-9-9 times in total, P 3, K 1, P 3, K 2, P 3, K 1, P 3, K 2, P 3, K 2, P 3, * K 1, P 3 *, repeat from *-* 7-8-9 times in total and finish with 1 edge st in garter st. Continue rib like this with K over K and P over P. Size XL + XXL + XXXL: 1 edge st in GARTER ST – see explanation above, * P 3, K 1 *, repeat from *-* 8-10-11 times in total, P 3, K 2, P 3, K 2, P 3, K 2, P 3, K 2, P 3, K 1, P 3, K 2, P 3, K 1, * P 3, K 1 *, repeat from *-* 9-9-9 times in total, P 3, K 1, P 3, K 2, P 3, K 1, P 3, K 2, P 3, K 2, P 3, K 2, P 3, K 2, P 3, * K 1, P 3 *, repeat from *-* 8-10-11 times in total and finish with 1 edge st in garter st. Continue rib like this with K over K and P over P. When piece measures 3 cm, work next row as follows from RS: Size S + M + L: 1 edge st in garter st, 28-32-36 sts in stocking st, P 3, K 2, P 3, A.1 (= 2 sts), P 3, K 1, P 3, A.1 (= 2 sts), P 3, K 1, insert 1 marker (= A), * P 3, K 1 *, repeat from *-* 9 times in total, P 3, insert 1 marker (= B), K 1, P 3, A.1 (= 2 sts), P 3, K 1, P 3, A.1 (= 2 sts), P 3, K 2, P 3, 28-32-36 sts in stocking st and 1 edge st in garter st. Continue with stocking st and textured pattern like this. Size XL + XXL + XXXL: 1 edge st in garter st, 32-40-44 sts in stocking st, P 3, K 2, P 3, A.1 (= 2 sts), P 3, K 2, P 3, A.1 (= 2 sts), P 3, K 1, P 3, A.1 (= 2 sts), P 3, K 1, insert 1 marker (= A), * P 3, K 1 *, repeat from *-* 9 times in total, P 3, insert 1 marker (= B), K 1, P 3, A.1 (= 2 sts), P 3, K 1, P 3, A.1 (= 2 sts), P 3, K 2, P 3, A.1 (= 2 sts), P 3, K 2, P 3, 32-40-44 sts in stocking st and 1 edge st in garter st. Continue with stocking st and textured pattern like this. REMEMBER THE KNITTING TENSION! DECREASE IN RIB-SECTION MID BACK: When 4 rows have been worked after rib, dec 1 st from RS after marker A and before marker B – READ DECREASE TIP 1 (= 2 sts dec). Repeat dec alternately every 6th and 4th row (i.e. alternately on every third and every other row from RS), 17 more times (= 18 dec in each side on rib-section). NOTE: The 3 sts that remain between marker A and B mid back after dec are worked K from WS. On next row from RS P these 3 sts tog (= 2 sts dec). On next row from RS work the one P st in the middle K tog with next K st so that 2 K sts are exactly mid back (= 1 st dec). DECREASE IN THE SIDES: AT THE SAME TIME when piece measures 8-8-10-10-10-12 cm, dec 1 st in each side – READ DECREASE TIP 2 (= 2 sts dec). Repeat dec in each side every 6-6-8-8-8-12 cm 3-3-2-2-2-1 more time = 4-4-3-3-3-2 dec in total in each side on back piece. INCREASE FOR SLEEVES: AT THE SAME TIME when piece measures 29-30-31-32-33-34 cm, cast on new sts for sleeves at the end of every row in each side as follows: Cast on 1 st 5 times in total, 2 sts 4-4-4-3-3-3 times in total and finally 15-14-12-12-10-10 sts 1 time – now work the 6 outermost sts in each side in garter st (= sleeve edges). INCREASE AND DECREASE IN TEXTURED PATTERN: AT THE SAME TIME when piece measures 34 cm in all sizes, move marker A and marker B so that marker A is before the first 3 P sts in textured pattern mid back (seen from RS) and marker B is after the last 3 P sts in textured pattern mid back. Then dec outside the outermost 3 P sts in textured pattern mid back, i.e. before marker A and after marker B – READ DECREASE TIP 3 (= 2 sts dec). Repeat dec every 4th row (i.e. every other row from RS) 14-14-14-19-19-19 more times (= 15-15-15-20-20-20 dec in total in each side). AT THE SAME TIME when piece measures 34 cm in all sizes, inc 1 st in each of the middle 6-6-6-8-8-8 P-sections mid back – READ INCREASE TIP (= 6-6-6-8-8-8 sts inc). Repeat inc every 3-3-3-2½-2½-2½ cm 5 more times (= 6 inc in total in each P-section – NOTE: At first inc, inc at beg of each P-section, next time at the end of each P-section etc.). After all dec and inc there are 158-164-170-180-192-202 sts on needle. Continue with stocking st and textured pattern as before. When piece measures 56-58-60-62-64-66 cm, cast off the middle 16-16-20-20-24-24 sts for neck and finish each shoulder separately. Continue to cast off 1 st at beg of the next 2 rows from neck = 69-72-73-78-82-87 sts remain on the shoulder. LOOSELY cast off when piece measures 58-60-62-64-66-68 cm. Repeat on the other shoulder. RIGHT FRONT PIECE: Cast on 78-82-86-92-100-104 sts (incl 1 edge st in the side and 5 band sts towards mid front) on circular needle size 3 mm with BabyAlpaca Silk. READ ALL OF THE FOLLOWING SECTION BEFORE CONTINUING! P 1 row from WS. Work next row as follows from RS: Size S + M + L: 5 band sts in GARTER ST, K 1, P 3, K 2, * P 3, K 1 *, repeat from *-* 6 times in total, P 3, K 2, P 3, K 2, P 3, * K 1, P 3 *, repeat from *-* 7-8-9 times in total and finish with K 1 and 1 edge st in garter st. Continue rib like this with K over K and P over P. Size XL + XXL + XXXL: 5 band sts in GARTER ST, K 1, P 3, K 2, * P 3, K 1 *, repeat from *-* 6 times in total, P 3, K 2, P 3, K 2, P 3, K 2, P 3, K 2, P 3, * K 1, P 3 *, repeat from *-* 8-10-11 times in total and finish with K 1 and 1 edge st in garter st. Continue rib like this with K over K and P over P. When piece measures 3 cm, work next row as follows from RS: Size S + M + L: 5 band sts in garter st, K 1, P 3, A.1 (= 2 sts), P 3, K 1, insert 1 marker (= A), * P 3, K 1 *, repeat from *-* 4 times in total, P 3, insert 1 marker (= B), K 1, P 3, A.1 (= 2 sts), P 3, K 2, P 3, 27-31-35 sts in stocking st, K 2 tog (= 28-32-36 sts in stocking st as on back piece) and 1 edge st in garter st = 77-81-85 sts. Continue with stocking st and textured pattern like this. Size XL + XXL + XXXL: 5 band sts in garter st, K 1, P 3, A.1 (= 2 sts), P 3, K 1, insert 1 marker (= A), * P 3, K 1 *, repeat from *-* 4 times in total, P 3, insert 1 marker (= B), K 1, P 3, A.1 (= 2 sts), P 3, K 2, P 3, A.1 (= 2 sts), P 3, K 2, P 3, 31-39-43 sts in stocking st, K 2 tog (= 32-40-44 sts in stocking st as on back piece) and 1 edge st in garter st = 91-99-103 sts. Continue with stocking st and textured pattern like this. DECREASE IN RIB-SECTION TOWARDS MID FRONT: When 4 rows have been worked after rib, dec 1 st from RS after marker A and before marker B – READ DECREASE TIP 1 (= 2 sts dec). Repeat dec every 3½ cm 7 more times (= 8 dec in total in each side on rib-section). NOTE: The 3 sts that remain between marker A and B after dec are worked K from WS. On next row from RS P these 3 sts tog (= 2 sts dec). On next row from RS, K tog the 3 middle sts in rib so that 1 K st is in the middle over rib-section (= 2 sts dec). DECREASE IN THE SIDE: AT THE SAME TIME when piece measures 8-8-10-10-10-12 cm, dec in the side as on back piece. Remember BUTTONHOLES on band - see explanation above. After all dec are done, 53-57-62-68-76-81 sts remain on needle. INCREASE FOR SLEEVE: When piece measures 29-30-31-32-33-34 cm, cast on new sts at the end of every row towards the side as on back piece. After last inc, work the outermost 6 sts in the side in garter st (= sleeve edge). INCREASE AND DECREASE IN TEXTURED PATTERN: AT THE SAME TIME when piece measures 34 cm in all sizes, move marker A to the second P-section from mid front. Move marker B so that marker is after the last 3 P sts in textured pattern. Then inc 1 st in each of the 2-2-2-3-3-3 P-sections after marker A - READ INCREASE TIP (= 2-2-2-3-3-3 sts inc). Repeat inc every 3 cm 5 more times (= 6 inc in total in each P-section – NOTE: Inc alternately at beg and end of P-sections as on back piece). AT THE SAME TIME when piece measures 34 cm in all sizes, dec outside the outermost 3 P sts towards the side, i.e. after marker B – READ DECREASE TIP 3 (= 1 st dec). Repeat dec every 4th row (i.e. every other row from RS) 14-14-14-19-19-19 more times (= 15-15-15-20-20-20 dec in total). COLLAR AND NECKLINE: AT THE SAME TIME when piece measures 34-35-36-37-38-39 cm, cast on 20-20-22-22-24-24 new sts at end of row from WS (i.e. towards mid front) for collar - work these sts in garter st. AT THE SAME TIME when piece measures 35-36-37-38-39-40 cm, dec for neck inside the 25-25-27-27-29-29 sts in garter st – READ DECREASE TIP 4. Repeat dec every 6-5-4-4-3-3 cm 3-3-5-5-7-7 more times (= 4-4-6-6-8-8 dec in total for neck). After all dec and inc there are 94-97-100-105-111-116 sts on needle. Continue with stocking st and textured pattern as before. When piece measures approx. 58-60-62-64-66-68 cm (adjust so that next row is worked from WS), LOOSELY cast off the first 69-72-73-78-82-87 sts for shoulder = 25-25-27-27-29-29 sts remain on needle for collar, work the rest of row. COLLAR: Continue in garter st back and forth over collar AT THE SAME TIME work short rows as follows: * 1 ridge in garter st over the outermost 15-15-17-17-19-19 sts, 1 ridge in garter st over all 25-25-27-27-29-29 sts *, repeat from *-* until collar measures approx. 6-6-7-7-8-8 cm on the most narrow part (collar will measure approx. 12-12-14-14-16-16 cm at the edge on the widest). LEFT FRONT PIECE: Cast on and work as right but reversed (do not cast off for buttonholes on left band). NOTE: When dec the last P sts between marker A and B, P the 3 sts twisted tog (instead of P tog). Further dec in K sts is done as follows: slip 1 st, K 2 tog, psso. Cast on new sts for collar at end of row from RS, and cast off shoulder on last row from RS (instead of from WS). ASSEMBLY: Sew shoulder seams - make sure the seam is not tight. Sew collar tog mid back (make sure that seam is not visible when collar is folded down) and sew collar to neckline at the back of neck. Sew underarm and side seams in one inside 1 edge st. Sew on buttons. |
||||||||||
Diagram explanations |
||||||||||
|
||||||||||
 |
||||||||||
Have you finished this pattern?Tag your pictures with #dropspattern #morningfogcardigan or submit them to the #dropsfan gallery. Do you need help with this pattern?You'll find 22 tutorial videos, a Comments/Questions area and more by visiting the pattern on garnstudio.com. © 1982-2026 DROPS Design A/S. We reserve all rights. This document, including all its sub-sections, has copyrights. Read more about what you can do with our patterns at the bottom of each pattern on our site. |
||||||||||


With over 40 years in knitting and crochet design, DROPS Design offers one of the most extensive collections of free patterns on the internet - translated to 17 languages. As of today we count 324 catalogues and 12290 patterns translated into English (UK/cm). 12290
We work hard to bring you the best knitting and crochet have to offer, inspiration and advice as well as great quality yarns at incredible prices! Would you like to use our patterns for other than personal use? You can read what you are allowed to do in the Copyright text at the bottom of all our patterns. Happy crafting!
Post a comment to pattern DROPS 149-20
We would love to hear what you have to say about this pattern!
If you want to leave a question, please make sure you select the correct category in the form below, to speed up the answering process. Required fields are marked *.