
Popular categories
Looking for a yarn?


Comments / Questions (53)
![]() Marina wrote:
Marina wrote:
Sto rifacendo la manica secondo le misure che mi servono, non creerà problemi al momento della cucitura avere circa 20 maglie in meno nella manica?
16.03.2017 - 18:35DROPS Design answered:
Buonasera Marina. Non ci sarà nessun problema per la cucitura, l'importante è la misura. Buon lavoro!
16.03.2017 - 19:28
![]() Marina wrote:
Marina wrote:
Buonasera, sto facendo la prima manica del maglione ma mi sembra veramente larga. Sono a 75m (mancano quindi 3 aumenti) e la larghezza è già di 44 cm. Come posso farla più stretta? La tensione è giusta nel numero delle maglie (18) ma sbagliata in quello dei ferri (27 invece di 35). Come risolvere? Grazie
14.03.2017 - 16:05DROPS Design answered:
Buongiorno Marina. Se ha già raggiunto la larghezza desiderata, può procedere senza ulteriori aumenti. In alternativa, può disfare e aumentare distanziando di più gli aumenti, fino alla larghezza necessaria. Buon lavoro!
14.03.2017 - 16:45
![]() Marta wrote:
Marta wrote:
Buonasera, ho un problema riguardo al falso raglan: restano dei buchini antiestetici per via delle diminuzioni, come si possono evitare? Ho visto che anche nel video sono abbastanza evidenti mentre nella foto di presentazione del maglione non se ne vedono.
31.01.2017 - 21:30DROPS Design answered:
Buonasera Marta, per evitare che si vedano i buchi l'unica cosa è lavorare le maglie a ritorto ed è quello che viene indicato nelle spiegazioni. Probabilmente nella foto si nota meno a causa dell'angolazione con cui è stata scattata e nel video il filato usato è più spesso di quello del modello. Buon lavoro!
31.01.2017 - 22:12
![]() Carla wrote:
Carla wrote:
Per favore, non mi è chiaro come terminare il davanti di questo modello. Si devono chiudere 2 maglie ogni ferro oppure sempre sul diritto? E verso la scollatura oppure verso le maniche? E fin dal primo ferro delle spalle? Molte grazie
12.05.2016 - 22:38DROPS Design answered:
Buonasera Carla. Deve chiudere le m, solo dalla parte dello scollo, quando il ferro inizia dallo scollo stesso. Quindi da una parte chiude le m sul diritto del lavoro, dalla parte opposto sul rovescio. Può iniziare da quando mette le m in attesa sul fermamaglie. Buon lavoro!
12.05.2016 - 23:14
![]() Margaretha Eklund wrote:
Margaretha Eklund wrote:
Hej, jag håller på att sticka herrtröjan strl. XXXL, stickar inte detta patent utan ett varv 1a 1r, andra varvet rätt. Undrar hur jag ska göra denna falska raglan + ska man verkligen börja när arbetet mäter 43 cm ? (Den minsta storleken ska man tydligen börja vid 47 cm.) Om jag inte gör denna falska patent hur många cm upp ska jag börja med halsen ? på bakstycket och framstycket.
12.01.2016 - 11:40DROPS Design answered:
Hej Margaretha, även om du väljer att sticka ett annat mönster måste du följa måtten som står i beskrivningen. Se även video för falsk raglan och avm i patent. Lycka till!
26.01.2016 - 15:52
![]() Phyllis Johnson wrote:
Phyllis Johnson wrote:
Unsure of how to start the front of this sweater. Do I inc/dec every 6th row for the number of times indicated for the back? For example, 12 times total? I am stumped at the point of slipping the stitches to the needle holder. At what point is this done? I may just be misunderstanding the pattern, but am unable to figure it out. How many times do I do the inc/dec on 6th row before the neck stitches are slipped on the holder?
24.11.2015 - 03:01DROPS Design answered:
Dear Mrs Johnson, you work front piece as you did for back piece ie inc/dec to displace rib - while neckline will be shaped when piece measures 58-68 cm: put the mid 17-31sts on a st holder, and finish each shoulder separately with inc/dec as before on the side and cast off for neckline. Happy knitting!
24.11.2015 - 09:34
![]() Carla wrote:
Carla wrote:
Per piacere come si recupera una maglia çaduta? grazie molte
22.09.2015 - 01:33DROPS Design answered:
Buongiorno Carla. Per recuperare una maglia caduta, può seguire le indicazioni riportate in questa lezione di maglia, oppure in questa se la maglia è caduta diversi ferri sotto. Buon lavoro!
22.09.2015 - 08:58
![]() Ornella wrote:
Ornella wrote:
Bei der Ferigstellung fehlt, wann die Seitennähte geschlossen werden sollen. Ich kann doch nicht als letztes die Schulternaht schließen? Das muß doch vor dem Einsetzen der Ärmel passieren? Bitte um Hilfe zur richtigen Reihenfolge der Fertigstellung.
14.03.2015 - 13:46DROPS Design answered:
Sie haben Recht, das fehlt. Die Schulternähte schließen Sie zuerst, bevor Sie die Ärmel einnähen. Sie schließen also jeweils die Naht unter den Ärmeln und die Schulternähte (dabei ist die Reihenfolge ja egal), dann setzen Sie die Ärmel ein und zuletzt schließen Sie die Seitennähte ab dem Ärmel nach unten.
14.03.2015 - 18:33
![]() Dorrit Liin Hansen wrote:
Dorrit Liin Hansen wrote:
Tak for videoen :-). Hvordan syr man ærmerne pænt sammen. Har prøver med madrassting. Er pænt hvor der ikke er udtagninger , men ellers hm ? Måske dumt spørgsmål men vil gerne have en god finish :-)
05.02.2015 - 12:20DROPS Design answered:
Hej Dorrit, Vi har flere gode videoer med montering, det er en smags sag så find den som passer dig bedst. God fornøjelse!
05.02.2015 - 14:18
![]() Yolande Benoist wrote:
Yolande Benoist wrote:
Merci beaucoup pour votre reponse rapide, Je suis contente de voir que je ne suis pas la seule a avoir de la difficulte avec le raglan, J'ai imprime votre patron en francais . Pourriez vous re-ecrire les instructions en Francais afin que nous soyons tous sur le meme pied . Merci de faire un video, J'ai hate de voir. Pour me pratiquer, j'ai monte un tricot sur 21 mailles car je ne voulais pas tout defaire ce que j'avais fait. Merci encore
28.01.2015 - 03:30DROPS Design answered:
Bonjour Mme Benoist, une vidéo sera bientôt ajoutée pour montrer comment faire ce faux raglan. Au 1er marqueur, on augm. 2 m avant les 4 m (du raglan) et on dim. 2 m après ces 4 mêmes mailles, on diminue ensuite 2 m avant les 4 m en fin de rang et on augmente 2 m après ces 4 m. Pour augm, faites 2 jetés, au rang suivant, vous tricotez ces jetés en côtes anglaises (cf au début/fin de rang sur l'envers) - pour dim en début de rang, on glisse la 1ère m à l'end en retirant le jeté de l'aiguille (celui de la m côte anglaise), 2 m ens à l'end et on passe la m glissée par-dessus la m tricotée. En fin de rang, on tricote 3 m ens à l'end. Bon tricot!
28.01.2015 - 11:11
|
|
DROPS Extra 0-898 |
|
 |
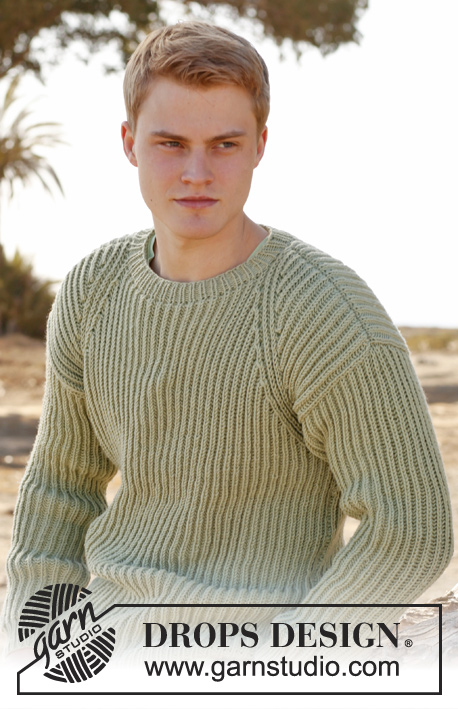 |
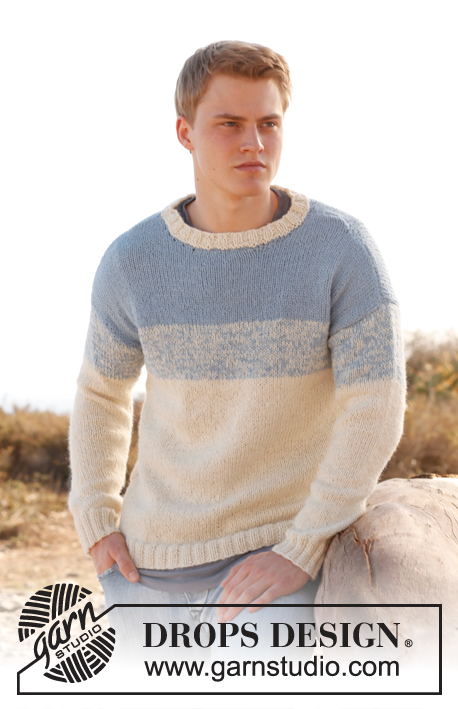
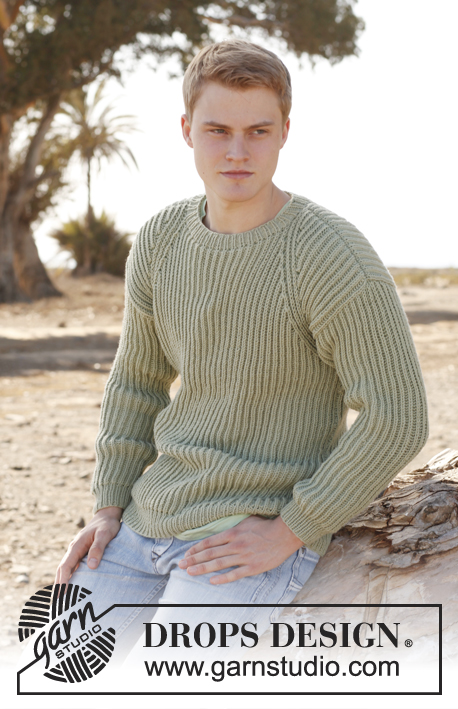
Men's knitted jumper with English rib, in DROPS Karisma. Size: S - XXXL.
DROPS Extra 0-898 |
|
|
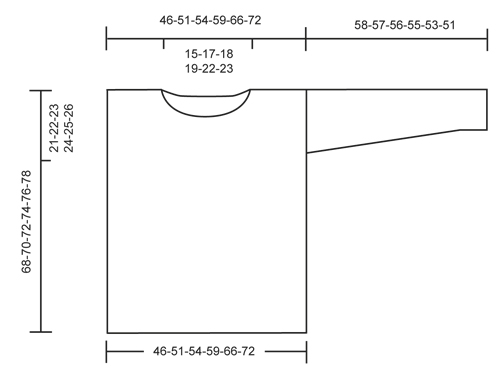
MEASURING TIP: Because of the weight of the yarn all measurements must be done when the piece is held up. GARTER ST (back and forth on needle): K all rows. 1 ridge = 2 rows K. ENGLISH RIB (back and forth on needle): Row 1 (from WS): 1 st in garter st, * 1 YO, slip 1 st as if to P, K 1 *, repeat from *-* until 2 sts remain, 1 YO, slip 1 st as if to P, 1 st in garter st. Row 2 (= from RS): 1 st in garter st, * K tog YO and slipped st, 1 YO, slip 1 st as if to P *, repeat from *-* until 2 sts remain, K tog YO and slipped st, 1 st in garter st. Row 3 (= from WS): 1 st in garter st, * 1 YO, slip 1 st as if to P, K tog YO and slipped st *, repeat from *-* until 2 sts remain, finish with 1 YO, slip 1 st as if to P, 1 st in garter st. Repeat 2nd and 3rd row upwards. ENGLISH RIB ST: When counting the sts, the YOs are not counted as sts. INCREASE TIP (applies to sleeve): Inc 1 st inside 1 edge st in each side of piece. Inc 1 st by making 1 YO, on next row work YO twisted i.e. work in back loop of st instead front. NOTE: Work the inc sts in English rib. CAST-OFF TIP: When casting off, work YO and slipped st K tog (= K 1). ---------------------------------------------------------- BACK PIECE: Worked back and forth on circular needle to make room for all the sts. Cast on 82-90-96-106-118-128 sts on circular needle size 4.5 mm with Karisma. Work as follows – from RS: 1 edge st, * K 1, P 1 *, repeat from *-* and finish with 1 edge st. Work edge st in GARTER ST until finished measurements - see explanation above. Work rib like this for 6 cm – READ MEASURING TIP. Inc 1 st at the end of last row in rib (last row = from RS) = 83-91-97-107-119-129 sts. Continue to work in ENGLISH RIB with 1 edge st in each side - see explanation above. When piece measures 47-47-47-46-45-43 cm, work a false raglan – 4 sts in English rib in each side should be displaced towards the neck. In the right side (from RS) inc 2 sts before 4 sts in English rib and dec 2 sts after 4 sts in English rib. In the left side dec 2 sts before 4 sts in English rib and inc 2 sts after 4 sts in English rib. No of sts should always be the same. Work the 2 inc sts in English rib. Work as follows from RS: 1 edge st in garter st, 2 YOs, insert 1 marker in piece, work 4 sts in English rib as before (YOs are not counted as sts - READ ENGLISH RIB ST), insert 1 marker in piece, pass next YO over st (so that it is behind this st), slip this st to the right needle as if to K, K the next 2 sts tog, psso, continue in English rib until 7 sts in English rib + 1 edge st remain, K the next 3 sts tog, insert 1 marker in piece, work 4 sts in English rib as before, insert 1 marker in piece, 2 YOs, finish with 1 edge st in garter st. On next row work the new YOs as follows: At beg of row (seen from WS): 1 edge st, P in back loop of first YO, 1 YO, K in back loop of second YO, continue in English rib as before. At end of row (seen from WS): K 1 in back loop of first YO, P 1 in back loop of second YO, 1 YO, 1 edge st in garter st. Work 4 rows in English rib over all sts. On next row work in English rib AT THE SAME TIME inc before first marker, dec after second marker, dec before third marker and inc after fourth marker as explained above. Inc and dec on every 6th row 11-12-13-15-17-19 times in total. Work in English rib for 2 cm after last dec/inc. Now cast off the middle 27-31-33-35-39-41 sts - READ CAST-OFF TIP = 28-30-32-36-40-44 sts remain on each shoulder. Finish each shoulder separately. Work in English rib for 2 cm, cast off. The whole piece measures approx. 68-70-72-74-76-78 cm. Insert 1 marker in each side of back piece, 21-22-23-24-25-26 cm down from shoulder. Markers show where sleeve is sewn in. FRONT PIECE: Cast on and work as on back piece until piece measures 58-60-62-64-66-68 cm. Continue inc and dec on every 6th row AT THE SAME TIME cast off for neck as follows: Slip the middle 17-21-23-25-29-31 sts on a stitch holder for neck and finish each shoulder separately. Continue pattern and displacement as before AT THE SAME TIME cast off for neck on every row from mid front as follows: 2 sts 2 times and 1 st 1 time = 28-30-32-36-40-44 sts remain on shoulder. Cast off when piece measures 68-70-72-74-76-78 cm. Insert 1 marker in each side of piece, 21-22-23-24-25-26 cm down from shoulder. Markers show where sleeve is sewn in. SLEEVE: Worked back and forth on circular needle. Loosely cast on 44-46-48-50-52-54 sts with Karisma on circular needle size 4.5 mm. Work as follows – from RS: 1 edge st, * K 1, P 1 *, repeat from *-* and finish with 1 edge st. Work edge sts in garter st until finished measurements. Work rib for 6 cm – READ MEASURING TIP. Inc 1 st at the end of last row in rib (last row = from RS) = 45-47-49-51-53-55 sts. Then work in English rib with 1 edge st in garter st in each side. When piece measures 8 cm, inc 1 st in each side - READ INCREASE TIP above! Repeat inc every 3-2½-2½-2½-2-2 cm 15-16-16-17-18-18 more times (16-17-17-18-19-19 inc in total) = 77-81-83-87-91-93 sts. When piece measures 58-57-56-55-53-51 cm (NOTE! Shorter measurements in the larger sizes because of wider shoulders), cast off. ASSEMBLY: Sew underarm seams inside 1 edge st. Sew in sleeves, down to markers on body. Sew side seams inside one edge st. NECK EDGE: Pick up approx. 84-88-92-96-100-104 sts (incl sts on stitch holder) around the neck on a short circular needle size 4.5 mm. Work rib = K 1/P 1 for 3 cm, then cast off with K over K and P over P. |
|
 |
|
Have you finished this pattern?Tag your pictures with #dropspattern or submit them to the #dropsfan gallery. Do you need help with this pattern?You'll find 18 tutorial videos, a Comments/Questions area and more by visiting the pattern on garnstudio.com. © 1982-2026 DROPS Design A/S. We reserve all rights. This document, including all its sub-sections, has copyrights. Read more about what you can do with our patterns at the bottom of each pattern on our site. |
|


With over 40 years in knitting and crochet design, DROPS Design offers one of the most extensive collections of free patterns on the internet - translated to 17 languages. As of today we count 324 catalogues and 12290 patterns translated into English (UK/cm). 12290
We work hard to bring you the best knitting and crochet have to offer, inspiration and advice as well as great quality yarns at incredible prices! Would you like to use our patterns for other than personal use? You can read what you are allowed to do in the Copyright text at the bottom of all our patterns. Happy crafting!
Post a comment to pattern DROPS Extra 0-898
We would love to hear what you have to say about this pattern!
If you want to leave a question, please make sure you select the correct category in the form below, to speed up the answering process. Required fields are marked *.