
Popular categories
Looking for a yarn?


Comments / Questions (111)
![]() Anna Pönitz wrote:
Anna Pönitz wrote:
Ich komme mit dem Mustersatz bei der Rundpasse nicht zurecht. Bei 325 Maschen gehen sich 11,5 Mustersätze aus. Wie muss man da beginnen?
21.01.2015 - 17:48DROPS Design answered:
Es müssten 23 Rapporte von A-1 (= 14 M) in 325 M passen: 1 Rand-M + 23 x 14 M + die 1. M von A-1 + 1 Rand-M = 1 + 322 + 1 + 1 = 325.
21.01.2015 - 21:52Yvonne wrote:
Model 142-1: met een stekenproef van 24 st=10 cm. en 276 st. opzetten voor de tweede maat kom ik uit op een omvang van 115 cm ipv de 86 cm die staan aangegeven. (276:24=11,5x10 cm= 115 cm.), dus een breedte/voorpand van 57,5 cm. in plaats van de 43 cm die in het patroon staat. Wat klopt hier niet? Alvast bedankt!
02.01.2015 - 22:43DROPS Design answered:
Hoi Yvonne. Je breit eerst in boordsteek. Dat zal meer samentrekken dan tricotsteek. Na de boordsteek minder je naar een totaal van 208 st en breit tricotsteeek. De breedte zal dan ook ca. 86 cm zijn. Veel breiplezier.
05.01.2015 - 14:58
![]() Jvonne Ravanelli wrote:
Jvonne Ravanelli wrote:
Bellissima è difficile da fare?
21.10.2014 - 08:13DROPS Design answered:
Buongiorno Jvonne. Seguendo attentamente le spiegazioni dovrebbe essere in grado di realizzare il capo. Inoltre, se clicca sulla scritta Video, sulla striscia grigia alla destra della fotografia, trova l’elenco di tutti i video che possono aiutarla nella lavorazione. Se ha bisogno di aiuto, può rivolgersi qui, sul nostro forum, oppure può scrivere all’indirizzo italy@garnstudio.com. Buon lavoro!
21.10.2014 - 08:50
![]() Veronica Pettersson wrote:
Veronica Pettersson wrote:
Är mönstret litet i storleken? ökningen mellan nedre delen av koftan och oket verkar stort.Blir oket mycket tajtare ? jag skulle vilja göra storlek L upp tills att ärmarna sätts på å sen sticka oket i M. Jag mäter total omkrets 102 cm där oket ska börja å min stickfasthet är 30 maskor på 10 cm bredd.
17.10.2014 - 10:39DROPS Design answered:
Hej Veronica, Du hittar plaggets mått nederst i beskrivningen. Följ beskrivningen på storleken som motsvarar det mått du är ute efter.
23.10.2014 - 11:20
![]() Julia wrote:
Julia wrote:
Was muss ich beachten, wenn ich dieses Modell nicht als Jacke, sondern als Pullover stricken möchte?
15.09.2014 - 13:43DROPS Design answered:
Liebe Julia, da die vorderen Blenden nachträglich angestrickt werden, müssen Sie gar nicht viel ändern - Sie können die Maschenzahl an sich beibehalten, müssen nur die beiden Randmaschen weglassen. D.h. Sie schlagen 2 M weniger an und stricken das Rumpfteil in Runden statt in Hin- und Rück-R. Die Seitenmarkierer bringen Sie nach jeweils der Hälfte der M an. Das Muster an der Passe geht dann auch auf. Die Taschen können Sie natürlich einfach weglassen und statt dessen glatt re weiterstricken.
15.09.2014 - 14:53
![]() Sonja wrote:
Sonja wrote:
Hallo Ich hab schwierigkeiten mit der Rundpasse. Bei dem Musterdiagram, ist es das dort nur die HinReihen abgebildet sind, und ich die Rückreihe so stricke wie ich sie sehe oder für die Rückreihe auch eine Musterreihe vorgesehen ist. Viele Grüße Sonja
16.03.2014 - 09:35DROPS Design answered:
Liebe Sonja, es sind alle Reihen abgebildet.
17.03.2014 - 13:21
![]() Lamia wrote:
Lamia wrote:
Quelle rapidité! Merci! :-) Vivement que je termine mon 1er gilet avec ce magnifique modèle!
26.02.2014 - 10:01
![]() SABATIER Catherine wrote:
SABATIER Catherine wrote:
Bonjour,Je ne comprends pas comment faire la re hausse au niveau du dos. Ou faut-il tricoter les 58-60-64 etc m endroit tourner, tricoter 20 m...etc ... Je ne comprends pas ? Merci pour votre aide
01.12.2013 - 21:31DROPS Design answered:
Bonjour Mme Sabatier, la ré-hausse dos se réalise en rangs raccourcis : tric. 58-76 m (cf taille) sur l'end., tournez et tric. 20 m sur l'envers, tournez, tric. les 20 m du rang précédent + 10m = 30 m sur l'end., tournez, tric. les 30 m du rang précédent +10m = 40 m sur l'envers, etc... avec 10 m en plus à chaque fois jusqu'à ce que vous ayez tricoté 80 m au total, tournez, encore 1 fois et tricotez toutes les mailles sur l'aig. avant de les mettre en attente. Bon tricot!
02.12.2013 - 14:10
![]() Gelas wrote:
Gelas wrote:
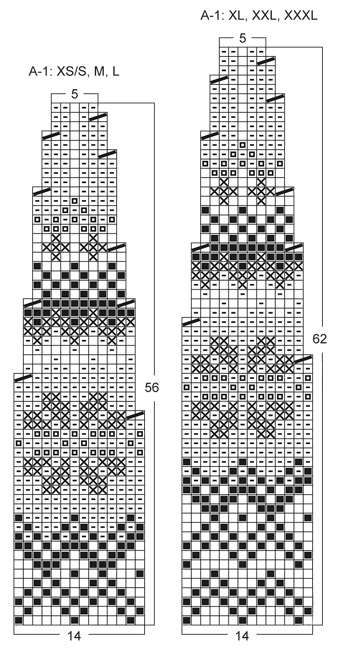
Bonjour.Je pense qu'il y a une erreur pour le diagramme A-1.A partir du 4eme rang.Quand on a fait 2 fois le motif(2x14mailles) celui est décalé et ne tombe plus au bon endroit.Jai recompté mes mailles et defait mon ouvrage plusieurs fois ,toujours le meme resultat.Merci de votre réponse.
03.03.2013 - 11:25DROPS Design answered:
Bonjour Madame Gelas, lorque vous tricotez le 1er rang de A1, vous devez terminer le rang en tricotant l'avant dernière m du rang comme la 1ère de A1 mais sans diminuer cette m. Celle-ci se tricotera toujours de la couleur de la 1ère m du rang (à droite), donc dernière m sur l'end = 1 m chameau, 1ère m sur l'env = 1 m pétrole. Bon tricot !
04.03.2013 - 09:57Veilleux Pierrette wrote:
J'aurais besoin d'info. supplémentaire sur les diminutions. Selon le diagramme, je n'arriverai pas à diminuer une centaine de mailles. Merci.
06.01.2013 - 05:06DROPS Design answered:
Bonjour Madame Veilleux, pour tricoter l'empiècement du gilet, vous répétez 21 fois (en taille XS/S) le diagramme A.1, et diminuez un total de 9 m dans chaque rapport, soit 9 x 21 = 189 m diminuées en taille XS/S. Bon tricot !
07.01.2013 - 09:38
|
|||||||||||||||||||
Bergen#bergencardigan |
|||||||||||||||||||
 |
 |
||||||||||||||||||
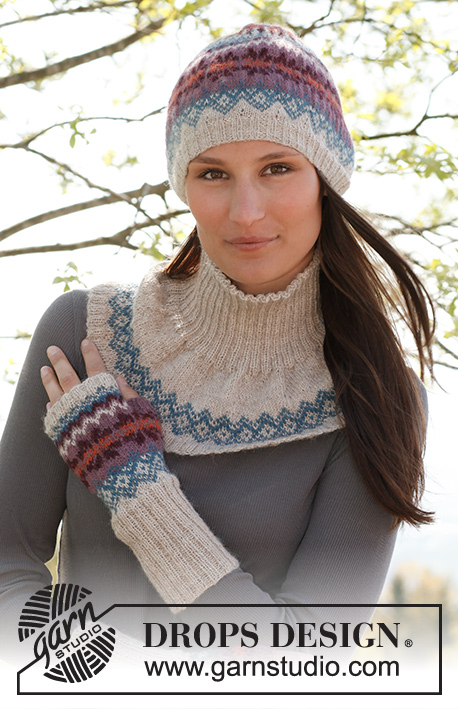
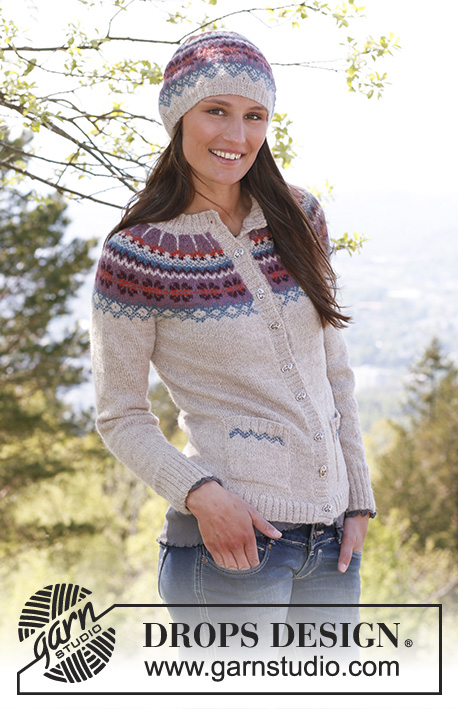
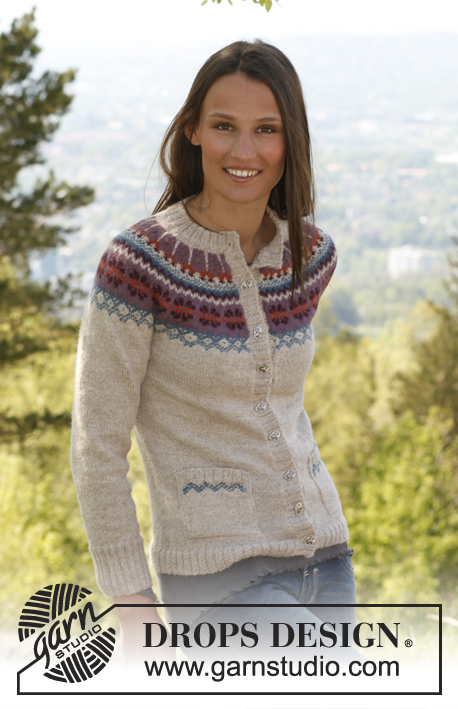
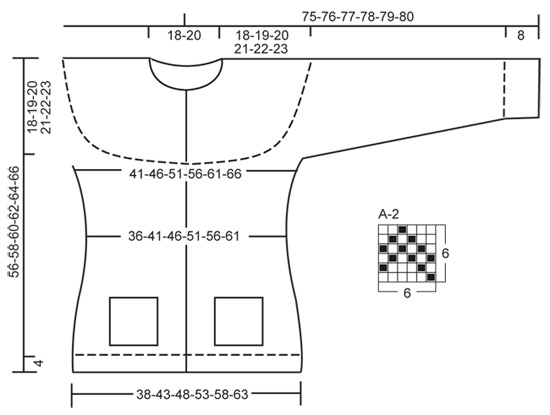
Knitted DROPS jacket with round yoke, pockets and Norwegian pattern in ”Alpaca”. Size XS – XXXL
DROPS 142-1 |
|||||||||||||||||||
|
GARTER ST (back and forth on circular needle): K all rows. 1 ridge = 2 rows K. PATTERN: See diagrams A-1 and A-2. Diagrams are worked in stocking st. ---------------------------------------------------------- BODY: Worked back and forth on circular needle from mid front. Cast on 244-276-308-340-372-404 sts on circular needle size 2.5 mm with light camel eco. Work rib as follows (1st row = RS): 1 edge st in GARTER ST - see explanation above - * K 2/P 2 *, repeat from *-* until 3 sts remain, K 2 and 1 edge st in garter st. When rib measures 4 cm, switch to circular needle size 3 mm and work next row as follows (from RS): K 3, * K 2 tog, K 2 *, repeat from *-* until 5 sts remain, K 2 tog and K 3 = 184-208-232-256-280-304 sts. Insert 2 markers in the piece; 46-52-58-64-70-76 sts in from each side (= 92-104-116-128-140-152 sts between markers on back piece). Continue in stocking st with 1 edge st in garter st in each side. REMEMBER THE KNITTING TENSION! When piece measures approx. 6 cm (adjust so that next row is worked from WS), work next row as follows: 1 st in garter st, P 38-40-44-47-51-53, then slip the last 29-29-31-31-33-33 sts worked on a stitch holder (these sts are knitted up for pocket later), continue with P until 10-12-14-17-19-21 sts remain, slip the last 29-29-31-31-33-33 sts worked on a stitch holder for pocket, P 9-11-13-16-18-20 and 1 st in garter st. On next row knit up 1 st at the back of each st slipped on stitch holder. Continue in stocking st. When piece measures 8-8-9-9-10-10 cm, dec 1 st on each side of markers in the sides. Repeat dec every 3 cm 2 more times = 172-196-220-244-268-292 sts. When piece measures 18-19-20-21-22-23 cm, inc 1 st on each side of markers in the sides. Repeat inc every 3 cm 5 more times = 196-220-244-268-292-316 sts. When piece measures approx. 38-39-40-41-42-43 cm (adjust so that next row is worked from WS), work next row as follows: 43-49-55-61-67-73 sts (= front piece), cast off 12 sts for armhole, 86-98-110-122-134-146 sts (= back piece), cast off 12 sts for armhole, 43-49-55-61-67-73 sts (= front piece) = 172-196-220-244-268-292 sts remain on needle. Put piece aside and knit the sleeves. SLEEVE: Worked in the round on double pointed needles. Cast on 72-80-80-80-88-88 sts on double pointed needles size 2.5 mm with light camel eco. Work rib = K 2/P 2 for 8 cm. Switch to double pointed needles size 3 mm, work next round as follows: * K 2, K 2 tog *, repeat from *-* = 54-60-60-60-66-66 sts. Insert 1 marker at the beg of the round. Continue in stocking st. When piece measures 10-10-12-14-14-14 cm, inc 1 st in each side of marker mid under sleeve, repeat inc every 3½-3½-2½-2-2-2 cm 10-10-13-15-14-16 more times = 76-82-88-92-96-100 sts. When piece measures 48 cm, cast off 12 sts mid under sleeve (i.e. cast off 6 sts on each side of marker) = 64-70-76-80-84-88 sts remain on needle. Put piece aside and knit another sleeve. YOKE: Slip sleeves on to same circular needle size 3 mm as body where armholes were cast off = 300-336-372-404-436-468 sts (do not work the sts when slipping them on needle). Work 2-4-8-6-8-12 rows in stocking st with light camel eco - AT THE SAME TIME on 1st row (= RS) dec 3-11-5-9-13-3 sts evenly = 297-325-367-395-423-465 sts. Continue to work and dec according to A-1 (1st row = RS, see diagram for your size) with 1 edge st in garter st in each side, work next to last st on row as first st in A-1 but do not dec in this st. After all dec there are 108-118-133-143-153-168 sts on needle and piece measures approx. 56-58-60-62-64-66 cm up to shoulder. Work 1 row with light camel eco (from RS) while at the same time dec 12-18-25-27-29-36 sts evenly = 96-100-108-116-124-132 sts. P 1 row on WS. Then work an elevation at the back with light camel eco in stocking st as follows starting from RS: Work 58-60-64-68-72-76 sts, turn, P 20, turn, K 30, turn, P 40, continue like this by working 10 sts more on every turn until a total of 80-80-80-100-110-110 sts have been worked, turn and work the rest of row, slip sts on a stitch holder. LEFT BAND: Knit up approx. 172 to 204 sts (divisible by 4) inside 1 edge st along left front with light camel eco. Work rib as follows (1st row = WS): 1 edge st in garter st, * P 2/K 2 *, repeat from *-* and finish with P 2 and 1 edge st in garter st. Continue with K over K and P over P until rib measures 3 cm, loosely cast off. RIGHT BAND: Work as left band but after 1 cm, cast off for 8 buttonholes evenly (buttonholes are cast off in P-sections seen from RS). 1 BUTTONHOLE = P 2 tog and make 1 YO – bottom buttonhole should be in the second P-section from bottom edge and top hole approx. 6-7 cm from the top (also cast off for 1 buttonhole on neck edge). NECK EDGE: The neck edge is worked with light camel eco on circular needle size 2.5 mm as follows: Knit up 8 sts over right band (inside 1 edge st), work the 96-100-108-116-124-132 sts from stitch holder around the neck on to needle and knit up 8 sts over left band = 112-116-124-132-140-148 sts. P 1 row from WS while at the same time inc 20-20-16-16-12-12 sts evenly = 132-136-140-148-152-160 sts. Then work rib as follows (from RS): 1 edge st in garter st, * K 2/P 2 *, repeat from *-* and finish with K 2 and 1 edge st in garter st. Continue with K over K and P over P. When neck edge measures 1 cm, cast off for 1 buttonhole over the other holes on band. When neck edge measures 3 cm, cast off with K over K and P over P. POCKET: Worked back and forth on 2 double pointed needles. Slip the 29-29-31-31-33-33 sts from stitch holder on one front piece back on 1 double pointed needle size 3 mm. Work in stocking st with light camel eco and 1 edge st in garter st in each side for 8-8-9-9-10-10 cm (adjust so that next row is worked from RS), continue like this: 1 st in garter st, 1-1-2-2-0-0 sts in stocking st with light camel eco, then diagram A-2 over the next 25-25-25-25-31-31 sts, 1-1-2-2-0-0 sts in stocking st with light camel eco and then 1 st in garter st. When A-2 has been worked, work 2 rows in stocking st with light camel eco - AT THE SAME TIME on last row inc 3-3-5-5-3-3 sts evenly = 32-32-36-36-36-36 sts. Switch to double pointed needles size 2.5 mm and continue with rib as follows (from RS): 1 st in garter st, * K 2, P 2 *, repeat from *-* and finish with K 2 and 1 st in garter st. Work a total of 6 rows in rib, then cast off from RS with K over K and P over P. Sew pocket neatly on to sts in garter st in the sides. Knit another pocket on the other front piece. ASSEMBLY: Sew the openings under the sleeves. Sew on buttons. |
|||||||||||||||||||
Diagram explanations |
|||||||||||||||||||
|
|||||||||||||||||||
 |
|||||||||||||||||||
 |
|||||||||||||||||||
Have you finished this pattern?Tag your pictures with #dropspattern #bergencardigan or submit them to the #dropsfan gallery. Do you need help with this pattern?You'll find 18 tutorial videos, a Comments/Questions area and more by visiting the pattern on garnstudio.com. © 1982-2026 DROPS Design A/S. We reserve all rights. This document, including all its sub-sections, has copyrights. Read more about what you can do with our patterns at the bottom of each pattern on our site. |
|||||||||||||||||||


With over 40 years in knitting and crochet design, DROPS Design offers one of the most extensive collections of free patterns on the internet - translated to 17 languages. As of today we count 324 catalogues and 12290 patterns translated into English (UK/cm). 12290
We work hard to bring you the best knitting and crochet have to offer, inspiration and advice as well as great quality yarns at incredible prices! Would you like to use our patterns for other than personal use? You can read what you are allowed to do in the Copyright text at the bottom of all our patterns. Happy crafting!
Post a comment to pattern DROPS 142-1
We would love to hear what you have to say about this pattern!
If you want to leave a question, please make sure you select the correct category in the form below, to speed up the answering process. Required fields are marked *.