
Popular categories
Looking for a yarn?


Comments / Questions (64)
![]() Dominique Vallon wrote:
Dominique Vallon wrote:
Bonsoir je tricote ce gilet pour un membre de ma famille qui a le gros bras suite à des soucis de santé. J'ai une manche beaucoup plus large que l'autre ( droite 108 mailles. Gauche 78 ) donc je sais pas comment faire pour les diminutions à l'empiècement ? Et je ne sais pas comment faire pour insérer les manches au niveau des emmanchures ? Merci dm'aider . Cordialement
07.04.2026 - 23:11DROPS Design answered:
Bonjour Mme Vallon, nous ne sommes malheureusement pas en mesure de pouvoir adapter chacun de nos modèles à chaque demande, n'hésitez pas à demander conseil auprès de votre magasin ou bien auprès d'un forum tricot. Merci pour votre compréhension. Bon tricot!
08.04.2026 - 14:27
![]() Dominique Vallon wrote:
Dominique Vallon wrote:
Bonjour je n'ai pas les diagrammes pour réaliser le haut du gilet Abbey . Merci de les afficher
01.04.2026 - 18:30DROPS Design answered:
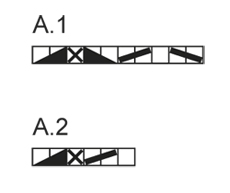
Bonjour Mme Vallon, vous trouverez les deux diagrammes entre la légende des symboles et le schéma des mesures. Il n'y a qu'un seul rang dans A.1 et A.2. Les mailles se tricotent ensuite comme indiqué dans les explications. Bon tricot!
07.04.2026 - 16:40
![]() Sharon Hunt- Dwars wrote:
Sharon Hunt- Dwars wrote:
Are armholes bound off on the right side. or wrong side Not sure as it says yo make sure 7¼"-17¾"-18"-18½" (make sure that next row is from WS),
01.02.2026 - 17:01DROPS Design answered:
Hi Sharon, The armholes are bound off from the wrong side. Regards, Drops Team.
02.02.2026 - 06:59
![]() Aline wrote:
Aline wrote:
Je ne comprends pas comment faire les dimensions entre les marqueur du bas
12.01.2026 - 17:30DROPS Design answered:
Bonjour Aline, vous devez avoir selon votre taille 88-96-104-116-128-140 m entre les marqueurs pour le dos, autrement dit les marqueurs doivent être placés à 50-54-58-64-70-76 mailles en comptant à partir de chaque extrémité des mailles pour chaque devant. Bon tricot!
14.01.2026 - 09:14
![]() Fiorella wrote:
Fiorella wrote:
Buongiorno, ho realizzato questa giacchina ma purtroppo ho sbagliato lavaggio e si è infeltrita. Chiedo se è possibile disfare il lavoro e riutilizzare la lana. Grazie mille.
26.10.2025 - 15:28DROPS Design answered:
Hi Fiorella, I'm afraid not. Please remember to always follow yarn care instructions, you will find them in each yarn colour chart and HERE.
06.11.2025 - 08:53
![]() Mai NGUYEN wrote:
Mai NGUYEN wrote:
Comment faire pour que la bordure en mousse et le jersey aient la même tension verticale ? J'ai l'impression que le jersey monte plus vite !! Merci beaucoup pour vos conseils
26.02.2025 - 09:41DROPS Design answered:
Bonjour Mme Nguyen, le point mousse a effectivement tendance à resserrer un peu, pour éviter que les bordures des devants ne remontent, vous pouvez tricoter des rangs raccourcis à intervalles réguliers (en fonction de votre tension, pour compenser la différence de hauteur): en commençant sur l'endroit, tricotez les mailles de la bordure devant, tournez et tricotez de nouveau ces mailles, tournez, tricotez toutes les mailles, tournez, tricotez les mailles de la bordure devant (sur l'envers), tournez et tricotez de nouveau ces mailles (sur l'endroit), tournez, et tricotez toutes les mailles. Bon tricot!
26.02.2025 - 17:29
![]() Nelly Cazenave wrote:
Nelly Cazenave wrote:
Bonjour Je reprends ma demande au sujet du gilet sans manche. C est abbey le modèle, j aimerai les explications T 44 svp p si c est possible Merci !
08.02.2025 - 17:35
![]() Nelly Cazenave wrote:
Nelly Cazenave wrote:
Bonjour! Je voudrai réaliser le gilet sans manche " karisma", mais je n arrive pas à comprendre et à convertir ce modèle avec ma laine que l on m'a offert. Je ne possède qu un smartphone et c est difficile pour moi . Merci beaucoup.
08.02.2025 - 15:55DROPS Design answered:
Bonjour Mme Cazenave, si votre tension n'est pas la même que celle du modèle (autrement dit si votre échantillon n'est pas de 21 m x 28 rangs jersey = 10 x 10 cm), il vous faudra recalculer entièrement les explications en fonction de votre propre tension - il peut être plus simple de recherche un modèle correspondant à votre échantillon. Bon tricot!
10.02.2025 - 09:54
![]() Carol wrote:
Carol wrote:
How many grams of dk weight yarn do I need for size XL? Thank you.
20.09.2024 - 23:12DROPS Design answered:
Dear Carol, if you are going to use a yarn different than in the pattern you need the meterage of your yarn to calculate the amount needed. You can read the following lesson for more information: https://www.garnstudio.com/lesson.php?id=14&cid=19, in the section: The amount of yarn is adjusted when changing. Happy knitting!
23.09.2024 - 00:20
![]() Monika wrote:
Monika wrote:
Guten Tag, ich würde gern das Modell Abbey mit einer feineren Wolle und Nadelstärke 3 stricken. Nehme ich einfach eine grössere Modellgrösse? Vielen Dank für Ihre Rückmeldung!
22.07.2024 - 16:28DROPS Design answered:
Liebe Monika, leider ist es nicht möglich, einfach nur eine andere Größe auszuwählen, da sich insgesamt die Maße verändern können und das Modell mit den Angaben z.B. für die Rundpasse auf die in der Anleitung genannte Maschenprobe ausgelegt ist. Wenn Sie gerne mit dünnerer Wolle stricken, sollten Sie sich eine dazu passende Anleitung suchen, oder dieses Modell mit der zur Maschenprobe passenden Wolle stricken.
23.07.2024 - 11:26
|
|||||||||||||||||||
Abbey#abbeycardigan |
|||||||||||||||||||
 |
 |
||||||||||||||||||
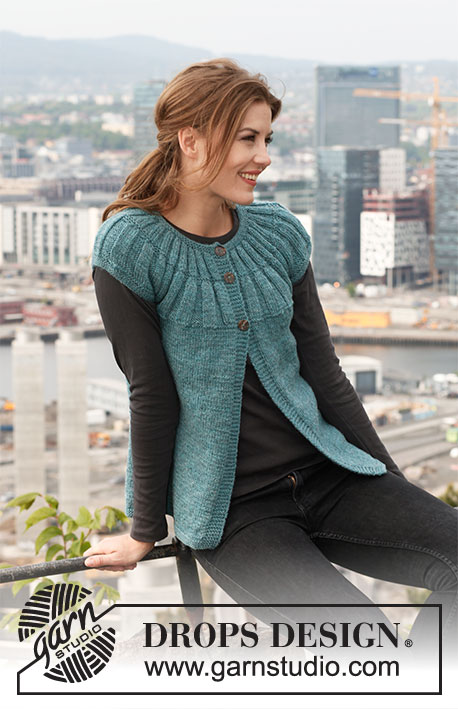
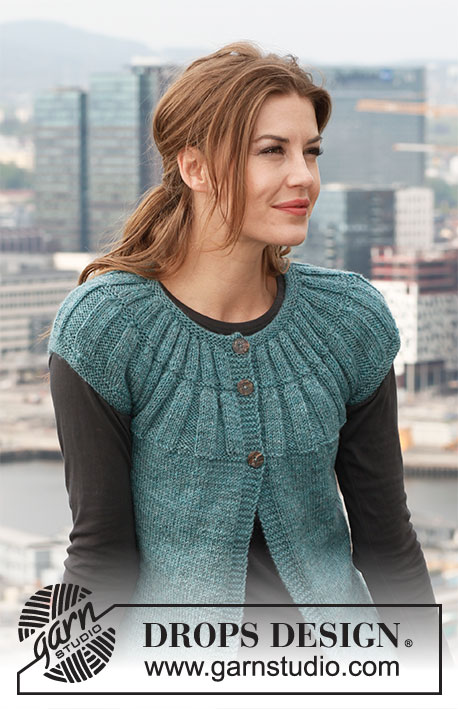
Knitted DROPS jacket with short sleeves and round yoke in ”Karisma”. Size: S - XXXL.
DROPS 142-14 |
|||||||||||||||||||
|
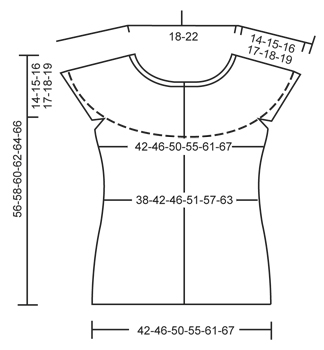
GARTER ST (back and forth on needle): K all rows. 1 ridge = 2 rows K. DECREASE TIP: All dec are done from RS. Beg 2 sts before marker and work as follows: K 2 tog, slip 1 st as if to K, K 1, psso. DECREASE (applies to round yoke): See diagrams A.1 and A.2. Diagrams show pattern from RS. BUTTONHOLES: Cast off for 3 buttonholes on right band as explained in pattern. 1 buttonhole = K tog third and fourth st from edge and make 1 YO. ---------------------------------------------------------- JACKET: Worked back and forth on circular needle from mid front. LOOSELY cast on 188-204-220-244-268-292 sts (incl 6 band sts in each side towards mid front) on circular needle size 3 mm with Karisma. Work 6 rows in GARTER ST - see explanation above. Switch to circular needle size 4 mm and work in stocking st - but continue the outermost 6 sts in each side in garter st (= bands). REMEMBER THE KNITTING TENSION! When piece measures 5 cm, insert 2 markers in the piece; 50-54-58-64-70-76 sts in from each side (= 88-96-104-116-128-140 sts between markers on back piece). On next row from RS, dec 1 st on each side of both markers - Read DECREASE TIP (= 4 sts dec). Repeat dec every 3½ cm 3 more times = 172-188-204-228-252-276 sts. When piece measures 20 cm, inc 1 st on each side of both markers (= 4 sts inc). Repeat inc every 6-6-6-7-7-7 cm 3 more times = 188-204-220-244-268-292 sts. When piece measures 42-43-44-45-46-47 cm (adjust so that next row is from WS), cast off 8-8-8-10-10-10 sts in each side for armholes (i.e. 4-4-4-5-5-5 sts on each side of both markers) = 46-50-54-59-65-71 sts on each front piece and 80-88-96-106-118-130 sts remain on back piece. Put piece aside and knit the sleeve edges. SLEEVE EDGE: Worked back and forth on circular needle. Cast on 62-64-66-70-72-74 sts on circular needle size 3 mm with Karisma. Work 6 rows in garter st (1st row = RS). Work next row as follows from RS: Cast off the first 4-4-4-5-5-5 sts, K the next 54-56-58-60-62-64 sts while AT THE SAME TIME inc 6 sts evenly over these (inc by working 2 sts in 1 st) and cast off the last 4-4-4-5-5-5 sts = 60-62-64-66-68-70 sts on needle. Put piece aside and knit another sleeve edge. YOKE: Slip sleeve edges on to same circular needle as body where armholes were cast off = 292-312-332-356-384-412 sts. Insert 1 marker – NOW MEASURE PIECE FROM HERE. K 1 row from RS AT THE SAME TIME cast off for 1 BUTTONHOLE on right band - see explanation above. K 1 row from WS, then K 1 row from RS while AT THE SAME TIME dec 5-5-5-9-7-5 sts evenly (do not dec over bands) = 287-307-327-347-377-407 sts. Work next row as follows from WS: 6 band sts in garter st, * P 5, K 5 *, repeat from *-* until 11 sts remain and finish with P 5 and 6 band sts in garter st. Continue rib like this. When piece measures approx. 6-7-7-8-9-10 cm, work next row as follows from RS: 6 band sts as before, work diagram A.1 until 11 sts remain on needle, work the next 5 sts as the first 5 sts in A.1, and finish with 6 band sts as before. After A.1 there are 177-189-201-213-231-249 sts on needle. Work 1 row K over K and P over P (work bands in garter st as before). K 1 row from RS AT THE SAME TIME cast off for 1 buttonhole on right band. K 1 row from WS and K 1 row from RS. Then work next row as follows from WS: 6 band sts as before, * P 3, K 3 *, repeat from *-* until 9 sts remain and finish with P 3 and 6 band sts as before. Continue rib like this until piece measures approx. 13-14-15-16-17-18 cm. Work next row as follows from RS: 6 band sts as before, work diagram A.2 until 9 sts remain on needle, work the next 3 sts as the first 3 sts in A.2, and finish with 6 band sts as before. After A.2 there are 122-130-138-146-158-170 sts on needle. Work 1 row K over K and P over P (work bands in garter st as before). Switch to circular needle size 3 mm and work 6 rows in garter st over all sts, AT THE SAME TIME on 1st row (i.e. RS) cast off for last buttonhole on right band and in addition dec 32-38-42-48-56-66 sts evenly (do not dec over bands) = 90-92-96-98-102-104 sts. After last row in garter st, loosely cast off with K from RS. Jacket measures approx. 56-58-60-62-64-66 cm up to shoulder. ASSEMBLY: Sew sleeve edges tog mid under sleeve - sew edge to edge in front loop of outermost sts. Sew the openings under the sleeves. Sew on buttons. |
|||||||||||||||||||
Diagram explanations |
|||||||||||||||||||
|
|||||||||||||||||||
 |
|||||||||||||||||||
 |
|||||||||||||||||||
Have you finished this pattern?Tag your pictures with #dropspattern #abbeycardigan or submit them to the #dropsfan gallery. Do you need help with this pattern?You'll find 13 tutorial videos, a Comments/Questions area and more by visiting the pattern on garnstudio.com. © 1982-2026 DROPS Design A/S. We reserve all rights. This document, including all its sub-sections, has copyrights. Read more about what you can do with our patterns at the bottom of each pattern on our site. |
|||||||||||||||||||


With over 40 years in knitting and crochet design, DROPS Design offers one of the most extensive collections of free patterns on the internet - translated to 17 languages. As of today we count 325 catalogues and 12298 patterns translated into English (UK/cm). 12298
We work hard to bring you the best knitting and crochet have to offer, inspiration and advice as well as great quality yarns at incredible prices! Would you like to use our patterns for other than personal use? You can read what you are allowed to do in the Copyright text at the bottom of all our patterns. Happy crafting!
Post a comment to pattern DROPS 142-14
We would love to hear what you have to say about this pattern!
If you want to leave a question, please make sure you select the correct category in the form below, to speed up the answering process. Required fields are marked *.