
Popular categories
Looking for a yarn?


Comments / Questions (94)
![]() Elena wrote:
Elena wrote:
Come posso fare lo scollo? Ho provato ma non mi riesce viene troppo scollato
06.04.2026 - 14:44DROPS Design answered:
Buonasera Elena, per un'assistenza così personalizzata può rivolgersi al suo rivenditore DROPS di fiducia. Buon lavoro!
08.04.2026 - 16:45
![]() Carola wrote:
Carola wrote:
Hallo, beim Rückenteil werden die Teillenabnahmen bei 10 und 20 cm gehäkelt. Beim den Vorderteilen steht, die Abnahmen sollen bei 15 und 25 cm gehäkelt werden. Ist das richtig? Liebe Grüße
04.04.2026 - 14:00DROPS Design answered:
Liebe Carola, ja so ist es richtig, die Abnahmen sind an unterschiedlichen Längen gehäkelt, um die Abnahmen an den Seiten zu gestalten (die Schrägung wird so schöner aussehen). Viel Spaß beim Häkeln!
08.04.2026 - 09:38
![]() Elena wrote:
Elena wrote:
Scusate si possono avere migliori spiegazioni per gli scalfi e per lo scollo? Oppure un diagramma? È la prima volta che mi cimento con una maglia e trovo un po di difficoltà grazie
03.04.2026 - 15:58DROPS Design answered:
Buonasera Elena, di che spiegazioni ha bisogno? Buon lavoro!
04.04.2026 - 18:02
![]() Jacinta wrote:
Jacinta wrote:
Hello, I wanted to know what the gauge refers to. It says "4x4 repetitions" should make a ten cm square. Repetitions of what? Thank you
25.11.2025 - 03:33DROPS Design answered:
Dear Jacinta, it is meant for the pattern worked, ie M.1 has 3 repeats in width and 1 repeat in height. Happy crocheting!
25.11.2025 - 09:14
![]() Doreen Vels Jacobs wrote:
Doreen Vels Jacobs wrote:
Klopt het dat bij de drops 136-13 de minderingen in de zij bij de rug en voorhanden op verschillende hoogtes zijn Rug bij 10 en 20 cm. Bij de voorpanden 15 en 25 cm?
13.08.2024 - 23:02DROPS Design answered:
Dag Doreen,
Ja, dat klopt. Dit is bewust gedaan, zodat je na het in elkaar zetten niet op één plek in de zijnaad ineens een heel groot verschil ziet, maar dat het meer verdeeld is.
16.08.2024 - 17:20
![]() Lorraine Shepherd wrote:
Lorraine Shepherd wrote:
Is the pattern written for a UK or US treble crochet? I am doing the UK one but it doesn’t seem to be making a large enough pattern.
25.09.2023 - 21:18DROPS Design answered:
Dear Mrs Shepherd, pattern is available in both language, but with treble crochets in UK-English - try with a larger crochet hook size if you have too few stitches/rows for the tension - read more here. Happy crocheting!
26.09.2023 - 11:22
![]() Carmen wrote:
Carmen wrote:
Hola, no entiendo las instrucciones de las disminuciones después de la sisa de las mangas para una talla L, ya que dice que se disminuye 1 repetición y luego 1/2 repetición 0 veces. Luego salen otros números y veces, ahí me perdí y no entiendo. Gracias 😁
09.01.2022 - 05:57DROPS Design answered:
Hola Carmen, si pone 0 significa que para esa talla no se tienen que trabajar disminuciones. Para la talla L, en la manga, solo disminuimos 8 veces a cada lado en cada fila. Tienen que quedarte al final 6 repeticiones.
10.01.2022 - 19:25
![]() Nancy wrote:
Nancy wrote:
Hello I want to make sure that i understand this part (dec for armholes in each side on every row as follows: 1 repetition 1-1-2-2-2-2 times, then ½ repetitions 0-2-2-2-4-4 times = 15-15-15-17-17-19 repetitions. When piece measures 52-54-56-58-60-62 cm) so i'll put it in steps : 1- work 1 repetition 1 time (x.1) 2- work 1/2 repetition 2 times (x.2) 3- work (m.1) until piece measures 54 cm So these steps are right or did i misunderstood??
12.08.2021 - 20:44DROPS Design answered:
Dear Nancy, that's exactly how to crochet in size M. Happy crocheting!
13.08.2021 - 07:26
![]() Nancy wrote:
Nancy wrote:
I did the first dec. after 10 cm Then how should i continue working is it using the M.1 or x.2
08.08.2021 - 19:51DROPS Design answered:
Dear Nancy, after decreasing, start and end the row as shown in X.2 and continue inbetween as before (in M.1 = middle of X.2). Happy crocheting!
09.08.2021 - 08:17
![]() Els Van Zantvliet wrote:
Els Van Zantvliet wrote:
Dank je wel voor de info
21.03.2021 - 10:57
|
||||||||||
Whispers#whisperscardigan |
||||||||||
 |
 |
|||||||||
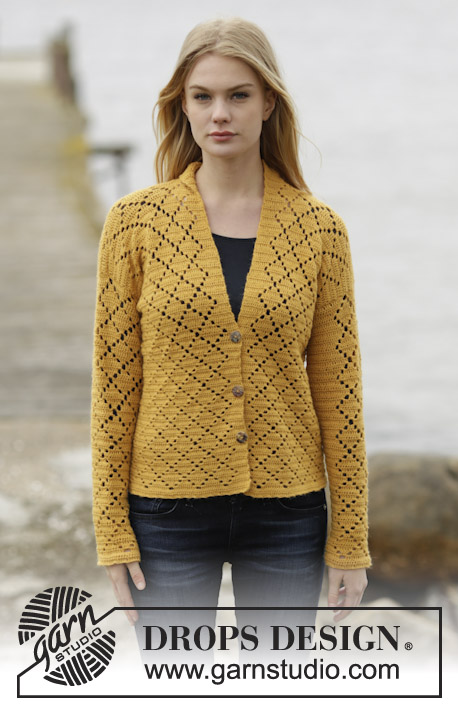
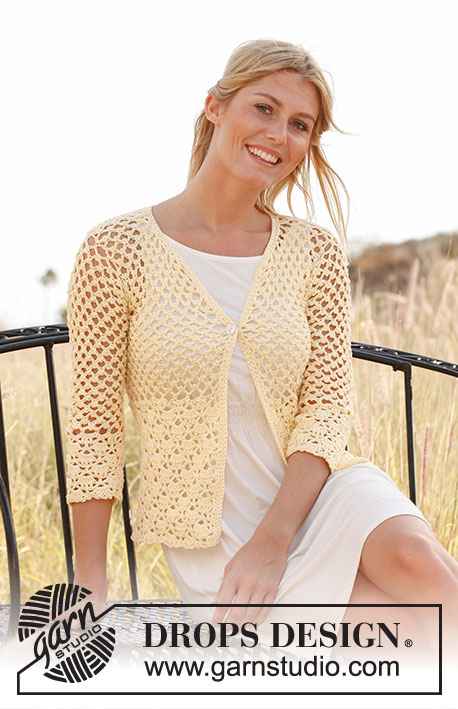
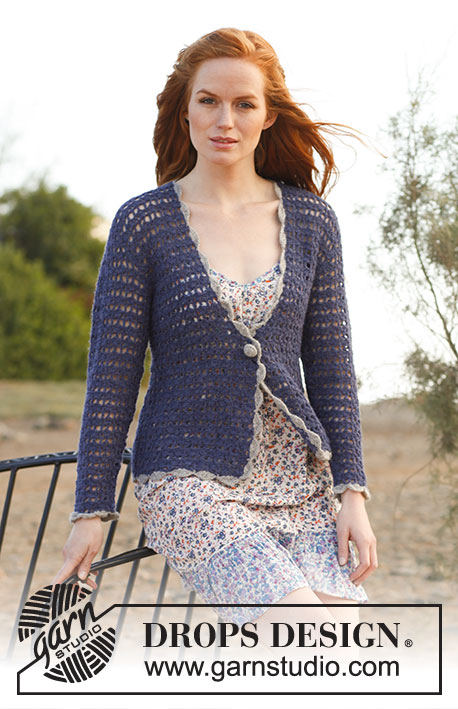
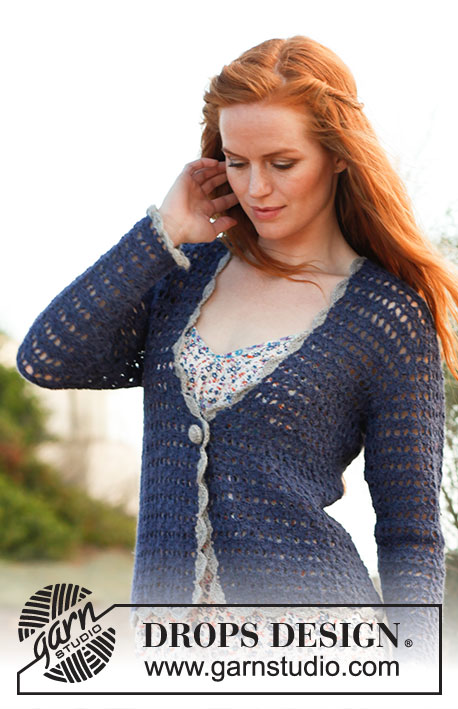
Crochet DROPS jacket in ”Alpaca”. Size: S - XXXL.
DROPS 136-13 |
||||||||||
|
CROCHET INFO: Replace first tr at beg of row with 3 ch. PATTERN: See diagram M.1. Repeat row 1 and 2. M.1 shows 3 repeats in width and 1 repeat in height. MEASURING TIP: The garment will be longer because of pattern. All measurements must therefore be done while holding up the garment. DECREASE TIP: Dec 1 repetition in diagram X.1, or ½ repetition in diagram X.2. Dec at beg of row as follows: Replace 1 repetition with 6 sl st and ½ repetition with 3 sl st. Dec at end of row as follows: Turn piece when either 1 or ½ repetition remains. INCREASE TIP (applies to sleeve): Inc ½ repetition. Inc by turning with 6/7 ch instead of 3, see diagram X.3. -------------------------------------------------------- -------------------------------------------------------- BACK PIECE: Work 120-132-144-156-168-180 ch (incl 8 ch to turn with) on hook size 3.5 mm with blue. Work 1 tr in the 9th ch from hook, * 2 ch, skip 2 ch, 1 tr in next ch *, repeat from *-* = 39-43-47-51-55-59 tr. Continue to work diagram M.1 (1st row is now done, beg on 2nd row) = 19-21-23-25-27-29 repetitions. When piece measures 10 and 20 cm - Read MEASURING TIP, dec ½ repetition in each side – read DECREASE TIP and see diagram X.2 = 17-19-21-23-25-27 repetitions. When piece measures 35-36-37-38-39-40 cm, dec for armholes in each side on every row as follows: 1 repetition 1-1-2-2-2-2 times, then ½ repetitions 0-2-2-2-4-4 times = 15-15-15-17-17-19 repetitions. When piece measures 52-54-56-58-60-62 cm, work 1 row only over the outermost 6-6-6-6-6-7 repetitions in each side (do not work over the middle 3-3-3-5-5-5 repetitions = neck line). Work 1 more row, cut and fasten the thread, the piece measures approx. 54-56-58-60-62-64 cm. RIGHT FRONT PIECE: READ ALL OF THE FOLLOWING SECTION BEFORE CONTINUING! Work 66-72-78-84-90-96 ch (incl 8 ch to turn with) on hook size 3.5 mm with blue. Beg from mid front and work towards the side. Work 1 tr in the 9th ch from hook, * 2 ch, skip 2 ch, 1 tr in next ch *, repeat from *-* = 21-23-25-27-29-31 tr. Continue to work diagram M.1 (1st row is now done, beg on 2nd row) = 10-11-12-13-14-15 repetitions. When piece measures 15 and 25 cm, dec in the side as on back piece. AT THE SAME TIME when piece measures 23-24-25-26-27-28 cm, dec for neck on every other row towards mid front as follows: Dec ½ repetition 4-4-4-6-6-6 times. AT THE SAME TIME when piece measures 35-36-37-38-39-40 cm, dec for armhole in the side as on back piece. After all dec, 6-6-6-6-6-7 repetitions remain for shoulder. Work until piece measures 54-56-58-60-62-64 cm, cut and fasten the thread. LEFT FRONT PIECE: Work as right front piece. SLEEVE: Work 60-60-66-66-72-72 ch (incl 8 ch to turn with) on hook size 3.5 mm with blue. Work 1 tr in the 9th ch from hook, * 2 ch, skip 2 ch, 1 tr in next ch *, repeat from *-* = 19-19-21-21-23-23 tr. Continue to work diagram M.1 (1st row is now done, beg on 2nd row) = 9-9-10-10-11-11 repetitions. When piece measures 6 cm, inc ½ repetition in each side, repeat inc every 12-7-7-7-7-7 cm 3-5-5-5-5-5 more times - read INCREASE TIP = 13-15-16-16-17-17 repetitions. When piece measures 48-47-47-46-46-45 cm (shorter measurements in the larger sizes because of longer sleeve cap and broader shoulder width) dec 1 repetition in each side for sleeve cap. Then dec ½ repetition in each side on every other row a total of 0-0-0-0-2-2 times, then on every row 6-7-8-8-6-6 times = 5-6-6-6-7-7 repetitions. Work until piece measures 57-57-58-58-59-59 cm, cut and fasten the thread. ASSEMBLY: Sew the shoulder seams. Sew in sleeves. Sew sleeve and side seams in one - sew edge to edge with neat, little stitches. CROCHET EDGE: Work an edge on hook size 3.5 mm with light grey up along right front piece, around the neckline, down along left front piece, around the bottom edge and then around the sleeves as follows: Work 1 dc, * skip 2 cm, 4 dtr in next ch, 2 ch, 4 dtr in same st, skip 2 cm, 1 dc in next st *, repeat from *-* and finish with one sl st in first dc. BUTTON COVER: Work cover for 1 button on hook size 3.5 mm with light grey as follows: Work 2 ch, then work 16 tr in the first of the 2 ch worked, finish with 1 sl st at top of first tr (= 1ST ROUND). ROUND 2: Work 1 dc in every tr and finish with 1 sl st in first dc on round. ROUND 3: Work 1 tr in every other dc and finish with 1 sl st in first tr on round = 8 tr. Place button inside the cover, sew around the edge and tighten tog. Sew button on to left front piece, directly before neck dec beg. Use holes in the pattern as button hole. |
||||||||||
Diagram explanations |
||||||||||
|
||||||||||
 |
||||||||||
 |
||||||||||
Have you finished this pattern?Tag your pictures with #dropspattern #whisperscardigan or submit them to the #dropsfan gallery. Do you need help with this pattern?You'll find 6 tutorial videos, a Comments/Questions area and more by visiting the pattern on garnstudio.com. © 1982-2026 DROPS Design A/S. We reserve all rights. This document, including all its sub-sections, has copyrights. Read more about what you can do with our patterns at the bottom of each pattern on our site. |
||||||||||


With over 40 years in knitting and crochet design, DROPS Design offers one of the most extensive collections of free patterns on the internet - translated to 17 languages. As of today we count 324 catalogues and 12290 patterns translated into English (UK/cm). 12290
We work hard to bring you the best knitting and crochet have to offer, inspiration and advice as well as great quality yarns at incredible prices! Would you like to use our patterns for other than personal use? You can read what you are allowed to do in the Copyright text at the bottom of all our patterns. Happy crafting!
Post a comment to pattern DROPS 136-13
We would love to hear what you have to say about this pattern!
If you want to leave a question, please make sure you select the correct category in the form below, to speed up the answering process. Required fields are marked *.