
Popular categories
Looking for a yarn?


Comments / Questions (50)
![]() Ada wrote:
Ada wrote:
Klopt het dat in de 2e naald de laatste 8 steken niet gebreid moeten worden? En in de 4e, 6e, enz. ook niet?
22.07.2021 - 22:09DROPS Design answered:
Dag Ada,
Nee, in de tweede naald van het patroon worden alle steken gewoon gebreid, ook in de andere naalden.
20.08.2021 - 11:27
![]() Debra wrote:
Debra wrote:
I am really confused! I do have 8sts after my last maker and I think I am supposed to turn. Am I working the row 1 pattern all the way back across? Then I am really confused about the short row pattern. I have done short rows before, but this is really confusing. Are top rows the same as right side and bottom rows the same as wrong side? Am I following the entire short row instructions all at one time or what?
23.04.2018 - 17:06DROPS Design answered:
Dear Debra, the first row from WS is worked in pattern as the first row from RS (= work garter st over garter st and row 2 in M.1 over sts in M.1, row 2 edge pattern over the 17 sts). Continue as pattern is established (continuing pattern/diagram) knitting short rows at the same time. Happy knitting!
24.04.2018 - 09:28
![]() Valerie TURCQ wrote:
Valerie TURCQ wrote:
Parfait ! superbe rendu... un peu compliqué à suivre entre points ajourés et rangs raccourcis mais avec la patience on y arrive. Merci Drops !
28.05.2017 - 12:10
![]() Jill wrote:
Jill wrote:
I am very confused on the short rows. Can you explain it any better for me to understand?
03.10.2016 - 04:08DROPS Design answered:
Dear Jill, short rows are worked beg from WS: *work 2 rows over the sts from bottom to 1st marker, 2 rows over sts from bottom to 2nd marker, 2 rows over sts from bottom to 3rd marker, 2 rows over sts from bottom to 4th marker (work M.1 as in diagram), 2 rows over all sts (work M.1 as in diagram)* = You have now worked 12 rows over the sts on the bottom and 2 rows over the sts at the very top (= work M.1 when working sts in M.1). Happy knitting!
03.10.2016 - 10:18
![]() Jill wrote:
Jill wrote:
When I get to the edge pattern on row 1, everything seems to work out alright as far as my stitches go. But then I go to row 2, and I have an extra stitch....18 stitches instead of 17 stitches. I don't know what I am doing wrong, and I have ripped it out and redone it three times and I get the same result every time.
08.07.2016 - 19:18DROPS Design answered:
Dear Jill, on row 2 in edge pattern, you work over the 18 sts from row 1 as follows: K 3, P 3, K 1, P 3, K 2, 1 YO, P 2 tog, 1 YO, P 2 tog, K 1 (= 17 sts). Do not hesitate to swatch only the edge pattern sts to train yourself on less sts. Happy knitting!
11.07.2016 - 08:34
![]() ENCARNACION RIOS BARCENA wrote:
ENCARNACION RIOS BARCENA wrote:
Se podría ver mejor la parte baja de la túnica? lo estoy haciendo siguiendo el patrón pero tengo alguna duda de cómo se unen las ondas-picos. Viéndolo mejoraría las dudas pero no puedo ampliar la parte baja. Patrón 139-4 el que lleva la botonadura al frente. Gracias. Sois muy generosos y con vosotros se aprende un montón viendo los videos sobretodo.
17.01.2015 - 15:05DROPS Design answered:
Hola Encarnación, el modelo 139-4 que indicas no tiene botonadura. El modelo 139-3 si la tiene. Puedes intentar descargar la foto y ampliarla pero no se si tendrá suficiente calidad. Si no te ayuda puedes concretarme la duda que tienes para poder ayudarte.
18.01.2015 - 00:12
![]() Tanja wrote:
Tanja wrote:
Hallo nochmal, ich habe jetzt "nach Gefühl" gestrickt... :-) Ich glaube es passt so. Trotzdem vielen Dank!
28.05.2013 - 10:27
![]() Tanja wrote:
Tanja wrote:
So, zur 2. Frage habe ich eine Lösung gefunden: Es sind immer sechs Reihen, die sich wiederholen. Man sollte erst probieren, bevor man fragt... ;-)
26.05.2013 - 14:24
![]() Tanja wrote:
Tanja wrote:
2. Frage: Wie stricke ich den Ärmel richtig? Bis zur 3. Markierung, drehen und BIS ZUM ENDE DER R also inklusive der 8 Hals-M oder ist in dieser Rückreihe bereits das Stricken bis zur 4. Markierung/ Wenden enthalten? Die 2 R über alle M beginnen gleich beim Wenden der Arbeit, wenn ich auf der einen Seite wieder über die Markierung stricke? Wie ist es mit den zwei R über alle M zu verstehen? Ist der Rapport im Ärmel immer über 5 R zu sehen? Vielen Dank für die Bearbeitung!
25.05.2013 - 13:58
![]() Tanja wrote:
Tanja wrote:
Hallo, ich habe Fragen zum li. Ärmel. 1. Frage: Vor dem Stilllegen der Seitenmaschen: Wenn ich von der Rücks. bis zu den 5 M hochstricke, muss ich das im Muster, also bis 1. Markierung, zurück, bis 2. Markierung, zurück und DANN bis zu den 5 M stricken ODER ohne Berücksichtigung des Rapportes?
25.05.2013 - 13:57DROPS Design answered:
Liebe Tanja, ich bin nach ihrem letzten Kommentar nicht sicher, ob sich Ihre Fragen erledigt haben, oder ob noch etwas unklar ist.
27.05.2013 - 11:45
|
|||||||||||||||||||||||||
Apple Blossom#appleblossomtunic |
|||||||||||||||||||||||||
|
|
|||||||||||||||||||||||||
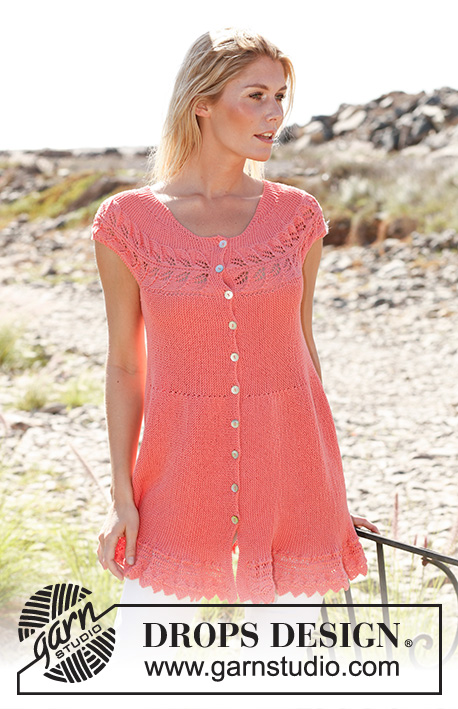
Knitted DROPS tunic worked sideways in garter st with lace pattern in ”Safran”. Size: S - XXXL
DROPS 139-4 |
|||||||||||||||||||||||||
|
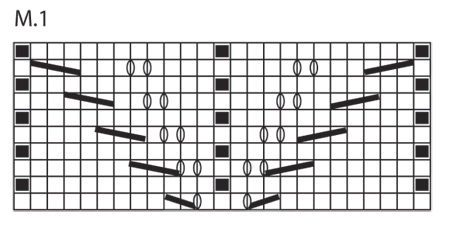
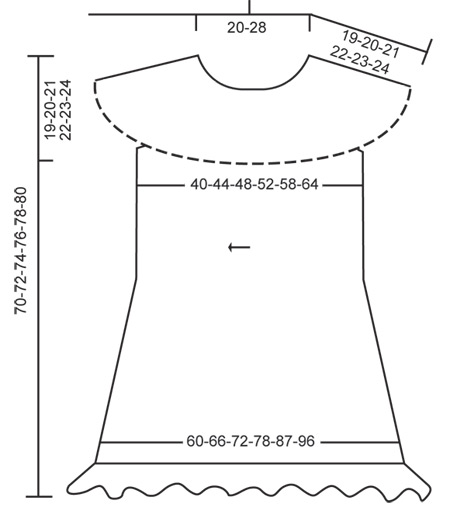
EDGE PATTERN: ROW 1 (= RS): K 3, 1 YO, P 2 tog, 1 YO, P 2 tog, 1 YO, K 1 twisted, K 2 tog, P 1, K 2 twisted tog, K 1 twisted, 1 YO, K 3 (= 17 sts). ROW 2 (= WS): K 3, P 3, K 1, P 3, K 2, 1 YO, P 2 tog, 1 YO, P 2 tog, K 1 (= 17 sts). ROW 3-4: Work as 1st and 2nd row. ROW 5: K 3, 1 YO, P 2 tog, 1 YO, P 2 tog, 1 YO, K 1 twisted, 1 YO, K 2 tog, P 1, K 2 twisted tog, 1 YO, K 4 (= 18 sts). ROW 6: K 4, P 2, K 1, P 4, K 2, 1 YO, P 2 tog, 1 YO, P 2 tog, K 1 (= 18 sts). ROW 7: K 3, 1 YO, P 2 tog, 1 YO, P 2 tog, 1 YO, K 1 twisted, K 1, K 1 twisted, 1 YO, slip 1 st as if to K, K 2 tog, psso, 1 YO, K 5 (= 19 sts). ROW 8: K 5, P 7, K 2, 1 YO, P 2 tog, 1 YO, P 2 tog, K 1 (= 19 sts). ROW 9: K 3, 1 YO, P 2 tog, 1 YO, P 2 tog, 1 YO, K 1 twisted, K 3, K 1 twisted, 1 YO, K 7 (= 21 sts). ROW 10: Cast off 4 sts (1 st is now on right needle), K 2, P 7, K 2, 1 YO, P 2 tog, 1 YO, P 2 tog, K 1 (= 17 sts). REPEAT THESE 10 ROWS. LACE PATTERN: See diagram M.1, diagram shows pattern from RS. GARTER ST (back and forth on needle): K all rows. 1 ridge = 2 rows K. SHORT ROWS: Work 1st row from bottom edge (= from WS): * Work until 1st marker, turn, work back, work until 2nd marker, turn, work back, work until 3rd marker, turn, work back, work until 1st marker, turn, work back, work until 4th marker, turn and work back, work 2 rows over all sts. * Repeat from *-*, i.e. 12 rows at the bottom and 2 rows at the top in 1 repetition. -------------------------------------------------------- TUNIC: Worked sideways from mid back to mid back and sewn tog afterwards. Worked back and forth on a circular needle to make room for all the sts. NOTE: THE PICTURE HAS BEEN REVERSED IN THE CATALOGUE! LOOSELY cast on 161-166-170-175-180-185 sts on circular needle size 3 mm. K 1 row over all sts (= WS). Work next row as follows from the top (= RS): 16-18-19-21-23-25 sts in GARTER ST – see explanation above, diagram M.1 (= 25 sts), 103-106-109-112-115-118 sts in garter st and then EDGE PATTERN over the last 17 sts - see explanation above. Work next row as follows from bottom edge (= WS) at the same time insert 4 markers in the piece as follows: Edge pattern over the first 17 sts, insert 1st marker, work 65-65-67-67-69-69 sts in garter st, insert 2nd marker, work 38-41-42-45-46-49 sts in garter st, insert 3rd marker, work diagram M.1 and work 8-10-11-13-15-17 sts in garter st, insert 4th marker, 8 sts remain after last marker. Turn and work 1 row back as 1st row. Continue the pattern like this – AT THE SAME TIME work SHORT ROWS, beg from WS – see explanation above! When piece measures approx. 19-20-22-23-26-28 cm measured between 2nd and 3rd marker – measured from cast on edge and out to needle (adjust after 1 whole repetition with short rows), work next row as follows from WS: Work until 3-3-4-4-5-5 sts remain before 3rd marker (44-46-48-50-53-55 sts should remain), slip the sts just worked on a stitch holder. Work the row as before, turn and work back as before over the 44-46-48-50-53-55 sts. Then work back and forth over only the sts on the needle (= left sleeve). LEFT SLEEVE: Work pattern and in garter st as before with short rows as follows: * Work until 3rd marker (= 3-3-4-4-5-5 sts), turn and work back, work until 4th marker, turn and work back, work 2 rows over all sts *, repeat from *-* until sleeve measures approx. 26-28-30-32-34-36 cm in bottom edge - finish after 1 row from RS. Slip the sts on a stitch holder. LEFT SIDE PIECE: Slip sts from the first stitch holder back on needle and work 1 row from RS as before. Then work pattern as before and short rows as follows: * Work until 1st marker, turn and work back, work until 2nd marker, turn and work back, work 2 rows over all sts *, repeat from *-* until piece measures 2-4-4-6-6-8 cm at the top under the sleeve - finish after 1 row from RS over all sts. FRONT PIECE: Work all sts on needle + sts from stitch holder back on circular needle (this row is worked from WS without short rows). NOW MEASURE PIECE FROM HERE! Work 1 row back from RS with pattern as before. Then continue with pattern, in garter st and short rows as before until piece measures 38-40-44-46-52-56 cm measured between 2nd and 3rd marker (adjust after 1 whole repetition with short rows). Now work next row from WS as follows: Work until 3-3-4-4-5-5 sts remain before 3rd marker, 44-46-48-50-53-55 sts should remain, slip the sts just worked on a stitch holder. Work the row as before, turn and work back as before over the 44-46-48-50-53-55 sts. Then work back and forth over only the sts on the needle (= right sleeve). RIGHT SLEEVE: Work as left sleeve. RIGHT SIDE PIECE: Work as left side piece. BACK PIECE: Work all sts on needle + sts from stitch holder back on needle. NOW MEASURE PIECE FROM HERE! Then continue with pattern, in garter and short rows as before. Work until piece measures approx. 19-20-22-23-26-28 cm measured between 2nd and 3rd marker (adjust after 1 whole repetition of Edge pattern and preferably also diagram M.1 if that fits). LOOSELY cast off - it is very important to avoid a tight cast off edge - if it is tight, the garment will not hang nicely. ASSEMBLY: Sew seam mid back – sew cast off edge against cast on edge, edge to edge with 1 stitch in every st. |
|||||||||||||||||||||||||
Diagram explanations |
|||||||||||||||||||||||||
|
|||||||||||||||||||||||||
 |
|||||||||||||||||||||||||
 |
|||||||||||||||||||||||||
Have you finished this pattern?Tag your pictures with #dropspattern #appleblossomtunic or submit them to the #dropsfan gallery. Do you need help with this pattern?You'll find 16 tutorial videos, a Comments/Questions area and more by visiting the pattern on garnstudio.com. © 1982-2026 DROPS Design A/S. We reserve all rights. This document, including all its sub-sections, has copyrights. Read more about what you can do with our patterns at the bottom of each pattern on our site. |
|||||||||||||||||||||||||


With over 40 years in knitting and crochet design, DROPS Design offers one of the most extensive collections of free patterns on the internet - translated to 17 languages. As of today we count 324 catalogues and 12290 patterns translated into English (UK/cm). 12290
We work hard to bring you the best knitting and crochet have to offer, inspiration and advice as well as great quality yarns at incredible prices! Would you like to use our patterns for other than personal use? You can read what you are allowed to do in the Copyright text at the bottom of all our patterns. Happy crafting!
Post a comment to pattern DROPS 139-4
We would love to hear what you have to say about this pattern!
If you want to leave a question, please make sure you select the correct category in the form below, to speed up the answering process. Required fields are marked *.