
Popular categories
Looking for a yarn?


Comments / Questions (51)
![]() Kathryn Nicholls wrote:
Kathryn Nicholls wrote:
Almost ready to give up. One last go. Tried trellis pattern written down and it was perfect. Just can't get this to work.
13.10.2024 - 20:31
![]() Sofia Broborg wrote:
Sofia Broborg wrote:
Symbolförklaringarna för högerlutande minskning / och vänsterlutande minskning \ verkar ha bytt plats? Eller ska det vara som det står? Väldigt förvirrande att bryta standard så i s f. Såhär BRUKAR symbolerna förklaras, men i beskrivningen står det alltså tvärtom: / = 2 rm tills (högerlutande minskning) \ = lyft 1 m , 1 rm, drag den lyfta m över (vänsterlutande minskning)
08.06.2024 - 02:06DROPS Design answered:
Hej Sofia. Ja det ska vara som det står, symbolförklaringarna är dessvärre inte alltid lika i de olika mönstren. Mvh DROPS Design
11.06.2024 - 08:30
![]() Inga-britta Strindberg wrote:
Inga-britta Strindberg wrote:
Stickas avigsidan på mönstret ,M1, med enbart räta maskor förutom de två i mitten?
24.02.2023 - 11:01DROPS Design answered:
Hej Inga-Britta, Varv 2 stickar du också enligt diagrammet från avigsidan: 2 rm, 2 am, 1rm i främre+1rm i bakre, 2am, 2rm :)
28.02.2023 - 14:59
![]() Susan wrote:
Susan wrote:
Sorry to ask again. I am not sure what the 4 stitches are for m.1b Anyway to get written directions? Im not doing well with the chart
20.09.2022 - 03:08DROPS Design answered:
Dear Susan - see answer below - the lesson on how to read diagrams linked below might help you. Happy knitting!
20.09.2022 - 10:04
![]() Susan wrote:
Susan wrote:
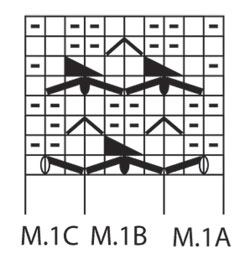
Ok so i am struggling with the chart. Are the directions written out any where? Im not sure what the 3 stitches of m.1a , 4 stitches of m.1b and same for m.1c are.
19.09.2022 - 20:35DROPS Design answered:
Dear Susan, there is only diagramsm to this pattern; but please read more about diagrams here, you will first start the pattern with the 3 sts marked with M.1A in the diagram, then repeat the 4 sts marked with M.1B and finish the pattern with the 3 sts in M.1C. From wrong side, read from the left towards the right: work M.1C, repeat M.1B and finish with M.1A. Happy knitting!
20.09.2022 - 09:54
![]() Susan wrote:
Susan wrote:
Please explain 1 YO, M.1A (= 3 sts), repeat M.1B until 3 sts remain before 2 mid sts, M.1C (=3 sts). Etc. TYIA!
18.09.2022 - 13:43DROPS Design answered:
Dear Susan, M.1A, M.1B and M.1C are shown in the charts below the pattern instructions. After the yarn over, work the 3 sts of M.1A. Then, work the 4 stitches of M.1b and repeat these 4 stitches until 3 sts remain before the mid sts. Then work the 3 sts in M.1C. For more information on how to interpret the charts, please check the following lesson: https://www.garnstudio.com/lesson.php?id=68&cid=19. Happy knitting!
18.09.2022 - 18:46
![]() Lara wrote:
Lara wrote:
C\'è scritto che il diagramma mostra il diritto del lavoro, ma nel secondo giro dal basso (da sx a dx) si lavora i gettati .... quindi sul rovescio?
23.01.2022 - 22:22DROPS Design answered:
Buonasera Lara, il diagramma inizia dall'angolo in basso a destra verso sinistra, dal diritto del lavoro e mostra tutti i ferri, sia dal diritto che dal rovescio del lavoro. Buon lavoro!
24.01.2022 - 22:44
![]() Marie-Claire wrote:
Marie-Claire wrote:
Très mal expliqué à partir du point de fantaisie . Seul le 1er rang est clair puisqu’il a été décrit. Il serait judicieux de décrire les 3 ou 4 premiers rangs. Ainsi le reste de point de fantaisie se fera sans problème. Merci de tenir compte de ce commentaire .
22.12.2021 - 23:31
![]() RIVALAIN EVELINE wrote:
RIVALAIN EVELINE wrote:
TUTORIEL VIDEO SVP. POINT FANTAISIE au rang suivant sur l'endroit ainsi : 4 m de bordure au point mousse, 1 jeté, M.1A (= 3 m), répéter M.1B jusqu'à ce qu'il reste 3 m avant les 2 m centrales, M.1C (= 3 m), 1 jeté, 2 m end, 1 jeté, M.1A, répéter M.1B jusqu'à ce qu'il reste 3 m avant les 4 m de bordure au point mousse, M.1C, 1 jeté, 4 m de bordure au point mousse
11.11.2021 - 08:48DROPS Design answered:
Bonjour Mme Rivalain, cette leçon explique comment lire les diagrammes, et devrait ainsi vous aider à pouvoir réaliser ce motif. Commencez sur un échantillon avec moins de mailles si besoin, c'est souvent plus simple pour bien maîtriser le point avant de commencer sur davantage de mailes. Bon tricot!
11.11.2021 - 09:06
![]() Den wrote:
Den wrote:
Bonjour, J’en suis au point fantaisie. Sur les rangs endroits, il faut faire un jeté avant et après M1. Comment doit on tricoter ces jetés sur l’envers ? Il me semble que j’ai des mailles en trop à partir du 3ieme rang du point fantaisie. Merci pour votre aide.
28.08.2021 - 20:08DROPS Design answered:
Bonjour Den, tricotez ces augmentations au point mousse jusqu'à ce que vous ayez augmenté 4 mailles, vous avez alors suffisamment de mailles pour tricoter 1 motif de M.1B en plus = tricotez M.1A sur les 3 premières mailles augmentées, puis tricotez M.1B sur les 4 mailles suivantes: la 4ème des mailles augmentées + les 3 mailles du M.1A précédent - en fin de rang, tricotez M.1B sur les 3 m du M.1C précédent + la 1ère des 4 augmentations et terminez par M.1C au-dessus des 3 dernières mailles augmentées. Bon tricot!
30.08.2021 - 07:40
|
|||||||||||||||||||||||||
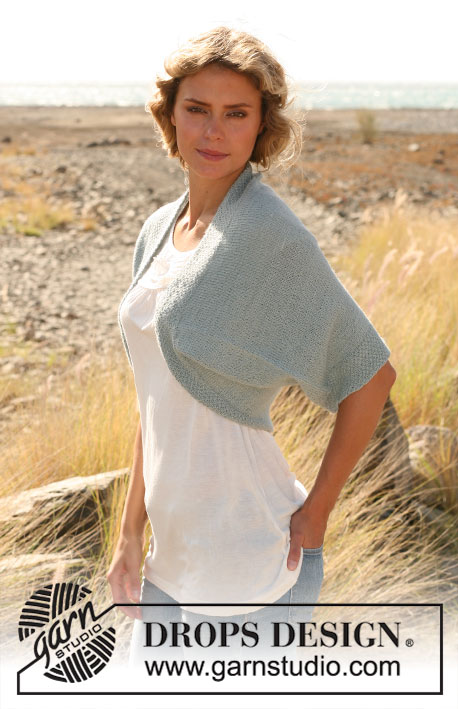
Trellis Shawl#trellisshawl |
|||||||||||||||||||||||||
|
|
|||||||||||||||||||||||||
Knitted DROPS shawl with pattern in ”Alpaca” and ”Kid-Silk”.
DROPS 129-37 |
|||||||||||||||||||||||||
|
GARTER ST (back and forth on needle): K all rows. INCREASE TIP: All inc are done from RS. Inc 4 sts on every other row until finished measurements as follows: Inc 1 st at beg of row as follows: 4 edge sts in garter st, 1 YO. Inc 2 sts in the mid of piece as follows: 1 YO, 2 mid sts in stocking st, 1 YO. Inc 1 st at the end of row as follows (start when 4 sts remain): 1 YO, 4 edge sts in garter st. MEASURING TIP: All measurements are done along the middle of the shawl. PATTERN: See diagram M.1. The diagram shows the pattern from RS. PATTERN TIP: Until there are 4 sts inc to complete a full new repeat in M.1 B, these new inc sts are K on every row. --------------------------------------------------------- SHAWL: Worked back and forth, top down on circular needle. Cast on 4 sts on circular needle size 5 mm with 1 thread Alpaca and 1 thread Kid-Silk. K 1 row from WS. Work the next 12 rows as follows: 1st row (RS): K 1, 1 YO, K 2 (= mid sts), 1 YO, K 1 = 6 sts. 2nd, 4th, 6th, 8th, 10th and 12th row (WS): K all sts but P the 2 mid sts. 3rd row: K 2, 1 YO, K 2 (= mid sts), 1 YO, K 2. 5th row: K 3, 1 YO, K 2 (= mid sts), 1 YO, K 3. 7th row: K 4, 1 YO, K 2 (= mid sts), 1 YO, K 4. 9th row: K 5, 1 YO, K 2 (= mid sts), 1 YO, K 5. 11th row: K 4 (= edge sts), 1 YO, K 2, 1 YO, K 2 (= mid sts), 1 YO, K 2, 1 YO, K 4 (edge sts). Then work in GARTER ST - see explanation above - over all sts but work the 2 mid sts in stocking st. AT THE SAME TIME inc 4 sts on every row from RS - read INCREASE TIP. Work until there are 18 sts in each side between the 4 edge sts in garter st and the 2 mid sts = a total of 46 sts. The piece now measures approx. 8 cm - read MEASURING TIP. Then work PATTERN on next row from RS: 4 edge sts in garter st, 1 YO, M.1A (= 3 sts), repeat M.1B until 3 sts remain before the 2 mid sts, M.1C (= 3 sts), 1 YO, K 2, 1 YO, M.1A, repeat M.1B until 3 sts remain before the 4 edge sts in garter st, M.1C, 1 YO, 4 edge sts in garter st - read PATTERN TIP. Continue like this until piece measures approx. 22 cm. Now work in stocking st with 4 edge sts in garter st in the sides and inc as before until there are 94 sts in each side between the 4 edge sts in garter st and the 2 mid sts = a total of 198 sts. The piece measures approx. 42 cm. Then work from RS as follows: 4 edge sts in garter st, 1 YO, M.1A, repeat M.1B until 3 sts remain before the 2 mid sts, M.1C, 1 YO, K 2, 1 YO, M.1A, repeat M.1B until 3 sts remain before the 4 edge sts in garter st, M.1C, 1 YO, 4 edge sts in garter st. When piece measures approx. 57 cm, work in garter st over all sts with 4 inc as before and the 2 mid sts in stocking st. Cast off after approx. 18 rows in garter st (9 ridges) or when piece measures 65 cm. |
|||||||||||||||||||||||||
Diagram explanations |
|||||||||||||||||||||||||
|
|||||||||||||||||||||||||
 |
|||||||||||||||||||||||||
Have you finished this pattern?Tag your pictures with #dropspattern #trellisshawl or submit them to the #dropsfan gallery. Do you need help with this pattern?You'll find 14 tutorial videos, a Comments/Questions area and more by visiting the pattern on garnstudio.com. © 1982-2026 DROPS Design A/S. We reserve all rights. This document, including all its sub-sections, has copyrights. Read more about what you can do with our patterns at the bottom of each pattern on our site. |
|||||||||||||||||||||||||


With over 40 years in knitting and crochet design, DROPS Design offers one of the most extensive collections of free patterns on the internet - translated to 17 languages. As of today we count 324 catalogues and 12290 patterns translated into English (UK/cm). 12290
We work hard to bring you the best knitting and crochet have to offer, inspiration and advice as well as great quality yarns at incredible prices! Would you like to use our patterns for other than personal use? You can read what you are allowed to do in the Copyright text at the bottom of all our patterns. Happy crafting!
Post a comment to pattern DROPS 129-37
We would love to hear what you have to say about this pattern!
If you want to leave a question, please make sure you select the correct category in the form below, to speed up the answering process. Required fields are marked *.