
Popular categories
Looking for a yarn?


Comments / Questions (5)
![]() Anita Dersen wrote:
Anita Dersen wrote:
Leider ist die Anleitung für mich nicht verständlich. Gibt es hierzu evtl. ein komplettes Strickdiagramm ?
05.09.2024 - 20:34DROPS Design answered:
Liebe Frau Dersen, wir haben hier nicht nur solche Anleitung, gerne stellen Sie aber Ihre Frage hier, wir versuchen gerne, Ihnen weiterzuhelfen. Viel Spaß beim Stricken!
06.09.2024 - 08:41
![]() Carmen Dhainaut wrote:
Carmen Dhainaut wrote:
Bonjour j'aimerai bien savoir avec aiguilles circulaires étant alitée je tricote beaucoup ma petite fille me demande pour lui en faire un merci beaucoup pour votre aide 🌹💋
30.08.2024 - 07:10
![]() Carmen Dhainaut wrote:
Carmen Dhainaut wrote:
Bonjour j'aimerai bien savoir avec aiguilles circulaires étant alitée je tricote beaucoup ma petite fille me demande pour lui en faire un merci beaucoup pour votre aide 🌹💋
30.08.2024 - 07:09
![]() Andrea wrote:
Andrea wrote:
Schade, dass es kein Foto von der Rückseite gibt.
22.05.2024 - 11:47
![]() Helena wrote:
Helena wrote:
Krásny top, určite si ho upletiem k letným sukniam.
16.04.2024 - 06:06
|
||||||||||||||||
Pearl Strings Top#pearlstringstop |
||||||||||||||||
 |
 |
|||||||||||||||
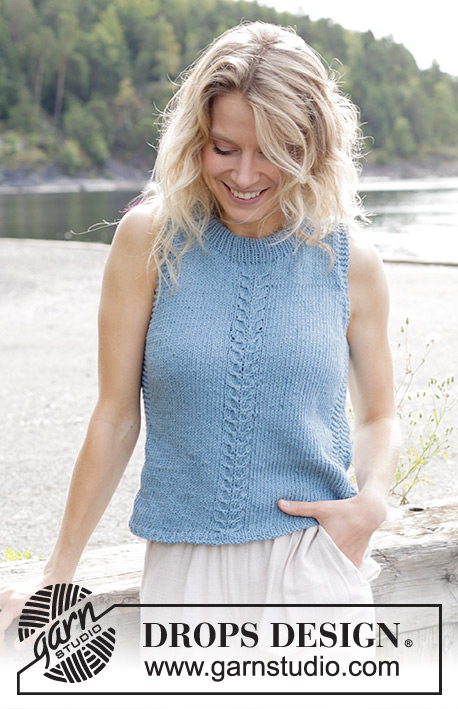
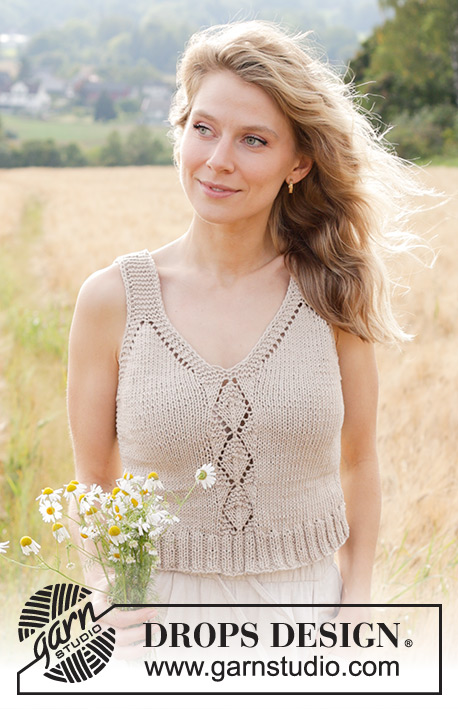
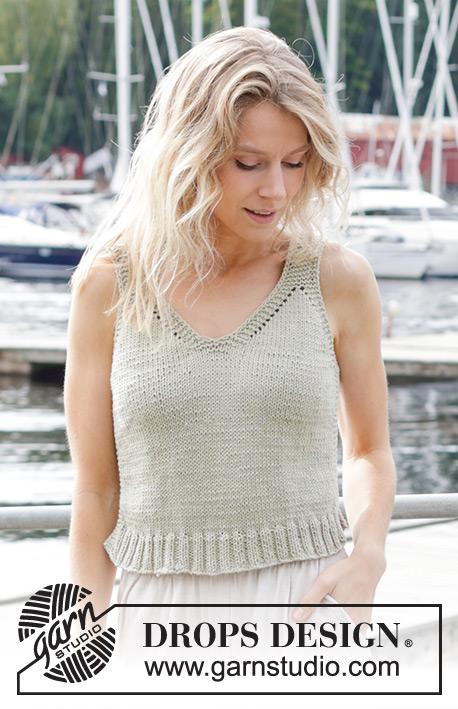
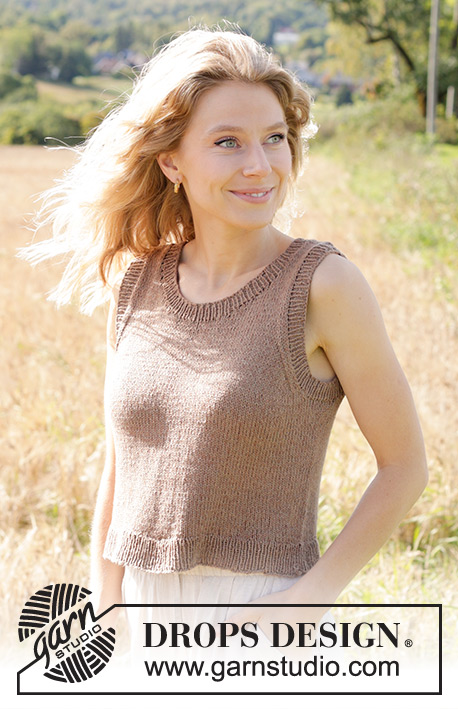
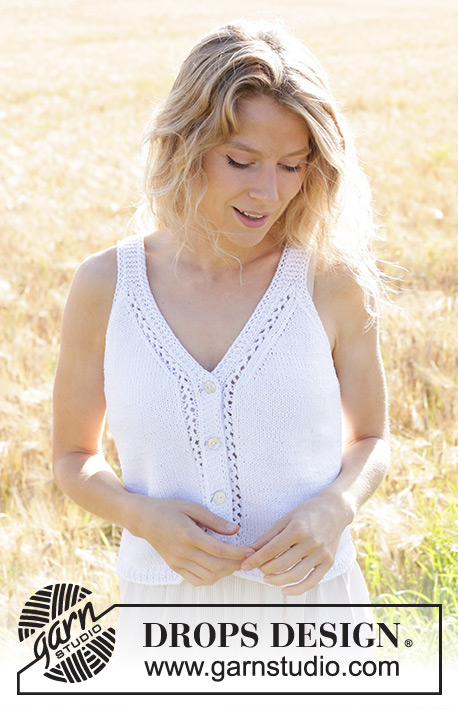
Knitted top/vest in DROPS Cotton Light. The piece is worked bottom up with stocking stitch, edges in lace pattern and V-neck with I-cord. Sizes S - XXXL.
DROPS 248-21 |
||||||||||||||||
|
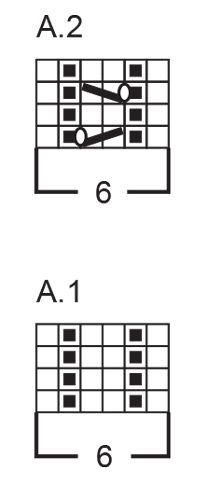
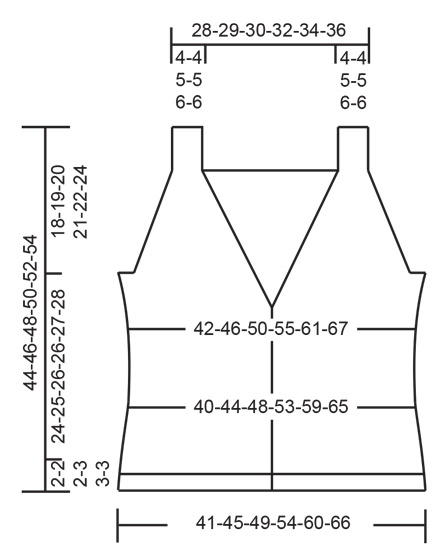
------------------------------------------------------- EXPLANATIONS FOR THE PATTERN: ------------------------------------------------------- GARTER STITCH (worked back and forth): Knit all rows, from both the right and wrong side. 1 ridge in height = knit 2 rows. PATTERN: See diagrams A.1 and A.2. The diagrams show all rows in the pattern from the right side. BANDS WITH I-CORD: START OF ROW: Work the band as follows: Slip 1 stitch purl-wise with yarn in front, knit 1, work 4 garter stitches. END OF ROW: Work the band as follows: Work until there are 6 stitches left on the row, work 4 garter stitches, slip 1 stitch purl-wise with yarn in front, knit 1. Work like this from both the right and wrong side. I-CORD: FIRST 2 STITCHES: Work like this on each row: Slip 1 stitch purl-wise with yarn in front, knit 1. LAST 2 STITCHES: Work like this on each row: Work until there are 2 stitches left, slip 1 stitch purl-wise with yarn in front, knit 1. DECREASE TIP-1 (for sides of body): All decreases are worked from the right side! Decrease 1 stitch on each side of the marker thread as follows: Work until there are 4 stitches left before the marker thread, knit 2 together, knit 4 (marker thread sits between these 4 stitches) slip 1 stitch knit-wise, knit 1 and pass the slipped stitch over the knitted stitch (= 2 stitches decreased). Repeat at the second marker-thread. DECREASE TIP-2 (bands): All decreases are worked from the right side! DECREASE 1 STITCH AT BEGINNING OF ROW: Work 2 stitches I-cord as before, knit 2 twisted together, finish the band as before (= 1 stitch decreased). DECREASE 1 STITCH AT END OF ROW: Work until there are 4 stitches left, knit 2 together, 2 stitches I-cord as before (= 1 stitch decreased). DECREASE TIP-3 (V-neck): All decreases are worked from the right side! DECREASE 1 STITCH AT BEGINNING OF ROW: Work 2 stitches I-cord, 2 garter stitches, work the first 5 stitches in A.2 as before, slip 1 stitch knit-wise, knit 1, pass the slipped stitch over the knitted stitch (= 1 stitch decreased). DECREASE 1 STITCH AT END OF ROW: Work until there are 11 stitches left, knit 2 together, work the last 5 stitches in A.2, 2 garter stitches and 2 stitches I-cord (= 1 stitch decreased). DECREASE TIP-4 (armholes and last section of V-neck): All decreases are worked from the right side! DECREASE 1 STITCH AT BEGINNING OF ROW: Work 2 stitches I-cord, 2 garter stitches, slip 1 stitch knit-wise, knit 1, pass the slipped stitch over the knitted stitch (= 1 stitch decreased). DECREASE 1 STITCH AT END OF ROW: Work until there are 6 stitches left, knit 2 together, 2 garter stitches and 2 stitches I-cord (= 1 stitch decreased). INCREASE TIP (for sides of body): All increases are worked from the right side! Increase 1 stitch on each side of the marker-threads as follows: Work until there are 3 stitches left before the marker thread, make 1 yarn over, knit 6 (marker thread sits between these 6 stitches) make 1 yarn over (= 2 stitches increased). Repeat at the second marker-thread. On the next row purl the yarn overs twisted to avoid holes. Then work the new stitches in stocking stitch. BUTTONHOLES: Work the buttonholes on the right band. 1 BUTTONHOLE = knit together the 3rd and 4th stitch from the edge and make 1 yarn over. On the next row knit the yarn over to leave a hole. Work the buttonholes when the piece measures: S: 2, 8, 14 and 20 cm M: 2, 9, 16 and 20 cm L: 2, 9, 16 and 24 cm XL: 3, 10, 17 and 23 cm XXL: 3, 10, 17 and 25 cm XXXL: 3, 10, 17 and 25 cm ------------------------------------------------------- START THE PIECE HERE: ------------------------------------------------------- TOP - SHORT OVERVIEW OF THE PIECE: The piece is worked back and forth, bottom up as far as the armholes, then divided for the front and back pieces which are finished separately, back and forth. The shoulder straps are sewn to the back piece to finish. BODY: Cast on 201-219-237-261-289-315 stitches with circular needle size 3 mm and DROPS Cotton Light. Work as follows from the right side: 6 stitches according to BANDS WITH I-CORD – read description above, work A.1, then rib (purl 1, knit 1) until there are 13 stitches left, purl 1, work A.1, 6 stitches according to BANDS WITH I-CORD. Continue this rib for 2-2-2-3-3-3 cm – remember the BUTTONHOLES on the right band – read description above. Change to circular needle size 4 mm. Work PATTERN – read description above, with the first row from the right side as follows: 6 band stitches as before, work A.2, then stocking stitch until there are 12 stitches left and decrease 17-19-21-21-25-27 stitches evenly over these stitches, work A.2 and 6 band stitches as before = 184-200-216-240-264-288 stitches. Insert 1 marker-thread in each side of the body, 49-53-57-63-69-75 stitches in from each end of the row (= 86-94-102-114-126-138 stitches between the marker-threads on the back piece). Allow the threads to follow your work onwards; they are used when decreasing/increasing in each side. Continue the pattern. REMEMBER THE KNITTING TENSION! When the piece measures 5-5-5-6-6-6 cm, decrease 1 stitch on each side of both marker-threads – read DECREASE TIP-1 (= 4 stitches decreased) = 180-196-212-236-260-284 stitches. When the piece measures 11-11-11-12-12-13 cm, increase 1 stitch on each side of both marker-threads – read INCREASE TIP (= 4 stitches increased). Repeat this increase when the piece measures 20-20-20-20-20-22 cm = 188-204-220-244-268-292 stitches. OVERVIEW OF NEXT SECTION: You now decrease on the bands, decrease for the V-neck and cast off for the armholes. Read V-NECK and ARMHOLES before continuing. V-NECK: When the piece measures 21-23-25-24-26-26 cm, decrease 2 stitches in both bands over the next 4 rows as follows (bands now cover 4 stitches rather than 6, giving a narrower edge along the V-neck): Decrease 1 stitch on each band every 2nd row 2 times – read DECREASE TIP-2 = 184-200-216-240-264-288 stitches. On the next row from the right side after the band-decreases (the piece measures approx. 22-24-26-25-27-27 cm), start decreasing for the V-neck as follows: Decrease 1 stitch on each side every 2nd row 18-19-21-23-25-27 times – read DECREASE TIP-3. ARMHOLES: At the same time, when the piece measures 25-26-27-28-29-29 cm and the next row is from the wrong side, work 3 rows of GARTER STITCH – read description above, over 16-18-20-22-24-26 stitches in each side (8-9-10-11-12-13 garter stitches on each side of both marker-threads – work the other stitches as before). On the next row (= right side) after the garter stitch section, cast off for the armholes as follows: Work until there are 4-5-6-7-8-9 stitches left before the first marker-thread (remember decreases for the V-neck), cast off 8-10-12-14-16-18 stitches for the armhole, work until there are 4-5-6-7-8-9 stitches left before the second marker-thread, cast off 8-10-12-14-16-18 stitches for the armhole and work to end of row. The front and back pieces are finished separately. LEFT FRONT PIECE: Start from the wrong side, work the band and A.2 as before, stocking stitch until there are 4 stitches left, work 2 garter stitches and 2 stitches I-CORD – read description above. Continue back and forth like this, decreasing for the V-neck as before and decreasing for the armhole every 2nd row 11-13-14-17-20-23 times – read DECREASE TIP-4. After all the decreases for V-neck and armhole, there are 15 stitches in all sizes. Continue decreasing for the V-neck in sizes S, M, L and XL (do not decrease in sizes XXL and XXXL) in the same way at the end of each row from the right side but inside the 4 stitches by the neck so the stitches in A.2 become fewer – read DECREASE TIP-4. Decrease like this every 2nd row 4-4-2-2-0-0 times = 11-11-13-13-15-15 stitches for shoulder strap. After the last decrease the piece measures approx. 38-40-42-46-45-46 cm. Work garter stitch back and forth with 2 stitches I-cord on each side until the strap measures 12-12-12-14-14-16 cm, cast off. RIGHT FRONT PIECE: Start from the wrong side. Work 2 stitches I-cord, 2 garter stitches, stocking stitch until there are 10 stitches left, work A.2 and the band as before. Continue back and forth like this, decreasing for the V-neck as before and decreasing for the armhole every 2nd row 11-13-14-17-20-23 times - remember DECREASE TIP-4. After all the decreases for V-neck and armhole, there are 15 stitches in all sizes. Continue decreasing for the V-neck in sizes S, M, L and XL (do not decrease in sizes XXL and XXXL) in the same way at the beginning of each row from the right side but inside the 4 stitches by the neck so the stitches in A.2 become fewer – remember DECREASE TIP-4. Decrease like this every 2nd row 4-4-2-2-0-0 times = 11-11-13-13-15-15 stitches for shoulder strap. After the last decrease the piece measures approx. 38-40-42-46-45-46 cm. Work garter stitch back and forth with 2 stitches I-cord on each side until the strap measures 12-12-12-14-14-16 cm, cast off. BACK PIECE: = 80-86-92-102-112-122 stitches. Start from the wrong side. Work 2 stitches I-cord, 2 garter stitches, stocking stitch until there are 4 stitches left, work 2 garter stitches and 2 stitches I-cord. Continue back and forth like this, decreasing for the armholes on each side every 2nd row 11-13-14-17-20-23 times – remember DECREASE TIP-4 = 58-60-64-68-72-76 stitches. After the last decrease the piece measures approx. 38-40-42-46-45-46 cm. Work 2 ridges over all stitches, with 2 stitches I-cord on each side as before. Cast off. ASSEMBLY: Sew the shoulder straps to the back piece – starting outermost on each side and sewing towards the neck. Sew the buttons onto the left band. |
||||||||||||||||
Diagram explanations |
||||||||||||||||
|
||||||||||||||||
 |
||||||||||||||||
 |
||||||||||||||||
Have you finished this pattern?Tag your pictures with #dropspattern #pearlstringstop or submit them to the #dropsfan gallery. Do you need help with this pattern?You'll find 22 tutorial videos, a Comments/Questions area and more by visiting the pattern on garnstudio.com. © 1982-2026 DROPS Design A/S. We reserve all rights. This document, including all its sub-sections, has copyrights. Read more about what you can do with our patterns at the bottom of each pattern on our site. |
||||||||||||||||


With over 40 years in knitting and crochet design, DROPS Design offers one of the most extensive collections of free patterns on the internet - translated to 17 languages. As of today we count 324 catalogues and 12290 patterns translated into English (UK/cm). 12290
We work hard to bring you the best knitting and crochet have to offer, inspiration and advice as well as great quality yarns at incredible prices! Would you like to use our patterns for other than personal use? You can read what you are allowed to do in the Copyright text at the bottom of all our patterns. Happy crafting!
Post a comment to pattern DROPS 248-21
We would love to hear what you have to say about this pattern!
If you want to leave a question, please make sure you select the correct category in the form below, to speed up the answering process. Required fields are marked *.