
Popular categories
Looking for a yarn?


Comments / Questions (8)
![]() Linda wrote:
Linda wrote:
Hei, jeg har felt til armhull men skjønner ikke fellingen (maskeantallet) videre. Jeg strikker størrelse L og etter forklaringen med 1m x 11 og 1m x 9 står det se forklaringen over for felling over fletten (=16 avfellingsmasker). Jeg trodde felletips over flette gjaldt avfelling? Uansett skjønner jeg ikke hva det menes med 16 masker her. Kan dere forklare meg det? På forhånd takk for hjelpa.
29.04.2026 - 21:24DROPS Design answered:
Hej Linda, inden du feller maskerne af skal flettemaskerne strikkes sammen to og to, så arbejdet ikke bliver for bredt. Læs felling over flette :)
30.04.2026 - 07:40
![]() Dicky Kaldeway wrote:
Dicky Kaldeway wrote:
In het patroon staat dat de teltekening het motief aan de goede kant weergeeft. Betekent dat dat alleen de even naalden zijn weergegeven? En in de oneven dus teruggaande naalden de steken zoals ze zich voordoen?
04.12.2025 - 15:21DROPS Design answered:
Dag Dicky,
Nee, alle naalden zijn weergegeven, zowel de heengaande als de teruggaande naalden. De averechte steken brei je op de teruggaande naald recht en de rechte steken brei je op de teruggaande naald averecht.
04.12.2025 - 20:00
![]() Ellie wrote:
Ellie wrote:
Bonjour, j'ai tricoté ce gilet et je ne retrouve pas dans les merceries Drops la référence des boutons (n°514) recommandés pour ce modèle. Pourriez-vous s'il vous plaît me donner une référence équivalente ou la taille adéquate en mm ? Merci par avance pour votre réponse.
25.10.2025 - 19:42DROPS Design answered:
Bonjour Ellie, ces boutons faisaient 20 mm de diamètre. Bon tricot!
03.11.2025 - 13:43
![]() Annette wrote:
Annette wrote:
Hej jeg kan ikke find ud af indtagning ved snoning midt for , kan det ikke uddybes lidt mere ? findes der ikke et foto ? M.v.h. Annette Nielsen
16.07.2021 - 22:35DROPS Design answered:
Hej Annette, Her kan du se hvordan man kan gøre: Felle over flette
04.08.2021 - 10:53
![]() Miranda wrote:
Miranda wrote:
Tip breien: Afkanten boven een kabel: Kant af boven kabel 1 als volgt: Brei de st 2 aan 2 r sm. Haal daarna de ene st over de volgende st zoals bij een gewone mindering. Doe dit boven alle st in de kabel. Betekent dit dat ik 3 steken minder in één toer?
23.12.2018 - 10:21DROPS Design answered:
Dag Miranda
Deze tip voor het breien geldt voor het afkanten. Als je aan het afkanten bent, kant je normaal af (dus steeds de vorige steek overhalen), maar als je bij de kabel bent brei je eerst 2 steken samen en dan haal je de vorige steek over). Dit doe je bij elke kabel tijdens het afkanten.
27.12.2018 - 11:49
![]() Miranda wrote:
Miranda wrote:
"Kant 11 keer 1 st af voor de hals binnen de 6 voorbiesst in iedere 2e nld, en daarna 8 (9-9) keer 1 st in iedere 4e nld - zie de Tip Breien voor de mindering boven de kabel (= 15 (16-16) st afgekant)." Ik tel 11+8 = 19 steken afgekant ipv 15? "Meerder voor de kraag 6 (6-6) keer 1 st binnen de buitenste st in iedere 6e (6e-6e) nld " dat zijn 6 meerderingen in totaal. De kraag wordt hier dan toch smaller van ipv breder?
22.12.2018 - 13:31
![]() Alexandra wrote:
Alexandra wrote:
Ik ben nu zover dat ik met de hals en kraag verder moet. Ik snap alleen hoe ik dat moet doen. Kunnen jullie mij hier verder mee helpen?
16.03.2018 - 18:01DROPS Design answered:
Voor de hals kant je steken af binnen de 6 voorbiessteken, dus op het pand vlak naast de voorbiessteken en voor de kraag meerder je vlak naast de buistenste steek. Op die manier krijg je een opening voor de hals (v-hals) en wordt de kraag breder. Hoe vaak en veel je meerdert danwel mindert staat in het patroon aangegeven voor jouw maat.
19.03.2018 - 08:06
![]() Conny Zee wrote:
Conny Zee wrote:
Ik mis bij de beschrijving het patroon van de panden. Ik kan niet zien hoe groot een voorpand, achterpand of mouw is, waardoor ik niet weet of ik medium of large wil breien.
14.08.2016 - 16:02DROPS Design answered:
De beschrijving van de panden staat in het patroon, na "kort model". De tekening met de afmetingen was in het Nederlands weggevallen, dit is gecorrigeerd.
14.08.2016 - 21:31
|
|||||||||||||
DROPS 54-9 |
|||||||||||||
|
|
|||||||||||||
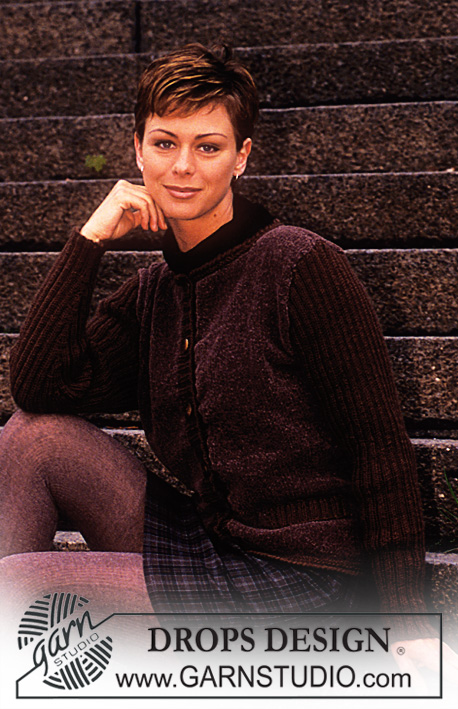
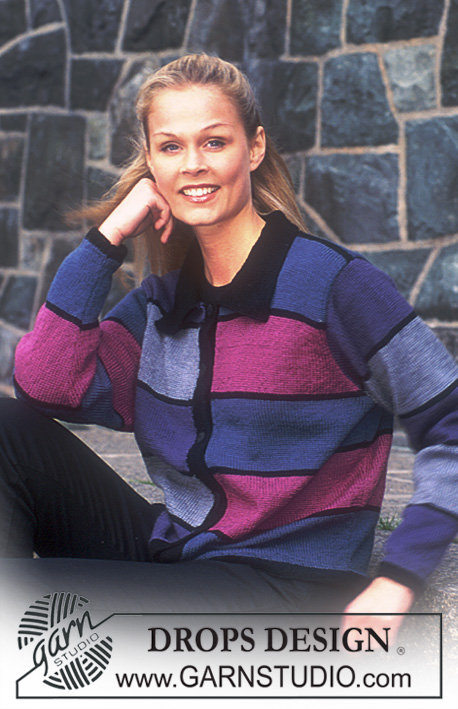
DROPS Cardigan in ANGORA TWEED with cables and collar. Long or short model.
DROPS 54-9 |
|||||||||||||
|
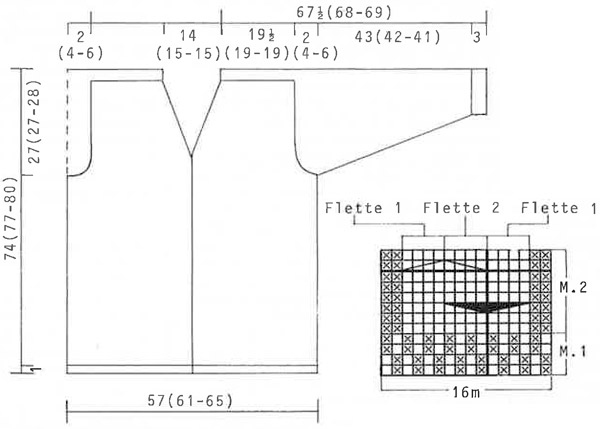
Gauge: 21 sts and 28 rows on larger needles in Pattern 1 - 10 x 10 cm Pattern: See chart. 1 chart equals one repeat of the pattern. Garter Stitch, when knitting flat, knit all sts all rows. Garter Stitch, when knitting in the round: Row 1, knit. Row 2, purl. One ridge = two rows. Buttonholes: When the work measures 1 (1-1) cm ,10.5 (11.5-12) cm , 20 (22-23) cm , 30 (32.5-34) cm , 40 (43-45) cm , and 50 (53-56) cm , bind off for buttonholes on the right front as follows: Bind off the 3rd and 4th sts and cast on 2 new sts over the bound off sts on the next row. Binding off over Cables: When binding off over the cables bind off as follows: knit 2 together, then knit 2 together and then then pass the 1st stitch over the next as with normal binding off. Repeat on all sts for the cable. Short model: For the short model knit as follows: Body: Decrease the measurements at armholes, neck and binding off at 18 (19-20) cm . Finished length = 56 (58-59) cm . Bind off for buttonholes on the right front when the work measures 1 (1-1) cm , 8.5 (9-9.5) cm , 16.5 (17.5-18) cm , 24 (26-26.5) cm , 32 (34-35) cm . Decrease the yarn amount by 50 grams. BODY: Knit the cardigan back and forth on circular needles. Cast on 300 (316-332) sts (includes 6 sts at each edge for button band) on smaller circular needles and knit 4 rows garter st. Change to larger circular needles and knit the next (right side) row as follows: 6 sts of Pattern 1 (for button band), 4 sts of Pattern 1, (Pattern 2 - 8 sts of Pattern 1) twice, Pattern 2, 8 (16-24) sts of Pattern 1, (Pattern 2 - 8 sts of Pattern 1) 5 times, Pattern 2, 8 (16-24) sts of Pattern 1, (Pattern 2 - 8 sts of Pattern 1) twice, Pattern 2, 4 sts of Pattern 1, 6 sts of Pattern 1 (for button band). Remember buttonholes on the right front (see instructions above). When the work measures 47 (50-52) cm , knit the next row as follows: Knit 76 (80-84) sts in pattern for front, bind off 4 sts for the armhole, knit 140 (148-156) sts in pattern for the back, bind off 4 sts for armhole, knit 76 (80-84) sts in pattern for the front. Knit the rest of each part separately. Front: 76 (80-84) sts. Bind off for armholes on every other row: 2 sts 0 (1-3) times, 1 stitch 2 (4-4) times. 74 (74-74) sts remain. When the work measures 51 (54-57) cm , shape neck edge as follows: Decrease 1 stitch each neck edge inside the 6 button band sts on every other row 11 times, then on every 4th row 1 stitch 8 (9-9) times. At the same time, increase 1 stitch at the neck edge on every 6th row 6 times. Knit these sts into Pattern 1 as they are increased. (You will be decreasing for the neckline at the same time that you will be increasing at the neck edge for the collar.) When the work measures 71 (74-77) cm , bind off 49 (48-48) sts starting at the shoulder edge. See instructions above concerning binding off over cables. 12 sts remain. Continue to knit the remaining 12 (12-12) sts upwards for a further 7 (7.5-7.5) cm for the back collar. Then bind off from the shoulder to the center front on every other row: 2 sts 4 times, 4 sts 1 time. All sts should now have been bound off. Back: 140 (148-156) sts. Bind off for armholes as on the front. 136 (136-136) sts remain. Bind off when the work measures 71 (74-77) cm . See instructions above concerning binding off over cables. Sleeves: Cast on 46 (46-48) sts on smaller double pointed needles. Join, being careful not to twist the sts. Place a marker at the join and knit 12 rows garter stitch. Change to larger double pointed needles and work 1 row in stockinette stitch, increasing 4 (4-4) sts evenly distributed on the row. 50 (50-52) sts remain. Knit the next row as follows: 17 (17-18) sts of Pattern 1, Pattern 2, 17 (17-18) sts of Pattern 1. Knit the pattern upwards. At the same time, after the garter stitch rows, inc 1 st on either side of the marker 34 (34-35) times on every 3rd row. 118 (118-122) sts. Knit the increased sts into Pattern 1. When the work measures 46 (45-44) cm , bind off 2 sts on either side of the marker and knit the rest back and forth on the needle. Bind off for sleeve tops on each side on every other row, on S: 18 sts 1 time, 30 sts 1 time. For M: 7 sts 4 times, 20 sts 1 time. And for L: 4 sts 8 times, 19 sts 1 time. 18 (18-18) sts remain in Pattern 2 + 1 edge stitch on either side which is knitted in stockinette stitch. Bind off when the work measures 67.5 (68-69) cm . These 18 sts constitute the shoulder strap. Assembly: Sew the front and back to the shoulder strap, then sew the sleeve to the body and finish by sewing the underarm and side seams. Sew together the bound off sts of either side of the collar at the center back, and then sew the collar in place at the back neck. Sew on the buttons. |
|||||||||||||
Diagram explanations |
|||||||||||||
|
|||||||||||||
 |
|||||||||||||
Have you finished this pattern?Tag your pictures with #dropspattern or submit them to the #dropsfan gallery. Do you need help with this pattern?You'll find 22 tutorial videos, a Comments/Questions area and more by visiting the pattern on garnstudio.com. © 1982-2026 DROPS Design A/S. We reserve all rights. This document, including all its sub-sections, has copyrights. Read more about what you can do with our patterns at the bottom of each pattern on our site. |
|||||||||||||


With over 40 years in knitting and crochet design, DROPS Design offers one of the most extensive collections of free patterns on the internet - translated to 17 languages. As of today we count 325 catalogues and 12298 patterns translated into English (UK/cm). 12298
We work hard to bring you the best knitting and crochet have to offer, inspiration and advice as well as great quality yarns at incredible prices! Would you like to use our patterns for other than personal use? You can read what you are allowed to do in the Copyright text at the bottom of all our patterns. Happy crafting!
Post a comment to pattern DROPS 54-9
We would love to hear what you have to say about this pattern!
If you want to leave a question, please make sure you select the correct category in the form below, to speed up the answering process. Required fields are marked *.