
Popular categories
Looking for a yarn?


Comments / Questions (3)
![]() Bettina Hansen wrote:
Bettina Hansen wrote:
Der er fejl i tommelfinger opskriften, det kan ikke være et lige tal tilbage når man skal strikke 2 og 2 sammen når der er 17 masker
19.01.2025 - 14:36
![]() Elisabeth Persson wrote:
Elisabeth Persson wrote:
Hur många nystan av varje går det åt till ett helt set.
01.09.2022 - 12:17DROPS Design answered:
Hej Elisabeth, du finder garnforbruget til hele sættet øverst i opskriften :)
02.09.2022 - 10:41
![]() Madelene Gustafsson wrote:
Madelene Gustafsson wrote:
Om jag vill sticka mössan enfärgad hur många nystan går det åt då?Mvh Madelene
23.01.2022 - 08:17DROPS Design answered:
Hei Madelene. Da vil det gå ca 100 gram (2 nøster). Mvh DROPS Design
25.01.2022 - 09:54
|
|
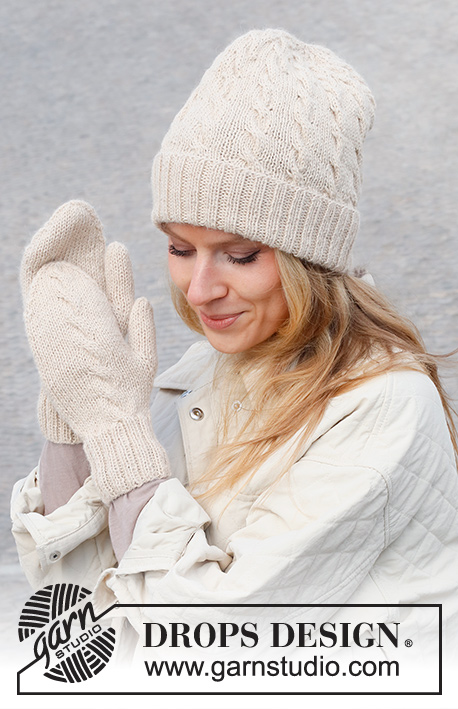
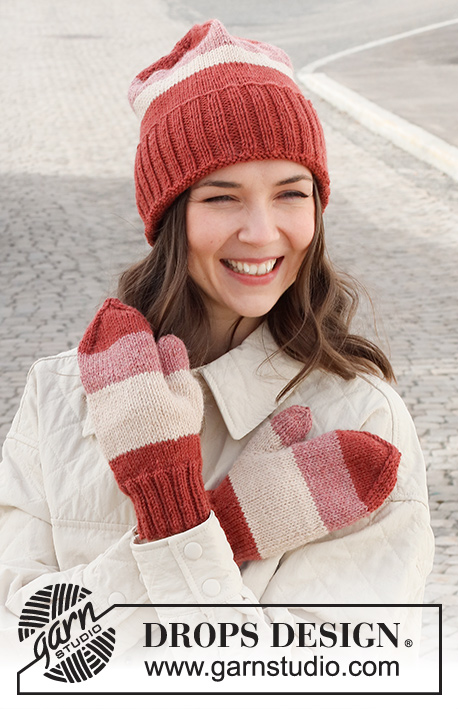
Christmas Frosting#christmasfrostingset |
|
 |
 |
Knitted hat and mittens in DROPS Lima. The piece is worked in stocking stitch with block-stripes and ribbed edges.
DROPS 225-23 |
|
|
------------------------------------------------------- EXPLANATIONS FOR THE PATTERN: ------------------------------------------------------- DECREASE TIP-1 (evenly spaced): To work out how to decrease evenly, count the total number of stitches on needle (e.g. 124 stitches) and divide by the number of decreases to be made (e.g. 20) = 6.2. In this example decrease by knitting together approx. each 5th and 6th stitch. DECREASE TIP-2 (top of hat): Start 3 stitches before the marker thread, slip 1 stitch as if to knit, knit 1 and pass the slipped stitch over the knitted stitch, knit 2 (marker thread sits between these 2 stitches), knit 2 together (= 2 stitches decreased). DECREASE TIP-3 (top of mittens): Start 3 stitches before the marker thread, knit 2 together, knit 2 (marker thread sits between these 2 stitches), slip 1 stitch as if to knit, knit 1 and pass the slipped stitch over the knitted stitch (= 2 stitches decreased). INCREASE TIP (thumb-gusset on the mittens): Work as far as the marker-stitch, 1 yarn over, knit 1 (= marker-stitch), 1 yarn over (= 2 stitches increased). On the next round knit the yarn overs twisted to avoid holes. The next increase is worked as follows: Work until there is 1 stitch left before the marker-stitch, 1 yarn over, knit 3, 1 yarn over (= 2 stitches increased). Increase every 2nd round, always on the outside of the previously increased stitches. ------------------------------------------------------- START THE PIECE HERE: ------------------------------------------------------- HAT – SHORT OVERVIEW OF THE PIECE: The piece is worked in the round with circular needle, bottom up. Change to double pointed needles when necessary. HAT: Cast on 124-132 stitches with circular needle size 3 mm and brick red DROPS Lima. Work rib in the round (knit 2, purl 2) for 8-8 cm. Work 1 round of stocking stitch where you decrease 20-20 stitches evenly spaced – read DECREASE TIP-1 = 104-112 stitches. Change to circular needle size 3.5 mm and continue with stocking stitch. REMEMBER THE KNITTING TENSION! When the piece measures 19-21 cm, change to wheat. Continue working until the piece measures 21-23 cm. Now change to blush. Continue working until the piece measures 25-27 cm, change to brick red and continue working. When the piece measures 26-28 cm, start to decrease for the top of the hat. Insert 4 markers with 26-28 stitches between each marker. On the next round decrease 1 stitch on each side of the 4 markers – read DECREASE TIP-2 (= 8 stitches decreased). Decrease like this every 2nd round a total of 10-11 times = 24-24 stitches left. * Work 1 round without decreasing. On the next round knit all stitches together 2 and 2 *, work from *-* one more time = 6-6 stitches left. Cut the strand, pull it through the remaining stitches, tighten and fasten well. The hat measures approx. 34-36 cm from the top down. Fold up the bottom 8-8 cm. ------------------------------------------------------- MITTENS – SHORT OVERVIEW OF THE PIECE: The piece is worked in the round with double pointed needles, bottom up. RIGHT MITTEN: Cast on 44-48 stitches with double pointed needle size 3 mm and brick red DROPS Lima. Work rib in the round (knit 2, purl 2) for 6-7 cm. Work 1 round of stocking stitch where you decrease 6-8 stitches evenly spaced – read DECREASE TIP-1 = 38-40 stitches. Change to double pointed size 3.5 mm and continue with stocking stitch. REMEMBER THE KNITTING TENSION! When the piece measures 8-9 cm, change to wheat. On the next round insert 1 marker in the first stitch on the round. Now increase for the thumb gusset by increasing 1 stitch on each side of the marker-stitch – read INCREASE TIP! Increase like this every 2nd round a total of 6-7 times = 50-54 stitches. Continue working until the piece measures 13-14 cm. On the next round place the 13-15 gusset stitches on a thread, continue working in the round with wheat and cast on 1 new stitch over the stitches on the thread = 38-40 stitches. When the piece measures 15-17 cm, change to blush. Continue working until the piece measures 20-22 cm. Change to brick red and continue working. When the piece measures 21-23 cm, start to decrease in the sides – there is approx. 4 cm left to finished length; try the mitten on and work to desired length. Insert 1 marker at the beginning of the round and 1 marker after 19-20 stitches. On the next round decrease 1 stitch on each side of both markers – read DECREASE TIP-3 (= 4 stitches decreased). Decrease like this every 2nd round a total of 5 times, then every round a total of 3 times = 6-8 stitches left. Cut the strand, pull it through the remaining stitches, tighten and fasten well. The mitten measures approx. 25-27 cm from the top down. THUMB: Place the 13-15 gusset stitches from the thread back on double pointed needles size 3.5 mm and knit up 2 stitches behind the thumb, working with blush = 15-17 stitches. Work stocking stitch in the round until the thumb measures 5-5½ cm. there is approx. ½ cm left to finished length; try the mitten on and work to desired length. Work 2 rounds where all stitches are knitted together 2 and 2 on both rounds = 4-4 stitches left. Cut the strand, pull it through the remaining stitches, tighten and fasten well. LEFT MITTEN: Cast on and work in the same way as the right mitten, but work the thumb gusset as follows: Increase 1 stitch on each side of the last stitch on the round. Then finish the mitten in the same way as the right mitten. |
|
Have you finished this pattern?Tag your pictures with #dropspattern #christmasfrostingset or submit them to the #dropsfan gallery. Do you need help with this pattern?You'll find 25 tutorial videos, a Comments/Questions area and more by visiting the pattern on garnstudio.com. © 1982-2026 DROPS Design A/S. We reserve all rights. This document, including all its sub-sections, has copyrights. Read more about what you can do with our patterns at the bottom of each pattern on our site. |
|


With over 40 years in knitting and crochet design, DROPS Design offers one of the most extensive collections of free patterns on the internet - translated to 17 languages. As of today we count 324 catalogues and 12290 patterns translated into English (UK/cm). 12290
We work hard to bring you the best knitting and crochet have to offer, inspiration and advice as well as great quality yarns at incredible prices! Would you like to use our patterns for other than personal use? You can read what you are allowed to do in the Copyright text at the bottom of all our patterns. Happy crafting!
Post a comment to pattern DROPS 225-23
We would love to hear what you have to say about this pattern!
If you want to leave a question, please make sure you select the correct category in the form below, to speed up the answering process. Required fields are marked *.