
Popular categories
Looking for a yarn?


Comments / Questions (13)
![]() Sandra wrote:
Sandra wrote:
Hallo! Ik heb wat vragen over het patroon voor de wanten. Dit is de eerste keer dat ik kabels ga breien :) - hoe weet ik welke 6 steken ik elke tour in patroon a3 ga breien? - klopt het dat je telkens alleen de 3e tour een kabelnaald gebruikt bij a3? - “ Voeg 1 markeerdraad in aan elke kant van het werk, met 8-9 steken tussen beide markeerdraden en A.3 ”, zouden jullie dit kunnen verduidelijken?
21.01.2025 - 22:11DROPS Design answered:
Dag Sandra,
In de beschrijving staat precies aangegeven wanneer je de betreffende telpatronen moet breien. Je kabelt inderdaad alleen in de derde naald van A.3. Tussen A.3 en de markeerdraad zitten 8-9 steken (8 voor de kleinste maat en 9 voor de grootste maat).
22.01.2025 - 21:41
![]() Huguette wrote:
Huguette wrote:
Bonjour je tricote la moufle avec A3 vous m'avez répondu que je devais commencer par 2 rangs endroit ,torsade ,5 rangs endroits ,,est-ce que je recommence les prochaines torsades avec 2 rangs endroits , 1 torsade et 5 rangs ou 1 torsade et 5 rangs endroits merci beaucoup
05.02.2024 - 18:15DROPS Design answered:
Bonjour Huguette, tout à fait, quand vous répétez le diagramme en hauteur, vous reprenez au 1er rang, autrement dit vous aurez 7 rangs entre chaque torsade. Bon tricot !
06.02.2024 - 08:21
![]() Huguette wrote:
Huguette wrote:
J'ai tricoter 1cm en jersey ensuite A1.est-ce que je tricote 2 rangs endroits avant de commencer le motif torsade pour les diagrammes A2 et A3? Merci
24.01.2024 - 20:42DROPS Design answered:
Bonjour Huguette, tout à fait car les diagrammes commencent par 2 tours endroit. Bon tricot!
25.01.2024 - 09:12
![]() Imogen Stevens wrote:
Imogen Stevens wrote:
I am very confused about the decreasing instructions for the mittens when finishing them. Am I being silly or does this not make sense at all? Please could you clarify what these instructions mean? When it says to decrease once either side of the markers every 4th round and then 4 times every second round and once every round. I really don't understand.
19.12.2023 - 22:19DROPS Design answered:
Hi Imogen, You have 2 markers, one in each side. Decrease 1 stitch on each side of both markers on the first round, then work 3 rounds without decreasing, decrease on the next round, work one round, decrease on the next round, repeat this 2 more times ( every 2nd round four times), then decrease for the last time on the subsequent round. Hope this helps and happy Christmas!
20.12.2023 - 06:46
![]() Karoline wrote:
Karoline wrote:
Hej, jeg laver vanten i str L/XL og jeg er noget til spidsen af vanten. Er noget til: Tag ind således på hver 4.omgang 1 gang, hver 2.omgang 4 gange og hver omgang 1 gang = 18-22 masker. Når det ikke er plads til at strikke alle masker i snoningen, strikkes der glatstrik over disse masker. Her forstår jeg hvor mange omgange det er i alt. Jeg læser det som at man skal tage flere gange ind på en omgang og at man kun strikker 4 omgange!?
28.11.2023 - 18:45DROPS Design answered:
Hej Karoline, du tager ind på 4. - 6. - 8. - 10. - 12. - 13. omgang :)
29.11.2023 - 11:39
![]() Karoline wrote:
Karoline wrote:
Jeg er noget til indtagningen i højre vante, men kan ikke forstå beskrivelsen?
28.11.2023 - 07:32DROPS Design answered:
Hej Karoline, hvilken størrelse strikker du, hvor langt er du kommet (hvilken en af indtagningerne). Skriv hvad du ikke forstår :)
28.11.2023 - 11:04
![]() Uschi wrote:
Uschi wrote:
Hallo, welchen Umfang brauche ich für die Fäustlinge? Handgelenk oder Handfläche? Danke für die Antwort - ich freue mich schon auf die Handschuhe 😀
15.10.2023 - 10:33DROPS Design answered:
Liebe Uschi, die Maßen (Umfang und Länge) finden Sie unter den Grössen für die Fäustlinge. Viel Spaß beim stricken!
16.10.2023 - 09:36
![]() Chantal Berthiaume wrote:
Chantal Berthiaume wrote:
Bonjour, À la fin des explications pour le bonnet, on écrit tricote 1-0 maille endroit, puis tricoter les mailles 2 par 2. Que signifie tricoter 1-0 ,aille endroit? Merci. Chantal
16.11.2022 - 20:10DROPS Design answered:
Bonjour Mme Berthiaume, en fonction de votre taille, vous commencez le tour soit par 1 maille endroit, soit directement par 2 mailles ensemble à l'endroit. Bon tricot!
17.11.2022 - 10:06
![]() Maria wrote:
Maria wrote:
Hej! Jag förstår inte nedan beskrivning. Vad ska man göra? Sticka 1-0 rätmaska? /Maria Sticka 1-0 rätmaska, sticka 2 och 2 maskor räta tillsammans varvet ut = 20-21 maskor. Sticka 1 varv rätt. Sticka 0-1 rätmaska, sticka 2 och 2 maskor räta tillsammans varvet ut = 10-11 maskor.
18.09.2022 - 11:09DROPS Design answered:
Hei Maria. Det kommer an på hvilken str du strikker. Når det står 1-0 eller 0-1, gjelder det første tallet den minste str og det andre tallet den største str. Så i den minste str har man etter å ha strikket ferdig A.2 39 masker på pinnen, da skal man strikke 1 rett maske, deretter 2 og 2 masker sammen = 20 masker på pinnen. Så strikker man 1 omgang rett og så skal man strikke 0 masker for så å strikke 2 og 2 masker sammen = 10 masker på pinnen. mvh DROPS Design
19.09.2022 - 13:28
![]() Madelief Engels wrote:
Madelief Engels wrote:
Wat wordt bedoeld met: "alle steken 2 aan 2 recht samen breien"? is dat gewoon elke 2 steken recht samen breien voor de hele tour?
01.03.2022 - 09:29
|
||||||||||||||||
Lace Falls Set#lacefallsset |
||||||||||||||||
 |
 |
|||||||||||||||
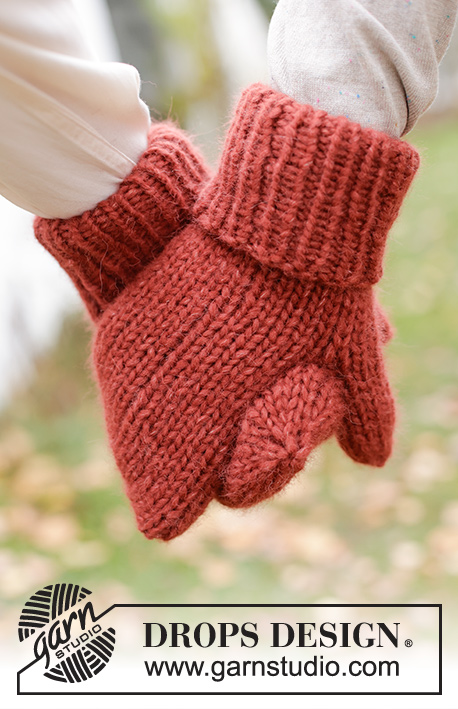
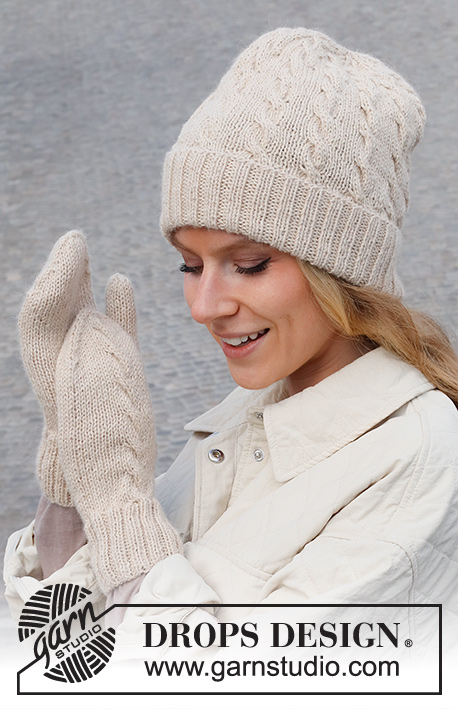
Knitted hat and mittens in DROPS Puna or DROPS Daisy, with cables.
DROPS 225-40 |
||||||||||||||||
|
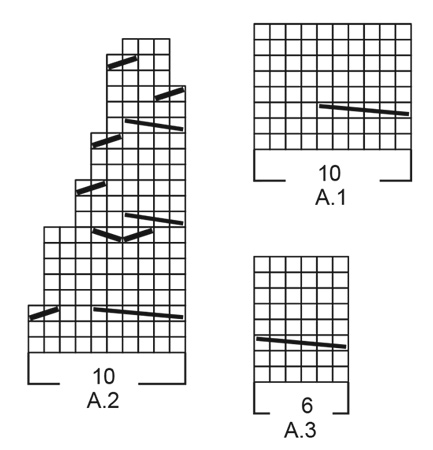
------------------------------------------------------- EXPLANATIONS FOR THE PATTERN: ------------------------------------------------------- PATTERN: Hat: See diagrams A.1 and A.2. Mittens: See diagram A.3. INCREASE/DECREASE TIP (evenly spaced): To work out how to increase/decrease evenly, count the total number of stitches on needle (e.g. 124 stitches), and divide by the number of increases/decreases to be made (e.g. 6) = 20.6. In this example, increase by making 1 yarn over after alternately each 20th and each 21st stitch (approx.). On the next round knit the yarn overs twisted to avoid holes. When decreasing, knit together alternately each 19th and 20th stitch and each 20th and 21st stitch (approx.). INCREASE TIP (mittens): Work to the marker-stitch, make 1 yarn over, knit 1 (= marker-stitch), 1 yarn over (= 2 stitches increased). On the next round knit the yarn overs twisted to avoid holes. The next increase is worked as follows: Work until there is 1 stitch left before the marker-stitch, make 1 yarn over, knit 3, 1 yarn over (= 2 stitches increased). Continue to increase like this every 2nd round; i.e. always on the outside of the increased stitches. DECREASE TIP (mittens): Decrease 1 stitch on each side of the marker thread as follows: Work until there are 3 stitches left before the marker thread, knit 2 together, knit 2 (marker thread sits between these 2 stitches), slip 1 stitch as if to knit, knit 1 and pass the slipped stitch over the knitted stitch. ------------------------------------------------------- START THE PIECE HERE: ------------------------------------------------------- HAT – SHORT OVERVIEW OF THE PIECE: The piece is worked in the round with circular needle, bottom up. Change to double pointed needles when necessary. HAT: Cast on 124-132 stitches with circular needle size 3 mm and DROPS Puna or DROPS Daisy. Work rib (knit 2, purl 2) in the round for 14 cm. Knit 1 round where you increase 6-8 stitches evenly spaced – read INCREASE/DECREASE TIP = 130-140 stitches. Change to circular needle size 4 mm. Work stocking stitch in the round for 1-2 cm. Now work pattern A.1 in the round (= 13-14 repeats of 10 stitches). REMEMBER THE KNITTING TENSION! Continue this pattern until the piece measures 24-25 cm from the cast-on edge (there is approx. 8 cm left to finished length; work to desired length) – adjust so you finish after a complete repeat in height. Now work A.2 over each A.1. When A.2 has been completed in height there are 39-42 stitches. Decrease as follows: Knit 1-0, then knit all stitches together 2 and 2 = 20-21 stitches. Knit 1 round. Knit 1-0, then knit all stitches together 2 and 2 = 10-11 stitches. Cut the strand, pull it through the remaining stitches, tighten and fasten well. The hat measures approx. 24-25 cm with 8 cm turn-up. ------------------------------------------------------- MITTENS – SHORT OVERVIEW OF THE PIECE: The piece is worked in the round with double pointed needles. RIGHT MITTEN: Cast on 52-56 stitches with double pointed needles size 3 mm and DROPS Puna or DROPS Daisy. Work rib (knit 2, purl 2) in the round for 6½ cm. Change to double pointed needles size 3.5 mm. Insert a marker at the beginning of the round and work as follows. Knit 8 and increase 0-1 stitch over these stitches, work A.3 over the next 6 stitches, knit 8 and increase 0-1 stitch over these stitches, knit the last 30-34 stitches and decrease 10-12 stitches evenly over these stitches – read INCREASE/DECREASE TIP = 42-46 stitches. Continue with knit and A.3 over the 6 middle stitches on top of the hand. REMEMBER THE KNITTING TENSION! When the piece measures 9 cm, insert a marker in the 23rd-25th stitch (= marker-stitch). Now increase for the thumb by increasing 1 stitch on each side of the marker-stitch – read INCREASE TIP. Increase like this every 2nd round a total of 5-6 times = 11-13 thumb stitches = 52-58 stitches. Continue working without further increases until the piece measures 13-14- cm from the cast-on edge. On the next round place the 11-13 thumb-stitches on a thread, cast on 1 stitch behind the thumb and continue in the round with stocking stitch and pattern = 42-46 stitches. Continue working until the piece measures approx. 20-21 cm (there is 5 cm left to finished length; try the mitten on and work to desired length). Insert 1 marker in each side of the piece, with 8-9 stitches between the markers and A.3 (= 20-22 stitches between the markers under the hand and 22-24 stitches between the markers on top of the hand). Continue the pattern and decrease on each side of both markers – read DECREASE TIP. Decrease like this every 4th round 1 time, every 2nd round 4 times and every round 1 time = 18-22 stitches. When there is not room for the whole cable, work stocking stitch over these stitches. Knit all stitches together 2 and 2 = 9-11 stitches. Cut the strand, pull it through the remaining stitches, tighten and fasten well. The mitten measures approx. 25-26 cm. THUMB: Place the 11-13 thumb-stitches back on double pointed needles size 3.5 mm and knit up 4 stitches behind the thumb = 15-17 stitches. Work stocking stitch in the round until the thumb measures 5-6 cm (there is approx. ½ cm to finished length, try the mitten on and work to desired length). Knit all stitches together 2 and 2 until there are 4 stitches left. Cut the strand, pull it through the remaining stitches, tighten and fasten well. LEFT MITTEN: Cast on 52-56 stitches with double pointed needles size 3 mm and DROPS Puna or DROPS Daisy. Work rib (knit 2, purl 2) in the round for 6½ cm. Change to double pointed needles size 3.5 mm. Insert a marker at the beginning of the round and work as follows. Knit 8 and increase 0-1 stitch over these stitches, work A.3 over the next 6 stitches, knit 8 and increase 0-1 stitch over these stitches, knit the last 30-34 stitches and decrease 10-12 stitches evenly over these stitches = 42-46 stitches. Continue with knit and A.3 over the 6 middle stitches on top of the hand. When the piece measures 9 cm, insert a marker in the last stitch on the round (= marker-stitch). Now increase for the thumb by increasing 1 stitch on each side of the marker-stitch – remember INCREASE TIP. Increase like this every 2nd round a total of 5-6 times = 11-13 thumb stitches = 52-58 stitches. Continue working without further increases until the piece measures 13-14- cm from the cast-on edge. On the next round place the 11-13 thumb-stitches on a thread, cast on 1 stitch behind the thumb and continue in the round with stocking stitch and pattern = 42-46 stitches. Continue working until the piece measures approx. 20-21 cm (there is 5 cm left to finished length; try the mitten on and work to desired length). Insert 1 marker in each side of the piece, with 8-9 stitches between both markers and A.3 (= 20-22 stitches between the markers under the hand and 22-24 stitches between the markers on top of the hand). Continue the pattern and decrease on each side of both markers – remember DECREASE TIP. Decrease like this every 4th round 1 time, every 2nd round 4 times and every round 1 time = 18-22 stitches. When there is not room for the whole cable, work stocking stitch over these stitches. Knit all stitches together 2 and 2 = 9-11 stitches. Cut the strand, pull it through the remaining stitches, tighten and fasten well. The mitten measures approx. 25-26 cm. Work the thumb in the same way as for the right mitten. |
||||||||||||||||
Diagram explanations |
||||||||||||||||
|
||||||||||||||||
 |
||||||||||||||||
Have you finished this pattern?Tag your pictures with #dropspattern #lacefallsset or submit them to the #dropsfan gallery. Do you need help with this pattern?You'll find 22 tutorial videos, a Comments/Questions area and more by visiting the pattern on garnstudio.com. © 1982-2026 DROPS Design A/S. We reserve all rights. This document, including all its sub-sections, has copyrights. Read more about what you can do with our patterns at the bottom of each pattern on our site. |
||||||||||||||||


With over 40 years in knitting and crochet design, DROPS Design offers one of the most extensive collections of free patterns on the internet - translated to 17 languages. As of today we count 324 catalogues and 12290 patterns translated into English (UK/cm). 12290
We work hard to bring you the best knitting and crochet have to offer, inspiration and advice as well as great quality yarns at incredible prices! Would you like to use our patterns for other than personal use? You can read what you are allowed to do in the Copyright text at the bottom of all our patterns. Happy crafting!
Post a comment to pattern DROPS 225-40
We would love to hear what you have to say about this pattern!
If you want to leave a question, please make sure you select the correct category in the form below, to speed up the answering process. Required fields are marked *.