
Oblíbené kategorie
Hledáte přízi?


Komentáře / Otázky (146)
![]() Paula Hynes napsala:
Paula Hynes napsala:
In Drops !25-15, when do you use M2 in this please . I only see where to use M1. Thanks Paula
10.02.2019 - 18:54Odpověď DROPS Design :
Dear Paula, you'll work M.2 at the end of the pattern, when you'll decrase on upper foot as follows: Work M.2 over M.1 (1-2-3 sts each side of M.1 worked in stocking st as before). Happy knitting!
10.02.2019 - 19:36
![]() Paula Hynes napsala:
Paula Hynes napsala:
When do you use M2 in the pattern for the Alaska socks? I only see M1 used in this pattern.
10.02.2019 - 18:50Odpověď DROPS Design :
Dear Paula, you'll work M.2 at the end of the pattern, when you'll decrase on upper foot as follows: Work M.2 over M.1 (1-2-3 sts each side of M.1 worked in stocking st as before). Happy knitting!
10.02.2019 - 19:36
![]() Sue McKay napsala:
Sue McKay napsala:
When u r ribbing the 21 stitches on the mid size and it says knit 21/4" is that from the top of the sock or from where u start the ribbing...if its from the top I cant pick up 10 stitches theres not enough knitted
10.02.2019 - 18:12Odpověď DROPS Design :
Dear Sue, after the ribbing you divide teh stitches for the foot and th eheel, and knit only on the heel stitches for 5-5.5-6 cm, and do teh decreases. The stitches for the gusset should be picked up on the two sides of this heel flap. Happy Knitting!
11.02.2019 - 03:54
![]() Dora napsala:
Dora napsala:
I'm doing the larger size after the heel is knit having some problem with the decrease for the heel .
04.02.2019 - 02:40Odpověď DROPS Design :
Dear Dora, can you please explain the kind of problem you have with the decrease for the heel?
04.02.2019 - 14:29
![]() Nathalie34 napsala:
Nathalie34 napsala:
Bonjour, Je ne comprends pas ou doit se mettre le marqueur au niveau du talon.
24.01.2019 - 08:31Odpověď DROPS Design :
Bonjour Nathalie34, le marqueur se met au niveau des mailles sur l'aiguilles, on va mesurer la longueur du pied à partir de ce marqueur, juste avant les diminutions du talon. Bon tricot!
24.01.2019 - 10:29
![]() Ida napsala:
Ida napsala:
Vad menas med "Sticka M.2 över M.1 (1-2-3 m på varje sida av M.1 slätstickas som innan)"? Ska jag sticka bara m2 på ovansidan när jag tar ihop för tå? Vad menas i så fall det i parentesen.
04.12.2018 - 08:21Odpověď DROPS Design :
Hei Ida. Det betyr at du skal strikke M.2 over de samme maskene som du har strikket M.1 over tidligere. Altså du strikker ikke lenger M.1, men M.2 isteden. Og du har 1-2-3 masker på hver side som strikkes i glattstrikk som før. M.2 strikkes kun på oversiden av foten, på undersiden av fotne feller du som forklart: Strikk de 2 m etter merketråden vridd rett sm og de 2 m før merketråden rett sm. Dette gjøres samtidig som du strikker M.2 og feller som anvist i diagrammet. God fornøyelse
06.12.2018 - 11:46
![]() Rose napsala:
Rose napsala:
I have just completed the decrease for the heel and I’m finding myself on the wrong side with 9 stitches. Should I turn and knit across before picking up the 9? Also can you tell me how many stitches per needle for3 needles as 9 heel stitches does not split evenly?
15.11.2018 - 20:59Odpověď DROPS Design :
Dear Rose, turn work so that you are from RS again to pick up the sts: work the sts from heel, pick up 9 sts on the left side of the heel sts, knit the 21 sts from upper foot back on needle, pick up 9 sts on the right side of heel. You can divide the sts with all sts from upper foot on one needle and the new sts + the sts from heel divided onto 2 needles. Happy knitting!
16.11.2018 - 09:27
![]() Rosemary napsala:
Rosemary napsala:
Hi there I’m about to decrease the heel, and it says to insert a marker. Can not figure out where or why
15.11.2018 - 18:49Odpověď DROPS Design :
Dear Rosemary, the marker is inserted in the sts on the row, it will be used to measure the length of the foot and when to start the decreases for toe. Happy knitting!
16.11.2018 - 09:15
![]() Ellen napsala:
Ellen napsala:
Following up on your answer to my "K4-section" question yesterday: I find no K4-section in the pattern. The places where I believe the decreases are to happen are K3-sections. Please point out where you are saying the correct K4-sections are in the pattern instructions. If they are actually K3-sections, I hope you will clarify this for everyone. Thank you.
30.08.2018 - 17:49Odpověď DROPS Design :
Dear Ellen, We looked again your first question and we believe that you should check again the instructions as there are no k-4 sections in the UK instructions. For decreasing, it says: NOTE! On last row from WS dec as follows: Size 35/37: 1 st in the first and last K-section by K2 tog, Size 38/40 and 41/43: . We hope this will help you out. Happy Knitting
31.08.2018 - 12:02
![]() Ellen napsala:
Ellen napsala:
I believe that the "NOTE! On last row from WS dec as follows: ... 1 st in each of the K4-section by K2 tog" is an error. I think it should be "... 1 st in each of the four K3-sections by K2 tog". By your usage (and common usage), K4 means KNIT 4, and there are no K4-sections in any part of the pattern. Is my interpretation correct? If so, I hope you will clarify the pattern for others.
29.08.2018 - 21:00Odpověď DROPS Design :
Dear Ellen Thank you so much for your feedback. There are many ways of phrasing pattern instructions. We will take your way into consideration but we are referring to "K4 sections" (which means sections with 4 knit stitches). Actually, we have changed our explanations for the newest patterns thanks to all the input we get from knitters. Thank you again for your feedback. Happy Knitting!
30.08.2018 - 14:26
|
|||||||||||||||||||||||||
Alaskan Cables |
|||||||||||||||||||||||||
 |
 |
||||||||||||||||||||||||
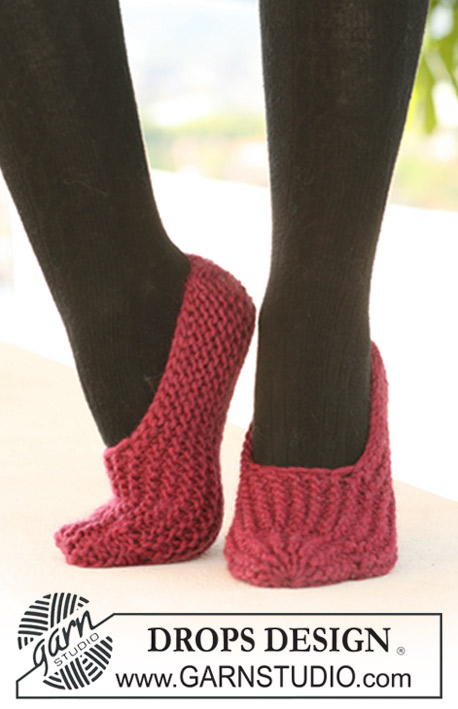
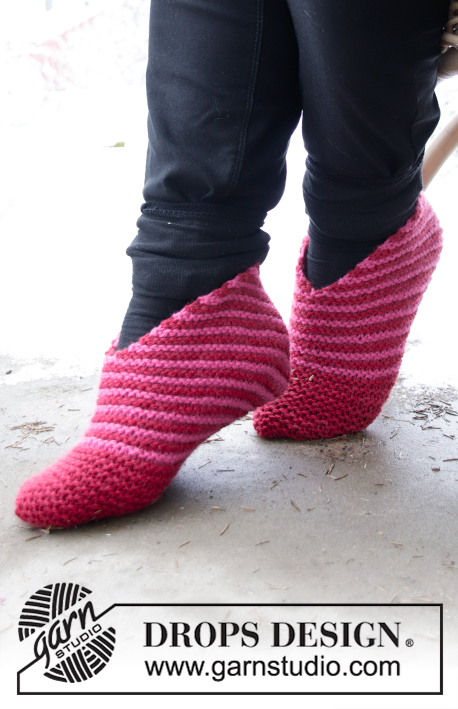
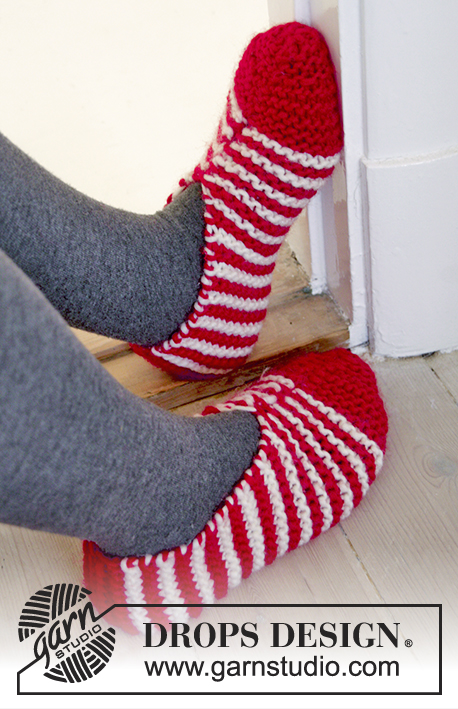
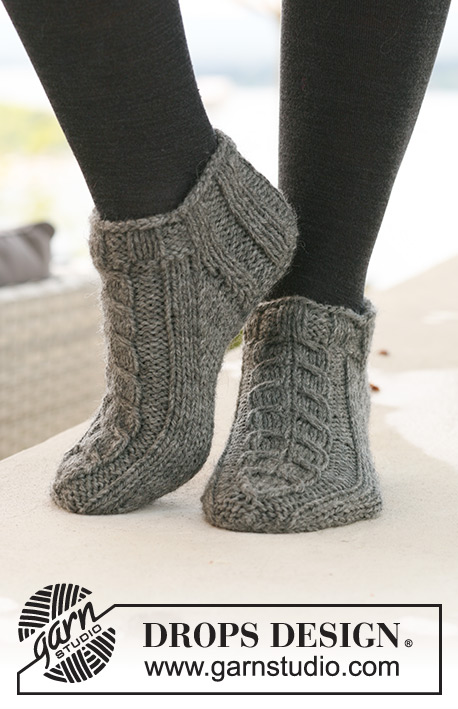
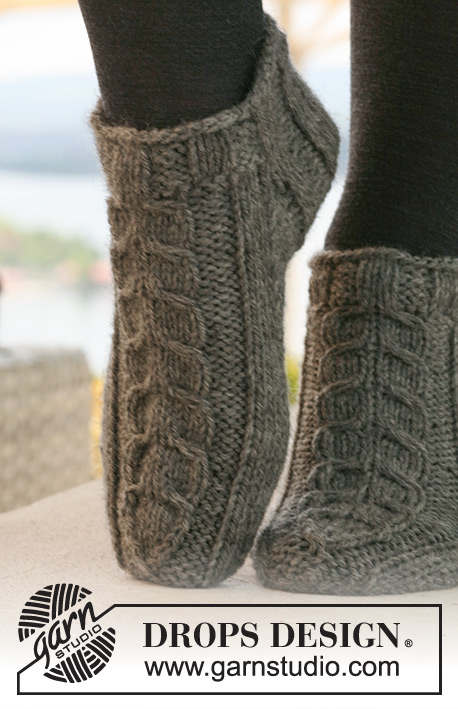
DROPS kotníkové ponožky s copánkovým vzorem z příze "Alaska".
DROPS 125-15 |
|||||||||||||||||||||||||
|
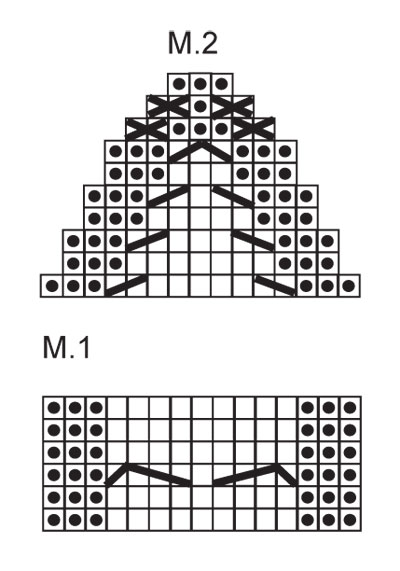
VZOR: Viz schémata M.1 (=15 ok) a M.2 (=15 ok); vzor je nahlížen z lícové strany. TIP - TVAROVÁNÍ PATY: 1. řada (= lícová): pleteme po posledních 6-7-7 ok v řadě, 1 oko sejmeme hladce, 1 oko upleteme hladce a sejmuté přes ně přetáhneme, otočíme práci. 2.ř. (= rubová): pleteme po posledních 6-7-7 ok v řadě, 1 oko sejmeme obrace, 1 oko upleteme obrace a sejmuté přes ně přetáhneme, práci otočíme. 3.ř. (= lícová): pleteme po posledních 5-6-6 ok v řadě, 1 oko sejmeme hladce, 1 oko upleteme hladce a sejmuté přes ně přetáhneme, otočíme práci. 4.ř. (= rubová): pleteme po posledních 5-6-6 ok v řadě, 1 oko sejmeme obrace, 1 oko upleteme obrace a sejmuté přes ně přetáhneme, práci otočíme. Tímto způsobem pokračujeme v ujímání (vždy o 1 oko snížíme počet ok zbylých v řadě) dokud nám v řadě nezůstane 9-11-11 ok. ---------------------------------------------------------------------- PONOŽKA: Pleteme v kruhových řadách na ponožkových jehlicích. Na ponožkové jehlice č.4,5 nahodíme přízí Alaska 42-48-48 ok. Upleteme 2 kruhové řady hladce a 5 kruhových řad žebrovým vzorem 3/3 (3 oka hladce, 3 obrace). V následující kruhové řadě začneme plést VZOR, takto: nad prvními 18-24-24 oky pleteme dál žebrovým vzorem 3/3, 6-6-6 ok hladce, vzor M.1 (= 15 ok), 3-3-3 oka hladce. DBÁME NA ROVNOMĚRNÉ NAPĚTÍ PŘÍZE! Takto pleteme do výše 4 cm (platí pro všechny velikosti). Nyní necháme prvních 21-27-27 ok na jehlici (= pata) a posledních 21-21-21 ok odložíme na pomocnou jehlici (= horní část, nárt). Nad oky na jehlici (= pata) upleteme v rovných řadách 5-5,5-6 cm žebrovým vzorem, SOUČASNĚ v poslední rubové řadě ujmeme (spletením 2 ok hladce): Velikost 35/37: 1 oko v prvním a posledním hladce pleteném „žebru“. Velikost 38/40 a 41/43: 1 oko v každém „žebru“ ze 4 ok hladce. Všechny velikosti: = 19-23-23 ok. Pak vložíme do pleteniny značku. Nyní tvarujeme patu – viz TIP. Po dokončení tvarování paty nabereme po obou stranách paty 9-10-12 ok a odložených 21-21-21 ok z pomocné jehlice vrátíme zpět na jehlici = 48-52-56 ok. Po obou stranách nártové části (= středních 21-23-25 ok) umístíme značky (= 3-4-5 ok na každou stranu od vzoru M.1). Pokračujeme lícovým žerzejem a vzorem M.1, SOUČASNĚ ujímáme na obou stranách takto: na nártové části před 1. značkou spleteme 2 oka hladce anglicky a za 2. značkou spleteme 2 oka hladce; ujímání opakujeme v každé 2. kruhové řadě celkem 6-7-7x = 36-38-42 ok. Pokračujeme do výše 18-20-22 cm od značky na patě – měli bychom mít dokončenu celou sekvenci vzoru M.1 (na výšku) (= zbývá asi 4-4-5 cm). Nyní vložíme do pleteniny na obou stranách značku tak, abychom na spodní části (šlapce) ponožky měli 19-19-21 ok a na svrchní části (nártu) 17-19-21 ok (= 1-2-3 oka na každou stranu od vzoru M.1). Nyní tvarujeme špičku. NEJPRVE SI POZORNĚ PŘEČTĚTE CELÝ NÁSLEDUJÍCÍ POPIS! (Pozn.: na nártové části a šlapce ponožky ujímáme rozdílně, avšak ve stejných kruhových řadách!) Na šlapce ponožky ujímáme takto: 2 oka za značkou spleteme hladce anglicky a 2 oka před značkou spleteme hladce. Ujímání opakujeme v každé 2. kruhové řadě, celkem 4-4-4x, pak v každé kruhové řadě, celkem 3-3-4x. SOUČASNĚ ujímáme na nártové části ponožky: nad vzorem M.1 pleteme vzorem M.2 (1-2-3 oka po obou stranách vzoru M.1 pleteme lícovým žerzejem jako dosud). V poslední kruhové řadě u velikosti 41/43 upleteme poslední 3 oka obrace = 10-12-14 ok zbylých na jehlici. Přízi odstřihneme, protáhneme zbylými oky, utáhneme a zapošijeme. |
|||||||||||||||||||||||||
Vysvětlivky ke schématu |
|||||||||||||||||||||||||
|
|||||||||||||||||||||||||
 |
|||||||||||||||||||||||||
Dokončili jste tento model?Pak označte své fotky tagem #dropspattern nebo je pošlete do galerie #dropsfan. Potřebujete s tímto návodem poradit?Otevřete-li si návod na stránce garnstudio.com, najdete tam 17 výukových video-ukázek, Komentáře/Dotazy a další užitečné informace. © 1982-2026 DROPS Design A/S. Vyhrazujeme si veškerá práva. Tento dokument, včetně všech jeho dílčích částí, podléhá autorským právům. Podrobnější komentář k možnostem užití našich návodů najdete dole pod každým návodem na našich stránkách. |
|||||||||||||||||||||||||


V oblasti pletené a háčkované módy působí DROPS Design více než 40 let. Díky tomu vám můžeme nabídnout jednu z nejrozsáhlejších kolekcí modelů s bezplatnými návody dostupnými na internetu - navíc v 17 jazycích. K dnešnímu dni máme na 324 katalogů a 12290 návodů celkem - z nich je už 7605 dostupných v [češtině].
Přidejte komentář k návodu DROPS 125-15
Rádi bychom věděli, co si o tomto modelu myslíte!
Pokud se chcete na něco zeptat, dbejte prosím na to, abyste ve formuláři níže vybrali správnou kategorii - díky tomu se dříve dozvíte, co potřebujete vědět. Povinná pole jsou označena *.