
Categorías populares
¿Buscas un hilo?


Comentarios / Preguntas (27)
![]() Della escribió:
Della escribió:
Hi. I’m wondering how I am going to fit 154 stitches at the end of A1 on a 15mm x 80cm circular needle. I’ve just started this garment and I’m doing the neck on the 12mm x 80cm and 44 stitches just fit 😳
22.08.2021 - 16:21DROPS Design respondió:
Dear Della, our knitters didn't really had problems fitting the stitches on the needles, but you can always use a longer circular, or even two circs, if you feel they are too crowded. Happy Stitching!
22.08.2021 - 17:33
![]() Emmanuelle escribió:
Emmanuelle escribió:
Merci pour votre réponse ultra rapide. C\'est parti, je me lance ! Bonne journée, Emmanuelle
02.08.2021 - 08:01
![]() Emmanuelle escribió:
Emmanuelle escribió:
Bonjour, très joli modèle. Une question toutefois avant de me lancer : je n'ai pas d'aiguille double pointe en 12. Peut-on commencer à tricoter dès le début (col) en rond avec les aiguilles circulaires 12 ? Merci par avance de votre réponse.
01.08.2021 - 10:45DROPS Design respondió:
Bonjour Emmanuelle et merci. Effectivement, vous pouvez tricoter le col sur une aiguille circulaire de 80 cm en utilisant la technique dite du magic loop jusqu'à ce que vous ayez augmenté suffisamment de mailles pour continuer sur une 60 ou sur la 80 mais en rond "normalement". Bon tricot!
02.08.2021 - 07:23
![]() Alica escribió:
Alica escribió:
Dear Drops, I have a problem with the yarn. Wanted to buy it, but I do not know which color is that colour 05, tan. When I choose colour 05 it is more brown. What does it mean tan? I would like to have the same colour as on the picture here. Pls help:)
04.05.2021 - 07:09DROPS Design respondió:
Hei Alica, The name of Polaris no 5 is Taupe (not tan) and is the colour you see in the picture - a dark mauve/grey. Happy knitting!
04.05.2021 - 07:42
![]() Madou escribió:
Madou escribió:
Merci pour les explications et les précisions ! Mon pull est à présent terminé et mon chat me le pique déjà... Le pull tient vraiment chaud et est très confortable à porter ! Conseil : ne pas hésiter à bien serrer l'encolure ! J'ai réalisé le modèle en taille Medium et je tiens juste à préciser qu'il me reste encore à peu près 150 g de laine, donc 1000 g vont bien pour cette taille, alors même que j'ai rallongé un peu les manches. Très beau pull, merci !
10.04.2021 - 16:09
![]() Madou escribió:
Madou escribió:
Bonjour, J'adore ce modèle et je viens de finir l'empiècement devant et dos, il ne me reste donc plus que les manches à tricoter. J'ai repris mes 24 mailles pour tricoter la première manche, et dois monter 2 mailles sous la manche. Dois-je les monter sur l'aiguille gauche ou droite ? Aussi, pourquoi suis-je censée avoir 28 mailles après avoir monter 24 + 2 mailles sous la manche ? Je vous remercie d'avance. Madou
08.04.2021 - 16:12DROPS Design respondió:
Bonjour Madou, montez 2 m de chaque côté des mailles en attente, par ex: montez 2 m, tricotez les 24 m de la manche et montez 2 m. La correction a été faite, merci. Bon tricot!
09.04.2021 - 07:11
![]() Laura Z Rhodes escribió:
Laura Z Rhodes escribió:
Hello, wonderfully patient DROPS design team. I have another sleeve question, regarding decreases. Are the decreases over 24 rows (one stitch decrease right side, one row no decreases, one row decrease left side, one row no decreases, for a total of 2 stitches decreased over 4 rows), or are the decreases over 12 rows (one stitch decrease start of knit row, one stitch decrease start of purl row, for a total of 2 stitches decreased over 2 rows)? Thank you.
17.02.2021 - 19:14DROPS Design respondió:
Dear Mrs Rhodes, the decreases will be worked over 24 rows, (1 row decreasing 1 st on the right side, 1 row without decreasing, 1 row decreasing on the left side, 1 row without decreasing), repeat from (to) a total of 6 times = 6 sts have been decreased on each side and 24 rows have been worked, 16 sts remain - decrease either at the beginning or at the end of a row from RS. Happy knitting!
18.02.2021 - 09:12
![]() Laura Rhodes escribió:
Laura Rhodes escribió:
Thank you so much for clearing up my question about the end of row marker. I am now ready to do the sleeves, but I don’t understand what you mean by casting on stitches mid under sleeve? I am to cast on 2 stitches (I am making the M), but twice, for a total of 28 stitches? Where is mid under sleeve? Thanks so much. The knitting is going super and I am excited to finish. :-)
15.02.2021 - 03:26DROPS Design respondió:
Hi Laura, The sleeve is worked over the stitches from the one thread as well as 2 stitches cast on, on each side = 4 new stitches (these stitches are used when the sleeve is sewn to the body when it is finished). You work back and forth until the sleeve is finished, then the sleeve seam and the opening under the sleeve are sewn together. Mid under the sleeve will be the underside of the sleeve, where the seam is. Hope this helps and happy knitting!
15.02.2021 - 07:54
![]() Laura Z Rhodes escribió:
Laura Z Rhodes escribió:
Thanks for your reply, but I am still confused about where the pattern starts in each row. At the start of A.1, I placed the marker before the first P. I understand increasing, but rnd7 seems to begin with a K placed BEFORE the marker. Is this the last K on rnd6? Then marker, then P1, K1, P1, K1 pattern? Rnd11 pattern is P1, P1 incr, P1, K1? Rnd12 is P1, K2, P1, K1? Rnd14 is P1, K2, P1, P incr? Or do you want the first incr on the last K of rnd13? Rnd15-18 is P1, K2? All start at EOR marker.
11.02.2021 - 17:30DROPS Design respondió:
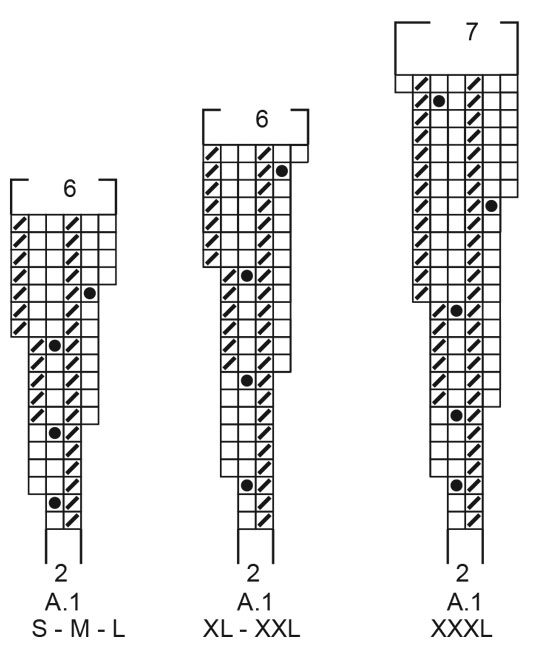
Dear Mrs Rhodes, you increase on row 6 and the stitch before the P stitch on row 7 is the new stitch that will be worked K, this means the marker on beg of round stays here and over P1, K1 (= increase on row 6), K1, you will now work: K1, P1, K1, P1. On row 11 work K1, P1, inc, P1 and row 12: K1, P1, K2, P1 etc... ie just work the stitches as they are shown in diagram. Hope this helps. Happy knitting!
12.02.2021 - 06:49
![]() Laura Z Rhodes escribió:
Laura Z Rhodes escribió:
Hello! I am following along the pattern chart, working from lower right to upper left, and I am at the row (row 7) where it looks like the pattern begins one stitch *before* the end-of-round marker. Is this correct? And then, in row 15, it again looks like I am adding stitches before the end-of-round marker. This would keep the purl stitches in line, which I assume you want? Thanks so much.
11.02.2021 - 02:44DROPS Design respondió:
Dear Mrs Rhodes, yes that's correct, you increased one stitch in each repeat on previous round, and now you work K1, P1, K1, P1 over the (P1, K1 worked with the increase, P1). On row 15, you will start with K2 since you increased on previous row 1 stitch in the first stitch of the repeat. Hope this helps. Happy knitting!
11.02.2021 - 06:52
|
||||||||||
November Woodland#novemberwoodlandsweater |
||||||||||
 |
 |
|||||||||
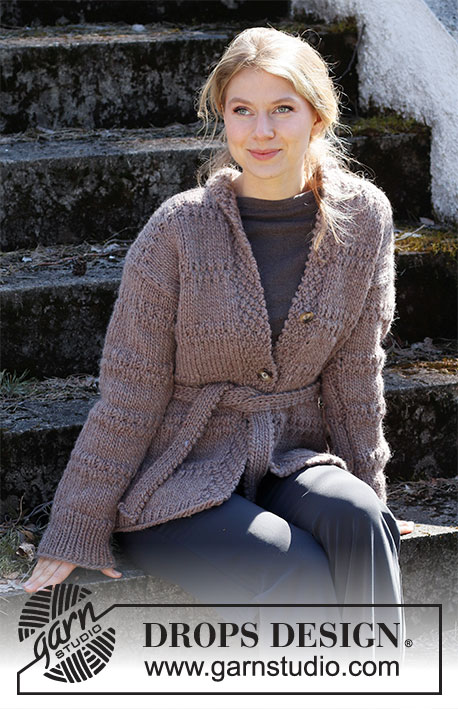
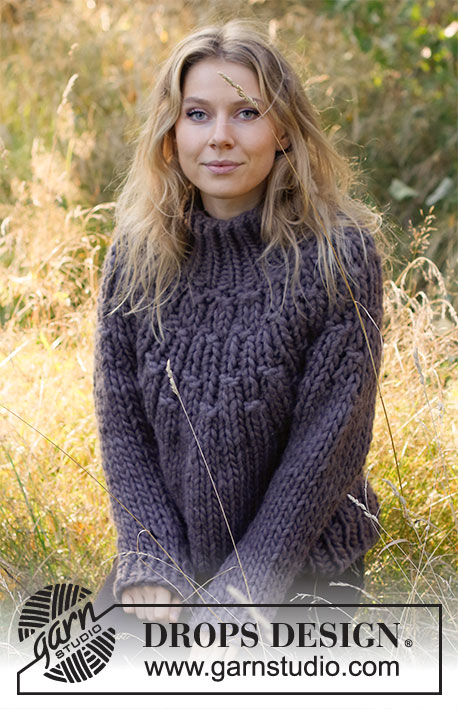
Jersey a punto con cuello alto y canesú redondo en DROPS Polaris. La labor está realizada de arriba abajo. Talla: S - XXXL
DROPS 216-24 |
||||||||||
|
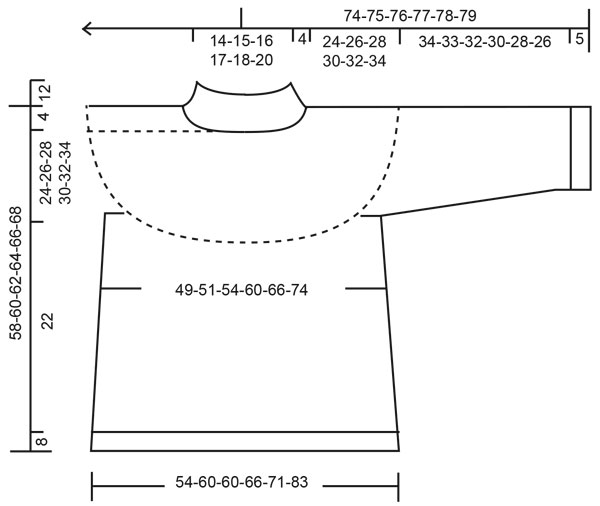
EXPLICACIONES PARA REALIZAR LA LABOR: ------------------------------------------------------- PATRÓN: Ver diagrama A.1, elegir el diagrama correspondiente para tu talla. ANILLO MÁGICO: Si la aguja circular es demasiado larga para trabajar en redondo, trabajar un anillo mágico como sigue: Mover los puntos al medio de la aguja circular (en el medio del cable). Dividir el número de puntos aprox. en el medio, y tirar del cable entre 2 puntos, Después deslizar los puntos a un lado desde donde trabajar hasta la punta de la aguja y trabajar hasta sacar el cable. Tirar de la mitad del cable entre 2 nuevos puntos en el lado opuesto antes de continuar de la misma manera, continuar de esta manera hasta que se hayan trabajado suficientes puntos para trabajar normal en redondo. TIP PARA LOS AUMENTOS (aplicar al cuerpo): Aumentar 1 punto haciendo 1 hebra. En la siguiente vuelta trabajar las hebras de derecho retorcido para evitar que se formen agujeros. TIP PARA LAS DISMINUCIONES (aplicar a las mangas): NOTA! Para obtener una disminución alternada en el lado derecho e izquierdo de la labor, disminuir como sigue: Trabajar alternadamente al inicio y al final de una fila con disminuciones. Disminuir como sigue por el lado derecho: 2 puntos juntos de derecho. Disminuir como sigue por el lado revés: 2 puntos juntos de revés. ------------------------------------------------------- COMENZAR LA LABOR AQUÍ: ------------------------------------------------------- JERSEY - RESUMEN DE LA LABOR: Trabajar en redondo con agujas de doble punta/ una aguja circular, de arriba abajo. Trabajar las mangas de ida y vuelta con una aguja circular y coser para finalizar. CENEFA DEL ESCOTE: Montar 34-36-38-40-42-44 puntos con agujas de doble punta de 12 mm con Polaris. Trabajar el elástico en redondo = 1 derecho/ 1 revés 12 cm. CANESÚ: Leer ANILLO MÁGICO en la explicación arriba. Insertar un marcapuntos aquí, MEDIR LA LABOR DESDE AQUÍ! Cambiar a una aguja circular de 15 mm y trabajar el patrón A.1 en redondo - elegir tu talla en el diagrama. RECORDAR MANTENER LA TENSIÓN DEL TEJIDO! Cuando se haya trabajado todo A.1 en vertical, hay 102-108-114-120-126-154 puntos en la vuelta. Trabajar 1 vuelta de derecho y al mismo tiempo aumentar 0-4-2-8-10-2 puntos repartidos - leer TIP PARA LOS AUMENTOS en las explicaciones arriba = 102-112-116-128-136-156 puntos. Después continuar en punto jersey hasta que la labor mida 24-26-28-30-32-34 cm desde el marcapuntos. Trabajar la siguiente vuelta como sigue: Trabajar los primeros 15-16-17-19-20-23 puntos (= mitad de la espalda), deslizar los siguientes 21-24-24-26-28-32 puntos con un gancho auxiliar para la manga y montar 4-4-4-4-6-6 puntos nuevos en la aguja (= en el lado bajo la manga), trabajar los siguientes 30-32-34-38-40-46 puntos (= delantero), deslizar los siguientes 21-24-24-26-28-32 puntos en un gancho auxiliar para la manga y montar 4-4-4-4-6-6 puntos nuevos en la aguja (= en el lado bajo la manga), trabajar los 15-16-17-19-20-23 puntos restantes (= mitad de la espalda). Ahora finalizar el cuerpo y las mangas por separado. AHORA MEDIR LA LABOR DESDE AQUÍ! CUERPO: = 68-72-76-84-92-104 puntos. Trabajar en redondo en punto jersey hasta que la labor mida 22 cm desde la división para todas las tallas. Cambiar a una aguja circular de 12 mm, y trabajar el elástico en redondo = 1 derecho/ 1 revés 8 cm en todas las tallas. Cerrar flojo los puntos con derecho sobre derecho y revés sobre revés. El jersey mide aprox. 58-60-62-64-66-68 cm desde el hombro. MANGA: Trabajar las mangas de ida y vuelta con una aguja circular y coser para finalizar. Deslizar los 21-24-24-26-28-32 puntos desde el gancho auxiliar a un lado de la labor con una aguja circular de 15 mm y montar 2-2-2-2-3-3 puntos nuevos en el centro bajo la manga = 25-28-28-30-34-38 puntos. Trabajar en punto jersey de ida y vuelta, al mismo tiempo en la siguiente fila por el lado derecho disminuir 1-0-0-0-0-0 puntos (disminuir sólo en la talla S) trabajar de derecho los 2 puntos más externos en el lado izquierdo de la labor juntos = 24-28-28-30-34-38 puntos. Cuando la labor mida 4-2-2-4-4-2 cm, disminuir 1 punto en el lado derecho de la labor - leer TIP PARA LAS DISMINUCIONES. Disminuir alternadamente en el lado izquierdo y derecho de la labor cada 2ª-2ª-2ª-1ª-1ª-1ª fila 8-12-12-14-14-18 veces en total (= 4-6-6-7-7-9 veces a cada lado) = 16-16-16-16-20-20 puntos. Trabajar hasta que la labor mida 34-33-32-30-28-26 cm desde la división. (NOTA: Las medidas son más cortas en las tallas más grandes debido a la mayor anchura de los hombros). Cambiar a una aguja circular de 12 mm. Trabajar de ida y vuelta con el elástico 1 derecho/ 1 revés 5 cm. Cerrar flojo con derecho sobre derecho y revés sobre revés. Trabajar la otra manga de la misma manera. TERMINACIÓN: Hacer la costura bajo la manga en el bucle más externo del punto orillo para evitar que la costura quede abultada - dividir el hilo para que sea más fino al coser. Coser la abertura bajo las mangas. |
||||||||||
Explicaciones del diagrama |
||||||||||
|
||||||||||
 |
||||||||||
 |
||||||||||
¿Terminaste este patrón?Entonces, etiqueta tus fotos con #dropspattern #novemberwoodlandsweater o envíalas a la galería #dropsfan. ¿Necesitas ayuda con este patrón?Encontrarás 24 videos tutoriales, un espacio para comentarios/preguntas y más visitando la página del patrón en garnstudio.com © 1982-2026 DROPS Design A/S. Todos los derechos reservados. Este documento, incluyendo todas sus sub-secciones, está protegido por los derechos de autor (copyright). Lee más acerca de lo que puedes hacer con nuestros patrones en la parte de abajo de cada patrón de nuestro sitio. |
||||||||||


Con más de 40 años en el diseño de modelos de punto y de ganchillo, DROPS Design ofrece una de las más vastas colecciones de patrones gratuitos en el internet - traducidos en 17 idiomas. Al día de hoy, contamos con 324 catálogos y 12290 patrones - de los cuales 11675 están traducidos en español.
Nosotros trabajamos con mucho esmero para brindarte lo mejor que las labores de punto y ganchillo tienen para ofrecer,inspiración y consejos, así como hilos de magnífica calidad a precios increíbles! Te gustaría usar nuestros patrones para otro fin además del uso personal? Puedes leer acerca de lo que estás permitida a hacer en el texto de Copyright en la parte de abajo de todos nuestros patrones. Felices labores!
Escribe un comentario sobre DROPS 216-24
¡Nos encantaría saber qué piensas acerca de este patrón!
Si quieres escribir una pregunta referente al patrón, por favor asegúrate de elegir la categoría correcta en el formulario debajo, para acelerar el proceso de respuesta. Los campos obligatorios están marcados con un *.