
Categorías populares
¿Buscas un hilo?


Comentarios / Preguntas (38)
![]() Anne escribió:
Anne escribió:
Hej Når symbolerne i diagrammet er tegnet oveni hinanden, betyder det så at der skal hækles to nye masker i én maske fra den tidligere omgang?Hilsen Anne
13.12.2021 - 23:21DROPS Design respondió:
Hei Anne. Ja, da økes det. mvh DROPS Design
14.12.2021 - 14:07
![]() Loreto Pedreros escribió:
Loreto Pedreros escribió:
Bonjour, Voilà ma question: a la fin de A2, j'obtiens 88 brides ou doubles brides + 3 mailles en l'air correspondantes au début de chaque rang. C'est bien ça ? Merci d'avance et je tiens aussi à vous remercier pour tant de jolis modèles, explications et belles vidéos qui m'ont permis de progresser. Merci mille fois! Loreto
24.11.2021 - 18:33DROPS Design respondió:
Bonjour Loreto et merci! Tout à fait, lorsque A.2 est terminé, vous avez bien 88 mailles (brides ou double-brides) + les 3 ml du début du tour si vous avez choisi de les faire en plus ou bien 88 mailles: 3 ml au début du tour pour remplacer la 1ère bride + 87 brides/double-brides. Bonne continuation!
25.11.2021 - 08:45
![]() Lupe Vasquez escribió:
Lupe Vasquez escribió:
Do you have written instructions to the "deep December fjords crochet hat"?
06.09.2021 - 22:30DROPS Design respondió:
Dear Mrs Vasquez, there are only diagrams to this pattern, but this lesson will help you understanding how to read crochet diagrams. Happy crocheting!
07.09.2021 - 08:23
![]() Nina escribió:
Nina escribió:
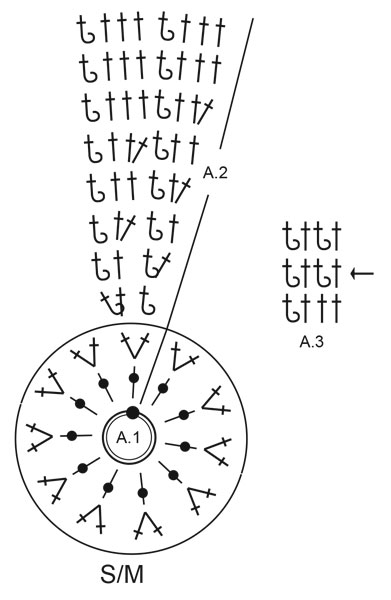
1.Hvordan starter man med en relieffmaske i runde fire? Videoen viser relieffmønster hvor man starter med tre luftmasker. 2. hva er forskjellen på å hekle relieffmaske i en stav (runde 4) og det å hekle stav og så relieffmaske slik man ser i feks runde 5? Hvordan gjør man det? 3. hva menes med 11-12 ganger rundt på omgangen? «…. A.2 totalt 11-12 ganger rundt på omgangen.» 4. hvorfor kan dere ikke legge ut video som viser hvordan man hekler denne lua?
28.08.2021 - 18:45DROPS Design respondió:
Hei Nina. 1) Runde 4, mener du da 2. omgang i A.2? Da hekler du 3 staver (les Hekleinformasjon) + 1 relieff-dobbelstav i neste maske. 2) Runde 4 og 5, mener du da 2.og 3. omgang i A.2? I omgang 4 hekles det 2 masker (1 stav+1 relieff-dobbeltstav) i samme maske, men det i 5. omgang hekles det 1 stav i 1 maske og 1 relieff-dobbeltstav i neste maske). 3) Hekler du str. S/M gjentar du A.2 11 ganger rundt på omgangen, mens hekler du str. M/L gjentar du A.2 12 ganger rundt på omgangen. 4) Å lage en hjelpevideo til hvordan man hekler denne luen vil bli altfor lang, så til denne luen har vi lagt til 8 video som vi mener er til god hjelp. Mvh DROPS design
30.08.2021 - 14:31
![]() Laura escribió:
Laura escribió:
Hej, jeg har et spørgsmål til A. 3. Altså man vender først huen, så mønsteret dvs. retsiden vender ind af og vrangsiden ud af. Jeg er dog i tvivl om hækleretningen? Skal man også lave de tre luftmasker og en kædemaske inden man starter eller hvordan? Skal man holde på huen så siden man hækle vender væk fra dig eller ind imod dig?
12.03.2021 - 14:32DROPS Design respondió:
Hei Laura. Ja, hekle de 3 luftmaskene og kjedemaskene du tidligere har heklet i begynnelsen og slutten av hver omgang. Når du vender arbeidet må du også vri på luen slik at du nå får vrangen/nålen nærmest mot deg og du hekler videre som vanlig, - fra høyre til venstre. mvh DROPS design
15.03.2021 - 13:39
![]() Natasja escribió:
Natasja escribió:
Tak for hjælpen tidligere. Jeg fandt ud af det, men jeg har et spørgsmål i forhold til de 21-23cm, som arbejdet skal måle før man går til A. 3. Er de 21-13cm i diameteren på huen eller fra top til bund?
09.03.2021 - 22:51DROPS Design respondió:
Hej Natasja, de 21-23 cm er fra toppen og ned i hækleretningen :)
10.03.2021 - 15:45
![]() Natasja escribió:
Natasja escribió:
Hej. Jeg forstår ikke helt, hvordan der kun skal være fire luftmasker i den inderste ring, når der er 11 stangmasker i næste række (A.1)?
07.03.2021 - 22:08DROPS Design respondió:
Hej Natasja, jo det stemmer, du hækler de 11 stangmasker rundt om ringen som består af 4 luftmasker. Hækler du i DROPS Merino Extra Fine? :)
08.03.2021 - 14:40
![]() Maja escribió:
Maja escribió:
Dzień dobry. Czy schemat A3 również zaczynamy 3 oczkami łańcuszka i kończymy oczkiem ścisłym? Dziękuję.
15.02.2021 - 06:29DROPS Design respondió:
Witaj Maju, dokładnie tak. Zobacz WSKAZÓWKĘ, która znajduje się na początku objaśnień do wzoru. Pozdrawiamy!
15.02.2021 - 09:49
![]() Sara escribió:
Sara escribió:
Hvordan skal man begynne på rad 4, når det er en relieffmaske..?
03.02.2021 - 02:32DROPS Design respondió:
Hej Sara, da hækler du 1 dobbeltstangmaske rundt om stangmasken fra forrige omgang. Se gerne vores video nederst i opskriften. God fornøjelse!
03.02.2021 - 15:28
![]() Gosia escribió:
Gosia escribió:
Czy dobrze rozumiem, że słupki nawijane mają być robione od przodu? Robiłam zgodnie z oznaczeniem tylne słupki reliefowe, ale wtedy wzorek czapki pojawia się wewnątrz robótki, zamiast na zewnątrz. Czy u Was te symbole są używane odwrotnie?
25.01.2021 - 10:51DROPS Design respondió:
Gosiu, później wyłożysz dół czapki na prawą stronę i wzorek pojawi się na prawej stronie. Pozdrawiamy!
25.01.2021 - 11:03
|
||||||||||||||||
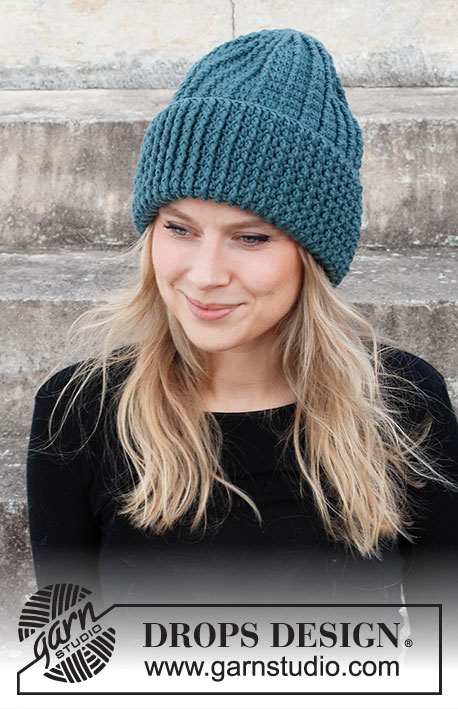
Deep December Fjords#deepdecemberfjordshat |
||||||||||||||||
 |
 |
|||||||||||||||
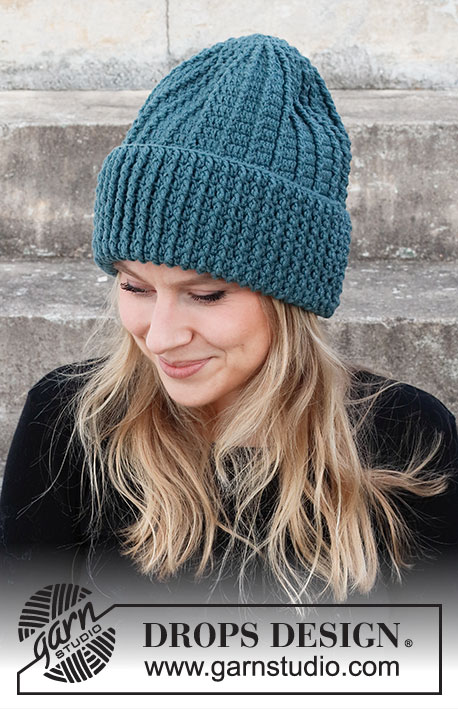
Gorro a ganchillo en DROPS Merino Extra Fine. La prenda está realizada de arriba abajo con puntos en relieve.
DROPS 214-38 |
||||||||||||||||
|
EXPLICACIONES PARA REALIZAR LA LABOR: ------------------------------------------------------- PUNTO DE CADENETA: Si se trabaja en el extremo de ganchillo, el punto de cadeneta a menudo quedará muy tenso; 1 punto de cadeneta debería ser tan largo como el ancho de 1 punto alto. PATRÓN: Ver diagramas A.1 a A.3. Elegir el diagrama correspondiente a tu talla (aplicar a A.1 y A.2). INFO PARA TRABAJAR A GANCHILLO: Al inicio de cada vuelta de puntos altos, trabajar 3 puntos de cadeneta que sustituyen al 1º punto alto; es decir, saltar el 1º punto alto/ punto bajo de la vuelta anterior. La vuelta termina con 1 punto enano en el 3º punto de cadeneta al inicio de la vuelta. ------------------------------------------------------- COMENZAR LA LABOR AQUÍ: ------------------------------------------------------- GORRO – RESUMEN DE LA LABOR: La labor se trabaja en redondo y de arriba abajo. GORRO: Trabajar 4 puntos de cadeneta – leer PUNTO DE CADENETA, con un ganchillo de 4 mm y Merino Extra Fine y formar un anillo con 1 punto enano en el 1º punto de cadeneta. Después trabajar el patrón A.1 – leer INFO PARA TRABAJAR A GANCHILLO. Cuando se haya completado A.1, continuar con A.2 un total de 11-12 veces en horizontal. RECORDAR MANTENER LA TENSIÓN DEL TEJIDO! Cuando se haya completado A.2 en vertical hay 88-96 puntos en la vuelta. Después repetir las últimas 2 vueltas en el diagrama hasta que la labor mida 21-23 cm. Ahora girar la labor de dentro hacia fuera (para que el dobladillo tenga el lado derecho hacia fuera al levantarlo). Trabajar A.3 en redondo, desde la flecha. Cuando el gorro mida 33-35 cm de arriba abajo, el gorro está terminado. Cortar y asegurar el hilo. El gorro mide aprox. 23-25 cm con aprox. 10 cm de dobladillo. |
||||||||||||||||
Explicaciones del diagrama |
||||||||||||||||
|
||||||||||||||||
 |
||||||||||||||||
 |
||||||||||||||||
¿Terminaste este patrón?Entonces, etiqueta tus fotos con #dropspattern #deepdecemberfjordshat o envíalas a la galería #dropsfan. ¿Necesitas ayuda con este patrón?Encontrarás 8 videos tutoriales, un espacio para comentarios/preguntas y más visitando la página del patrón en garnstudio.com © 1982-2026 DROPS Design A/S. Todos los derechos reservados. Este documento, incluyendo todas sus sub-secciones, está protegido por los derechos de autor (copyright). Lee más acerca de lo que puedes hacer con nuestros patrones en la parte de abajo de cada patrón de nuestro sitio. |
||||||||||||||||


Con más de 40 años en el diseño de modelos de punto y de ganchillo, DROPS Design ofrece una de las más vastas colecciones de patrones gratuitos en el internet - traducidos en 17 idiomas. Al día de hoy, contamos con 324 catálogos y 12290 patrones - de los cuales 11685 están traducidos en español.
Nosotros trabajamos con mucho esmero para brindarte lo mejor que las labores de punto y ganchillo tienen para ofrecer,inspiración y consejos, así como hilos de magnífica calidad a precios increíbles! Te gustaría usar nuestros patrones para otro fin además del uso personal? Puedes leer acerca de lo que estás permitida a hacer en el texto de Copyright en la parte de abajo de todos nuestros patrones. Felices labores!
Escribe un comentario sobre DROPS 214-38
¡Nos encantaría saber qué piensas acerca de este patrón!
Si quieres escribir una pregunta referente al patrón, por favor asegúrate de elegir la categoría correcta en el formulario debajo, para acelerar el proceso de respuesta. Los campos obligatorios están marcados con un *.