
Categorías populares
¿Buscas un hilo?


Comentarios / Preguntas (92)
![]() Katie escribió:
Katie escribió:
Where it says ‘begin on the wrong side’ for the front section, how do I make sure I do this?
27.05.2021 - 08:39DROPS Design respondió:
Dear Katie, when working front piece from the wrong side, you should have the purl side of the stocking stitch from the beginning of piece towards you. Happy knitting!
27.05.2021 - 09:37
![]() Larissa escribió:
Larissa escribió:
Hallöchen, Leider verstehe ich nicht was damit gemeint ist die mittleren 10 Maschen an beiden Seiten des Rumpfteiles zu Stricken ?
24.05.2021 - 10:00DROPS Design respondió:
Liebe Larissa, es handelt sich um die 5 Maschen vor + nach jeder Markierungen (= 5 M am Anfang der Runde (1. Seite) + 5 M vor der 2. Markierung + 5 M nach der 2. Markierung (= 2. Seite) + 5 M am Ende der Runde (= 1. Seite). Viel Spaß beim stricken!
25.05.2021 - 08:13
![]() Laura Sweary escribió:
Laura Sweary escribió:
How do I begin the front or back if I’ve cut the yarn at the arm hole? This is not clear to me.
08.05.2021 - 02:19DROPS Design respondió:
Dear Laura, simply attach the yarn to the fist stitch on the front, and continue knitting according to the pattern. After finishing the knitting and assembly, weave in the yarn ends. Happy Knitting!
08.05.2021 - 09:35
![]() Anne Iversen escribió:
Anne Iversen escribió:
Hvordan regner jeg min str. ud? Har ikke kunne finde ud af det og kan ikke helt finde ud af om diagrammet viser mig str.? På forhånd mange tak :)
20.04.2021 - 16:01DROPS Design respondió:
Hej Anne. Måleskitsen visar mål i alla storlekar i cm på plagget, så det bästa är att du måler ett plagg du redan har för att se vilken storlek som passar dig bäst. Mvh DROPS Design
21.04.2021 - 07:24
![]() Fie Pultz Thomsen escribió:
Fie Pultz Thomsen escribió:
Hej, jeg er i gang med Spiced Breeze toppen og jeg er nået til at skulle strikke forstykket, men jeg forstå ikke helt hvordan jeg skal gøre det. Skal jeg stadig strikke med rundkindede eller skal jeg bruge en pind mere? Skal jeg strikke forstykket og bagstykket samtidig? Hvad betyder det at jeg skal starte fra vrangen? Håber at i kan hjælpe. Mvh Fie
27.02.2021 - 18:00DROPS Design respondió:
Hej Fie, når du har strikket det første stykke rundt på rundpind, fortsætter du over maskerne til forstykket og strikker frem og tilbage over kun dem. Du kan sætte de andre masker på en tråd, eller bare lade dem hvilke på en anden rundpind. Du strikker forstykket klart første ifølge opskriften og så strikker du bagefter bagstykket. God fornøjelse!
04.03.2021 - 12:30
![]() Dara escribió:
Dara escribió:
Thank you so much for your response- are these 14 stitches for the garter stitch under the arm or center front and back rib of the neck? I am looking at the image of the vest and how this applies? So sorry for the additional question! SPICED BREEZE vest and I don't understand these instructions. My piece measures 24 cm on round stitches. Do I to knit on either end of the center 14 garter stitches for each side ?
07.01.2021 - 16:19DROPS Design respondió:
Dear Dara, these 14 sts are for armhole on each side. You continue working stocking stitch over the middle 76 sts on front and back piece and 14 sts in garter stitch on each side as follows from beg of round: 7 sts in garter st, 76 sts stocking st, 14 sts garter st, 76 sts stocking st, 7 sts garter st (=180sts), Then cast off as explained = 80 sts remain resp. for the front and the back piece and work them in stocking st with 2 sts in garter st on each side. Happy knitting!
07.01.2021 - 16:42
![]() Dara escribió:
Dara escribió:
Hello- I am knitting the SPICED BREEZE vest and I don't understand these instructions. My piece measures 24 cm on round stitches. Do I to knit on either end of the center 14 garter stitches for each side ? When piece measures 21-22-23-24-25-26 cm, , work 2 ridges in GARTER STITCH - read explanation above, over the middle 10-10-14-14-20-24 stitches in each side (marker threads are in the middle of these 10-10-14-14-20-24 stitches - work the other stiches in stocking stitch).
07.01.2021 - 00:11DROPS Design respondió:
Dear Dara, you should now work the 14 sts on each side (= 7 sts before each marker thread + 7 sts after each marker thread) in garter stitch (= alternately 1 round knit, 1 round purl) and continue working as before (= stocking stitch) the remaining stitches between these 14 sts in garter stitch. Happy knitting!
07.01.2021 - 10:27
![]() Isabel escribió:
Isabel escribió:
Como hago el escote cuadrado..no me quedó claro.de una sola pasada se hace el escote?saludos
04.11.2020 - 13:44DROPS Design respondió:
Hola Isabel, para rematar para el escote, se trabajan los primeros puntos del delantero, después se rematan los puntos centrales y se trabajan los últimos puntos del delantero. El número de puntos trabajados y rematados dependerá de la talla.
19.11.2020 - 11:48
![]() Kirsty escribió:
Kirsty escribió:
When knitting the front and back pieces, do you start then from scratch or pick up the stitches from what’s already knitted?
16.10.2020 - 19:32DROPS Design respondió:
Dear Kirsty, for front and back piece, you will work the sts that are on needle, the one worked on last round on body when divided piece and cast off for armholes. Happy knititng!
19.10.2020 - 07:56
![]() Helle Pedersen escribió:
Helle Pedersen escribió:
Jeg skal strikke denne model i Safran garn, men er i tvivl om hvilken størrelse pinde jeg skal bruge og om jeg kan bruge de mål der er i opskriften.
25.07.2020 - 12:39DROPS Design respondió:
Hej Helle, hvis du strikker denne model i 2 tråde DROPS Safran, så skal du sikkert bruge pind nr 5 for at overholde strikkefastheden ifølge opskriften. God fornøjelse!
27.07.2020 - 15:26
|
|
Spiced Breeze#spicedbreezetop |
|
 |
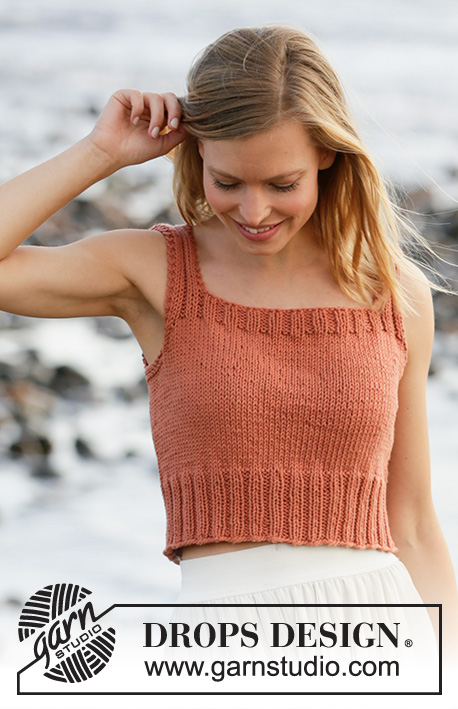 |
Top de punto en DROPS Paris. La pieza está tejida en punto jersey con orillas en resorte. Tallas: S – XXXL.
DROPS 211-15 |
|
|
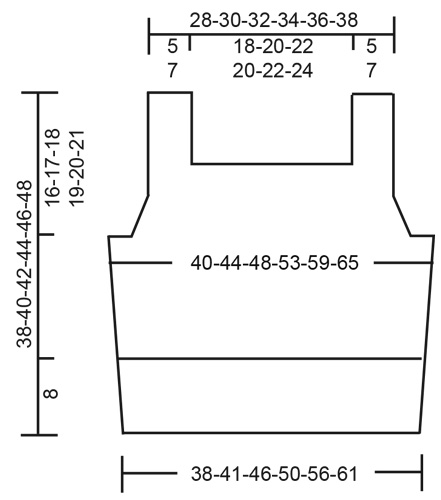
EXPLICACIONES PARA REALIZAR EL PATRÓN: ------------------------------------------------ PUNTO MUSGO (tejido en redondo): 1 surco verticalmente = 2 vueltas; es decir, tejer 1 vuelta de derecho y 1 vuelta de revés. PUNTO MUSGO (de ida y vuelta): Tejer todas las hileras de derecho. 1 surco verticalmente = tejer 2 hileras de derecho. TIP PARA DISMINUIR (aplica a las sisas): Disminuir para las sisas en el interior de 2 puntos de orillo en punto musgo. Todas las disminuciones son hechas por el lado derecho. Disminuir de la manera siguiente después de 2 puntos de orillo en punto musgo: Deslizar 1 punto como de derecho, tejer 1 punto derecho, pasar el punto deslizado por encima del punto tejido (= 1 punto disminuido). Disminuir de la manera siguiente antes de 2 puntos de orillo en punto musgo: Comenzar 2 puntos antes de los 2 puntos de orillo y tejer 2 puntos juntos de derecho (= 1 punto disminuido). ------------------------------------------------ COMENZAR LA PIEZA AQUÍ: ------------------------------------------------ TOP – RESUMEN DE LA PIEZA: La pieza se teje en redondo en aguja circular, a partir de la parte de abajo hasta las sisas. Después tejer el frente y la pieza de la espalda de ida y vuelta en aguja circular separadamente. Después coser las costuras de los hombros. CUERPO: Montar 136-148-164-180-200-220 puntos en aguja circular tamaño 4.5 mm con Paris. Tejer 1 vuelta de derecho. Después tejer el resorte en redondo (= 2 derechos/2 reveses) durante 8 cm. Insertar 1 hilo marcador al principio de la vuelta y 1 hilo marcador después de 68-74-82-90-100-110 puntos. Los hilos marcadores marcan los lados del cuerpo. Cambiar a aguja circular tamaño 5 mm y tejer en punto jersey en redondo. ¡RECORDAR MANTENER LA MISMA TENSIÓN DE TEJIDO DE LA MUESTRA! Cuando la pieza mida 21-22-23-24-25-26 cm, tejer 2 surcos en PUNTO MUSGO – leer explicación arriba, sobre los 10-10-14-14-20-24 puntos centrales a cada lado (los hilos marcadores están en el centro de estos 10-10-14-14-20-24 puntos – tejer los otros puntos en punto jersey). En la primera vuelta después de los 2 surcos, rematar para las sisas de la manera siguiente: Rematar 3-3-5-5-8-10 puntos, tejer 62-68-72-80-84-90 puntos en punto jersey, rematar 6-6-10-10-16-20 puntos (el hilo marcador está en el centro de estos 6-6-10-10-16-20 puntos), tejer 62-68-72-80-84-90 puntos en punto jersey, y rematar los 3-3-5-5-8-10 puntos restantes. Cortar el hilo. Terminar el frente y la pieza de la espalda separadamente. FRENTE: = 62-68-72-80-84-90 puntos. Comenzar por el lado revés y continuar con punto jersey de ida y vuelta y 2 puntos de orillo en punto musgo a cada lado. AL MISMO TIEMPO, en la primera hilera por el lado derecho, disminuir 1 punto a cada lado para las sisas – leer TIP PARA DISMINUIR. Disminuir así a cada 2 hileras (es decir, en cada hilera por el lado derecho) 4-5-5-7-7-8 veces en total a cada lado = restan 54-58-62-66-70-74 puntos. Después de la última disminución para las sisas, tejer 1 hilera de revés por el lado revés con 2 puntos de orillo en punto musgo a cada lado. Cambiar a aguja circular tamaño 4.5 mm y tejer la hilera siguiente por el lado derecho de la manera siguiente: 2 puntos de orillo en punto musgo, * 2 derechos, 2 reveses *, repetir de *a* hasta que resten 4 puntos, tejer 2 puntos derechos y terminar con 2 puntos de orillo en punto musgo. Continuar el resorte así durante 3 cm. En la hilera siguiente por el lado derecho, rematar para el escote de la manera siguiente: Tejer 2 puntos de orillo en punto musgo, * 2 derechos, 2 reveses *, tejer de *a* 1-1-1-2-2-2 veces en total, tejer 2 puntos derechos y 2 puntos en punto musgo, después rematar los 34-38-42-38-42-46 puntos siguientes para el escote (rematar con derecho sobre derecho y revés sobre revés), tejer 2 puntos en punto musgo, * 2 derechos, 2 reveses *, tejer de *a* 1-1-1-2-2-2 veces en total, tejer 2 puntos derechos y terminar con 2 puntos de orillo en punto musgo. Ahora hay 10-10-10-14-14-14 puntos restantes a cada lado de la pieza para los tirantes. Terminar los tirantes separadamente. TIRANTE: = 10-10-10-14-14-14 puntos. Tejer en resorte de ida y vuelta como antes con 2 puntos de orillo en punto musgo a cada lado hasta que la pieza complete mida 38-40-42-44-46-48 cm a partir de la orilla de montaje (o el largo deseado). Rematar. Tejer el otro tirante de la misma manera. ESPALDA: = 62-68-72-80-84-90 puntos. Comenzar por el lado revés y continuar con punto jersey de ida y vuelta y 2 puntos de orillo en punto musgo a cada lado. AL MISMO TIEMPO, en la primera hilera por el lado derecho, disminuir 1 punto a cada lado para las sisas – leer TIP PARA DISMINUIR. Disminuir así a cada 4ª hilera (no a cada 2 hileras como en la pieza del frente) 4-5-5-7-7-8 veces en total a cada lado = 54-58-62-66-70-74 puntos. Después de la última disminución para las sisas, tejer 1 hilera de revés por el lado revés con 2 puntos de orillo en punto musgo a cada lado. Cambiar a aguja circular tamaño 4.5 mm y tejer la hilera siguiente por el lado derecho de la manera siguiente: 2 puntos de orillo en punto musgo, * 2 derechos, 2 reveses *, repetir de *a* hasta que resten 4 puntos, tejer 2 puntos derechos y terminar con 2 puntos de orillo en punto musgo. Continuar el resorte así durante 3 cm. En la hilera siguiente por el lado derecho, rematar para el escote de la manera siguiente: Tejer 2 puntos de orillo en punto musgo, * 2 derechos, 2 reveses *, tejer de *a* 1-1-1-2-2-2 veces en total, tejer 2 puntos derechos y 2 puntos en punto musgo, después rematar los 34-38-42-38-42-46 puntos siguientes para el escote (rematar con derecho sobre derecho y revés sobre revés), tejer 2 puntos en punto musgo, * 2 derechos, 2 reveses *, tejer de *a* 1-1-1-2-2-2 veces en total, tejer 2 puntos derechos y terminar con 2 puntos de orillo en punto musgo. Ahora hay 10-10-10-14-14-14 puntos restantes a cada lado para los tirantes. Tejer los tirantes separadamente de la misma manera como en la pieza del frente. ENSAMBLAJE: Coser las costuras de los hombros. |
|
 |
|
¿Terminaste este patrón?Entonces, etiqueta tus fotos con #dropspattern #spicedbreezetop o envíalas a la galería #dropsfan. ¿Necesitas ayuda con este patrón?Encontrarás 21 videos tutoriales, un espacio para comentarios/preguntas y más visitando la página del patrón en garnstudio.com © 1982-2026 DROPS Design A/S. Todos los derechos reservados. Este documento, incluyendo todas sus sub-secciones, está protegido por los derechos de autor (copyright). Lee más acerca de lo que puedes hacer con nuestros patrones en la parte de abajo de cada patrón de nuestro sitio. |
|


Con más de 40 años en el diseño de modelos de punto y de ganchillo, DROPS Design ofrece una de las más vastas colecciones de patrones gratuitos en el internet - traducidos en 17 idiomas. Al día de hoy, contamos con 324 catálogos y 12239 patrones - de los cuales 11618 están traducidos en español.
Nosotros trabajamos con mucho esmero para brindarte lo mejor que las labores de punto y ganchillo tienen para ofrecer,inspiración y consejos, así como hilos de magnífica calidad a precios increíbles! Te gustaría usar nuestros patrones para otro fin además del uso personal? Puedes leer acerca de lo que estás permitida a hacer en el texto de Copyright en la parte de abajo de todos nuestros patrones. Felices labores!
Escribe un comentario sobre DROPS 211-15
¡Nos encantaría saber qué piensas acerca de este patrón!
Si quieres escribir una pregunta referente al patrón, por favor asegúrate de elegir la categoría correcta en el formulario debajo, para acelerar el proceso de respuesta. Los campos obligatorios están marcados con un *.