
Categorías populares
¿Buscas un hilo?


Comentarios / Preguntas (93)
![]() Sandrine escribió:
Sandrine escribió:
Bonjour, faut il couper le fil à chaque changement de couleur ou les faire suivre le long du tricot ? Merci
26.04.2025 - 17:50DROPS Design respondió:
Bonjour Sandrine, vous pouvez faire suivre les fils au fur et à mesure et/ou les couper si les rayures sont trop hautes, cf vidéo. Bon tricot!
28.04.2025 - 08:05
![]() Sophie escribió:
Sophie escribió:
Bonjour, Je souhaite faire ce pull d'une seule couleur. Combien de pelotes dois-je prévoir? Merci d'avance
06.04.2025 - 14:42DROPS Design respondió:
Bonjour Sophie, comme ce modèle a été tricoté avec des rayures, nous n'avons que les quantités nécessaires pour chaque couleur - et nous n'avons plus ce modèle. Vous pouvez additionner la totalité des couleurs, vous en aurez probablement besoin d'un peu moins - vous pouvez vous inspirer d'un modèle similaire en Melody (pensez à bien vérifier la tension et les mesures correspondantes) - votre magasin pourra également vous aider si besoin, même par mail ou téléphone. Bon tricot!
07.04.2025 - 08:45
![]() Marie escribió:
Marie escribió:
Hey, Wenn ich jeweils nur eine Runde einer Farbe stricke und dann zu einer neuen Farbe wechsele entsteht ein „Loch“ bzw. eine Spalte am Rundennanfang. Wie kann ich das vermeiden? Gibt es hierzu ein Video? Vielen Dank! :)
15.03.2025 - 21:15DROPS Design respondió:
Liebe Marie, in diesem Video zeigen wir, wie man Streifen in Runden ohne Stufe stricken kann Viel Spaß beim Stricken!
17.03.2025 - 08:29
![]() Petra escribió:
Petra escribió:
Hallo Ist das Modell auch zum Stricken für Anfänger geeignet? Woran erkenne ich auf der HP den Schweregrad der Modelle?
26.02.2025 - 15:38DROPS Design respondió:
Liebe Petra, lesen Sie die ganze Anleitung, sollten Sie Fragen haben, dann können Sie sie gerne hier stellen, wir werden uns dann bemühen, Ihnen zu helfen. Viel Spaß beim Stricken!
26.02.2025 - 18:01
![]() Patricia escribió:
Patricia escribió:
Bonjour, je ne comprends pas : placer les 12-14-14-16-16-18 mailles centrales en attente sur un fil pour l'encolure et terminer chaque épaule séparément. Rabattre ensuite les mailles tous les rangs à partir de l'encolure: 1 fois 2 mailles et 2 fois 1 maille = 19-20-23-24-27-30 mailles pour l'épaule. On rabat les mailles centrales, après avoir tricoté les épaules et comment? Je fais la taille M. merci
03.12.2024 - 23:55DROPS Design respondió:
Bonjour Patricia, pour que l'encolure devant soit suffisamment souple, on ne rabat pas les mailles centrales pour l'encolure mais on les met en attente, et on termine chaque épaule séparément en rabattant 1 x 2 m et 2 x 1 m côté encolure (début de rang sur l'endroit pour le devant droit/début de rang sur l'envers pour le devant gauche). Bon tricot!
04.12.2024 - 07:46
![]() Monica Kugelberg escribió:
Monica Kugelberg escribió:
Vore bra om diagrammen vore lite större. Inte lätt att se vilken färg som markeringar avser.
02.12.2024 - 15:50
![]() Lucia Bandirali escribió:
Lucia Bandirali escribió:
Se volessi farlo di 1 solo colore, tg xs, quanto filato servirebbe, grazie
02.12.2024 - 15:33DROPS Design respondió:
Buonasera Lucia, per un'assistenza così personalizzata, può rivolgersi al suo rivenditore DROPS di fiducia. Buon lavoro!
03.12.2024 - 22:42
![]() Patricia escribió:
Patricia escribió:
Bonjour, que signifie "Continuer en rabattant 1 maille au rang suivant à partir de l'encolure = 19-20-23-24-27-30 mailles. Continuer en jersey jusqu'à ce que l'ouvrage mesure 54-56-58-60-62-64 cm (= 18-19-20-21-22-23 cm depuis la maille rabattue de chaque côté pour les emmanchures), rabattre. " Comment passe t'on de 23 à 20 mailles pour la taille M par exemple? je ne comprends ça ni "de chaque côté" Merci
02.12.2024 - 01:24DROPS Design respondió:
Bonjour Patricia, vous avez 68 m pour le dos en taille M, vous rabattez les 20 m centrales = vous avez 24 mailles pour chaque épaule. Au début du rang suivant à partir de l'encolure (en début de rang sur l'endroit pour l'épaule gauche/ en début de rang sur l'envers pour l'épaule droite), vous rabattez 1 maille = il reste 23 mailles. Vous tricotez jusqu'à ce que l'ouvrage mesure 58 cm = soit 20 cm depuis les mailles rabattues pour les emmanchures (à 38 cm). Bon tricot!
02.12.2024 - 10:49
![]() Ute Kruth escribió:
Ute Kruth escribió:
Kann ich die Wolle für dieses Modell bei Ihnrn bestellen?
06.11.2024 - 13:54DROPS Design respondió:
Liebe Frau Kruth, sicher, schauen Sie mal bei der Farbkarte und klicken Sie auf "Bestellen" so sehen Sie die Liste von den Läden, die Melody online verkaufen, dann wählen Sie Ihr Laden und klicken auf "Bestellen" rechts von der Name. Viel Spaß beim Stricken!
06.11.2024 - 16:08
![]() Anna Wiberg escribió:
Anna Wiberg escribió:
Hej! Använder jag alltså rundstickor nr 9, 40 cm till ärmar och 60 cm till kroppen? Strumpstickor nr 8 till resår ärmar? Vad använder jag till resår halsringning? Strumpstickor nr 8 eller rundsticka nr 8? Vilken längd i så fall på rundsticka? Vad använder jag till resår nederkant? Rundsticka nr 8?vilken längd? Mvh Anna
08.10.2024 - 21:41DROPS Design respondió:
Hej Anna. Du använder kort rundsticka och strumpstickor till ärmar och halsringning( strumpstickor när rundstickan blir för lång). Lång rundsticka används till kroppen. Mvh DROPS Design
14.10.2024 - 11:13
|
|||||||||||||||||||
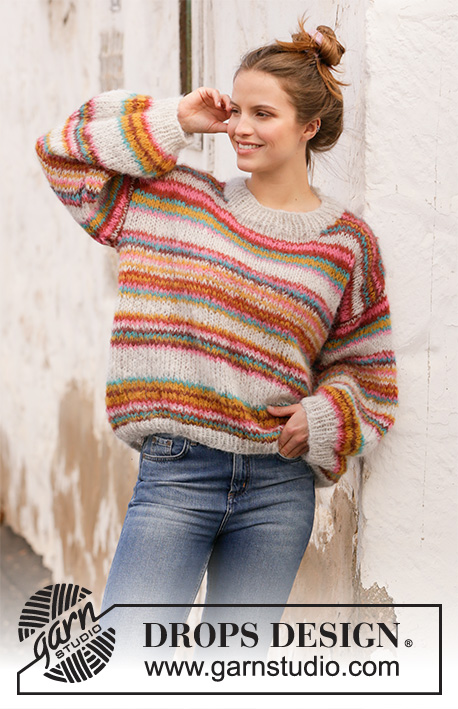
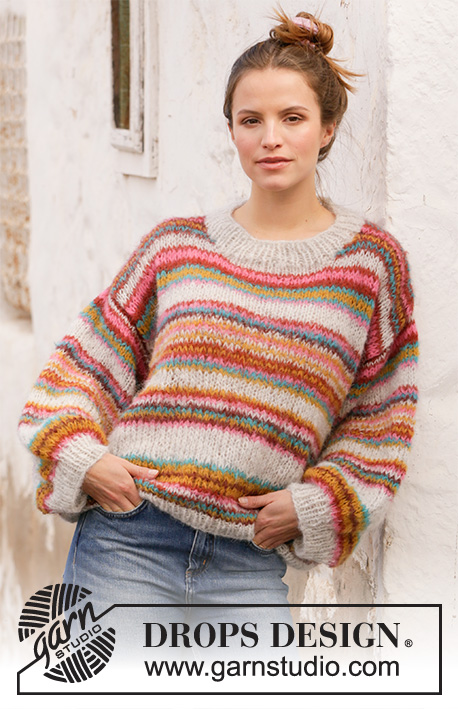
Moroccan Market Muse#moroccanmarketmusesweater |
|||||||||||||||||||
 |
 |
||||||||||||||||||
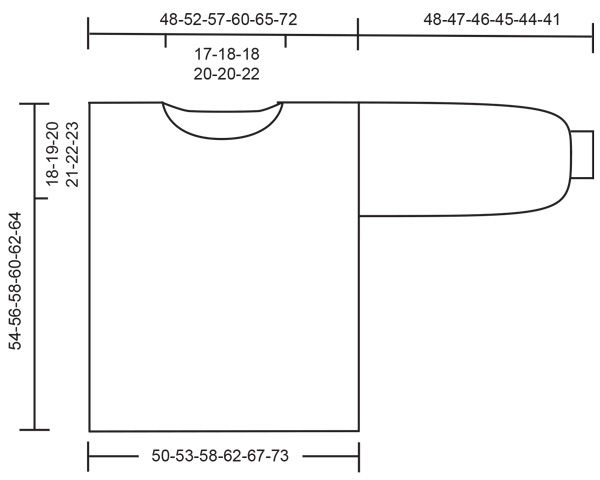
Jersey de punto con franjas en DROPS Melody. Tallas XS – XXL.
DROPS 212-20 |
|||||||||||||||||||
|
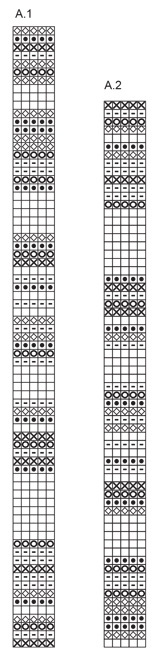
EXPLICACIONES PARA REALIZAR EL PATRÓN: ------------------------------------------------ PATRÓN: Ver diagramas A.1 y A.2. Repetir A.1 en altura hasta completar las medidas. TIP PARA AUMENTAR: Aumentar haciendo 1 lazada a cada lado del hilo marcador + 1 punto a cada lado. En la vuelta siguiente, tejer las lazadas retorcidas para evitar que se formen agujeros. TIP PARA AUMENTAR (distribuidos equitativamente): Para calcular cómo aumentar equitativamente, contar el número total de puntos en la aguja (p. ej. 50 puntos) y dividirlo entre el número de aumentos a hacer (p. ej. 20) = 2.5. En este ejemplo, tejer juntos de derecho cada 1º y 2º punto y cada 2º y 3er punto alternadamente. ------------------------------------------------ COMENZAR LA PIEZA AQUÍ: ------------------------------------------------ JERSEY – RESUMEN DE LA PIEZA: El cuerpo es tejido en redondo con aguja circular, de abajo para arriba. La pieza es dividida para las mangas y terminada de ida y vuelta en la aguja. Las mangas son tejidas en redondo con agujas de doble punta/aguja circular corta, de arriba para abajo. CUERPO: Montar 120-128-140-148-160-176 puntos con aguja circular tamaño 8 mm y gris perla. Tejer 1 vuelta de derecho, después tejer el resorte de la manera siguiente: * 1 derecho/1 revés *, repetir de *a*. Tejer el resorte durante 4 cm, después cambiar a aguja circular tamaño 9 mm. Continuar con punto jersey y las franjas de acuerdo a A.1 hasta completar las medidas. ¡ACORDARSE DE MANTENER LA MISMA TENSIÓN DE TEJIDO DE LA MUESTRA! Cuando la pieza mida 36-37-38-39-40-41 cm, tejer la vuelta siguiente de la manera siguiente: Rematar 1 punto, tejer 58-62-68-72-78-86 puntos, rematar 2 puntos, tejer 58-62-68-72-78-86 puntos y rematar 1 punto. Cada pieza es ahora terminada separadamente, de ida y vuelta en la aguja. Colocar los primeros 58-62-68-72-78-86 puntos en un hilo y continuar tejiendo los últimos 58-62-68-72-78-86 puntos para la pieza de la espalda. ESPALDA: = 58-62-68-72-78-86 puntos. Continuar con punto jersey y las franjas. Cuando la pieza mida 52-54-56-58-60-62 cm, rematar los 18-20-20-22-22-24 puntos centrales para el escote y cada hombro es terminado separadamente. Continuar rematando 1 punto en la hilera siguiente a partir del escote = 19-20-23-24-27-30 puntos. Continuar con punto jersey hasta que la pieza mida 54-56-58-60-62-64 cm (= 18-19-20-21-22-23 cm a partir de donde se remató 1 punto a cada lado para la sisa), rematar. Tejer el otro hombro de la misma manera. FRENTE: = 58-62-68-72-78-86 puntos. Continuar con punto jersey y las franjas. Cuando la pieza mida 47-49-51-53-55-57 cm, colocar los 12-14-14-16-16-18 puntos centrales en un hilo para el escote y cada hombro es terminado separadamente. Después rematar puntos en cada hilera a partir del escote de la manera siguiente: Rematar 2 puntos 1 vez y 1 punto 2 veces = 19-20-23-24-27-30 puntos en el hombro. Continuar con punto jersey hasta que la pieza mida 54-56-58-60-62-64 cm (= 18-19-20-21-22-23 cm a partir de donde se remató 1 punto a cada lado para las sisas), rematar. Tejer el otro hombro de la misma manera. ENSAMBLAJE: Coser las costuras de los hombros. MANGAS: Las mangas son tejidas con agujas de doble punta/aguja circular corta, de arriba para abajo. Levantar 44-46-48-50-52-54 puntos alrededor de la sisa en el bucle más externo de los puntos más externos con aguja circular tamaño 9 mm y ladrillo – comenzar donde la pieza fue dividida para la pieza del frente y la pieza de la espalda y levantar 22-23-24-25-26-27 puntos hasta la costura del hombro, levantar 22-23-24-25-26-27 puntos a partir de la costura del hombro y descendiendo hasta la división nuevamente. Insertar 1 hilo marcador en el centro bajo la manga. Tejer punto jersey y A.2. Cuando la pieza mida 30-29-28-27-26-23 cm, aumentar 1 punto a cada lado del hilo marcador – leer TIP PARA AUMENTAR. Aumentar así a cada 5 cm un total de 3 veces en todas las tallas = 50-52-54-56-58-60 puntos. Continuar con punto jersey y A.2 hasta que la pieza mida 44-43-42-41-40-37 cm. Ahora terminar la manga con gris perla. Tejer 1 vuelta de derecho disminuyendo 20-22-20-22-20-22 puntos distribuidos equitativamente = 30-30-34-34-38-38 puntos. Cambiar a agujas de doble punta tamaño 8 mm y tejer en resorte (1 derecho/1 revés) durante 4 cm. Rematar con derecho sobre derecho y revés sobre revés cuando la manga mida 48-47-46-45-44-41 cm. Tejer la otra manga de la misma manera. ORILLA DEL ESCOTE: Comenzar por el lado derecho con gris perla y aguja circular corta tamaño 8 mm. Levantar 60-80 puntos (incluyendo los puntos en el hilo – el número debe ser múltiplo de 2). Tejer en resorte (1 derecho/1 revés) durante 4 cm. Rematar con derecho sobre derecho y revés sobre revés. |
|||||||||||||||||||
Explicaciones del diagrama |
|||||||||||||||||||
|
|||||||||||||||||||
 |
|||||||||||||||||||
 |
|||||||||||||||||||
¿Terminaste este patrón?Entonces, etiqueta tus fotos con #dropspattern #moroccanmarketmusesweater o envíalas a la galería #dropsfan. ¿Necesitas ayuda con este patrón?Encontrarás 23 videos tutoriales, un espacio para comentarios/preguntas y más visitando la página del patrón en garnstudio.com © 1982-2026 DROPS Design A/S. Todos los derechos reservados. Este documento, incluyendo todas sus sub-secciones, está protegido por los derechos de autor (copyright). Lee más acerca de lo que puedes hacer con nuestros patrones en la parte de abajo de cada patrón de nuestro sitio. |
|||||||||||||||||||


Con más de 40 años en el diseño de modelos de punto y de ganchillo, DROPS Design ofrece una de las más vastas colecciones de patrones gratuitos en el internet - traducidos en 17 idiomas. Al día de hoy, contamos con 324 catálogos y 12291 patrones - de los cuales 11689 están traducidos en español.
Nosotros trabajamos con mucho esmero para brindarte lo mejor que las labores de punto y ganchillo tienen para ofrecer,inspiración y consejos, así como hilos de magnífica calidad a precios increíbles! Te gustaría usar nuestros patrones para otro fin además del uso personal? Puedes leer acerca de lo que estás permitida a hacer en el texto de Copyright en la parte de abajo de todos nuestros patrones. Felices labores!
Escribe un comentario sobre DROPS 212-20
¡Nos encantaría saber qué piensas acerca de este patrón!
Si quieres escribir una pregunta referente al patrón, por favor asegúrate de elegir la categoría correcta en el formulario debajo, para acelerar el proceso de respuesta. Los campos obligatorios están marcados con un *.