
Categorías populares
¿Buscas un hilo?


Comentarios / Preguntas (96)
![]() Anke escribió:
Anke escribió:
Ik snap het afkanten van de armsgaten niet, er staat Kant af aan de goede kant:voor 3 kantst.:2recht samen. Na 3 kantsteken, haal 1 steek recht af brei 1 st. En de afgehaalde steek over de gebreide steek, maar wat voor kantsteken zijn dit?
20.07.2021 - 19:25DROPS Design respondió:
Dag Anke,
De buitenste 3 steken aan beide kanten brei je in gerstekorrel, hiermee worden de kantsteken bedoeld. Je mindert dus naast de kantsteken. Als je aan het begin van de naald bent, meerder je dus vlak na de 3 kantsteken en als je aan het eind van de naald bent, meerder je vlak voor de 3 kantsteken.
21.07.2021 - 18:13
![]() Ellinor escribió:
Ellinor escribió:
Hei, skjønner ikke det med økingen. Jeg leser det slik at det skal økes først 8 masker på første omgang etter tre pinner perlestrikk. Deretter økes 8 nye masker etter 5 cm oppover. Disse skal strikkes inn i mønsteret. Hvor da for at det skal bli pent? Da vil jo noen av stripene med glattstrikk bli bredere enn andre?
15.07.2021 - 21:34DROPS Design respondió:
Hej Ellinor. Du ökar 1 m på var sida av merketråden, dvs 4 m ökade per p. Detta gör du på hver 5. cm totalt 4 gånger (dvs totalt 16 m ökade). De økte m strikkes inn i Mønsteret etter hvert, dvs du stickar de enten i perlestikk eller i glattstrik enligt diagram (mönster). Mvh DROPS Design
16.07.2021 - 09:45
![]() Renate Steiner escribió:
Renate Steiner escribió:
Wird das Top in runden gestrickt? Ich hab es aufgetrennt, weil ich dachte es ist falsch und neu begonnen. Sorry, ich finde die Anleitung grottenschlecht. Dann lieber nichts anbieten.
05.07.2021 - 11:54DROPS Design respondió:
Liebe Frau Steiner, auch wenn das Top selbst zeitlos ist, handelt es sich bei der Anleitung um eine der älteren, die leider nicht immer den aktuellen Standards entsprechen. Wir bemühen uns, auch solche Anleitungen zu verbessern. Diese Anleitung wurde nun komplett neu übersetzt und ist jetzt hoffentlich übersichtlicher und eindeutiger. Wenn Sie noch Fragen dazu haben, melden Sie sich gerne noch einmal. Gutes Gelingen!
05.07.2021 - 13:11
![]() Ana escribió:
Ana escribió:
Hi, I think I understand the pattern and instructions for DROPS / 60 / 13 . But I have one question. I’m making a size L. Do I start each round as the first round, from the beginning of the chart or should I just keep knitting in the round repeating the chart on and on?
26.06.2021 - 06:26DROPS Design respondió:
Dear Ana, for the pattern, start with the first row, then go on according to the diagram. Happy Stitching!
26.06.2021 - 09:15
![]() Eva Angervik escribió:
Eva Angervik escribió:
Vi är några (en person stickar M, den andra L) som har problem med att få mönstret snyggt vid sidorna, dvs mellan fram- och bakstycke. Vi är erfarna stickare och när vi stickat andra modeller har intagningar/ utlägg sett likadant ut på bägge sidor. Mönstret har snyggt anpassats. Detta får vi trots ansträngningar inte till. Vad gör vi för fel?
20.06.2021 - 12:54DROPS Design respondió:
Hei Eva. Usikker på hva som blir feil hos dere, men har dere lest Strikketips? Fell slik på retten: Før 3 kantmaskene: 2 rett sammen. Etter 3 kantmasker: 1 maske løs av, strikk 1 rett, løft den løse masken over. Fell slik på vrangen: Før 3 kantmasker: 2 vridd vrang sammen. Etter 3 kantm: 2 vrang sammen. mvh DROPS design
21.06.2021 - 11:52
![]() Anke escribió:
Anke escribió:
Na de gerstekorrel beginnen met meerderen aan de zijkanten maar hoe kan ik dan verder in patroon aan de zijkanten?
22.05.2021 - 16:43DROPS Design respondió:
Dag Anke,
Je breit de gemeerderde steken in patroon, volgens de teltekening. Dus als j e na de gerstekorrel meerdert, brei je die steken in tricotsteek. Na 4 keer meerderen heb je 1 patroonherhaling erbij in de breedte.
24.06.2021 - 09:39
![]() Cinzia Quarti escribió:
Cinzia Quarti escribió:
Buongiorno, sto facendo taglia S. Nel primo ferro che si inizia lo schema dopo il punto riso ho aumentato subito accanto al marca punto seguendo sullo schema il punto evidenziato S e ho apportato gli aumenti richiesti ma alla fine del giro con l’ultimo aumento prima del marcapunto finisco con una maglia rovescia e lo schema quindi non mi viene completo continuando con inizio giro con 3 maglie dritte. È giusto che venga così??
10.04.2021 - 12:14DROPS Design respondió:
Buongiorno Cinzia, ha iniziato sulla maglia corretta del diagramma? Le ripetizioni successive del diagramma sul gjro sono intere, di 8 maglie. Buon lavoro!
11.04.2021 - 12:03
![]() Annet Voss escribió:
Annet Voss escribió:
Waar moet ik beginnen met het afkanten van de armsgaten, bij de eerste steek van de pen of halverwege (dus bij het volgende armsgat?
03.02.2021 - 13:15DROPS Design respondió:
Dag Annet,
Je kunt telkens aan het begin van de naald afkanten voor het armsgat.
06.02.2021 - 11:29
![]() Lorinda escribió:
Lorinda escribió:
So I will work every round this way? Start with the second stitch, complete the round using all eight stitches finish the round with Stitch 1 of the diagram? I guess I would have to in order for the seed stitch to line up, correct?
04.11.2020 - 14:21DROPS Design respondió:
Dear Lorinda, yes correct, the first repeat on the round is worked over the last 7 sts, then you repeat the 8 sts and finish with the first stitch in diagram. Happy knitting!
04.11.2020 - 17:02
![]() Lorinda escribió:
Lorinda escribió:
Hello, just need clarification. I am making size S and I begin the chart at the corresponding arrow. Does that mean the chart for me will repeat every 7 stitches instead of 8? Or is that arrow only for the beginning of first round only?
04.11.2020 - 12:42DROPS Design respondió:
Dear Lorinda, no you just start with the 2nd stitch in diagram (= first repeat on the round), then work the 7 sts in diagram, now repeat all the 8 sts to the end of the round and finish with the first stitch in diagram just before the end of the round. And continue working diagram like this. Happy knitting!
04.11.2020 - 13:47
|
|||||||
Summer Charm |
|||||||
|
|
|||||||
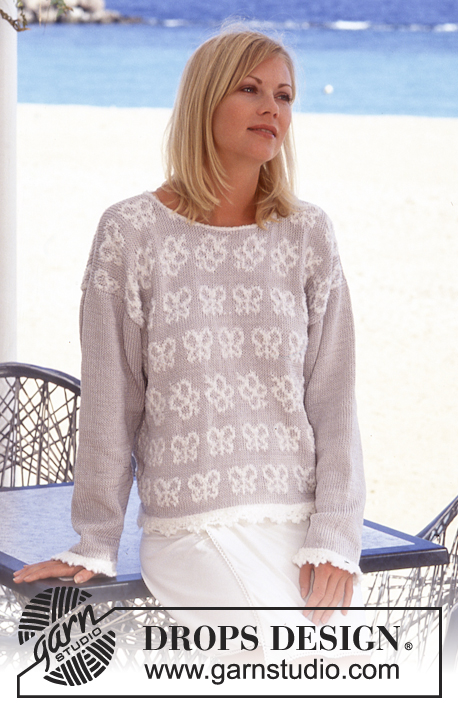
Top corto DROPS en Muskat
DROPS 60-13 |
|||||||
|
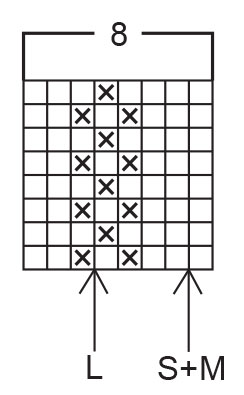
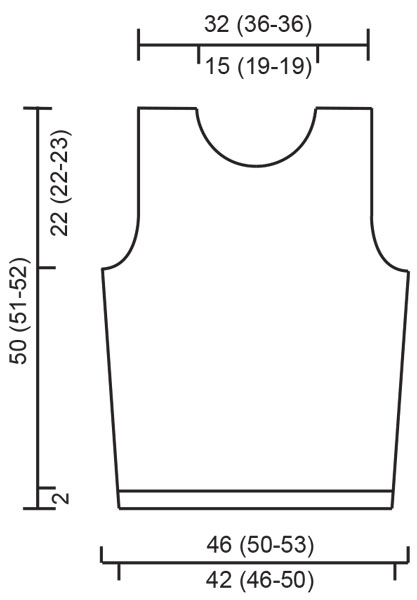
Patrón: Ver diagrama (1 diagrama = 1 repetición). El patrón en el diagrama se ve por el LD. Pt Musgo, al trabajar en redondo: *Vta 1, derecho. Vta 2, revés.* Repetir de * a *. Punto Arroz: * Fila 1: 1d, 1r. Fila 2: d sobre r y r sobre d. * Repetir la fila 1 y la fila 2 hacia arriba. Tip para tejer! Disminuir de esta manera por el LD: Antes de los 3 pts orillo: 2pjd. Después de los 3 pts orillo: deslizar 1 pt como de derecho, 1d, pasar el pt deslizado sobre el pt trabajado. Disminuir de esta manera por el LR: Antes de los 3 pts orillo: 2pjr retorcidos. Después de los 3 pts orillo: 2pjr. ---------------------------------------------------------- Cuerpo: Montar 176 (192-208) pts con una aguja circular de 4mm con blanco y trabajar 2 filas en pt musgo, después 3 filas en pt arroz. Insertar un marcapuntos a cada lado, delantero = 87 (95-103) pts, espalda = 89 (97-105) pts. Trabajar el patrón hacia arriba - comenzando en la flecha. Recordar mantener la tensión del tejido. Al mismo tiempo después del borde en pt musgo, aum a cada lado del marcapuntos: 1 pt x 4 cada 5 cm = 192 (208-224) pts, delantero = 95 (103-111) pts, espalda = 97 (105-113) pts. Incorporar los pts aum en el patrón. Cuando la labor mida 27 (28-28)cm trabajar 3 vueltas en pt arroz sobre 6 (6-7) pts a cada lado del marcapuntos, después cerrar 3 (3-4) pts para la sisa a cada lado de los marcapuntos, ahora trabajar de ida y vuelta en la fila – delantero = 89 (97-103) pts, espalda = 91 (99-105) pts. Delantero: = 89 (97-103) pts. Ahora dism para la sisa - ver tip para tejer arriba! - dentro de 3 pts orillo ( trabajar los pts orillo en pt arroz hacia arriba) a cada lado cada fila: 1 pt x 5 (5-8), cada 2ª fila: 1 pt x 4, y cada 4ª fila: 1 pt x 2 = 67 (75-75) pts. Cuando la labor mida 37 (37-37) cm trabajar 3 filas en pt arroz sobre los 15 (23-23) pts centrales, después cerrar los 9 (17-17) pts restantes para el escote. Después dism hacia el escote - ver tip para tejer arriba! - dentro de los 3 pts orillo ( trabajar estos pts en pt arroz hacia arriba) cada fila: 1 pt x 6, cada 2ª fila: 1 pt x 2, y cada 4ª fila: 1 pt x 2. Cerrar cuando la labor mida (51-52) cm. Espalda: = 91 (99-105) pts. Dism para la sisa dentro de los 3 pts orillo como en el delantero = 69 (77-77) pts. Cuando la labor mida 47 (48-49) cm trabajar 3 filas en pt arroz sobre los 33 (41-41) pts centrales, después cerrar los 27 (35-35) pts centrales para el escote. Después dism hacia el escote - ver tip para tejer arriba! - dentro de 3 pts orillo (trabajar estos pts en pt arroz hacia arriba) cada fila: 1 pt x 2. Cerrar cuando la labor mida 50 (51-52) cm. Terminación: Coser las costuras de los hombros. Trabajar un borde a ganchillo alrededor del escote por el LD con blanco y una aguja de 2 mm de esta manera: Fila 1: 1 pb, * 4 p.de cad sobre 2 pts tejidos, 1 p.e en el 3º pt tejido *, repetir de * a *. Fila 2: * 4 p.b alrededor del bucle de p.de cad, 1 p.e en el p.e de la fila anterior*, repetir de * a *. |
|||||||
Explicaciones del diagrama |
|||||||
|
|||||||
 |
|||||||
 |
|||||||
¿Terminaste este patrón?Entonces, etiqueta tus fotos con #dropspattern o envíalas a la galería #dropsfan. ¿Necesitas ayuda con este patrón?Encontrarás 23 videos tutoriales, un espacio para comentarios/preguntas y más visitando la página del patrón en garnstudio.com © 1982-2026 DROPS Design A/S. Todos los derechos reservados. Este documento, incluyendo todas sus sub-secciones, está protegido por los derechos de autor (copyright). Lee más acerca de lo que puedes hacer con nuestros patrones en la parte de abajo de cada patrón de nuestro sitio. |
|||||||


Con más de 40 años en el diseño de modelos de punto y de ganchillo, DROPS Design ofrece una de las más vastas colecciones de patrones gratuitos en el internet - traducidos en 17 idiomas. Al día de hoy, contamos con 324 catálogos y 12290 patrones - de los cuales 11675 están traducidos en español.
Nosotros trabajamos con mucho esmero para brindarte lo mejor que las labores de punto y ganchillo tienen para ofrecer,inspiración y consejos, así como hilos de magnífica calidad a precios increíbles! Te gustaría usar nuestros patrones para otro fin además del uso personal? Puedes leer acerca de lo que estás permitida a hacer en el texto de Copyright en la parte de abajo de todos nuestros patrones. Felices labores!
Escribe un comentario sobre DROPS 60-13
¡Nos encantaría saber qué piensas acerca de este patrón!
Si quieres escribir una pregunta referente al patrón, por favor asegúrate de elegir la categoría correcta en el formulario debajo, para acelerar el proceso de respuesta. Los campos obligatorios están marcados con un *.