
Categorías populares
¿Buscas un hilo?


Comentarios / Preguntas (85)
![]() Jacqueline Last escribió:
Jacqueline Last escribió:
Als ik de foto van het hoedje bekijk Iet het er anders uit met het aantal stokjes dan op het diagram. Ik heb in rij 8 , 3 st 2 lossen 10 st. 2 lossen, 3 st 2 lossen etc. Op de foto is de punt tussen de 2 lossen boogjes 4, 3 en 2 's stokjes. De hoedje wordt zo heel wijd
05.06.2023 - 21:47DROPS Design respondió:
Dag Jacqueline,
Eerlijk gezegd snap ik niet helemaal wat je bedoeld met dat de punt tussen 2 lossenboogjes 4, 3 en 2 stokjes zijn op de foto. In dezelfde toer (dus toer 8) zie ik op de foto ook steeds 3 stokjes er tussen zitten.
07.06.2023 - 08:54
![]() Anna escribió:
Anna escribió:
Dzień dobry Jakiego drucika najlepiej użyć i gdzie się w niego zaopatrzyć? No i jak potem czyścić kapelusz, kiedy umieści się w nim drucik? Pozdrawiam - Anna
15.02.2023 - 16:28DROPS Design respondió:
Witaj Aniu, szukaj drucika w sklepie budowlano-dekoracyjnym, są również dostępne druciki w osłonce. Przed czyszczeniem kapelusza drucik trzeba będzie wyjąć. Pozdrawiamy!
17.02.2023 - 07:50
![]() Åsa escribió:
Åsa escribió:
Jag har även samma fråga som Heidi hade den 9/2 som hon inte fått svar på. Kan ni vara snäll och svara på hennes fråga. Bra om nu svara både på danska och svenska.
04.09.2022 - 22:30DROPS Design respondió:
Hej Åsa, de första 2 smygmaskorna skall endast virkas första gången, när diagrammet upprepas, virkas 2 lm, hoppa över 2 st, 14 st, 2 lm, hoppa över 2 st, 14 st osv :)
07.09.2022 - 08:48
![]() Åsa Zellin escribió:
Åsa Zellin escribió:
Läser man ert tips på hur ett diagram läses står det att A2 innehåller både börjar och slutet på varvet men om jag läser så får jag inte det att gå ihop. Det blir fel i virkningen så då kan man inte läsa diagrammet som ni tipsar. Tex att de 3 luftmaskorna ska vara i början på varvet och smygmaskan i slutet med de övriga stolparna i A2? Ska de virkas i början eller i slutet av varvet eller ska de alltid virkas tillsammans med A1?
04.09.2022 - 00:46DROPS Design respondió:
Hei Åsa. Du skal hekle A.1 og A.2 6 ganger i bredden, Men under HEKLEINFORMASJON står det at første stav på omgangen (ikke første stav i hver A.2) skal erstattes med 3 luftmasker, altså kun første gang av de 6 gangene, og når du har heklet A.1 og A.2 6 ganger avslutter du omgangen med 1 kjedemaske i den 3. luftmasken. mvh DROPS Design
05.09.2022 - 14:18
![]() Beanca escribió:
Beanca escribió:
Je begint eerst met het haken van A1 en A2. En dat 6 maal. Ik snap de streep er tussen niet. Betekend dit dat je A2 alleen bij het begin van de toer haakt, of herhaal je deze steken ook 5 x? Dus is de derde toer : 3 lossen (=1 stokje), 2 stokjes, meerderen, 1 stokje en dan de herhaling 3 stokjes, meerderen 1 stokje of 3 lossen (= 1 stokje), 1 stokje “1 stokje, meerderen, 1 stokje” en alleen tussen “ en “ herhalen?
27.06.2022 - 16:03DROPS Design respondió:
Dag Beanca,
De streep ertussen geeft aan waar A.2 eindigt en A.1 begint. Je haakt dus A.2 en dan A.1 en vervolgens herhaal je dit. Dus na A.2 haak je opnieuw A.1 en A,2, enzovoort.
03.07.2022 - 13:47
![]() Thea De Raes escribió:
Thea De Raes escribió:
Volgens mij staat er nog een fout in het Nederlandstalig patroon. Er staat: Haak * A.2, A.2 *, haak van *-* 6 keer in totaal in de breedte (er zijn geen steken in A.2 op de eerste toer). En dat moet volgens mij zijn: Haak * A.1, A.2 *, haak van *-* 6 keer in totaal in de breedte (er zijn geen steken in A.2 op de eerste toer). Met vriendelijke groeten, Thea
21.06.2022 - 10:38
![]() Angi escribió:
Angi escribió:
Hallo, ich habe Probleme mit der 7. Reihe (A2/A1) Mache ich hier LM Bogen (mit 2Lm) und mache das nächste Stäbchen in die übernächste Masche (also nur 1 auslassen)? Wieviel Maschen sollte ich nach Reihe 6 haben? Reihe 7 geht sich bei mir irgendwie nicht aus.. Danke! Kg
10.06.2022 - 14:31DROPS Design respondió:
Liebe Angi, 6. Runde war: *1 KM in das nächste Stb, 3 Lm (=1. Stb), 1Stb in je die 2 nächsten Stb (= A.2), 1 Stb in je die 4 nächsten Stb, 2 Lm, 2 Stb in das nächste Stb, 2 Lm (= A.1) * von *bis* häkeln Sie insgesamt 6 Mal; 7. Runde: *1 Km in das nächste Stb, 1 Stb in das nächste Stb (A.2), 1 Stb in die 3 nächsten Stb, 2 Lm, 2 Stb im Lm-Bogen, 1 Stb in je die 2 nächsten Stb, 2 Stb im Lm-Bogen, 2 Lm (A.1)*, von *-* häkeln Sie insgesamt 6 Mal; Viel Spaß beim häkeln!
13.06.2022 - 08:19
![]() Daniella escribió:
Daniella escribió:
I agree with other posters. Without a stitch count at the end of each row, this pattern is very hard to follow.
12.04.2022 - 17:13
![]() Methida escribió:
Methida escribió:
Hi! How many double crochet i have to make on the second round after i form the ring? can you show the exact number how many sticht i need to make in each round? - Thank you :)
26.03.2022 - 12:03DROPS Design respondió:
Dear Methida, we don't make personalised patterns. In the first round, you work 12 double crochet (6 repeats of A.1). From the 2nd row on, you work 6 repeats of A.1, A.2. You can check the following lesson on how to read crochet diagrams: https://www.garnstudio.com/lesson.php?id=69&cid=19 Happy crochetting!
26.03.2022 - 20:22
![]() Renate escribió:
Renate escribió:
Hallo Ich habe Schwierigkeiten in den ersten 3 Runden. Muss man in der 3.Runde nur am Anfang drei Luftmaschen von A2 machen oder die ganze Runde. Also drei Luftmaschen ein Stäbchen in die dritte Luftmaschen dann weiter zu A1 mit Stäbchen dann zwei Stäbchen in eine Masche und wieder Stäbchen dann 3 Luftmaschen? und in die dritte Luftmaschen ein Stäbchen und weiter mit A1. Liebe Grüße Renate
26.02.2022 - 19:34DROPS Design respondió:
Liebe Renate, ab der 2. Runde häkeln Sie (A.2, A.1), dann bei der 3. Runde häkeln Sie (3 Lm, 1 Stb in die 3 Lm von Anfang der vorrigen Runde) = A.2, und (1 Stb in das nächste Stb, 2 Stb in das nächste Stb und 1 Stb in das nächste Stb) und so A.2 und A.1 wiederholen (bei den nächsten A.2 häkeln Sie 1 Stb anstatt die 3 Lm). Kann das Ihnen helfen? Viel Spaß beim häkeln!
28.02.2022 - 09:49
|
||||||||||||||||||||||||||||
Always Bright#alwaysbrighthat |
||||||||||||||||||||||||||||
 |
 |
|||||||||||||||||||||||||||
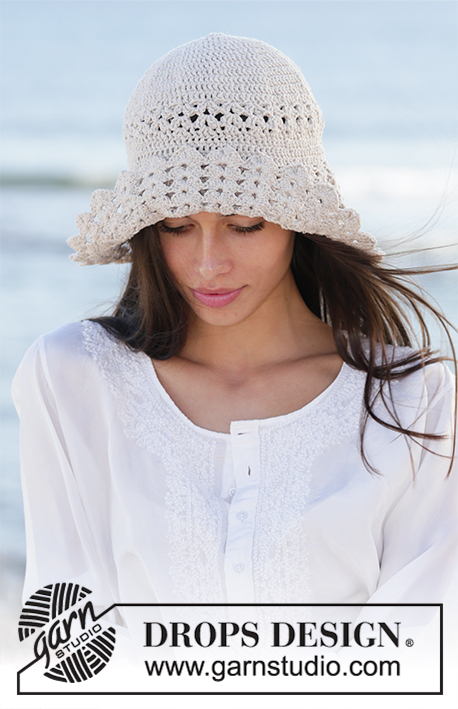
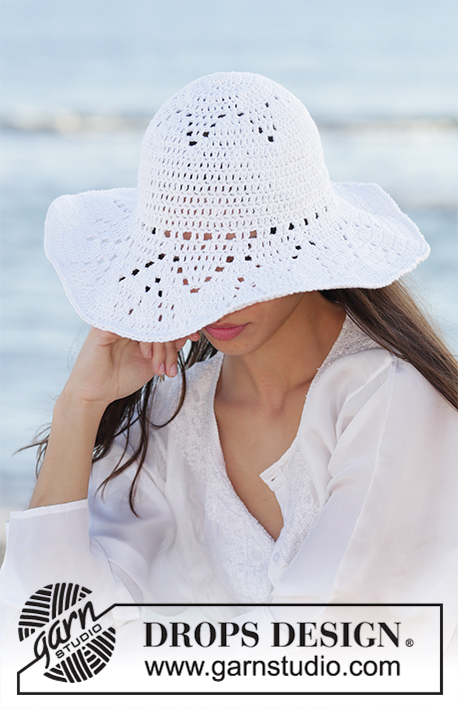
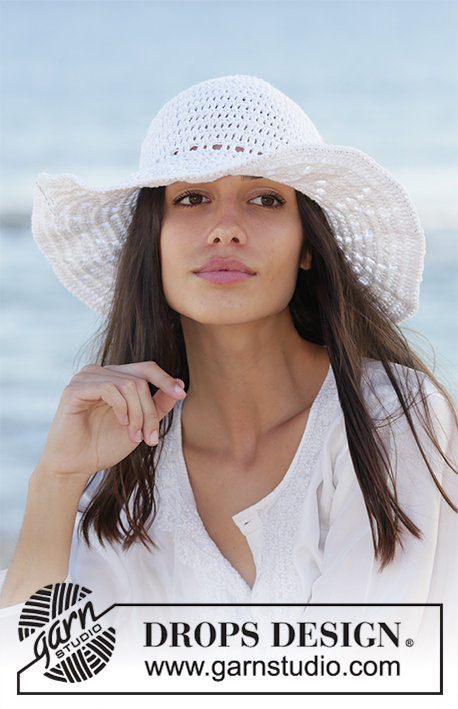
Sombrero a ganchillo en DROPS Bomull-Lin o DROPS Paris. La pieza está elaborada de arriba para abajo con puntos altos y patrón de calados.
DROPS 199-14 |
||||||||||||||||||||||||||||
|
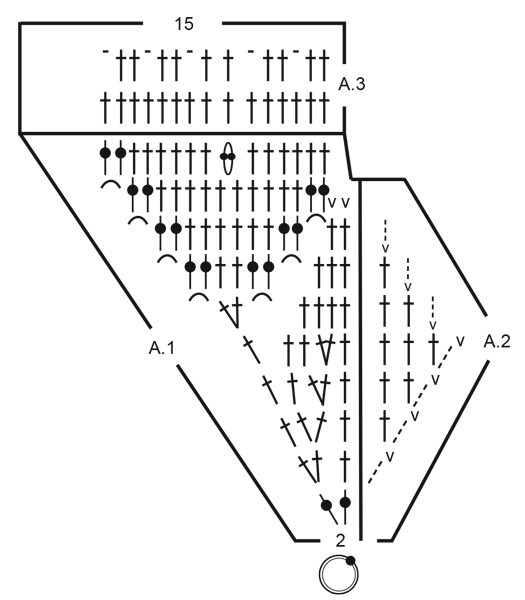
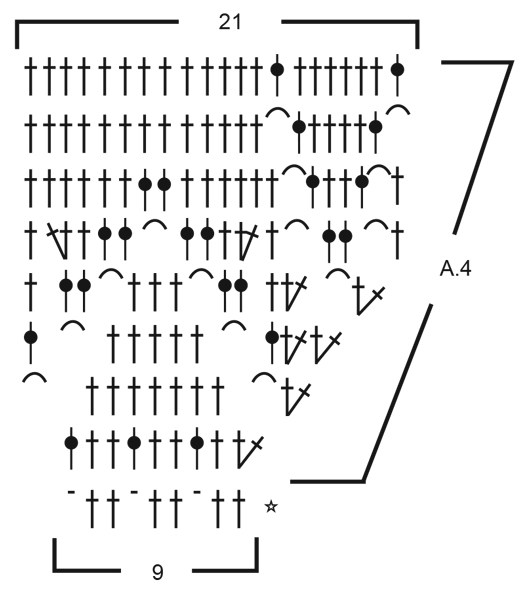
EXPLICACIONES PARA REALIZAR EL PATRÓN: ----------------------------------------------------- PATRÓN: Ver diagramas A.1 a A.4. INFORMACIÓN PARA TRABAJAR A GANCHILLO: Sustituir el primer punto alto de la vuelta con 3 puntos de cadena. Terminar la vuelta con 1 punto bajísimo en el tercer punto de cadena del principio de la vuelta. TIP PARA DISMINUIR: Disminuir 1 punto alto trabajando los siguientes 2 puntos altos juntos de la manera siguiente: Trabajar 1 punto alto, pero no hacer la última lazada (= 2 bucles en la aguja de ganchillo), después trabajar el punto alto siguiente pero ahora pasar la última lazada a través de todos los 3 bucles en la aguja de ganchillo. TIP PARA AUMENTAR: Aumentar 1 punto alto trabajando 2 puntos altos en el mismo punto alto. ----------------------------------------------------- COMENZAR LA PIEZA AQUÍ: ----------------------------------------------------- SOMBRERO – RESUMEN CORTO DE LA PIEZA: La pieza se trabaja en redondo, de arriba para abajo. SOMBRERO: Trabajar 4 puntos de cadena en aguja de ganchillo tamaño 3.5 mm con Bomull-Lin o Paris y formar un anillo con 1 punto bajísimo en el primer punto de cadena. ¡Leer INFORMACIÓN PARA TRABAJAR A GANCHILLO! Trabajar * A.2, A.1 *, trabajar de *a* 6 veces en total a lo ancho (en la primera vuelta no hay puntos en A.2). ¡ACORDARSE DE MANTENER LA MISMA TENSIÓN DE LA MUESTRA! Después de haber trabajado A.1 y A.2 verticalmente, hay 90 puntos altos en la vuelta. Trabajar la 1ª vuelta de A.3 y repetir esta vuelta hasta que la pieza mida aprox. 16 cm a partir de la parte de arriba para abajo. Trabajar la última vuelta de A.3 (= hilera de agujeros). Después trabajar el ala como está explicado abajo. ALA: Trabajar A.4 en redondo (= 10 repeticiones de 9 puntos). Después de haber trabajado A.4 verticalmente, hay 210 puntos en la vuelta. Colocar un alambre de acero delgado a lo largo de la orilla del ala. Trabajar 1 punto bajo en cada punto alto en toda la vuelta, trabajando, AL MISMO TIEMPO, alrededor del alambre de acero. Esto se hace para que el sombrero quede más rígido a lo largo de la orilla. Ajustar la longitud del alambre de acuerdo a las medidas deseadas del ala. Retorcer los extremos del alambre de acero juntamente y esconderlos en los puntos. Cortar y asegurar el hilo. |
||||||||||||||||||||||||||||
Explicaciones del diagrama |
||||||||||||||||||||||||||||
|
||||||||||||||||||||||||||||
 |
||||||||||||||||||||||||||||
 |
||||||||||||||||||||||||||||
¿Terminaste este patrón?Entonces, etiqueta tus fotos con #dropspattern #alwaysbrighthat o envíalas a la galería #dropsfan. ¿Necesitas ayuda con este patrón?Encontrarás 13 videos tutoriales, un espacio para comentarios/preguntas y más visitando la página del patrón en garnstudio.com © 1982-2026 DROPS Design A/S. Todos los derechos reservados. Este documento, incluyendo todas sus sub-secciones, está protegido por los derechos de autor (copyright). Lee más acerca de lo que puedes hacer con nuestros patrones en la parte de abajo de cada patrón de nuestro sitio. |
||||||||||||||||||||||||||||


Con más de 40 años en el diseño de modelos de punto y de ganchillo, DROPS Design ofrece una de las más vastas colecciones de patrones gratuitos en el internet - traducidos en 17 idiomas. Al día de hoy, contamos con 324 catálogos y 12290 patrones - de los cuales 11685 están traducidos en español.
Nosotros trabajamos con mucho esmero para brindarte lo mejor que las labores de punto y ganchillo tienen para ofrecer,inspiración y consejos, así como hilos de magnífica calidad a precios increíbles! Te gustaría usar nuestros patrones para otro fin además del uso personal? Puedes leer acerca de lo que estás permitida a hacer en el texto de Copyright en la parte de abajo de todos nuestros patrones. Felices labores!
Escribe un comentario sobre DROPS 199-14
¡Nos encantaría saber qué piensas acerca de este patrón!
Si quieres escribir una pregunta referente al patrón, por favor asegúrate de elegir la categoría correcta en el formulario debajo, para acelerar el proceso de respuesta. Los campos obligatorios están marcados con un *.