
Categorías populares
¿Buscas un hilo?


Comentarios / Preguntas (44)
![]() Margarita escribió:
Margarita escribió:
Moin, ich verstehe die Maschenprobe nicht richtig. Bedeutet 24 Maschen in der Breite auch, dass nur die rechten Maschen gezählt werden? Also i. Wirklichkeit 48 Maschen auf der Nadel sind und 10 cm ergeben?
23.07.2025 - 18:01DROPS Design respondió:
Liebe Margarita, die Maschenprobe soll 24 Maschen auf der Nadel 10 cm messen und 48 Reihen in der Höhe = 24 sichtbare rechte Maschen 10 cm messen. Viel Spaß beim Stricken!
24.07.2025 - 16:31
![]() Catharina escribió:
Catharina escribió:
Jeg strikkede nederdelen i uld i efteråret og har først lige færdigmontet den. Superflot og så lækker at have på. Vil nu strikke den i flere nuancer. 🤗
13.01.2025 - 20:13
![]() Ghita Forelius escribió:
Ghita Forelius escribió:
Förstår ej ur stickas varv A1
03.12.2024 - 15:33DROPS Design respondió:
Hej, du börjar nederst till höger i diagrammet och stickar första varvet så här: *2 aviga maskor tillsammans, 1 omslag, lyft 1 maska som om den skulle stickas avig*, upprepa *-* (= de tre rutorna i diagrammet) hela varvet runt. Fortsätt sedan med följande varv i diagrammet (läs diagrammet från höger till vänster).
03.12.2024 - 18:18
![]() Cecilie escribió:
Cecilie escribió:
Der er en video om hvordan man folder kanten og syr den, men hvad gør man, når den foldede kant skal sys på noget, der er meget mere elastisk? Lige efter kanten tager man jo ud og begynder at strikke rib - hvordan undgår man at miste elasticiteten, når der kommer sting på tværs af ribbene?
14.09.2022 - 12:29DROPS Design respondió:
Hej Cecilie, ja du har helt ret, da er det vigtigt at du syr løst, så kanten ikke mister elasticiteten :)
15.09.2022 - 15:46
![]() Elvira Eger escribió:
Elvira Eger escribió:
Guten Tag, ich bin gerade dabei, den Rock zu stricken und hätte da eine Frage zu dem Muster Diagramm. Es gibt das Muster A. 1 mit der ersten Reihe mit Abnahme und dann noch das Muster A. 1a, das bis zum Ende gestrickt werden soll. Ich sehe aber keinen Unterschied zwischen A. 1 und A.. 1a. Bitte melden Sie sich bald, damit ich weiter machen kann. Vielen Dank für die Bemühungen Elvira Eger
17.02.2022 - 13:16DROPS Design respondió:
Liebe Frau Eger, bei der 1. Reihe in A.1a stricken Sie *2 Maschen links zusammen, 1 Umschlag, 1 Maschen wie zum Linksstricken abheben*, und diese 3 Maschen von *bis* wiederholen (Umschläge werden nicht als Maschen gezählt), so haben Sie abgenommen. Dann stricken Sie die 2. und 3. Reihe in A.1 und stricken Sie so weiter, dh die 2 Reihen in A.1a sind die gleichen als die 2. und die 3. Reihe in A.1. Kann das Ihnen helfen?
17.02.2022 - 13:42
![]() Carol MacDonald escribió:
Carol MacDonald escribió:
Hi I have pattern Drops 196-37. Can you please tell me what the measurements are for the sizes
16.10.2021 - 07:37DROPS Design respondió:
Dear Carol, you can find all the relevant measurements of the finished piece on the shcematic drawing just below the pattern description. Happy Stitching!
17.10.2021 - 00:23
![]() Lara escribió:
Lara escribió:
Does anyone else find A1 not working for them? It works when I do rows, and does not when I try in rounds. Shouldn't it be "purl in one round, then knit in the next?" I watched a few videos of false English rib, it usually starts with "knit one " - not purl. Could this be an issue?
02.01.2021 - 05:50
![]() Lara escribió:
Lara escribió:
Dear Drops Design, Kristen seems to be right, the pattern appears to give the wrong side as "right side" when switching to false English rib. I looked up a video explaining false English rib, it appears that A1 diagram is somehow wrong, I am still trying to figure out what exactly the problem is. Maybe it has something to do with translation from Norwegian? Was anyone able to get it right using this pattern? Thank you.
01.01.2021 - 05:36
![]() Emma escribió:
Emma escribió:
Jeg har svært ved at forstå overgangen fra de 8 cm rib til det nye mønster. Bliver forvirret over strikkediagrammet og den vejledende video for falsk patent. Prøver de at forklare den samme ting?
18.11.2020 - 23:30DROPS Design respondió:
Hej Emma, første pind i diagrammet er anderledes end i videoen da du strikker 2 masker vrang sammen, men herefter strikkes de to omgange skiftevis som i videoen. God fornøjelse!
23.11.2020 - 16:00
![]() Lisia escribió:
Lisia escribió:
Dit was de eerste keer dat ik in aanraking kwam met valse patentsteek en patentsteken überhaupt, na veel gepuzzel en googlen ontdekte ik een fout in het telpatroon. De averechtste steken in de tour van de dichte bolletjes (de toer met de extra omslagen) moeten rechtste steken zijn!
14.11.2020 - 16:42
|
||||||||||||||||
See You In Dublin#seeyouindublinskirt |
||||||||||||||||
 |
 |
|||||||||||||||
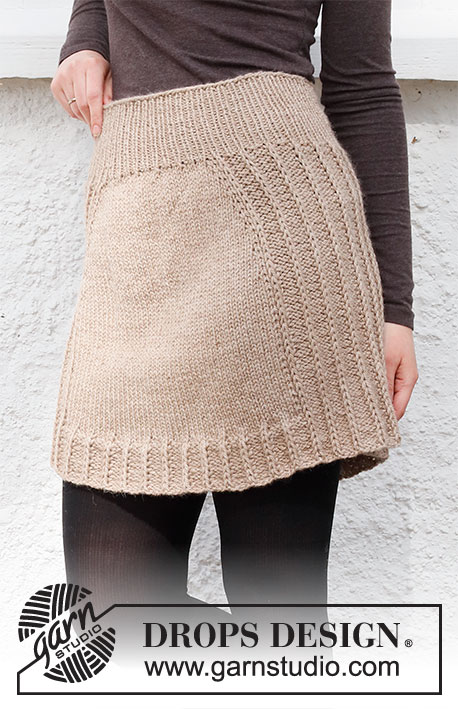
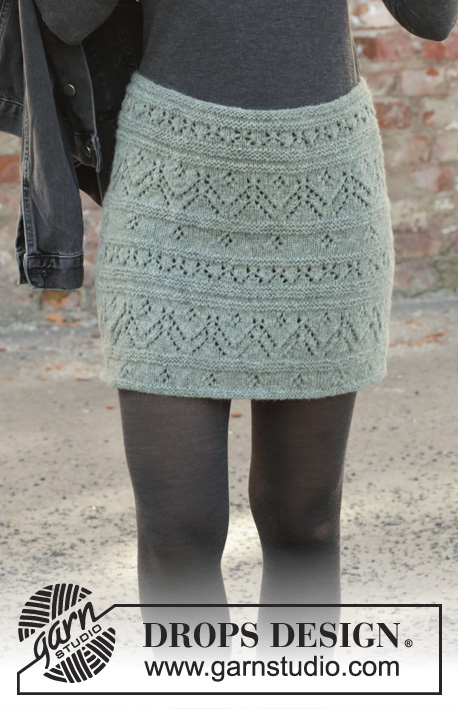
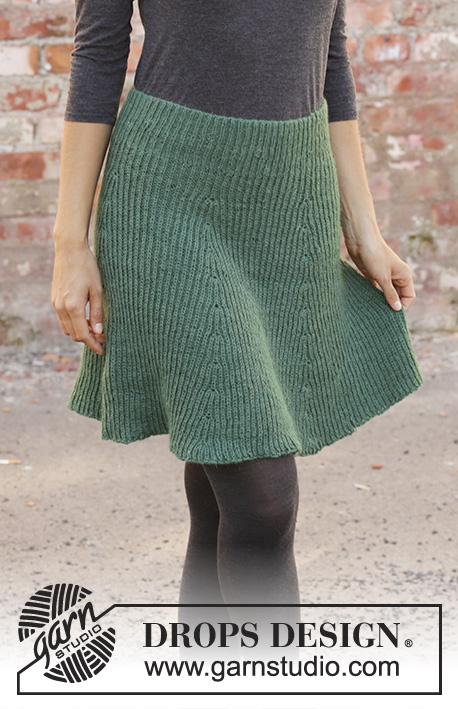
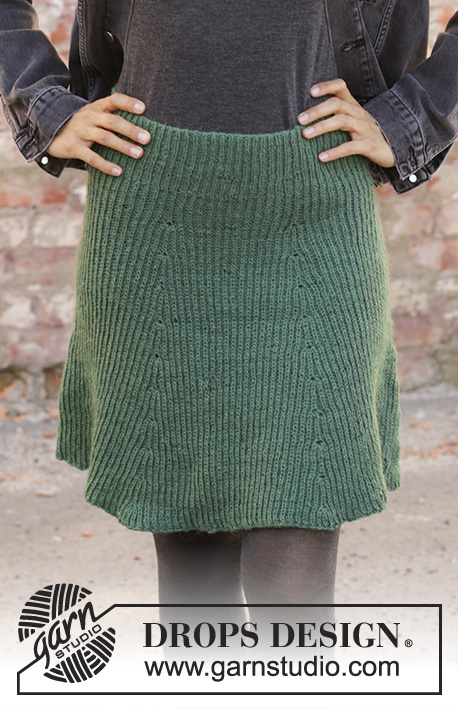
Falda de punto en DROPS Nord. La prenda está realizada de arriba abajo con punto inglés falso. Talla: S - XXXL
DROPS 196-37 |
||||||||||||||||
|
EXPLICACIONES PARA REALIZAR LA LABOR: ---------------------------------------------------------- TENSIONES DEL TEJIDO: La textura de la prenda hace que se estire al ponerla y tiene por ello 2 tipos de tensiones. Tensión del tejido 1: se aplica cuando la prenda se trabaja y está plana. La prenda debe tener esta tensión cuando se trabaja. Tensión del tejido 2: es la tensión de la falda en la parte de la cintura cuando se lleva la prenda puesta. La tensión del tejido en vertical corresponde al punto de derecho, que se trabaja sobre 1 vuelta menos que el punto de revés, porque el punto de derecho se desliza flojo a la aguja derecha cada 2ª vuelta. Es decir, 24 filas medidas en vertical de derecho en 10 cm = 48 filas medidas en vertical de revés en 10 cm. Las medidas del diagrama son las medidas con la prenda puesta. TIP-1 PARA LOS AUMENTOS (repartidos): Para calcular cómo aumentar de manera repartida, contar el número total de puntos en la aguja (p.e 172 puntos) y dividirlo entre el número de aumentos a trabajar (p.e 26) = 6.6. En este ejemplo, aumentar trabajando 1 hebra después de cada 6º / 7º punto de modo alterno (aprox.). En la siguiente vuelta, trabajar las hebras de derecho retorcido para evitar que se formen agujeros. TIP-2 PARA LOS AUMENTOS: Todos los aumentos se trabajan en una vuelta donde la hebra y el punto de derecho se trabajan juntos. Trabajar 5 puntos en el punto de derecho y la hebra como sigue: Trabajar juntos de derecho la hebra y el punto de derecho, pero no pasar el punto de derecho trabajado junto con la hebra a la aguja derecha, *hacer 1 hebra con la aguja derecha y trabajar juntos de derecho el punto de derecho y la hebra*, trabajar de * a * un total de 2 veces = 5 puntos (= 4 puntos aumentados). PATRÓN: Ver el diagrama A.1. ---------------------------------------------------------- COMENZAR AQUÍ LA LABOR: ---------------------------------------------------------- FALDA - RESUMEN DE LA LABOR: Se trabaja en redondo con aguja circular, de arriba abajo. Primero trabajar un dobladillo para pasar el hilo elástico. Después trabajar punto elástico y punto inglés falso. La textura de la prenda será diferente con la prenda puesta - leer TENSIÓN DEL TEJIDO. DOBLADILLO: Montar 172-188-202-228-250-292 puntos con aguja circular tamaño 2,5 mm y Nord. Trabajar 1 vuelta de revés. Ahora trabajar 4 vueltas en punto jersey. Trabajar 1 vuelta de revés y al mismo tiempo aumentar 26-28-32-36-38-44 puntos repartidos (= borde de doblaje) - leer TIP-1 PARA LOS AUMENTOS = 198-216-234-264-288-336 puntos. Insertar 1 marcapuntos en la labor. AHORA MEDIR LA LABOR DESDE AQUÍ. FALDA: Trabajar 8 cm en punto elástico (2 revés/ 1 derecho). Cambiar a aguja circular tamaño 3 mm y trabajar A.1 sobre todos los puntos (= 66-72-78-88-96-112 veces en la vuelta). Cuando se ha trabajado la primera vuelta de A.1, hay 132-144-156-176-192-224 puntos en aguja. Las hebras no se cuentan como puntos. Después de completar A.1 una vez en vertical, repetir A.1a hasta finalizar las medidas. RECUERDE MANTENER LA MISMA TENSIÓN DEL TEJIDO. Cuando la labor mida 10 cm desde el marcapuntos, insertar 1 marcapuntos en cada 11º-12º-13º-11º-12º-14º punto de derecho (= 6-6-6-8-8-8 marcapuntos). Después aumentar 4 puntos en cada punto con marcapuntos - leer TIP-2 PARA LOS AUMENTOS (= 24-24-24-32-32-32 puntos aumentados). Continuar en redondo con el patrón, trabajar los puntos aumentados dentro del patrón. Aumentar de la misma manera cada 4-4-4-4½-4½-4½ cm hasta que la labor mida 48-50-52-54-56-58 cm desde el marcapuntos. Hay aprox 348-384-396-464-512-544 puntos en la aguja. Ajustar para que la última vuelta sea una vuelta con hebras. Rematar con derecho sobre derecho y revés sobre revés, pero rematar las lazadas como puntos regulares para evitar que el borde de remate queda muy tenso. TERMINACIÓN: Doblar el dobladillo hacia el lado revés de la falda y asegurar con puntadas pequeñas, dejar una pequeña abertura para pasar la cinta elástica. |
||||||||||||||||
Explicaciones del diagrama |
||||||||||||||||
|
||||||||||||||||
 |
||||||||||||||||
¿Terminaste este patrón?Entonces, etiqueta tus fotos con #dropspattern #seeyouindublinskirt o envíalas a la galería #dropsfan. ¿Necesitas ayuda con este patrón?Encontrarás 18 videos tutoriales, un espacio para comentarios/preguntas y más visitando la página del patrón en garnstudio.com © 1982-2026 DROPS Design A/S. Todos los derechos reservados. Este documento, incluyendo todas sus sub-secciones, está protegido por los derechos de autor (copyright). Lee más acerca de lo que puedes hacer con nuestros patrones en la parte de abajo de cada patrón de nuestro sitio. |
||||||||||||||||


Con más de 40 años en el diseño de modelos de punto y de ganchillo, DROPS Design ofrece una de las más vastas colecciones de patrones gratuitos en el internet - traducidos en 17 idiomas. Al día de hoy, contamos con 325 catálogos y 12298 patrones - de los cuales 11698 están traducidos en español.
Nosotros trabajamos con mucho esmero para brindarte lo mejor que las labores de punto y ganchillo tienen para ofrecer,inspiración y consejos, así como hilos de magnífica calidad a precios increíbles! Te gustaría usar nuestros patrones para otro fin además del uso personal? Puedes leer acerca de lo que estás permitida a hacer en el texto de Copyright en la parte de abajo de todos nuestros patrones. Felices labores!
Escribe un comentario sobre DROPS 196-37
¡Nos encantaría saber qué piensas acerca de este patrón!
Si quieres escribir una pregunta referente al patrón, por favor asegúrate de elegir la categoría correcta en el formulario debajo, para acelerar el proceso de respuesta. Los campos obligatorios están marcados con un *.