
Categorías populares
¿Buscas un hilo?


Comentarios / Preguntas (74)
![]() Smolka escribió:
Smolka escribió:
Leider stimmt die Anleitung nicht. Schade.
10.01.2026 - 21:39
![]() Lindy escribió:
Lindy escribió:
After completion of A1 and A2, do I keep repeating A2? Pattern says "work A.2 over every repetition of A1". That sounds like I should repeat A1 and A2? Thanks.
12.11.2024 - 15:44DROPS Design respondió:
Dear Lindy, after A.1 has been worked one time in height, work and repeat A.2 to the end; befopre casting off you wil then work A.3 (decreasing the stitches increased in A.1 at the beg of piece). Happy knitting!
12.11.2024 - 16:19
![]() Lindy escribió:
Lindy escribió:
I am confused by the 1st row of A1. It looks like a six stitch repeat, but the instructions say "5 stitches on 1st row"? So, is it "K3, YO, K2", repeated 6 times? Also, is there a video for the section where the work is split "18" and "18" in each half and then plaited"? Thank you!
12.11.2024 - 14:30DROPS Design respondió:
Dear Lindy, the first row in A.1 is worked over 5 stitches only, but you increase 1 stitch so that there are 6 sts in total, so work the first row as follows: P1, K2, YO, K1, P1 (= 5 sts increased to 6 sts). In this video we show (for another pattern) how to split piece in 2 and how to work/cross both sides to make a cable in the middle of headband, hope this could help you. Happy knitting!
12.11.2024 - 16:08
![]() Joanna escribió:
Joanna escribió:
Czy trzeci rząd schematu A1 powinien wyjść na stronie prawej czy lewej robótki? Chodzi mi o to czy powinnam przerobić oczko lewe jako prawe czy raczej przerobić dodatkowo jeden rząd lewy i zacząć warkocz na prawej stronie?
09.08.2024 - 01:28DROPS Design respondió:
Witaj Joanno, rzędy nieparzyste schematu znajdują się zwykle na prawej stronie robótki, a parzyste na lewej. Pozdrawiamy!
12.08.2024 - 09:59
![]() Elsa escribió:
Elsa escribió:
Hallo, sind die ersten und letzten Maschen in den Diagrammreihen Randmaschen oder werden sie tatsächlich als rechte, bzw. linke Maschen gestrickt? Danke!
07.01.2023 - 20:54DROPS Design respondió:
Liebe Elsa, die 30 Maschen werden in A.1 gestrickt, dh die 1. Masche der Reihe wird wie die 1. Masche vom 1. A.1 gestrickt und die letzte Masche wird wie die letze Maschen von letzten A.1 gestrickt, es sind keine extra Randmaschen. Viel Spaß beim stricken!
09.01.2023 - 09:32
![]() Merlene Harris escribió:
Merlene Harris escribió:
Ok thank you for your reply, but what I don't understand is the increasing on A1, it says I should end up with 36 stitches, but there is no indication on that first row about increasing??
14.12.2021 - 08:16DROPS Design respondió:
Dear Mrs Harris, you cast on 30 sts and when working the first row of A.1 you will increase 1 stitch in each A.1 (see yarn over afterP1, k2), so that there will be 6 repeats of A.1 with 6 sts each = 36 sts. Does it help?
14.12.2021 - 16:46
![]() Merlene Harris escribió:
Merlene Harris escribió:
I would just like to know why the pattern for the headband shows knit 2 together in A3?
14.12.2021 - 00:35DROPS Design respondió:
Dear Mrs Harris, you increased at the beginning of the headband when working A.1, you will now decrease at the end of the headband working A.3. You need more stitches to get the same width when working cables as when working garter stitch, that's the reason why you increased in A.1 and have to decrease in A.3. Happy knitting!
14.12.2021 - 07:50
![]() NATHALIE TERRIER escribió:
NATHALIE TERRIER escribió:
Bonjour, je suis en train de faire ce superbe bandeau pour en faire un cadeau de Noël. Mais il est impossible de faire la grande torsade, les mailles sont trop serrées et cela devient impossible à tricoter. Je pense faire quelques rangs sur 2 bandes de 18 mailles et les croisées ensuite. Cordialement
08.12.2021 - 17:43DROPS Design respondió:
Bonjour Mme Terrier, une correction dans ce sens a effectivement été mise en ligne le 24 novembre: on vous propose désormais de tricoter 4 cm sur chaque moitié avant de croiser les mailles. Bon tricot!
09.12.2021 - 07:47
![]() Lena escribió:
Lena escribió:
Uselt mönster, stickade och repade upp vridningen otaliga gånger (det funkar bara inte) innan jag läste kommentarerna. Videon som hänvisas till stämmer inte med texten i mönstret. Läste kommentarerna och såg att jag inte var ensam om detta problem, Hittade till slut en kommentar från Gunnar 2018. Följde hans utmärkta tips. Nu har jag stickat tre stycken med lyckat resultat. Tack Gunnar!
23.11.2021 - 09:41
![]() Sigga escribió:
Sigga escribió:
Getur verið að það séu mistök í þýðingu á íslensku þar sem snúningurinn kemur framan á - þar segir: Prjónið fyrstu 18 lykkjur á kaðlaprjóni, prjónið hinar 18 lykkjurnar og síðan 18 lykkjur af kaðlaprjóni. En á ensku er það: Slip the first 18 stitches on cable needle, work the remaining 18 stitches and then the 18 stitches on cable needle. - Þ.e. Slip er þýtt sem prjónið í stað færið fyrstu 18 lykkjurnar?
16.11.2021 - 23:19DROPS Design respondió:
Blessuð Sigga. Takk fyrir ábendinguna, þetta hefur verið leiðrétt.
17.11.2021 - 10:52
|
|||||||||||||||||||
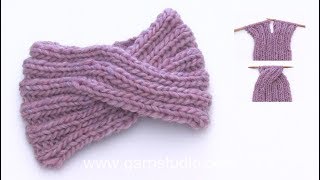
Waiting for Snow Headband#waitingforsnowheadband |
|||||||||||||||||||
|
|
|||||||||||||||||||
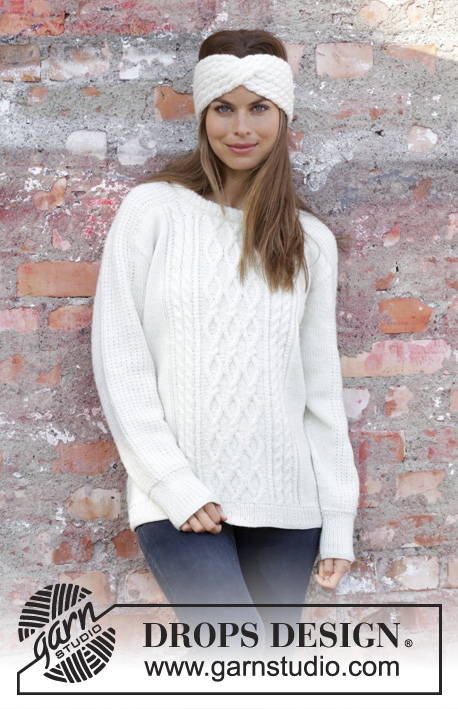
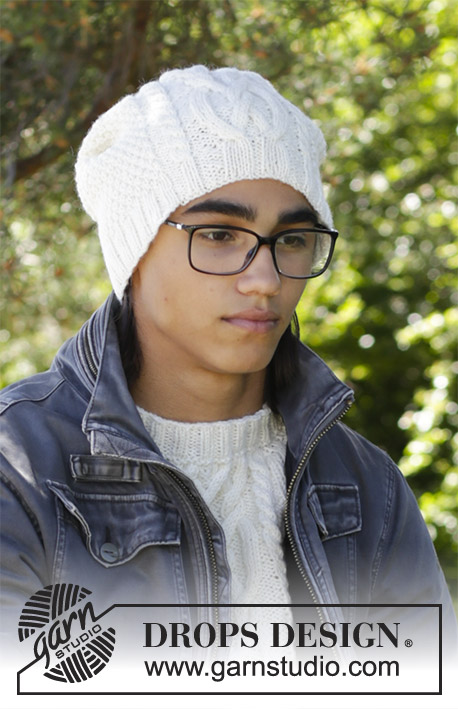
Banda para la cabeza con torsadas en DROPS Merino Extra Fine o DROPS Karisma.
DROPS 195-2 |
|||||||||||||||||||
|
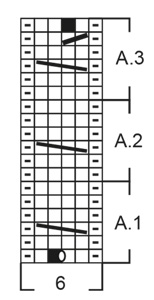
EXPLICACIÓN PARA REALIZAR EL PATRÓN: ----------------------------------------------------- PUNTO MUSGO (de ida y vuelta): 1 surco = tejer 2 hileras de derecho. PATRÓN: Ver diagramas A.1 a A.3. Los diagramas muestran todas las hileras del patrón vistas por el lado derecho. ----------------------------------------------------- COMENZAR LA PIEZA AQUÍ: ----------------------------------------------------- BANDA PARA LA CABEZA – RESUMEN CORTO DE LA PIEZA: La pieza se teje de ida y vuelta a partir del centro de la parte de atrás y se une con una costura cuando está terminada. BANDA PARA LA CABEZA: Montar 30 puntos en aguja tamaño 4 mm con Merino Extra Fine o Karisma. Tejer 1 surco en PUNTO MUSGO de ida y vuelta – ¡leer explicación arriba! Ahora tejer el patrón de la manera siguiente: Tejer A.1 (= 5 puntos en la primera hilera) 6 veces en total en la aguja. Después de la primera hilera de A.1, hemos aumentado 6 puntos en total = 36 puntos. Después de haber tejido A.1, tejer A.2 (= 6 puntos) sobre cada repetición de A.1. ¡RECORDAR MANTENER LA MISMA TENSIÓN DE TEJIDO DE LA MUESTRA! Cuando la pieza mida 24 cm, dividir la pieza en el centro (= 18 puntos en cada mitad). Tejer el patrón A.2 como antes durante 4 cm sobre la primera mitad. Después tejer la segunda mitad de la misma manera. Colocar los puntos de la primera mitad de vuelta en la aguja, pero cambiar de posición con la segunda mitad de manera que las dos mitades queden trenzadas en el centro del frente. Continuar con el patrón A.2 de ida y vuelta hasta que la pieza mida aprox 49 cm – ajustar para terminar después de una repetición completa de A.2 verticalmente (restan por tejer aprox 3 cm para completar las medidas). Ahora tejer A.3 sobre cada repetición de A.2. Después de haber tejido A.3, hay 30 puntos en la hilera. Tejer 1 surco sobre todos los puntos. Rematar. Unir la banda para la cabeza con una costura en el centro de la parte de atrás, cosiendo un punto con el otro en el interior de la orilla de montaje y de la orilla de remate. Cortar y rematar el hilo. |
|||||||||||||||||||
Explicaciones del diagrama |
|||||||||||||||||||
|
|||||||||||||||||||
 |
|||||||||||||||||||
¿Terminaste este patrón?Entonces, etiqueta tus fotos con #dropspattern #waitingforsnowheadband o envíalas a la galería #dropsfan. ¿Necesitas ayuda con este patrón?Encontrarás 17 videos tutoriales, un espacio para comentarios/preguntas y más visitando la página del patrón en garnstudio.com © 1982-2026 DROPS Design A/S. Todos los derechos reservados. Este documento, incluyendo todas sus sub-secciones, está protegido por los derechos de autor (copyright). Lee más acerca de lo que puedes hacer con nuestros patrones en la parte de abajo de cada patrón de nuestro sitio. |
|||||||||||||||||||


Con más de 40 años en el diseño de modelos de punto y de ganchillo, DROPS Design ofrece una de las más vastas colecciones de patrones gratuitos en el internet - traducidos en 17 idiomas. Al día de hoy, contamos con 324 catálogos y 12290 patrones - de los cuales 11675 están traducidos en español.
Nosotros trabajamos con mucho esmero para brindarte lo mejor que las labores de punto y ganchillo tienen para ofrecer,inspiración y consejos, así como hilos de magnífica calidad a precios increíbles! Te gustaría usar nuestros patrones para otro fin además del uso personal? Puedes leer acerca de lo que estás permitida a hacer en el texto de Copyright en la parte de abajo de todos nuestros patrones. Felices labores!
Escribe un comentario sobre DROPS 195-2
¡Nos encantaría saber qué piensas acerca de este patrón!
Si quieres escribir una pregunta referente al patrón, por favor asegúrate de elegir la categoría correcta en el formulario debajo, para acelerar el proceso de respuesta. Los campos obligatorios están marcados con un *.