
Categorías populares
¿Buscas un hilo?


Comentarios / Preguntas (32)
![]() Renie escribió:
Renie escribió:
3. At the beginning it should also say that the back piece is only knitted in stocking stitch (that's why there are less stitches than for the front piece with the special). 4. At the beginning of "Front Piece" please say that the cable stitch pattern A.2 requires more stitches (so you prevent another possible confusion). 5. The description of the first round re.: the front piece (when A.2 cable pattern begins) should be directly placed under "Front Piece", it only belongs there.
16.12.2018 - 09:07
![]() Renie escribió:
Renie escribió:
2. I understand why those quite simple ribs are being made an extra pattern "A.1". But by placing it directly under the main pattern A.2 without a certain note right by the pattern (NOT only in the text, the description) that A.1 is only to be knitted for 6 cm whereas A.2 is to be repeated until the respective piece ends (at the shoulders), this seems to confuse, obviously. Additionally, what about a small space between A.1 and A.2 for better optics? -> 3.
16.12.2018 - 08:43
![]() Renie escribió:
Renie escribió:
Hi Drops-Team, this is such an easy pattern, but you are complicating it. 1. At the beginning, it says "Knit up stitches around the armhole for sleeves and continue working IN THE ROUND with double pointed needles down the sleeve." Later, and in your answers, you say "The sleeve are worked BACK AND FORTH, top down." (By the way, it must say "sleeveS" - plural). -> 2.
16.12.2018 - 08:33
![]() Boize escribió:
Boize escribió:
I have the same problem, it seems that 34 sts makes a sleeve too narrow
09.12.2018 - 18:13DROPS Design respondió:
Dear Mrs Boize, if your tension is right (9 sts = 10 cm in width), the 34 sts should measure 38 cm = 19 cm when folded double as shown in measurement chart. Happy knitting!
10.12.2018 - 10:42Marcia Miller escribió:
I am confused about the sleeve. It seems that 35 stitches for size small is not nearly big enough for the armhole. Are we picking up the stitches from the body of the sweater or knitting the sleeve separately and then setting it into the armhole?
07.12.2018 - 21:45DROPS Design respondió:
Hi Marcia! The sleeves are worked back and forth, top down. If knitting tension is right, 36 stitches is 40 cm. Should be enough for armhole. You can always pick a few more. Happy knitting!
09.12.2018 - 19:20
![]() Emmanouela Evanggelatou escribió:
Emmanouela Evanggelatou escribió:
THAT I WANT TO UNDERSTAND.. BEFORE I WAS WORKING in A.2 AND AT THE BEGGINING THE RIB IN A.1. SO YOU ARE TELLING ME TO CHANGE AND WORK THE SHOULDERS IN A.1 (KNIT 2 PURL 2 ..) AS THE RIB. IS THAT CORRECT?
08.11.2018 - 15:10DROPS Design respondió:
Dear Mrs Evanggelatou, there might have been a typo in the previous answer - you will work the sts on each shoulder as before : on back piece: all sts will be worked in stocking stitch, and on front piece: either P or K as before in A.2 - there might be a typo in the pattern, our Design team will check this. Happy knitting!
08.11.2018 - 15:49Emmanouela Evanggelatou escribió:
Hello again , i can't understand that.." Each shoulder is now finished separately. Continue with ...... in the same way." That paragraphe concernes the shoulders? and I knit them also in A1 as the rib? please explain me this paragr. for the front piece. Thank you!
07.11.2018 - 20:59DROPS Design respondió:
Hi Emmanouela, After you have placed the middle stitches on a thread for the neck, you continue working one shoulder only, with knit and purl over the remaining stitches in A.1 as before. Decrease for the neck as described and continue working until this shoulder is finished. Then work the other shoulder in the same way. Happy knitting!
08.11.2018 - 08:24Emmanouela Evanggelatou escribió:
Hello , i would like some help conserning the armholes...."Cast off the first 2-2-2-2-2-3 stitches on the round, work the next 49-53-57-61-65-69 stitches as before (= front piece), cast off the next 4-4-4-4-4-6 stitches, work until there are 2-2-2-2-2-3 stitches left, cast off these stitches. Cut the strand. ".... Please explain me this paragraphe. I cast off 2 stitches for each armhole or 1 stitche for each? and how i continue to cast off ?
04.11.2018 - 01:16DROPS Design respondió:
Dear Mrs Evanggelatou, on this round in the first 5 sts you start casting off 2 sts at the beg of round, work the next 49-53-57-61-65 sts as before, cast off the next 4 sts for armhole, work the next sts as before until 2 sts remain before end of round (= before the first 2 sts cast off at the beg of the round) and cast off these last 2 sts, cut the yarn = there are now 4 sts cast off for each armhole on each side. You finish now each part separately joining the yarn at the beg of back piece first. Happy knitting!
05.11.2018 - 09:22
![]() Geke escribió:
Geke escribió:
Kunt u me uitleggen hoe ik 0-0-0-0-1 steek tricotsteek moet breien? Ik begrijp het niet.
04.10.2018 - 06:45
![]() Geke escribió:
Geke escribió:
Ik begrijp niet wat 0-0-0-0-0-1 steek tricot betekent. Kunt u me dat uitleggen?
02.10.2018 - 19:57DROPS Design respondió:
Dag Geke, In maat S brei je 0 steken in tricot, in maat M 0 steken enz. De getallen staan in volgorde van de maten en je hoeft dus alleen maar in de grootste maat een steek in tricotsteek te breien.
04.10.2018 - 11:59
|
|||||||||||||
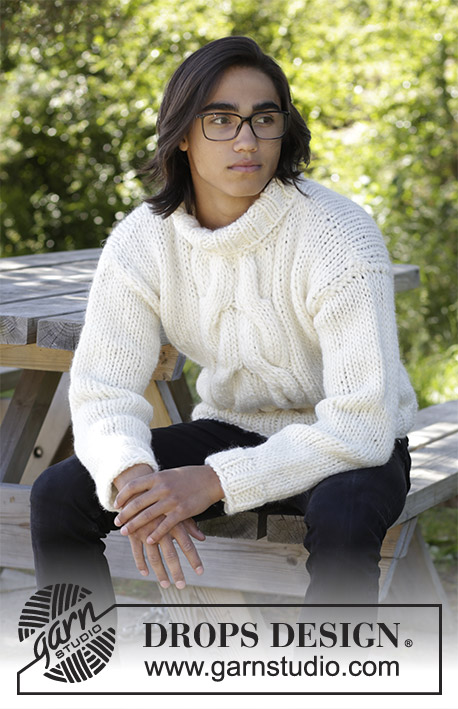
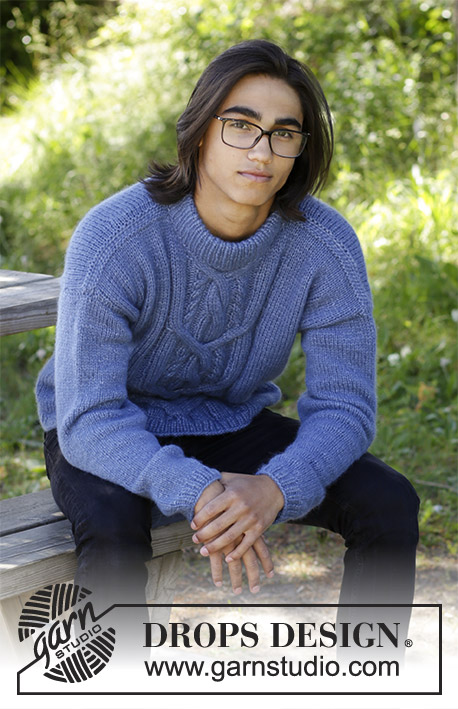
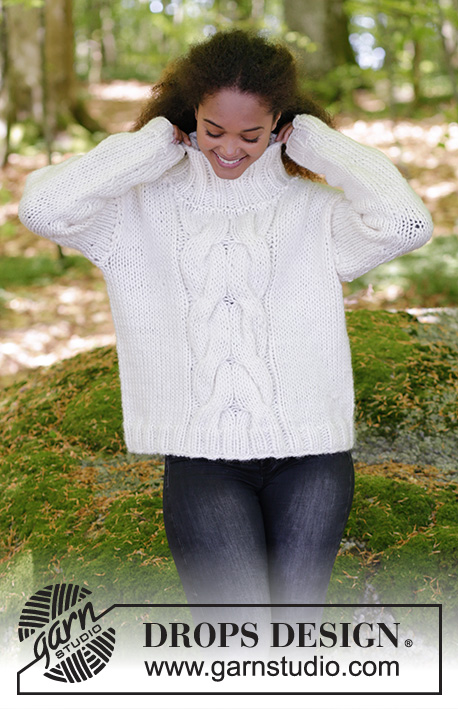
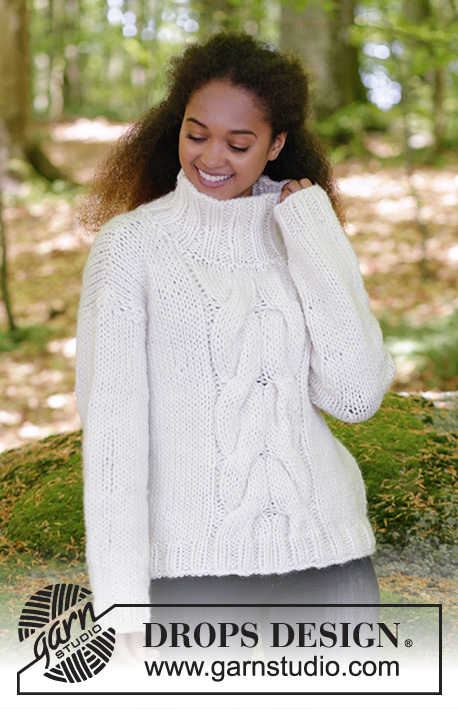
Cozy Weekend#cozyweekendsweater |
|||||||||||||
 |
 |
||||||||||||
Jersey de punto con trenzas y cuello alto. Tallas S - XXXL. La labor se trabaja en DROPS Snow.
DROPS 181-13 |
|||||||||||||
|
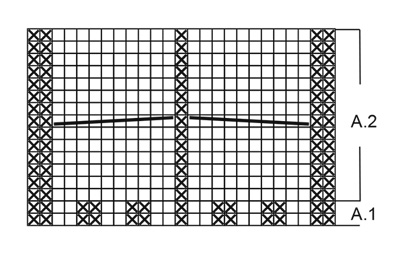
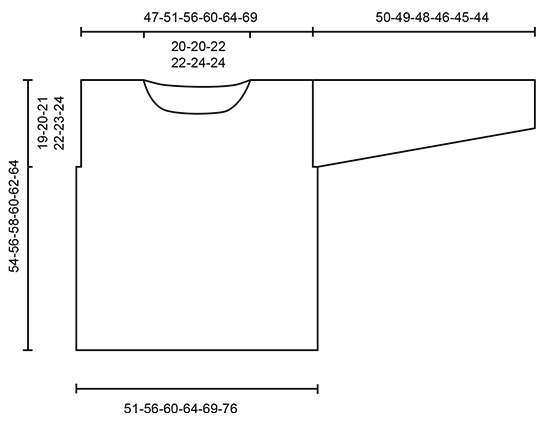
INFORMACIÓN PARA REALIZAR EL PATRÓN: PATRÓN: Ver los diagramas A.1 y A.2. Los diagramas muestran todas las filas del patrón vistas por el lado derecho. ---------------------------------------------------------- JERSEY: El jersey se trabaja en redondo con aguja circular de abajo arriba. Después de disminuir para la sisas la labor se divide y se finaliza de ida y vuelta, trabajando por separado la espalda y el delantero. Recoger puntos alrededor de la sisa para la manga y continuar trabajando en redondo con agujas de doble punta hacia abajo. El cuello se trabaja con aguja circular corta. CUERPO: Montar 99-107-115-123-131-143 puntos con aguja circular tamaño 9 mm y Snow. Trabajar 1 vuelta de derecho, después trabajar el elástico como sigue según la talla: S-L- XXL-XXXL: *2 derechos, 2 reveses*, trabajar de * a * sobre los primeros 12-16-20-24 puntos, 2 derechos, trabajar A.1 (= 25 puntos), *2 derechos, 2 reveses* sobre los 60-72-84-92 puntos restantes. M-XL: *2 reveses, 2 derechos*, trabajar sobre los primeros 16-20 puntos, trabajar A.1 (= 25 puntos), * 2 derechos, 2 revés*, trabajar de * a * sobre los 64-76 puntos siguientes y finalizar con 2 derechos. TODAS LAS TALLAS: Continuar el elástico de la misma manera hasta que la labor mida 6 cm. Cambiar a aguja circular tamaño 10 mm. Trabajar 0-0-0-0-0-1 puntos en punto jersey, la vuelta ahora comienza aquí, insertar 1 marcapuntos (la vuelta se habrá desplazado 0-0-0-0-0-1 puntos). En la siguiente vuelta trabajar como sigue: Trabajar en punto jersey sobre los primeros 14-16-18-20-22-25 puntos, A.2 (= 25 puntos) sobre A.1, punto jersey sobre los siguientes 14-16-18-20-22-25 puntos, insertar 1 marcapuntos (= delantero), trabajar en punto jersey sobre los últimos 46-50-54-58-62-68 puntos. Continuar con el patrón hacia arriba. RECUERDE MANTENER LA MISMA TENSIÓN DEL TEJIDO: Cuando la labor mida 35-36-37-38-39-40 cm cerrar puntos para la sisa en la siguiente vuelta como sigue (ajustar para que la siguiente vuelta sea la 1ª-3ª-5ª-7ª-9ª-11ª o 13ª vuelta de A.2): Cerrar los primeros 2-2-2-2-2-3 puntos de la vuelta, trabajar los siguientes 49-53-57-61-65-69 puntos como antes (= delantero), cerrar los siguientes 4-4-4-4-4-6 puntos, trabajar hasta que queden 2-2-2-2-2-3 puntos, rematar estos puntos. Cortar el hilo. Ahora finalizar cada parte por separado. ESPALDA: = 42-46-50-54-58-62 puntos. Continuar con punto jersey sobre todos los puntos (la primera fila se trabaja por el lado revés). Cuando la labor mida 17-18-19-20-21-22 cm desde donde se cerraron los puntos para la sisa (la labor mide un total de 52-54-56-58-60-62 cm) cerrar los 16-16-18-18-20-20 puntos centrales para el escote y terminar cada hombro por separado = 13-15-16-18-19-21 puntos para el hombro. Continuar en punto jersey y disminuir 1 punto en la siguiente fila desde el escote = 12-14-15-17-18-20 puntos quedan para el hombro. Continuar trabajando hasta que la labor mida 19-20-21-22-23-24 cm desde donde se cerraron los puntos para la sisa (la labor mide un total de 54-56-58-60-62-64 cm). Rematar. Trabajar otro hombro de la misma manera). DELANTERO: = 49-53-57-61-65-69 puntos. Continuar trabajando hasta que la labor mida 48-50-50-52-52-54 cm (la primera fila se trabaja por el lado revés). Ahora pasar los puntos para el escote a una aguja auxiliar como sigue: Trabajar 16-18-19-21-22-24 puntos como antes, trabajar los siguientes 17-17-19-19-21-21 puntos como antes pero disminuir 7 puntos repartidos sobre estos puntos, después pasar estos puntos a un gancho auxiliar (= 10-10-12-12-14-14 puntos en el gancho auxiliar), trabajar los 16-18-19-21-22-24 puntos restantes como antes. Cada hombro se termina ahora por separado. Continuar con derecho y revés como antes sobre los puntos restantes de A.2 y cerrar para el escote al inicio de cada fila desde el escote como sigue: Cerrar 2 puntos 1 vez y 1 punto 2 veces = 12-14-15-17-18-20 puntos restantes para el hombro. Continuar trabajando hasta que la labor mida 54-56-58-60-62-64 cm, ajustar con la espalda. Rematar. Trabajar el otro hombro de la misma manera. TERMINACIÓN: Coser los hombros con grafting. MANGA: La manga se trabaja de ida y vuelta, de arriba abajo. Recoger 34-36-38-40-42-44 puntos a lo largo de la sisa en los puntos/filas más externos, con aguja circular tamaño 10 mm y Snow. Trabajar en punto jersey. Cuando la labor mida 4 cm disminuir 1 punto a cada lado de la labor (= 2 puntos disminuidos). Repetir las disminuciones de la misma manera cada 9-7-5-6-5-4 cm un total de 5-6-7-6-7-8 veces = 24-24-24-28-28-28 puntos. Cuando la labor mida 45-44-43-41-40-39 cm, cambiar a aguja circular tamaño 9 mm y trabajar punto elástico (= 2 derechos/2 reveses). Cuando la manga mida 50-49-48-46-45-44 cm, cambiar a aguja circular tamaño 10 mm y rematar de derecho sobre todos los puntos. ESCOTE: La labor se trabaja en redondo. Recoger 56-56-60-60-64-64 puntos alrededor del escote (incluido los puntos en el gancho auxiliar) con aguja circular corta tamaño 9 mm y con Snow. Trabajar 1 vuelta de revés y 1 vuelta de derecho, después trabajar 12 cm en punto elástico (= 2 derechos/2 revés). Rematar FLOJO con derecho sobre derecho y revés sobre revés. TERMINACIÓN: Montar las mangas y coser en el bucle exterior del punto orillo. |
|||||||||||||
Explicaciones del diagrama |
|||||||||||||
|
|||||||||||||
 |
|||||||||||||
 |
|||||||||||||
¿Terminaste este patrón?Entonces, etiqueta tus fotos con #dropspattern #cozyweekendsweater o envíalas a la galería #dropsfan. ¿Necesitas ayuda con este patrón?Encontrarás 22 videos tutoriales, un espacio para comentarios/preguntas y más visitando la página del patrón en garnstudio.com © 1982-2026 DROPS Design A/S. Todos los derechos reservados. Este documento, incluyendo todas sus sub-secciones, está protegido por los derechos de autor (copyright). Lee más acerca de lo que puedes hacer con nuestros patrones en la parte de abajo de cada patrón de nuestro sitio. |
|||||||||||||


Con más de 40 años en el diseño de modelos de punto y de ganchillo, DROPS Design ofrece una de las más vastas colecciones de patrones gratuitos en el internet - traducidos en 17 idiomas. Al día de hoy, contamos con 324 catálogos y 12290 patrones - de los cuales 11685 están traducidos en español.
Nosotros trabajamos con mucho esmero para brindarte lo mejor que las labores de punto y ganchillo tienen para ofrecer,inspiración y consejos, así como hilos de magnífica calidad a precios increíbles! Te gustaría usar nuestros patrones para otro fin además del uso personal? Puedes leer acerca de lo que estás permitida a hacer en el texto de Copyright en la parte de abajo de todos nuestros patrones. Felices labores!
Escribe un comentario sobre DROPS 181-13
¡Nos encantaría saber qué piensas acerca de este patrón!
Si quieres escribir una pregunta referente al patrón, por favor asegúrate de elegir la categoría correcta en el formulario debajo, para acelerar el proceso de respuesta. Los campos obligatorios están marcados con un *.