
Categorías populares
¿Buscas un hilo?


Comentarios / Preguntas (27)
![]() Viola escribió:
Viola escribió:
Hallo, ich würde diese Jacke für ein neunjähriges Mädchen stricken. Es gibt nicht zufällig diese Anleitung für die Größe XXS oder XS? Viele Grüße
03.04.2018 - 21:17DROPS Design respondió:
Liebe Frau Viola, dieses Modell gibt es nur in Damen-Größe. Viel Spaß beim stricken!
04.04.2018 - 08:54
![]() Holly Hensel Kinsella escribió:
Holly Hensel Kinsella escribió:
When not working the A-1 pattern or the front band garter do you knit on your purls and purl on your knits on the opposite sides? After you set up the pattern it just says to continue the pattern upwards and I find this confusing? Exp. on the 25 knit stitches on either side do you purl these on the wrong side? And the 2 purls between the patterns do you knit these on the wrong sides? Thank you!
12.03.2018 - 21:30DROPS Design respondió:
Dear Mrs Kinsella, from WS you work in garter st the sts in garter st and K over K and P over P and diagram as shown on WS row in diagram. Happy knitting!
13.03.2018 - 09:30
![]() Barbara escribió:
Barbara escribió:
Guten Tag, ich wollte mir diese Anleitung ausdrucken, aber es hat leider NICHT funktioniert, nur die Seiten 1 - 3 sind ausdruckbar, das Lochmuster und die Skizze für die Maße kann ich nicht ausdrucken, können Sie mir bitte weiterhelfen? Grüße Barbara
24.02.2018 - 18:41DROPS Design respondió:
Liebe Barbara, die Settings Ihrer Drücker sollen Sie vielleicht mal prüfen, damit alle Seiten gedrückt werden. Viel Spaß beim stricken!
26.02.2018 - 08:09
![]() Fran Miller escribió:
Fran Miller escribió:
I am assembling the piece and working on the neck and so there is no decreasing at all. I want to know if I should knit the stitches off of the thread and then pick up stitches around the rest of the neck and then knit the final 15 stitches that are on the thread.
15.01.2018 - 17:28DROPS Design respondió:
Dear Mrs Miller, correct, you will knit the sts from thread back on needle and knit up sts around whole neckline, beg on one shoulder or on mid back. Happy knitting!
16.01.2018 - 09:03
![]() Fran Miller escribió:
Fran Miller escribió:
I still have a question about the stitches on the thread. Since they are at the beginning of each side, there are no stitches that have been worked previously. If I slip the first 15 on the right needle and then join a yarn to work the others of the neck on to the needle, the last 15 are on the thread. If I just slip them on, then my yarn would be in the middle of a row. If I knit them on, then the first 15 have not been knitted but the last 15 have! Please clarify as I am very confused.
15.01.2018 - 15:04DROPS Design respondió:
Dear Mrs Miller, for neck you will work first 15 sts from RS then slip them on a st holder (so that you don't have to cut the yarn), work to the end of row. Turn and work return row. At the beg from next row from RS beg to dec for neck. Happy knitting!
15.01.2018 - 15:54
![]() Fran Miller escribió:
Fran Miller escribió:
I am assembling my sweater and am on the neckline. How do I know up the stitches for the neckline, specifically the 15 stitches that are on the threads. Do I just slip them on the needle and then join yarn to get the other stitches on the needle or do I treat these stitches like bound off stitches and pull thread through them. I have tried finding a video but can't find any.
15.01.2018 - 02:02DROPS Design respondió:
Hi Fran, Slip the stitches on the thread onto the right needle when you have knitted up the other stitches as far as the front and then work them too. Then carry on knitting up stitches on the other side of the thread stitches. I hope this helps and happy knitting!
15.01.2018 - 06:18
![]() Sabina escribió:
Sabina escribió:
Hi.can you please explain in detail the sleeve cap and the 3 stitches cast off on each side-does that mean you cast off while on wrong side and right side? Thanks
17.12.2017 - 09:24DROPS Design respondió:
Hi Sabina, Yes, you cast off at the beginning of each row, so the one will be RS the other WS. Happy knitting!
18.12.2017 - 06:21
![]() Fran Miller escribió:
Fran Miller escribió:
I have another question about the front piece. On the right front piece, if you put the first 15 stitches on the thread, the yarn from your knitting is with it. So do you attach new yarn to do the stitches after that so you can begin the bind off? Likewise on the left side, do you work from the wrong side and take the 15 stitches off at the beginning or do you work from the right side and slip them to the thread at the end? Again what happens to that yarn if done in the beginning?
18.11.2017 - 23:52DROPS Design respondió:
Dear Mrs Miller, when slipping the first 15 sts from RS on right front piece, work them first to avoid cutting the yarn. On left front piece, leave the last 15 sts from RS unworked and turn. This way you won't have to cut yarn and join it on next row. Happy knitting!
20.11.2017 - 09:21
![]() Fran Miller escribió:
Fran Miller escribió:
I still have a question about the right front piece. After you put the 15 stitches on the thread, what happens to them. I don't see anything in the directions. Also when it says"bind off for the neck at the beginning of the row from the neck " does this mean after the stitches that are on the thread? I would think so in order to have the 18 stitches for the shoulder.
18.11.2017 - 01:13DROPS Design respondió:
Hi Fran, The 15 stitches on the thread are worked when you get to Neck, The new stitches that you bind off are, as you say, the ones next to the stitches on the thread so you shape the neck up to the shoulders. Happy knitting!
18.11.2017 - 07:07
![]() Fran Miller escribió:
Fran Miller escribió:
I am starting this sweater and want clarification on the ribbing. Is the purl row just done for the first row? So knit 5, (knit 2,purl 2) to last 7 stitches, knit last 7 stitches is done every row?
24.10.2017 - 22:19DROPS Design respondió:
Dear Mrs Miller, you will K every row the first 5 sts and the last 5 sts on row, all remaining sts between these will be worked K2/P2, ie from RS you will finish with K7 and from WS you will start with K5 (= front band), then work K over K and P over P for the rib, and finish with K5 (= front band). Happy knitting!
25.10.2017 - 08:44
|
||||||||||||||||
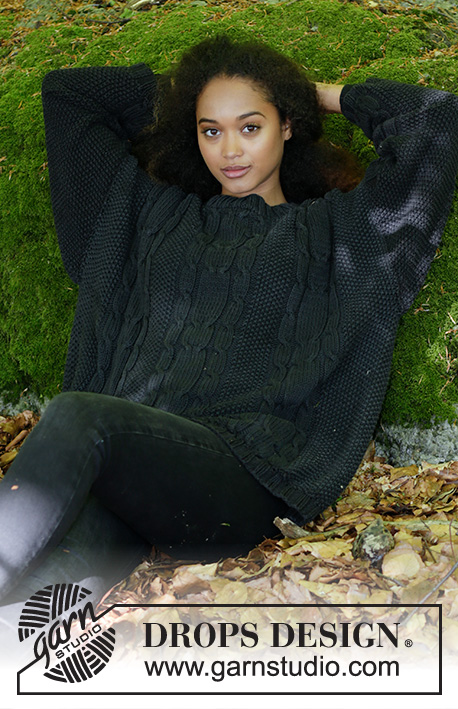
Lotus Jacket#lotusjacket |
||||||||||||||||
 |
 |
|||||||||||||||
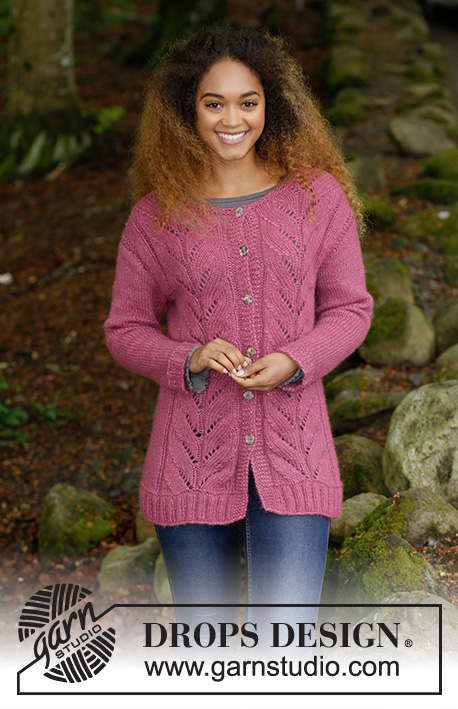
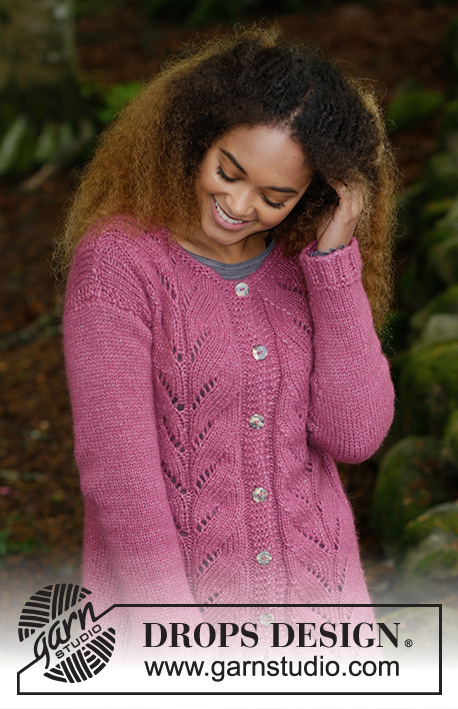
Chaqueta de punto con patrón de calados y resorte. Tallas S – XXXL. La chaqueta es tejida en DROPS Air.
DROPS 179-18 |
||||||||||||||||
|
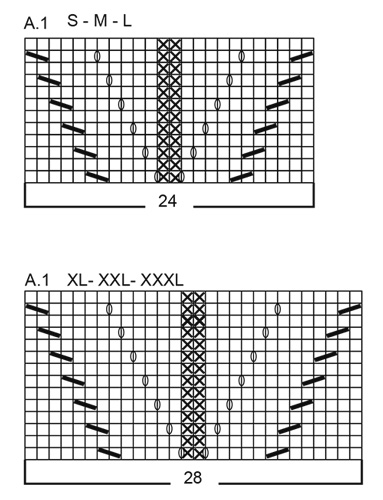
INFORMACIÓN PARA REALIZAR EL PATRÓN: SURCO/PUNTO MUSGO (tejido en redondo): 1 surco = 2 vueltas. Tejer 1 vuelta de derecho y 1 vuelta de revés. SURCO/PUNTO MUSGO (tejido de ida y vuelta): 1 surco = tejer 2 hileras de derecho. PATRÓN: Ver diagrama A.1. El diagrama muestra todas las hileras del patrón vistas por el lado derecho. Ver el diagrama que corresponda a tu talla. TIP PARA DISMINUIR (para el lado): Comenzar 3 puntos antes del hilo marcador en el lado: Tejer 2 puntos juntos de derecho, tejer 2 puntos derechos (el hilo marcador está entre estos puntos), deslizar 1 punto, tejer 1 punto derecho, pasar el punto deslizado por encima del punto tejido. TIP PARA AUMENTAR (aplica al centro bajo la manga): Comenzar 1 punto antes del hilo marcador, hacer 1 lazada, tejer 2 derechos (el hilo marcador está en el centro de estos 2 puntos), hacer 1 lazada (= 2 puntos aumentados). En la vuelta siguiente, tejer las lazadas retorcidas de derecho para evitar agujeros. OJALES: Disminuir para los ojales en el borde delantero derecho. 1 OJAL = tejer juntos de derecho el tercero y el cuarto punto a partir de la orilla y hacer 1 lazada. En la hilera siguiente, tejer la lazada de derecho = agujero. Disminuir para los ojales cuando la pieza mida: S: 16, 24, 34, 43, 52 y 61 cm M: 16, 25, 34, 43, 53 y 63 cm L: 16, 25, 35, 45, 55 y 65 cm XL: 16, 24, 32, 40, 49, 58 y 67 cm XXL: 16, 24, 33, 42, 51, 60 y 69 cm XXXL: 16, 26, 35, 44, 53, 62 y 71 cm ----------------------------------------------------- CHAQUETA: La pieza se teje de ida y vuelta a partir del centro del frente, de abajo para arriba hasta las sisas. Después tejer las piezas del frente y de la espalda de ida y vuelta en aguja circular, separadamente. Las mangas se tejen en redondo con agujas de doble punta/aguja circular corta. CUERPO: Montar 204-220-232-252-272-296 puntos con aguja circular tamaño 5 mm y Air. Tejer 1 hilera de revés por el lado revés, después tejer en resorte de la manera siguiente – por el lado derecho: 5 puntos en PUNTO MUSGO – ver descripción arriba, * 2 derechos / 2 reveses *, repetir de *a* hasta que resten 7 puntos, tejer 2 puntos derechos y 5 puntos en punto musgo. Continuar con el resorte hasta que la pieza mida 6 cm. Cambiar a aguja circular tamaño 6 mm y tejer 1 surco sobre todos los puntos y, AL MISMO TIEMPO, en la primera hilera del surco, disminuir 34-38-38-42-46-50 puntos distribuidos equitativamente en la hilera = 170-182-194-210-226-246 puntos. Continuar de la manera siguiente – por el lado derecho: 5 puntos en punto musgo, 2 reveses, A.1 (= 24-24-24-28-28-28 puntos), 2 reveses, 25-31-37-37-45-55 derechos, 2 reveses, A.1, 2 reveses, A.1, 2 reveses, 25-31-37-37-45-55 derechos, 2 reveses, A.1, 2 reveses y 5 puntos en punto musgo. Continuar este patrón hacia arriba. ¡RECORDARSE DE MANTENER LA MISMA TENSIÓN DE TEJIDO DE LA MUESTRA! Insertar 1 hilo marcador a cada lado, a 45-48-51-55-59-64 puntos a partir del centro del frente (= pieza de la espalda = 80-86-92-100-108-118 puntos). Cuando la pieza mida 8 cm, disminuir 1 punto a cada lado de los hilos marcadores de los lados = 4 puntos disminuidos, ¡LEER TIP PARA DISMINUIR! Disminuir a cada 12-12-13-13-14-14 cm un total de 4 veces = 154-166-178-194-210-230 puntos. AL MISMO TIEMPO, cuando la pieza mida 16 cm, comenzar a disminuir para los OJALES – ver descripción arriba. Cuando la pieza mida 48-49-50-51-52-53 cm, tejer surcos sobre 14 puntos a cada lado (= 7 puntos a cada lado de los hilos marcadores de los lados). Cuando se han tejido 2 surcos sobre los puntos de los lados, tejer la hilera siguiente de la manera siguiente – por el lado derecho: Tejer 37-40-43-47-51-56 puntos, rematar los 8 puntos siguientes para la sisa (= 4 puntos a cada lado de los hilos marcadores de los lados), tejer 64-70-76-84-92-102 puntos, rematar los 8 puntos siguientes para la sisa, tejer 37-40-43-47-51-56 puntos. Ahora tejer cada parte separadamente. ESPALDA: = 64-70-76-84-92-102 puntos. Continuar con el patrón como antes, los 3 puntos más externos a cada lado ahora se tejen en punto musgo. Cuando la pieza mida 66-68-70-72-74-76 cm, rematar los 26-26-28-28-30-30 puntos centrales para el escote y terminar cada hombro separadamente. Rematar 1 punto en la hilera siguiente a partir del escote = 18-21-23-27-30-35 puntos restantes en el hombro. Continuar tejiendo hasta que la pieza mida 68-70-72-74-76-78 cm (los puntos restantes de A.1 se tejen en punto jersey) y rematar. Tejer el otro hombro de la misma manera. FRENTE DERECHO: = 37-40-43-47-51-56 puntos. Continuar con el patrón como antes, los 3 puntos más externos del lado en dirección de la sisa se tejen en punto musgo. RECORDARSE DE LOS OJALES. Continuar tejiendo hasta que la pieza mida 62-64-66-68-70-72 cm. Ahora colocar los primeros 15-15-16-16-17-17 puntos en un hilo para el escote. Continuar el patrón como antes y rematar para el escote al principio de cada hilera a partir del escote de la manera siguiente: 2 puntos 1 vez y 1 punto 2 veces = 18-21-23-27-30-35 puntos restantes en el hombro. Continuar tejiendo hasta que la pieza mida 68-70-72-74-76-78 cm (los puntos restantes de A.1 se tejen en punto jersey) y rematar. Tejer el otro hombro de la misma manera. FRENTE IZQUIERDO: Tejer como el frente derecho, pero en sentido inverso. MANGA: La manga se teje en redondo con agujas de doble punta/aguja circular. Montar 40-40-44-48-52-52 puntos con agujas de doble punta tamaño 5 mm y Air. Tejer 1 vuelta de derecho, después tejer en resorte, 2 derechos / 2 reveses. Tejer en resorte durante 5 cm, después cambiar a agujas de doble punta tamaño 6 mm, tejer 1 SURCO – ver descripción arriba, y en la primera vuelta del surco disminuir 6-6-8-10-12-12 puntos distribuidos equitativamente en la vuelta = 34-34-36-38-40-40 puntos. Continuar con punto jersey. Insertar 1 hilo marcador al principio de la vuelta = centro bajo la manga. Tejer en punto jersey en redondo. Cuando la pieza mida 8-8-8-8-10-9 cm, aumentar 2 puntos al centro bajo la manga – LEER TIP PARA AUMENTAR. Aumentar de esta manera a cada 3½-3-2½-2½-2-2 cm un total de 12-13-14-14-15-16 veces = 58-60-64-66-70-72 puntos. Cuando la pieza mida 49-48-47-46-44-41 cm (medidas más cortas en las tallas más grandes debido al ancho del hombro), rematar los 6 puntos centrales bajo la manga y terminar la copa de la manga de ida y vuelta en aguja circular. Tejer en punto jersey y rematar al principio de cada hilera a cada lado de la manera siguiente: 3 puntos 3 veces = 34-36-40-42-46-48 puntos. La manga mide aprox 52-51-50-48-47-44 cm. Rematar los puntos restantes. Tejer una manga más de la misma manera. ENSAMBLAJE: Hacer las costuras de los hombros. Montar las mangas. Coser los botones en la pieza del frente izquierdo. CUELLO: Levantar aprox 80 – 100 puntos (incluyendo los puntos en los hilos) con aguja circular tamaño 5 mm y Air. Tejer 2 surcos de ida y vuelta, después rematar de derecho por el lado derecho. |
||||||||||||||||
Explicaciones del diagrama |
||||||||||||||||
|
||||||||||||||||
 |
||||||||||||||||
 |
||||||||||||||||
¿Terminaste este patrón?Entonces, etiqueta tus fotos con #dropspattern #lotusjacket o envíalas a la galería #dropsfan. ¿Necesitas ayuda con este patrón?Encontrarás 27 videos tutoriales, un espacio para comentarios/preguntas y más visitando la página del patrón en garnstudio.com © 1982-2026 DROPS Design A/S. Todos los derechos reservados. Este documento, incluyendo todas sus sub-secciones, está protegido por los derechos de autor (copyright). Lee más acerca de lo que puedes hacer con nuestros patrones en la parte de abajo de cada patrón de nuestro sitio. |
||||||||||||||||


Con más de 40 años en el diseño de modelos de punto y de ganchillo, DROPS Design ofrece una de las más vastas colecciones de patrones gratuitos en el internet - traducidos en 17 idiomas. Al día de hoy, contamos con 324 catálogos y 12291 patrones - de los cuales 11689 están traducidos en español.
Nosotros trabajamos con mucho esmero para brindarte lo mejor que las labores de punto y ganchillo tienen para ofrecer,inspiración y consejos, así como hilos de magnífica calidad a precios increíbles! Te gustaría usar nuestros patrones para otro fin además del uso personal? Puedes leer acerca de lo que estás permitida a hacer en el texto de Copyright en la parte de abajo de todos nuestros patrones. Felices labores!
Escribe un comentario sobre DROPS 179-18
¡Nos encantaría saber qué piensas acerca de este patrón!
Si quieres escribir una pregunta referente al patrón, por favor asegúrate de elegir la categoría correcta en el formulario debajo, para acelerar el proceso de respuesta. Los campos obligatorios están marcados con un *.