
Categorías populares
¿Buscas un hilo?


Comentarios / Preguntas (103)
![]() Bricchi escribió:
Bricchi escribió:
Mon échantillon correspond bien mais il me reste plus que les mailles du diagramme,peut être un problème au niveau des diminutions? j'ai en effet que 7 fois 2B de diminutions et non les 14 fois(après celles de 4 et 3 B) et la hauteur totale est bien de 30 cm?
17.07.2013 - 09:50DROPS Design respondió:
Il faut diminuer de chaque côté les 2-3-6-8 fois 4 B, 3-7-7-7 fois 3 B, 14-9-6-5 fois 2 B, soit au début et à la fin de chaque rang. Donc en taille XS, on a 30 cm de hauteur, on avait 145 m - ( 2 x 4B x 2 côtés) - (3 x 3 B x 2 côtés) - 14 x 2 B x 2 côtés) = 55 - les diminutions du diagramme. Avez-vous bien diminué au début et à la fin de chaque rang ? Bon crochet !
17.07.2013 - 10:05
![]() Bricchi escribió:
Bricchi escribió:
Bonjour, Lorsqu'on arrive en haut du diagramme,doit-il rester les 39 mailles + les 2 de chaque côté? Dans mon cas,il m'en reste plus et la largeur en haut ne fait pas environ 20 cm mais 30 cm. D'autre part en ayant suivi toutes les diminutions ,les côtés "montent tout droit" et ne font pas la "courbe" qui est sous le bras? Merci par avance
17.07.2013 - 07:50DROPS Design respondió:
Bonjour Mme Brichi, quand on a terminé les diminutions de chaque côté, il ne reste que les mailles du diagramme. Avez-vous pensé à vérifier votre tension ? Ce top a été réalisé sur la base d'un échantillon de 20 brides x 10 rangs = 10 x 10 cm. Bon crochet !
17.07.2013 - 09:30
![]() Cloclo escribió:
Cloclo escribió:
Trés joli modèle , merci pour les explications
22.06.2013 - 17:05
![]() Cassy escribió:
Cassy escribió:
I've noticed that alot of people are having the same problem with this pattern that I have. I've read the replies and found how to properly work the pattern, but it's wasted alot of time. You may consider re-writing the first row as "1 double crochet (dc) in the 3rd ch from the hook, 1 dc in each of the next 2 sts, * skip 1 ch, 1 dc in each of the next 3 sts *, repeat from * - *=" to increase clarity.
18.02.2013 - 05:39
![]() Elisabeth escribió:
Elisabeth escribió:
Jeg har nå heklet denne toppen ferdig, men min topp er kortere enn lengden som sto i oppskriften. I str. S så skulle den være 31 cm, mens min kun er 26 cm. Jeg vurderer å hekle nedover fra bunnen av toppen (luftmaskeraden) og til ønsket lengde. Har noen erfaring med å improvisere på denne måten? Og vil det i så fall bli et bra resultat?
11.01.2013 - 03:46DROPS Design respondió:
Stemmer din haeklefasthed i höjden? Du skal have 11 raekker paa 10 cm. Hvis du har flere raekker bliver din top for kort. Du kan starte forfra eller pröve at haekle nedover fra bunnen med stangm, men du skal nok tage ind til din talje.
16.01.2013 - 18:24
![]() DROPS Design escribió:
DROPS Design escribió:
Cindy, this is how you work row 1: 1 dc in the 3rd ch from the hook, 1 dc in the next ch, 1 dc in the next ch, * skip 1 ch, 1 dc in the next ch, 1 dc in the next ch, 1 dc in the next ch*, repeat from * - * = 129-139-149-159 dc.
15.08.2011 - 09:13
![]() DROPS Design escribió:
DROPS Design escribió:
Cindy, this is how you work row 1: 1 dc in the 3rd ch from the hook, 1 dc in the next ch, 1 dc in the next ch, * skip 1 ch, 1 dc in the next ch, 1 dc in the next ch, 1 dc in the next ch*, repeat from * - * = 129-139-149-159 dc.
15.08.2011 - 09:08
![]() Cindy escribió:
Cindy escribió:
Hello. I'm trying to figure out how to start the pattern so that by end of row 1 I can have the correct number of dc. I've tried it 3 times and always end up with double the total it should be. What am I doing wrong. Please help and thank you.
07.08.2011 - 22:29Hobbes5 escribió:
Hi I'm trying to understand how to do the dec, when I reach the end of the row I do the dec again, my problem is, how do I do the dec to the next row? Do I, after the end dec, turn, ch eg. 6 then miss 4 and ss into 5 with a or dc into 5? I've got two chains running along alternate dc rows, is that correct? Thanks!
27.01.2011 - 03:02
![]() Victoria escribió:
Victoria escribió:
Hi. I think i misunderstood something, may be i had to inc 1dc on each row instead of 1 dc on each side of the row? Cause I crocheted the first row and the next 9 (for size S) but the work does not measure to 8cm, it's more like the half of it... what do i do? ignore and continue?
27.06.2009 - 23:34
|
|||||||||||||
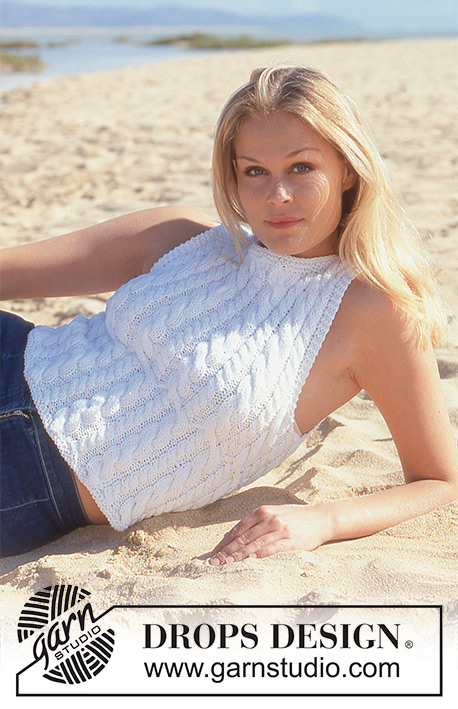
Mediterranean Love Top#mediterraneanlovetop |
|||||||||||||
 |
 |
||||||||||||
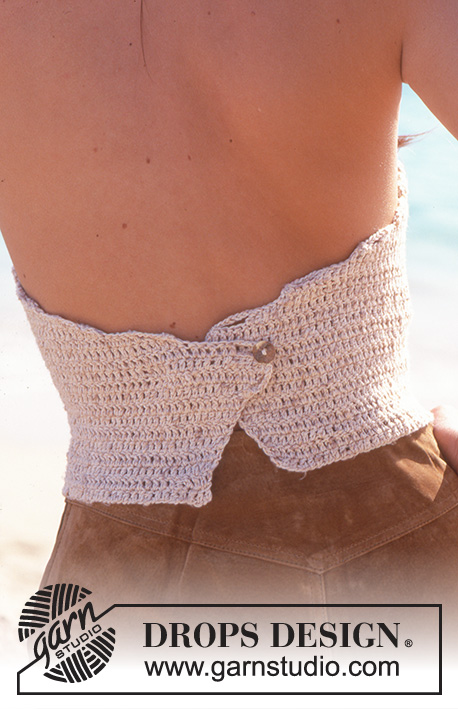
Top de ganchillo DROPS con la espalda descubierta en Safran
DROPS 65-13 |
|||||||||||||
|
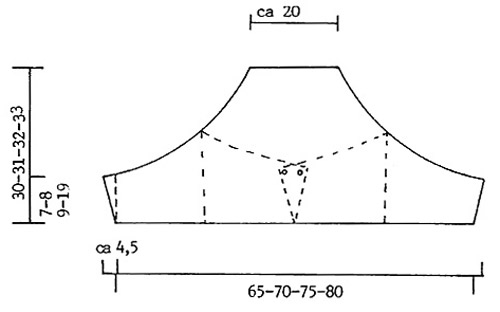
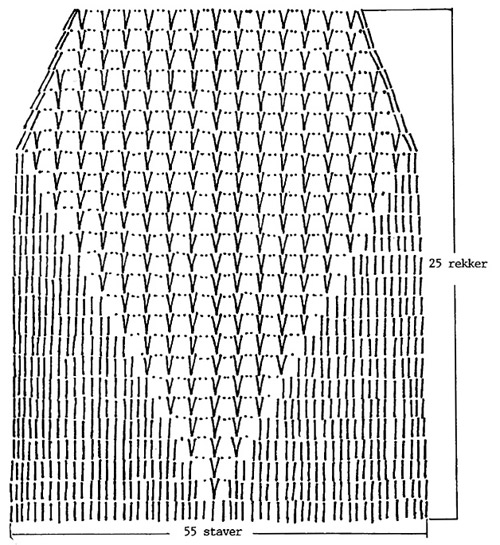
TENSIÓN DE LA MUESTRA DE GANCHILLO: 20 pts x 11 filas = 10 x 10 cm PATRÓN : Ver el diagrama. Trabajar todo el diagrama en todas las tallas. TIP PARA LA REALIZACIÓN DEL TRABAJO: Cuando se disminuye p.a. en una fila, trabajar un cadeneta en diagonal hacia arriba, hasta la sig fila para compensar los p.a. que se han dism. Cuando haya que dism 4 p.a.: al final de la fila girar, trabajar 6 p.de cad, saltar los primeros 4 p.a. de la fila y comenzar trabajando en el 5º p.a. Cuando haya que dism 3 p.a.: al final de la fila girar, trabajar 5 p.de cad, saltar los primeros 3 p.a. de la fila y comenzar trabajando en el 4º p.a. Cuando haya que dism 2 p.a.: al final de la fila girar, trabajar 4 p.de cad, saltar los primeros 2 p.a. de la fila y comenzar trabajando en el 3º p.a. ----------------------------------------------------------------------- CUERPO: Trabajar una fila de p. de cad de 170-183-196-210 pts con un ganchillo de 3 mm con beige brown. En la siguiente fila trabajar p.a sobre la fila de p.de cad como sigue: 3 p.a (sustituir el 1º p.a por 3 p.de cad), * saltar 1 p.de cad, 3 p.a *, repetir de * a * (es decir, trabajar 3 p.a sobre 4 p.de cad) hasta que queden 0-1-2-0 p.de cad, trabajar 1 p.a en cada p.de cad = 129-139-149-159 p.a. Recuerda mantener la tensión del tejido - es importante no trabajar demasiado flojo ya que la prenda es bastante pequeña y ajustada .Ahora trabajar p.a. sobre todos los pts y al mismo tiempo aum a ambos lados en cada fila: 1 p.a. a cada lado 8-9-10-11 vcs = 145-157-169-181 p.a. Ahora la labor mide aprox 7-8-9-10 cm. Ahora dism a ambos lados en cada fila - ver TIP PARA LA REALIZACIÓN DEL TRABAJO - al mismo tiempo comenzar con el diagrama - asegurate de que el diagrama queda situado en el centro de la labor - sobre los 55 p.a. centrales. Dism a ambos lados como sigue: 4 p.a. 2-3-6-8 vcs, 3 p.a. 3-7-7-7 vcs, 2 p.a. 14-9-6-5 vcs; desde aquí trabajar el resto de la labor según el diagrama. Después de completar el diagrama la labor mide aprox 30-31-32-34 cm. TERMINACIÓN: Trabajar una presilla (ojal) con aguja de ganchillo tamaño 3 mm y color blanco hueso en la parte superior de cada lado (centro de la espalda) como sigue: 1 p.a., 2 p.de cad., saltar 0.5 cm y asegurar con 1 p.a. Probarse el top para calcular la posición de los botones - 1 en la parte interior de la sección izquierda de la espalda y 1 en la parte exterior de la sección derecha. Trabajar 3 cordones con p.de cad. de aprox. 1 m de largo cada uno. Trenzarlos, hacer un nudo en cada extremo y pasar el cordón por la fila de agujeros más alta del top. |
|||||||||||||
Explicaciones del diagrama |
|||||||||||||
|
|||||||||||||
 |
|||||||||||||
 |
|||||||||||||
¿Terminaste este patrón?Entonces, etiqueta tus fotos con #dropspattern #mediterraneanlovetop o envíalas a la galería #dropsfan. ¿Necesitas ayuda con este patrón?Encontrarás 4 videos tutoriales, un espacio para comentarios/preguntas y más visitando la página del patrón en garnstudio.com © 1982-2026 DROPS Design A/S. Todos los derechos reservados. Este documento, incluyendo todas sus sub-secciones, está protegido por los derechos de autor (copyright). Lee más acerca de lo que puedes hacer con nuestros patrones en la parte de abajo de cada patrón de nuestro sitio. |
|||||||||||||


Con más de 40 años en el diseño de modelos de punto y de ganchillo, DROPS Design ofrece una de las más vastas colecciones de patrones gratuitos en el internet - traducidos en 17 idiomas. Al día de hoy, contamos con 325 catálogos y 12298 patrones - de los cuales 11698 están traducidos en español.
Nosotros trabajamos con mucho esmero para brindarte lo mejor que las labores de punto y ganchillo tienen para ofrecer,inspiración y consejos, así como hilos de magnífica calidad a precios increíbles! Te gustaría usar nuestros patrones para otro fin además del uso personal? Puedes leer acerca de lo que estás permitida a hacer en el texto de Copyright en la parte de abajo de todos nuestros patrones. Felices labores!
Escribe un comentario sobre DROPS 65-13
¡Nos encantaría saber qué piensas acerca de este patrón!
Si quieres escribir una pregunta referente al patrón, por favor asegúrate de elegir la categoría correcta en el formulario debajo, para acelerar el proceso de respuesta. Los campos obligatorios están marcados con un *.