
Categorías populares
¿Buscas un hilo?


Comentarios / Preguntas (103)
Aida escribió:
Hi as i start Dec on both sides as follows: 4 dc 2-3-6-8 times do i also start the diagram here or after i finish all of the decrease?
08.10.2015 - 10:22DROPS Design respondió:
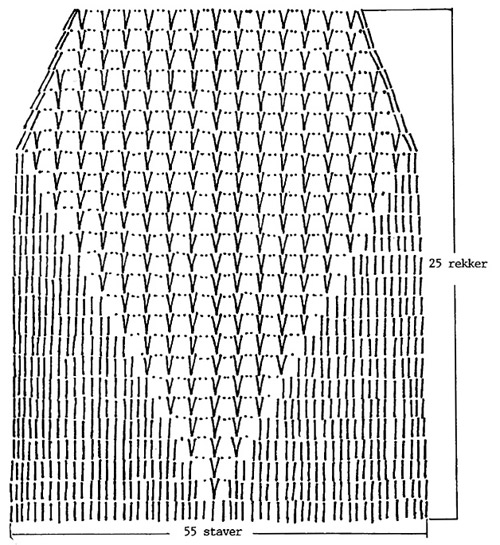
Dear Aida, start diagram when starting dec, ie at the same time as you start dec, the diagram is worked over the center 55 dc. Happy crocheting!
08.10.2015 - 17:23Carol escribió:
Why do you not have a video for the complete pattern.so we can look at the video like on youtube. Thank you.
26.07.2015 - 10:48DROPS Design respondió:
Dear Carol. It's not possible for us to publish videos of a complete pattern, we only make on techniques, stitches and pattern diagrams. If you need help with a specific part of the pattern, we will take a look at it.
27.07.2015 - 15:34
![]() Studer Brigitta escribió:
Studer Brigitta escribió:
Hallo, das Abnehmen auf der linken Seite ist nicht beschrieben! Wie muss das gemacht werden mit den Luftmaschen? Diese Anleitung ist recht spärlich beschrieben, könnte eine Auffrischung brauchen.
21.07.2015 - 06:54DROPS Design respondió:
Die Abnahmen werden beidseitig gemacht, d.h. immer am Anfang jeder R. Die Anleitung wurde neu übersetzt und ist nun hoffentlich etwas deutlicher, ansonsten fragen Sie gerne noch einmal nach. Gutes Gelingen!
28.07.2015 - 16:56
![]() Summer escribió:
Summer escribió:
How would you instead of having a button connect it in the back?
04.07.2015 - 04:56DROPS Design respondió:
Dear Summer, you can make 2 twisted strings or a ch and sew them at each end of piece then cross them and tie them with a knot. A button may be a good idea to hold both pieces tog. Happy crocheting!
04.07.2015 - 09:27
![]() Tam escribió:
Tam escribió:
I don't understand the part that inc 1 dc on each side every row 8 times . That mean I'm do inc 8 times the hold row 1 from beginning 1 the end and another 6 during the row ????
24.06.2015 - 18:27DROPS Design respondió:
Dear Tam, you inc 1 st at the beg + 1 st at the end of row (= 2 sts inc per row) for 8 rows (1st size) = you have a total of 145 sts on row 9. Happy crocheting!
25.06.2015 - 10:24
![]() Stephanie escribió:
Stephanie escribió:
After reading pattern and looking at the diagram for drops 65-13 pattern I don't understand the instructions right above the chart
04.06.2015 - 16:46DROPS Design respondió:
Dear Stephanie, you will find above measurement chart all diagram text, 1 symbol represent 1 st / 1 group of st - read more about diagrams here. Happy crocheting!
05.06.2015 - 09:48
![]() Pam escribió:
Pam escribió:
I have just got rolling with no problem.Rows 2 through 9-10-11-12: 1 dc in each dc from the previous row--at the same time, inc 1 dc on each side every row 8-9-10-11 times. What does 8-9-10-11 times mean. It doesn't make sense to me. Does it mean to increase row 3 through row 12 ? Maybe if you clear up if I am understanding this part I will be able to get through the decreasing also.
09.04.2015 - 07:50DROPS Design respondió:
Dear Pam, this refers to the size, eg in 1st size, you work rows 2 through row 9, inc every row 8 times (in 2nd size through row 10, inc 9 times etc..). Happy crocheting!
09.04.2015 - 09:56
![]() Kathy escribió:
Kathy escribió:
Hi, this is a beautiful pattern, I've been trying to do the math of the pattern in my head after reading through the comments below. From my understanding, to dec on both sides takes 2 rows (so for example: dec 4 dc, size S = 6 rows in total). But with that, there would be a total of 38 rows of dec yet the chart only shows 25 rows. What am doing wrong?
03.04.2015 - 04:32DROPS Design respondió:
Dear Kathy, you decrease at the beg and at the end of every row, ie to dec 4dc, work as stated under crocheting tip, (skip first 4 dc at beg of row ...) and at the end of same row, turn when 4 dc remain before the end of row = you have decreased 4 dc each side on the same row. Happy crocheting!
03.04.2015 - 09:22
![]() Maria escribió:
Maria escribió:
Thanks for you reply but I need further clarification. I'm crocheting size small, have completed the 145 dc's. According to the instructions I'm supposed to start decreasing on both sides on every row, meaning that I have to start decreasing 4 dc's at the beginning of the row by chaining 6 and starting working on the 5th chain, how do I decrease the 4 dc's at the end of the same row? If I do what you suggest in your answer I'll be only decreasing 4 dc's at only one end of the row.
24.03.2015 - 21:38DROPS Design respondió:
Dear Maria, (answer edited) to dec 4 dc work 1 row as stated: turn at the end of row, ch 6, skip 4 dc and work in 5th dc on row and work remaining sts on row until 4 sts remain (= you have decreased 4 dc each side), turn and work next decrease. Repeat how many times required in pattern (and continue same way (see crocheting tip) when dec 3 dc and 2 dc each side. Happy crocheting!
25.03.2015 - 09:01
![]() Maria escribió:
Maria escribió:
Beautiful pattern but need help to continue working on it. Would you please clarify the decreasing (dec) instructions. The pattern calls for dec on both sides of every row, but the directions under Crocheting tip refer only to the end of the row. The same doesn't work for the beginning of the row. Thanking you in advance, María
23.03.2015 - 23:27DROPS Design respondió:
Dear Maria, (answer edited) when you have worked the row with dec at the end of the first row, turn work when the number of sts remain before end of row. Happy crocheting!
24.03.2015 - 09:31
|
|||||||||||||
Mediterranean Love Top#mediterraneanlovetop |
|||||||||||||
 |
 |
||||||||||||
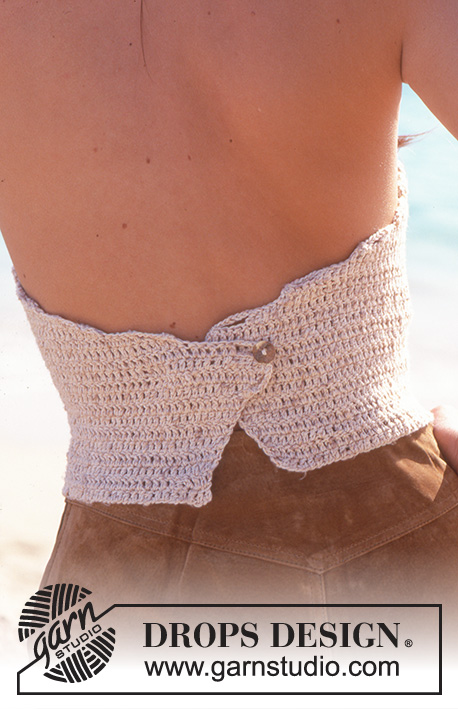
Top de ganchillo DROPS con la espalda descubierta en Safran
DROPS 65-13 |
|||||||||||||
|
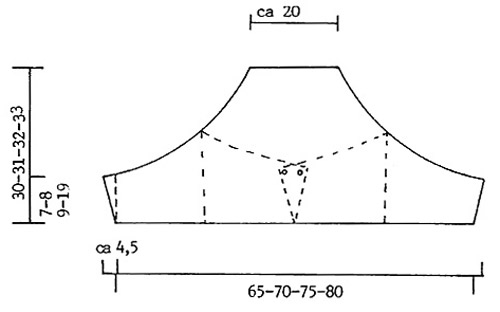
TENSIÓN DE LA MUESTRA DE GANCHILLO: 20 pts x 11 filas = 10 x 10 cm PATRÓN : Ver el diagrama. Trabajar todo el diagrama en todas las tallas. TIP PARA LA REALIZACIÓN DEL TRABAJO: Cuando se disminuye p.a. en una fila, trabajar un cadeneta en diagonal hacia arriba, hasta la sig fila para compensar los p.a. que se han dism. Cuando haya que dism 4 p.a.: al final de la fila girar, trabajar 6 p.de cad, saltar los primeros 4 p.a. de la fila y comenzar trabajando en el 5º p.a. Cuando haya que dism 3 p.a.: al final de la fila girar, trabajar 5 p.de cad, saltar los primeros 3 p.a. de la fila y comenzar trabajando en el 4º p.a. Cuando haya que dism 2 p.a.: al final de la fila girar, trabajar 4 p.de cad, saltar los primeros 2 p.a. de la fila y comenzar trabajando en el 3º p.a. ----------------------------------------------------------------------- CUERPO: Trabajar una fila de p. de cad de 170-183-196-210 pts con un ganchillo de 3 mm con beige brown. En la siguiente fila trabajar p.a sobre la fila de p.de cad como sigue: 3 p.a (sustituir el 1º p.a por 3 p.de cad), * saltar 1 p.de cad, 3 p.a *, repetir de * a * (es decir, trabajar 3 p.a sobre 4 p.de cad) hasta que queden 0-1-2-0 p.de cad, trabajar 1 p.a en cada p.de cad = 129-139-149-159 p.a. Recuerda mantener la tensión del tejido - es importante no trabajar demasiado flojo ya que la prenda es bastante pequeña y ajustada .Ahora trabajar p.a. sobre todos los pts y al mismo tiempo aum a ambos lados en cada fila: 1 p.a. a cada lado 8-9-10-11 vcs = 145-157-169-181 p.a. Ahora la labor mide aprox 7-8-9-10 cm. Ahora dism a ambos lados en cada fila - ver TIP PARA LA REALIZACIÓN DEL TRABAJO - al mismo tiempo comenzar con el diagrama - asegurate de que el diagrama queda situado en el centro de la labor - sobre los 55 p.a. centrales. Dism a ambos lados como sigue: 4 p.a. 2-3-6-8 vcs, 3 p.a. 3-7-7-7 vcs, 2 p.a. 14-9-6-5 vcs; desde aquí trabajar el resto de la labor según el diagrama. Después de completar el diagrama la labor mide aprox 30-31-32-34 cm. TERMINACIÓN: Trabajar una presilla (ojal) con aguja de ganchillo tamaño 3 mm y color blanco hueso en la parte superior de cada lado (centro de la espalda) como sigue: 1 p.a., 2 p.de cad., saltar 0.5 cm y asegurar con 1 p.a. Probarse el top para calcular la posición de los botones - 1 en la parte interior de la sección izquierda de la espalda y 1 en la parte exterior de la sección derecha. Trabajar 3 cordones con p.de cad. de aprox. 1 m de largo cada uno. Trenzarlos, hacer un nudo en cada extremo y pasar el cordón por la fila de agujeros más alta del top. |
|||||||||||||
Explicaciones del diagrama |
|||||||||||||
|
|||||||||||||
 |
|||||||||||||
 |
|||||||||||||
¿Terminaste este patrón?Entonces, etiqueta tus fotos con #dropspattern #mediterraneanlovetop o envíalas a la galería #dropsfan. ¿Necesitas ayuda con este patrón?Encontrarás 4 videos tutoriales, un espacio para comentarios/preguntas y más visitando la página del patrón en garnstudio.com © 1982-2026 DROPS Design A/S. Todos los derechos reservados. Este documento, incluyendo todas sus sub-secciones, está protegido por los derechos de autor (copyright). Lee más acerca de lo que puedes hacer con nuestros patrones en la parte de abajo de cada patrón de nuestro sitio. |
|||||||||||||


Con más de 40 años en el diseño de modelos de punto y de ganchillo, DROPS Design ofrece una de las más vastas colecciones de patrones gratuitos en el internet - traducidos en 17 idiomas. Al día de hoy, contamos con 325 catálogos y 12298 patrones - de los cuales 11698 están traducidos en español.
Nosotros trabajamos con mucho esmero para brindarte lo mejor que las labores de punto y ganchillo tienen para ofrecer,inspiración y consejos, así como hilos de magnífica calidad a precios increíbles! Te gustaría usar nuestros patrones para otro fin además del uso personal? Puedes leer acerca de lo que estás permitida a hacer en el texto de Copyright en la parte de abajo de todos nuestros patrones. Felices labores!
Escribe un comentario sobre DROPS 65-13
¡Nos encantaría saber qué piensas acerca de este patrón!
Si quieres escribir una pregunta referente al patrón, por favor asegúrate de elegir la categoría correcta en el formulario debajo, para acelerar el proceso de respuesta. Los campos obligatorios están marcados con un *.