
Categorías populares
¿Buscas un hilo?


Comentarios / Preguntas (34)
![]() Andrea escribió:
Andrea escribió:
Hola. Los patrones solo muestra la hilera del derecho si hay dos filas de cuadros en blanco osea dos filas del derecho en total son 4 hileras osea dos al derecho y dos al reves o muestra una hilara del derecho y la otra es la tejida al reves ... El dibujo noe calza es punto abanico el patron A 1
15.11.2025 - 23:11DROPS Design respondió:
Hola Andrea, el diagrama muestra todas las filas del patrón (tanto por el lado derecho como por el lado revés) como vistas por el lado derecho. Es decir, una fila del patrón será por el lado derecho, leyéndose de derecha a izquierda, mientras que la siguiente fila, por el lado revés, se lee en la dirección opuesta (de izquierda a derecha) y los puntos, aunque sean del mismo símbolo, se trabajan de forma opuesta, como se indica en el diagrama (p.e, derecho por el lado derecho, revés por el lado revés).
14.12.2025 - 20:59
![]() Patricia Psotka-Sarmini escribió:
Patricia Psotka-Sarmini escribió:
Gemäss der Erläuterungen wurden die Diagramme A2 und A3 zweimal korrigiert. Ist in der Anleitung jetzt das neuste Diagramm abgebildet? Oder muss man eine andere Anleitung benutzen?
18.09.2024 - 21:07DROPS Design respondió:
Liebe Frau Psotka-Sarmini, wenn Sie die Anleitung nach dem Korrektur-Datum gedruckt haben, dann haben Sie die richtige Diagramme. Viel Spaß beim Stricken!
19.09.2024 - 09:29
![]() Marine escribió:
Marine escribió:
Bonjour . Je ne comprends pas très bien le calcul: après les 33 mailles de diminution il reste 351 ( xxl) comment peut on faire 9 x A2 et A3 plus 10 mailles de la boutonnière ( total 34+35+10 = 79 mailles ( 351:79= 4,44??) mon dernier dessin ne sera pas complet . Merci pour votre réponse
20.04.2022 - 09:23DROPS Design respondió:
Bonjour Marine, tricotez ainsi: 5 m de bordure devant, 9 x les 34 m de A.2 (= 306 mailles), les 35 m de A.3 et 5 m de bordure devant soit: 5+306+35+5=351 mailles. Bon tricot!
20.04.2022 - 13:33
![]() Angelika Wolf escribió:
Angelika Wolf escribió:
Hallo, ich habe eine Frage zum Muster A2: In der 15. Reihe soll ich nach den Blendenmaschen 2 rechte Maschen stricken und dann das Muster von A2 stricken. Muss ich auch bei den anderen Wiederholungen in der 15. Reihe immer 2 rechte Maschen stricken?
21.03.2022 - 22:41DROPS Design respondió:
Liebe Frau Wolf, so stricken Sie nur am Anfang der Reihe, dh bei der ersten A.2 der Reihe, dann stricken Sie die letzte Masche in A.2 mit den 2 ersten Maschen vom nächsten A.2 / und dann A.3 zusammen. Viel Spaß beim stricken!
22.03.2022 - 10:23
![]() Marine escribió:
Marine escribió:
Vous avez très bien expliqué ( cela m’aidera après le cardigan) mais cest moi qui me suis trompée de drop . c’est pour le Summer swing cardigan 178/31 ou il y a une étoile dans le A2 ligne 15 et ligne 56 . Merci encore pour vos explications .
28.02.2022 - 12:03DROPS Design respondió:
Bonjour Marine et merci, là je vois l'étoile :) Lorsque vous tricotez ce rang, vous allez devoir ajuster le début du 1er motif: tricotez 2 mailles endroit (les 2 cases qui manquent) lorsque vous tricotez le diagramme la 1ère fois, puis, à la fin du diagramme, tricotez la dernière maille avec les 2 mailles du A.2suivant/de A.3 (= les 2 mailles qui manquent au début). Bon tricot!
28.02.2022 - 13:42
![]() Ruth Bealer escribió:
Ruth Bealer escribió:
I need some clarification. I'm on the yoke and have put the sleeves on the needle and inserted the marker. When I continue in stockinette and garter stitch , am I knitting the sleeves at this point. in A4pattern? Also with the reglan decrease-If I go up to the marker, I will eb reducing the stitches in the sleeve each time, I don't understand how I get to the138 Stitches. thank you for your time. I love this pattern and have had no problem up to this point. Ruth Bealer
19.05.2021 - 20:53DROPS Design respondió:
Dear Ruth, after you put together the sleeves and the body, and continue to knit the cardivan in one piece, you should knit in stockinett stitch and garter stitch only on teh button babnds. A.1 pattern is only for the edge of the sleeves and the neckline. You have not stated which size, but from teh 138 stitches I am guessing M. For raglan decreases see the explanations in the pattern, in eevery other row you are decreasing 8 stitches 25 times. You start with 338 stitches - (8X25 = 200)= 138 stitches. Happy Knitting
20.05.2021 - 00:38
![]() Beverley escribió:
Beverley escribió:
On diagram A2, row 51 you have 32 stitches which reduces by 1 stitch. On the next row, it is shown to be reduced by 2 stitch’s ? When I go to stitch row 53, I have 1 extra stitch ?
02.04.2020 - 10:14DROPS Design respondió:
Dear Beverly, diagram A.2 will be checked, but it might take some time sorry in advance. Continue diagram as shown to get the lace pattern coming in a triangle so that the lace pattern continue from previous row - the number of sts on each side of the lace pattern/decreases might then be different on the next 2 rows. Happy knitting!
02.04.2020 - 12:50
![]() Beverley escribió:
Beverley escribió:
Just about to start this on the jacket and it says “ Work as follows from WS: Work 5 band stitches in GARTER STITCH - see explanation above, work A.1 (= 21 stitches) 16-16-18-20-22-24 times, finish with 5 band stitches in garter stitch.” Do i start on the WS after cast on? Does this mean I start with my first row of A1 after cast on with Knit? It is not clear why my first row should start with “WS”?
19.03.2020 - 22:38DROPS Design respondió:
Dear Beverly, after casting on, you should knit the first row, according to the first row of the diagram and go from there. However, the side, from which you knitted the first row, will be the wrong side of the sweater, the feather and fan pattren's right side will be on the other side (the right side) of teh sweater. I hope this helps. Happy Knitting!
19.03.2020 - 22:55
![]() Mrs Stephanie Greenside escribió:
Mrs Stephanie Greenside escribió:
Hi, I am not a fan of garter stitch, has anyone tried a seed or moss stitch. I would really have to play with the increases and decreases, using another stitch but I don't know if it is possible with this pattern?
31.12.2019 - 20:04DROPS Design respondió:
Dear Mrs Greenside, except if I'm misunderstanding your question, garter stitch is here used most in the front band edges + bottom of sleeve + in the diagram (this sections in garter stitch shouldn't been removed). Hope this can help. Do not hesitate to contact your DROPS store - even per mail or telephone - for any individual assistance. Happy knitting!
02.01.2020 - 14:13
![]() Leigh escribió:
Leigh escribió:
Hi, please can you tell me if it is possible to make this pattern long sleeve? Thanks a lot Leigh
21.12.2019 - 08:06DROPS Design respondió:
Dear Leigh, Yes, you can make this with long sleeves. to do so, instead of the sleeve edges, you sould knit sleeves, until the underarm, and put them on the needles woth the stotches of the body (where you cast off teh stitches for the armhole) and continue according to the pattern. Be careful to have the sleeves end up with as many stitches as the sleeve edges would, befre putting them together with the other stitches. Happy Knitting!
24.12.2019 - 17:24
|
||||||||||||||||||||||
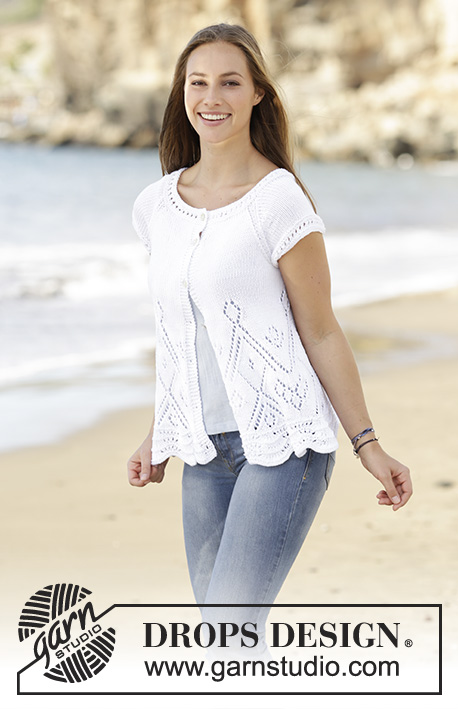
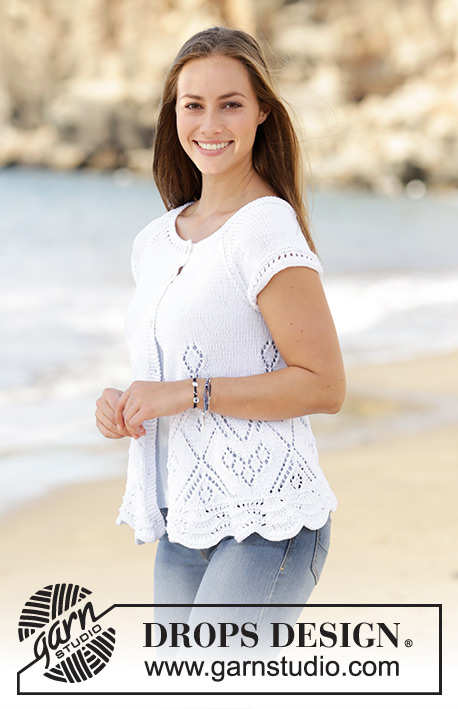
Summer Swing Cardigan#summerswingcardigan |
||||||||||||||||||||||
 |
 |
|||||||||||||||||||||
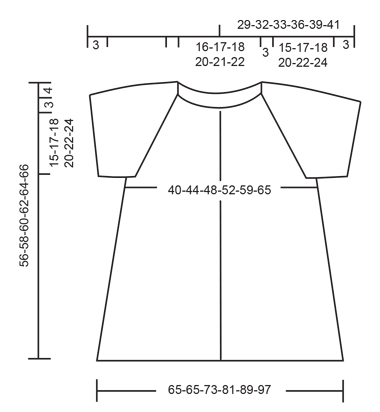
Chaqueta con patrón de calados y raglán, tejido de abajo para arriba en DROPS Muskat. Talla: S – XXXL.
DROPS 178-31 |
||||||||||||||||||||||
|
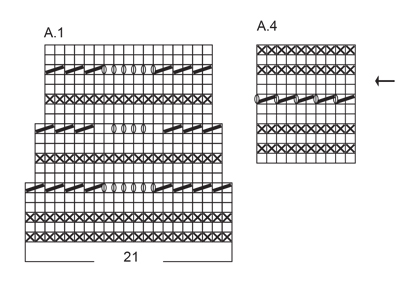
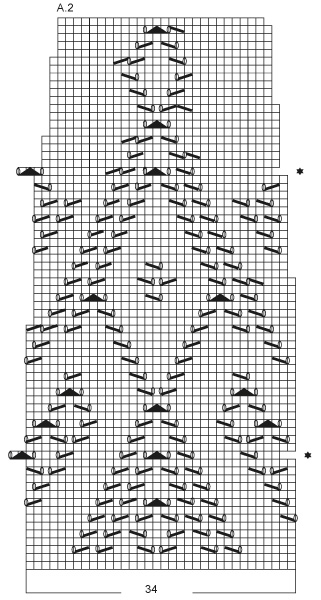
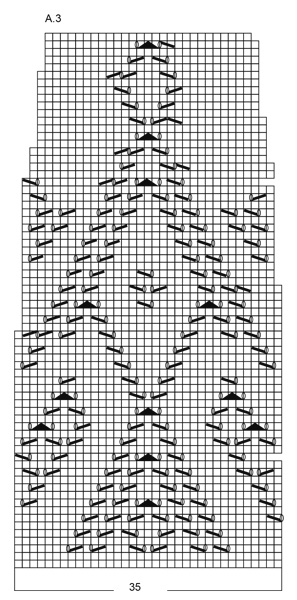
PUNTO MUSGO (de ida y vuelta): Tejer todas las hileras de derecho. 1 surco = 2 hileras tejidas de derecho. PATRÓN: Ver diagramas A.1 a A.4. Los diagramas muestran todas las hileras en el patrón vistas por el lado derecho. TIP PARA DISMINUIR: Para calcular cómo disminuir equitativamente, usar el número total de puntos en la hilera (p. ej. 282 puntos), menos los bordes delanteros (10 puntos) y dividir los puntos restantes entre el número de disminuciones a hacer (p. ej. 33) = 8.5. Es decir, en este ejemplo, tejer alternadamente aprox cada 7º y 8º punto y cada 8º y 9º punto juntamente (no disminuir sobre los bordes delanteros). RAGLÁN: Disminuir de la manera siguiente: Comenzar 3 puntos antes del hilo marcador: tejer 2 puntos juntamente de derecho, 2 puntos derechos (el hilo marcador está entre estos puntos), deslizar 1 punto como de derecho, 1 derecho, pasar el punto deslizado por encima del punto tejido (= 8 puntos disminuidos en la hilera). OJALES: Disminuir para los ojales en el borde delantero derecho. 1 ojal = comenzar por el lado revés y tejer hasta que resten 2 puntos en la aguja en dirección del centro del frente, hacer 2 lazadas y tejer los últimos 2 puntos de derecho. Virar la pieza, tejer 1 punto derecho, tejer el punto siguiente juntamente de derecho con la primera lazada, tejer la segunda lazada juntamente de derecho con el punto siguiente, después continuar como antes. Disminuir para los ojales cuando la pieza mida: Talla S: 2, 10, 18, 26, 34, 42 y 50 cm Talla M: 3, 12, 20, 28, 36, 44 y 52 cm Talla L: 3, 12, 21, 30, 38, 46 y 54 cm Talla XL: 2, 11, 20, 29, 38, 47 y 56 cm Talla XXL: 3, 13, 22, 31, 40, 49 y 58 cm Talla XXXL: 3, 13, 23, 33, 42, 51 y 60 cm ----------------------------------------------------- CHAQUETA: Tejer la pieza de ida y vuelta en aguja circular. Tejer la orilla de las mangas en redondo en agujas de doble punta. Montar 346-346-388-430-472-514 puntos en aguja circular tamaño 4 mm con Muskat. RECORDARSE DE LOS OJALES! Tejer de la manera siguiente por el lado revés: Tejer 5 puntos del borde delantero en PUNTO MUSGO – ver explicación arriba, tejer A.1 (= 21 puntos) 16-16-18-20-22-24 veces, terminar con 5 puntos del borde delantero en punto musgo. Cuando se ha tejido todo el diagrama A.1 verticalmente, restan 282-282-316-350-384-418 puntos en la aguja. Tejer 1 hilera de derecho por el lado revés y, al mismo tiempo, disminuir 33 puntos distribuidos equitativamente – LEER TIP PARA DISMINUIR (distribuidos equitativamente) = 249-249-283-317-351-385 puntos. RECORDARSE DE MANTENER LA MISMA TENSIÓN DE TEJIDO DE LA MUESTRA! Después tejer de la manera siguiente por el lado derecho: Tejer 5 puntos del borde delantero en punto musgo, tejer A.2 (= 34 puntos) 6-6-7-8-9-10 veces, tejer A.3 (= 35 puntos), terminar con 5 puntos del borde delantero en punto musgo. Continuar este patrón y disminuir como se muestra en los diagramas. Cuando se ha tejido todo el diagrama A.2 y A.3 verticalmente, restan 193-193-219-245-271-297 puntos en la aguja. Tejer 1 hilera de derecho por el lado derecho ajustando el número de puntos a 178-194-210-230-258-282 (es decir, en la talla M aumentar 1 punto. En las tallas S, L, XL, XXL y XXXL disminuir 15-9-15-13-15 puntos distribuidos equitativamente). Continuar en punto jersey con punto musgo en el borde delantero. Cuando la pieza mida 34-34-35-35-35-35 cm, tejer la hilera siguiente por el lado derecho de la manera siguiente: Tejer los primeros 43-47-50-55-61-66 puntos (= pieza del frente), rematar los 8-8-10-10-12-14 puntos siguientes para la sisa, tejer los 76-84-90-100-112-122 puntos siguientes (= pieza de la espalda), rematar los 8-8-10-10-12-14 puntos siguientes, tejer los 43-47-50-55-61-66 puntos restantes (pieza del frente). Dejar la pieza a un lado y tejer la orilla de las mangas. ORILLA DE LAS MANGAS: Tejer la orilla de las mangas en redondo en agujas de doble punta. Montar 68-76-84-88-92-98 puntos en agujas de doble punta tamaño 3.5 mm con Muskat. Tejer A.4 en redondo. Cuando se ha tejido A.4 verticalmente, tejer la vuelta siguiente de la manera siguiente: Rematar los primeros 8-8-10-10-12-14 puntos (= bajo las mangas), tejer de derecho sobre los puntos restantes y disminuir 1-0-0-0-0-1 punto distribuido equitativamente = 59-68-74-78-80-83 puntos. Dejar la pieza a un lado y tejer una otra orilla de manga de la misma manera. CANESÚ: Deslizar las orillas de las mangas en la misma aguja circular del cuerpo donde las sisas fueron rematadas = 280-314-338-366-394-420 puntos. Insertar 1 hilo marcador en todas las transiciones entre las mangas y el cuerpo (= 4 hilos marcadores). Continuar en punto jersey y en punto musgo como antes y, AL MISMO TIEMPO, en la 1ª hilera por el lado derecho, comenzar a disminuir para el RAGLÁN – ver explicación arriba. Disminuir de esta manera a cada 2 hileras (cada hilera por el lado derecho) 21-23-25-28-30-33 veces en total = 112-130-138-142-154-156 puntos. Cambiar a una aguja circular corta tamaño 3.5 mm. Tejer A.4 con 5 puntos del borde delantero en punto musgo a cada lado. En la hilera marcada con flecha en el diagrama, disminuir 2-14-18-16-24-20 puntos distribuidos equitativamente (no disminuir sobre los bordes delanteros) = 110-116-120-126-130-136 puntos. Rematar cuando se ha tejido A.4 una vez verticalmente. ENSAMBLAJE: Coser los agujeros bajo las mangas. Coser los botones en el borde delantero izquierdo. Cortar y rematar el hilo. |
||||||||||||||||||||||
Explicaciones del diagrama |
||||||||||||||||||||||
|
||||||||||||||||||||||
 |
||||||||||||||||||||||
 |
||||||||||||||||||||||
 |
||||||||||||||||||||||
 |
||||||||||||||||||||||
¿Terminaste este patrón?Entonces, etiqueta tus fotos con #dropspattern #summerswingcardigan o envíalas a la galería #dropsfan. ¿Necesitas ayuda con este patrón?Encontrarás 26 videos tutoriales, un espacio para comentarios/preguntas y más visitando la página del patrón en garnstudio.com © 1982-2026 DROPS Design A/S. Todos los derechos reservados. Este documento, incluyendo todas sus sub-secciones, está protegido por los derechos de autor (copyright). Lee más acerca de lo que puedes hacer con nuestros patrones en la parte de abajo de cada patrón de nuestro sitio. |
||||||||||||||||||||||


Con más de 40 años en el diseño de modelos de punto y de ganchillo, DROPS Design ofrece una de las más vastas colecciones de patrones gratuitos en el internet - traducidos en 17 idiomas. Al día de hoy, contamos con 324 catálogos y 12290 patrones - de los cuales 11685 están traducidos en español.
Nosotros trabajamos con mucho esmero para brindarte lo mejor que las labores de punto y ganchillo tienen para ofrecer,inspiración y consejos, así como hilos de magnífica calidad a precios increíbles! Te gustaría usar nuestros patrones para otro fin además del uso personal? Puedes leer acerca de lo que estás permitida a hacer en el texto de Copyright en la parte de abajo de todos nuestros patrones. Felices labores!
Escribe un comentario sobre DROPS 178-31
¡Nos encantaría saber qué piensas acerca de este patrón!
Si quieres escribir una pregunta referente al patrón, por favor asegúrate de elegir la categoría correcta en el formulario debajo, para acelerar el proceso de respuesta. Los campos obligatorios están marcados con un *.