
Categorías populares
¿Buscas un hilo?


Comentarios / Preguntas (33)
![]() Louise escribió:
Louise escribió:
Jag blir inte klok på er beskrivning! Den är rörig som bara den. Jag har satt markörer på 4 ställen men det blir ca 25cm över när de är satta. Är det fel i beskrivningen eller är detta tänkt till något annat? Är det själva halsen det beskrivs så är de helt fel på var 9e maska. Sedan undrar jag även över ökningen. Jag har ökat 8st med en på var sida omslag, men ska jag nu fortsätta göra det vartannat varv eller 4st på 6 varv? Så förvirrande!
05.04.2020 - 15:09DROPS Design respondió:
Hej Louise, ... forstår ikke hvad du mener med at det bliver 25 cm över.... Vi skal prøve at forklare men skal vide hvilken størrelse du vil strikke
21.04.2020 - 12:09
![]() Chelo escribió:
Chelo escribió:
Hola, sus patrónes son muy buenos pero muchos modelos vienen sin diagrama, pueden decirme como descagarlos?. Muchas gracias
17.11.2019 - 16:52DROPS Design respondió:
Hola Chelo. Bajo los materiales tienes un botón IMPRIMIR para descargar e imprimir gratis.
17.11.2019 - 18:46
![]() Eva escribió:
Eva escribió:
I am sorry to bother you again regarding this pattern please help me. I am at the stage of having knitted 160 sts and piece measures 44cm. Instruction stating to divide pieces back, front, and sleeves, which I did and cut the yarn as instructions. Now I need to work the back piece inc. every RS row 3 times = only 6 rows. If I do that the whole thing will not be long enough as an extra 6 rows will give appx 2" so it will be a neck warmer not a poncho, as I cut the yarn when it reached 44cm.
15.09.2018 - 20:57DROPS Design respondió:
Dear Eva, make sure your tension is right you should have 10 rows in seed stitch = 4" in height - and check your measurements with the measurement chart at the bottom of the pattern. Happy knitting!
17.09.2018 - 08:49
![]() Eva escribió:
Eva escribió:
I am still very confused, please help me I have started the poncho 4 times now Ie. On the first increase row when increasing 1 stitch on either side of the marker I keep getting the moss stitch muddled up and each time I am getting either 2 Knit or 2 Purl stitch together. (Somehow the numbers don't add up. Ie. start Knit one, p,k,p,k =...9 stitches put a marker on the 10th Knitt stitch, then p,k,p,k ..9, and put marker On next knitt stitch as instruction, )
13.09.2018 - 18:20DROPS Design respondió:
Dear Eva, the marker should be in one stitch, you will then increase in moss stitch before this stitch with marker (= P or K this stitch depending on your last st worked), knit the stitch with marker and increase in moss stitch after the stitch with marker (K or P this stitch depending on how you have to work the next stitch). This way, you may have K2 at the marker (including the st with marker) but on next round, the st with marker will be K and the other K will be worked P in moss st. Happy knitting!
14.09.2018 - 08:13
![]() Eva escribió:
Eva escribió:
Please help me, I am struggling to work out the gauge for this poncho because I am about to use ESKIMO yarn where the tension is 11 st & 15 rows in 10 cm knitted with size 8 mm needles. This poncho's tension is 7 st 10 rows in 10 cm. I don't know what to do should I double the yarn and needle size, or use the largest size to achieve the small size poncho? in that case how much yarn would I need to complete a s/m size poncho? I very much appreciate your help.
11.09.2018 - 14:20DROPS Design respondió:
Dear Eva, DROPS Cloud was yarn group E as Eskimo, ie you should get the same tension with 1 strand Eskimo - adjust the needle size if necessary. Happy knitting!
11.09.2018 - 14:41
![]() Mona escribió:
Mona escribió:
Hei. Hvis jeg skal benytte polaris i denne oppskriften, hvor mange nøster må jeg beregne? Og hvilken pinne størrelse bør jeg benytte?
31.08.2018 - 17:04DROPS Design respondió:
Hei Mona, Når du bruker et annet garn enn det i oppskriften, kan du bruke vår garnkalkulator. Det er også lurt å strikke en prøvelapp på 10 x 10 cm for å se om du har riktige strikkefasthet og riktige pinne størrelse. God fornøyelse!
01.09.2018 - 12:22Isabel Valenzuela Giovanetti escribió:
Terminé el poncho pero no sé hasta donde hay quecoser los costados. Si llego muy arriba queda muy estrecho.
25.05.2018 - 00:27Maria Cristina escribió:
No se tejer con agujas circulares ,hay alguna forma de convertirlo para tejer con agujas derechas gracias
16.05.2018 - 12:33DROPS Design respondió:
Hola María Cristina, sí, muchos de los patrones de DROPS se pueden trabajar con 2 agujas, pero tienes que hacer los cálculos adicionales tú misma o acudir a una tienda de DROPS para que te ayuden.
20.05.2018 - 19:31Susanne escribió:
I have knitted this sweater the end of the Back Piece instructions. I have not yet cast off though because the picture appears that the sweater is decreased to a point in the front and back yet the instructions have no mention of any decreasing....how then are the points formed? Your assistance is appreciated.
02.04.2018 - 23:02DROPS Design respondió:
Dear Suzanne, poncho is worked top down increasing in the middle of back and front piece. When working back piece back and forth, continue increasing in the middle of back piece as you did before, this will create the tip in the middle. Happy knitting!
03.04.2018 - 10:07
![]() Jette Andersen escribió:
Jette Andersen escribió:
Hej Drops. Er det rigtigt at man skal strikke rundt med 32 m på en 60 cm lang rundpind, det syntes jeg er umuligt. Venlig hilsen Jette
02.01.2018 - 14:08DROPS Design respondió:
Hei Jette. Dert skal strikkes med dobbelt tråd eller 4-dobbelt tråd, slik at det blir en ganske "tykk" tråd. Men det går fint å bruke en 60 cm lang rundpinne. God Fornøyelse!
03.01.2018 - 11:32
|
|
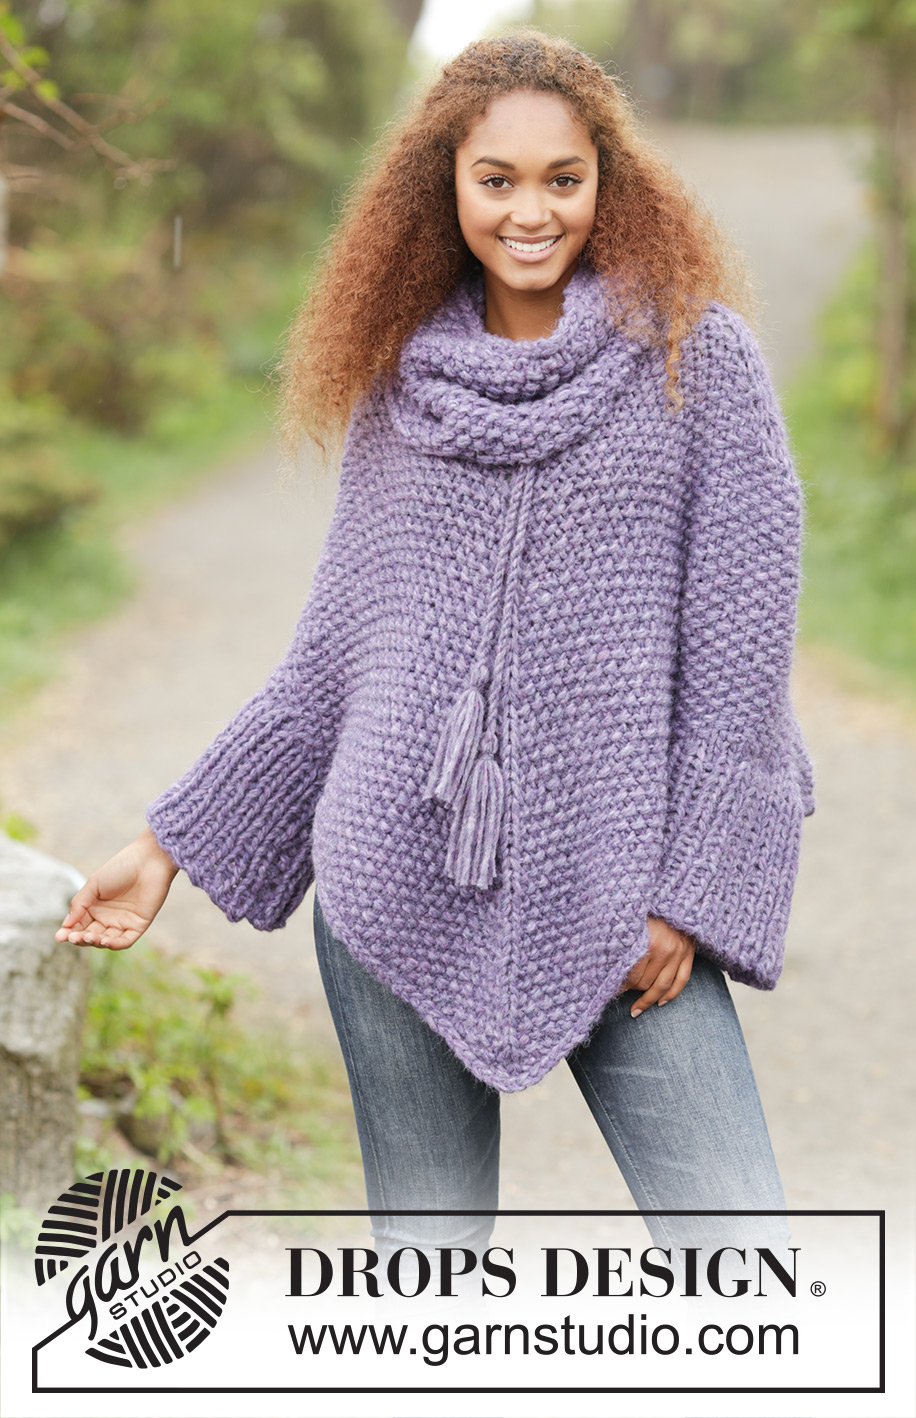
Lavender Grove#lavendergroveponcho |
|
|
|
|
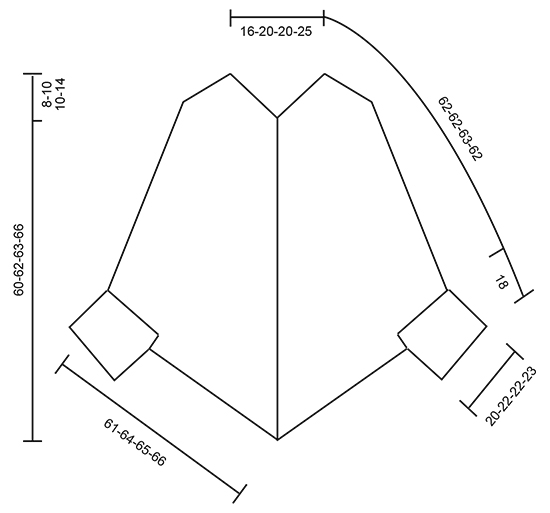
Poncho de punto DROPS en punto de arroz, cuello removible, tejido de arriba para abajo en 2 hilos Cloud o 4 hilos Air. Talla: S – XXXL.
DROPS 172-25 |
|
|
PT MUSGO (tejido en redondo): 1 surco = 2 vtas. * 1 vta de derecho y 1 vta de revés *, repetir de *a*. PT MUSGO (de ida y vuelta): Tejer todas las hileras de derecho. 1 surco = 2 hileras tejidas de derecho. PT DE ARROZ: Vuelta/hilera 1: * 1 d, 1 r *, repetir de *a* y terminar con 1 d. Vuelta/hilera 2: derecho sobre revés y revés sobre derecho. Repetir la 2ª vuelta/hilera. TIP PARA AUMENTAR: Primero aumentar 8 pts en la vta. Cuando los aumentos en cada hombro/lado estén hechos, aumentar 4 pts en la vta. Aumentar 1 pt haciendo una HEB (lazada). En la vta siguiente, tejer la HEB retorcida para evitar que se formen agujeros. Tejer la HEB retorcida de derecho o retorcida de revés para que los nuevos pts calcen en el pt de arroz. ------------------------------------------------------ PONCHO: Tejido en redondo en ag circular, de arriba para abajo. Montar 32-40-40-48 pts con 2 hilos Cloud o 4 hilos Air en ag circular tamaño 15 mm. Tejer 1 surco en PT MUSGO – ver explicación arriba. Tejer la vta siguiente de la manera siguiente: * 2 pjd, 1 HEB *, repetir de *a* el resto de la vta. En la vta siguiente, tejer todos los pts y las HEBs de derecho para crear agujeros. Ahora insertar 4 marcapuntos en la pieza y tejer el patrón de la manera siguiente: 1 d, insertar el 1er marcapuntos en este pt (= hombro derecho/lado), tejer PT DE ARROZ – ver explicación arriba, sobre los 7-9-9-11 pts siguientes, 1 d, insertar el 2º marcapuntos en este pt (= centro del frente), pt de arroz sobre los 7-9-9-11 pts siguientes, 1 d, insertar el 3er marcapuntos en este pt (= hombro izquierdo/lado), pt de arroz sobre los 7-9-9-11 pts siguientes, 1 d, insertar el 4º marcapuntos en este pt (= centro de la espalda), tejer pt de arroz sobre los 7-9-9-11 pts restantes. Continuar de esta manera en redondo. En la vta siguiente, aumentar 1 pt a cada lado de cada pt derecho con marcapuntos – Leer TIP PARA AUMENTAR! Aumentar de esta manera a cada 2 vtas 6 veces en total = 80-88-88-96 pts. RECORDARSE DE MANTENER LA MISMA TENSIÓN DE TEJIDO DE LA MUESTRA! Después continuar con los aumentos en el centro del frente y en el centro de la espalda a cada 2 vtas 16-16-17-16 veces más y, AL MISMO TIEMPO, aumentar en cada hombro/lado a cada 4ª vta 2 veces más = 152-160-164-168 pts. La pieza ahora mide aprox 44-44-45-44 cm medida a lo largo de los pts derechos al centro del frente. Ahora continuar aumentando a cada lado de los pts derechos en el centro del frente y en el centro de la espalda y dividir la labor en pieza del frente, pieza de la espalda y mangas de la manera siguiente: Tejer los primeros 10-11-11-12 pts y deslizarlos en un gancho auxiliar (= mitad de la manga), tejer los 57-59-61-61 pts siguientes y deslizar estos pts en un gancho auxiliar (= pieza del frente), después tejer los 19-21-21-23 pts siguientes antes de deslizarlos en un gancho auxiliar (= manga), tejer los 57-59-61-61 pts siguientes (= pieza de la espalda) y mantenerlos en la ag, tejer los 9-10-10-11 pts restantes (= mitad de la manga) y deslizarlos en el mismo gancho auxiliar en el que se colocaron los primeros 10-11-11-12 pts de la vta (= manga). Cortar el hilo. ESPALDA: = 59-61-63-63 pts. Continuar de ida y vuelta sobre los pts en la pieza de la espalda de la manera siguiente: Comenzar por el LR y tejer en pt de arroz de ida y vuelta, continuar aumentando a cada lado de los pts derechos con marcapuntos a cada hilera por el LD 3 veces más = 65-67-69-69 pts. Tejer 1 hilera de revés por el LR, y rematar de derecho por el LD. FRENTE: Deslizar los 59-61-63-63 pts del gancho auxiliar de vuelta en la ag circular tamaño 15 mm. Comenzar por el LR y tejer como se hizo para la pieza de la espalda. PUÑO: Tejido de ida y vuelta en ag circular. Ahora medir la pieza a partir de aquí! Montar 8 pts con 2 hilos Cloud o 4 hilos Air en ag circular tamaño 15 mm. Tejer los 19-21-21-23 pts en pt de arroz de uno de los ganchos auxiliares para la manga en la ag, montar 8 nuevos pts al final de la hilera = 35-37-37-39 pts. Tejer la hilera siguiente por el LR de la manera siguiente: 1 pt de orillo en pt musgo, * 1 r, 1 d *, repetir de *a* hasta que resten 2 pts, 1 r, 1 pt de orillo en pt musgo. Continuar el resorte con derecho sobre derecho y revés sobre revés con 1 pt de orillo en pt musgo a cada lado hasta que la pieza mida 18 cm. Rematar los pts con derecho sobre derecho y revés sobre revés. Tejer el otro puño de la misma manera. ENSAMBLAJE: Coser el puño entre sí en el interior de 1 pt de orillo en pt musgo a cada lado, después coser los nuevos pts que fueron montados bajo la manga a cada lado del frente/espalda del poncho. Repetir en el otro lado. CORDÓN RETORCIDO CON BORLAS: Cortar 2 hilos de Cloud o 4 hilos de Air de 3 metros cada uno. Retorcer los hilos juntamente hasta que ofrezcan resistencia, doblar el cordón en dos para que se retuerza nuevamente. Hacer un nudo en cada extremo. Comenzar al centro del frente del poncho y pasar el cordón de arriba abajo a través de la hilera de agujeros. Cortar 10 hilos de Cloud o 20 hilos de Air de 30 cm. Pasarlos a través de un extremo del cordón retorcido y distribuirlos de modo que queden parejos. Colocar un hilo alrededor de la borla, apretar y hacer un nudo. Repetir en el otro extremo del cordón. CUELLO REMOVIBLE: Tejido en redondo en ag circular. Montar 49 pts con 2 hilos Cloud o 4 hilos Air en ag circular tamaño 15 mm. Tejer 1 vta de derecho. Ahora tejer en PT DE ARROZ – ver explicación arriba. Cuando la pieza mida 30 cm, tejer 1 vta de derecho. Rematar de derecho. |
|
 |
|
¿Terminaste este patrón?Entonces, etiqueta tus fotos con #dropspattern #lavendergroveponcho o envíalas a la galería #dropsfan. ¿Necesitas ayuda con este patrón?Encontrarás 30 videos tutoriales, un espacio para comentarios/preguntas y más visitando la página del patrón en garnstudio.com © 1982-2026 DROPS Design A/S. Todos los derechos reservados. Este documento, incluyendo todas sus sub-secciones, está protegido por los derechos de autor (copyright). Lee más acerca de lo que puedes hacer con nuestros patrones en la parte de abajo de cada patrón de nuestro sitio. |


Con más de 40 años en el diseño de modelos de punto y de ganchillo, DROPS Design ofrece una de las más vastas colecciones de patrones gratuitos en el internet - traducidos en 17 idiomas. Al día de hoy, contamos con 324 catálogos y 12290 patrones - de los cuales 11673 están traducidos en español.
Nosotros trabajamos con mucho esmero para brindarte lo mejor que las labores de punto y ganchillo tienen para ofrecer,inspiración y consejos, así como hilos de magnífica calidad a precios increíbles! Te gustaría usar nuestros patrones para otro fin además del uso personal? Puedes leer acerca de lo que estás permitida a hacer en el texto de Copyright en la parte de abajo de todos nuestros patrones. Felices labores!
Escribe un comentario sobre DROPS 172-25
¡Nos encantaría saber qué piensas acerca de este patrón!
Si quieres escribir una pregunta referente al patrón, por favor asegúrate de elegir la categoría correcta en el formulario debajo, para acelerar el proceso de respuesta. Los campos obligatorios están marcados con un *.