
Categorías populares
¿Buscas un hilo?


Comentarios / Preguntas (101)
![]() Karin Conte escribió:
Karin Conte escribió:
Ich weiß nicht wie ich bei der Anleitung "173-1 Taschen häkeln" in den Reihen 5 - 10 die Maschen zunehmen muß, damit es im Muster passt. Mit freundlichen Grüßen Karin Conte
08.08.2023 - 18:55DROPS Design respondió:
-Siehe Antwort unten, und vielleicht auch diese Lektion, unter Kästchendiagramme / Farbdiagramme wird es erklärt, wie man solche Diagramme häkelt. Viel Spaß beim häkeln!
09.08.2023 - 08:09
![]() Karin Conte escribió:
Karin Conte escribió:
Bei dieser Anleitung weiß ich nicht, wie ich in den Reihen 5 - 10 die Maschen zunehmen soll damit das Muster passt. Liebe Grüße Karin Conte
08.08.2023 - 18:51DROPS Design respondió:
Liebe Frau Conte, die Zunahmen werden in die schriftlichen Anleitung erklärt, dh bei der 1. Runde häkeln Sie 12 Stäbchen = 12 Mal A.1; bei der 2. Runde, häkeln Sie 2 Stb in jedes Stb = 24 Stb, die wie bei der 2. Reihe A.1 gehäkelt werden; bei der 3. Runde verdoppelten Sie jedes 2. Stb = 36 Stb (12 x die 3 Stb in A.1 in der Runde) usw. Viel Spaß beim häkeln!
09.08.2023 - 08:08
![]() Guendalina escribió:
Guendalina escribió:
* 1 m.a in ognuna delle (prime 3 m.a /delle )3 m.a successive quindi si deve leggere così, "le prime 3 m.a. " non contano?
20.06.2023 - 17:18DROPS Design respondió:
Buongiorno Guendalina, all'inizio del giro lavoreeà 1 maglia alta in ognuna delle prime 3 maglie, poi 1 maglia alta nelle 3 maglie successive, e così via. Buon lavoro!
21.06.2023 - 08:20
![]() Guendalina escribió:
Guendalina escribió:
* 1 m.a in ognuna delle prime 3 m.a /delle 3 m.a successive, me lo spiegate meglio? Non lo capisco. Grazie mille
19.06.2023 - 23:54DROPS Design respondió:
Buonasera Guendalina, deve semplicemente lavorare 1 maglia alta in ognuna delle 3 maglie alte successive. Buon lavoro!
20.06.2023 - 16:58
![]() Guendalina Bosio escribió:
Guendalina Bosio escribió:
Domanda sul fondo : Come effettuare gli aumenti dalla riga 5 a 10?
13.06.2023 - 15:40DROPS Design respondió:
Buongiorno Guendalina, deve aumentare come nei giri precedenti lavorando 1 maglia in più tra gli aumenti ad ogni giro e continuando a lavorare il motivo A.1. Buon lavoro!
14.06.2023 - 08:41
![]() Mijai escribió:
Mijai escribió:
I had no problem what so ever about pattern But wondering if you have a video of strap Not sure how to attetch Thanks
30.08.2022 - 23:17DROPS Design respondió:
Dear Mijai, there is no video to the straps, make a bread with 36 strands of yarn (3 bunches of 12 strands each), starting after approx. 12 cm from one end (make a knot there). When the braid measures approx. 68 cm divide the strands into 2 bunches (18 strands each), insert one bunch into the round with holes on top of bag, from inside towards outside, insert the other bunch into the same round but 3 dc away from the first bunch and make a knot with both bunches. Unknot the knot at the beg of the braid and repeat on the other side of bag. Make another braid and fasten it the same way on the other side of bag. Hope it can help.
31.08.2022 - 07:54
![]() Luna escribió:
Luna escribió:
"På omg med pil hækles der således: * 1 st i hver af de 3 første/næste st, 1 lm, spring over 1 st *, gentag fra *-*. " Jeg forstår ikke. Betyder det. *1 st,1 st, 1 st, lm, spring over 1 st, forsæt med at hækle mønster ??
09.08.2022 - 13:08DROPS Design respondió:
Hej Luna, ja det stemmer som du beskriver, sådan gør du hele vejen rundt og fortsætter bagefter med mønster :)
11.08.2022 - 09:17
![]() Rebekah Lovelady escribió:
Rebekah Lovelady escribió:
So on the bottom, when doing the two stitches in the increase, they are both the same color? Like if the one box indicating the color on the diagram that falls on the increase is one color but two stitches? Forgive me if this question was asked before, but there are a lot of comments on this pattern lol!
20.04.2022 - 19:09DROPS Design respondió:
Dear Rebekah, it depends on the pattern. For example, in diagram A.1, you start with 1 stitch in dark grey. In the next round you increase to two stitches in dark grey. In the 3rd round, you increase one of them to 2 light beige stitches and work the third stitch in light beige. In the 4th round, you increase one light beige stitch to 1 dark grey stitch and 1 light beige stitch and work 1 dark grey stitch and 1 light beige stitch over the other 2 stitches. Happy crocheting!
20.04.2022 - 19:53
![]() Mona Ragheb escribió:
Mona Ragheb escribió:
Very nice pattern
08.03.2022 - 07:11
![]() Jaana escribió:
Jaana escribió:
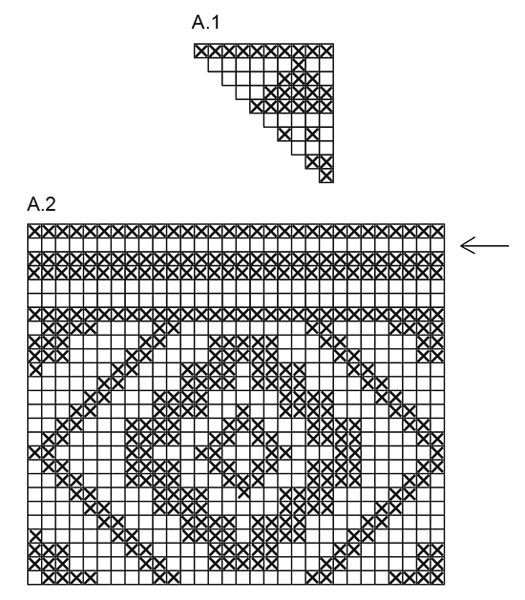
When you have finished the A1 (bottom), you can´t start the A2 from the start, if you want to get the patterns aligned in the middle of the A1. You must begin from the third dc of the pattern A2.
30.06.2021 - 15:32
|
|||||||
Santa Fe#santafebag |
|||||||
|
|
|||||||
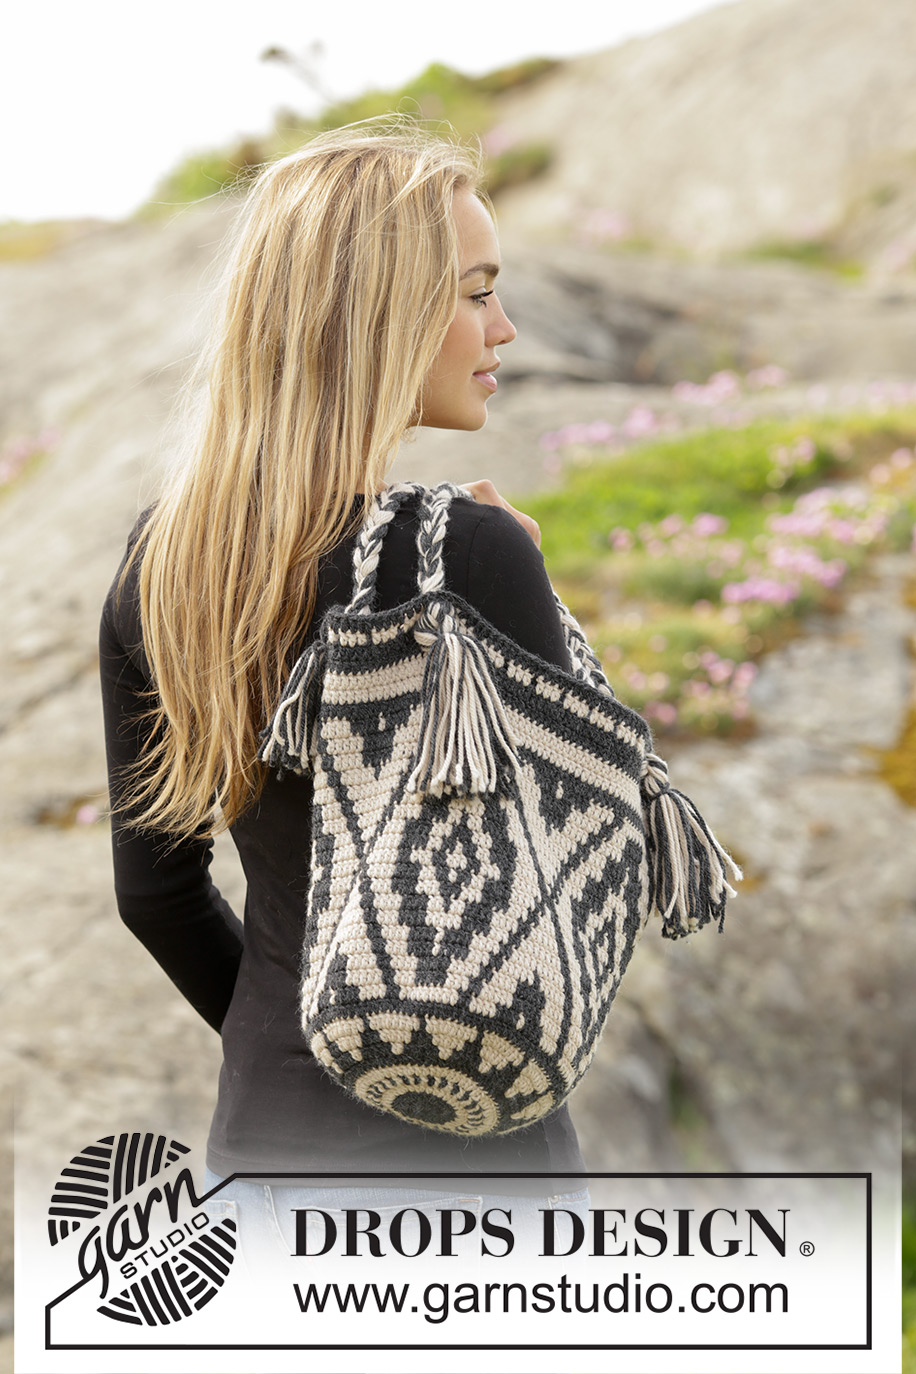
Bolso a ganchillo DROPS con patrón de colores en ”Nepal”.
DROPS 173-1 |
|||||||
|
PATRÓN: Ver los diagramas A.1 y A.2. Los diagramas muestran los colores del patrón. 1 cuadrado = 1 p.a. PATRÓN DE COLORES (se trabaja en redondo): Cuando se cambia de color trabajar como sigue: Trabajar el último p.a. con el 1er color, pero sin hacer la última lazada, cambiar al sig color y trabajar la última lazada con este color, ahora trabajar el sig p.a. Cuando se trabaja con dos colores colocar los hilos del color que no se trabaja sobre los pts de la vta anterior, trabajar alrededor de los hilos de modo que queden escondidos y sigan la vta. TIP PARA LA REALIZACIÓN DEL TRABAJO: Sustituir el primer p.a. al inicio de cada vta por 3 p.de cad, finalizar la vta con 1 p.e. en el tercer p.de cad. -- -- -- -- -- -- -- -- -- -- -- -- -- -- -- -- -- -- -- -- -- -- -- -- -- -- -- -- BOLSO: Se trabaja en redondo. Trabajar 5 p.de cad con gris oscuro y ganchillo tamaño 3.5 mm y formar un anillo con 1 p.e. en el primer p.de cad. Ahora trabajar en redondo y según el diagrama A.1 (trabajar 12 repeticiones de A.1 en el ancho) - LEER PATRÓN DE COLORES. VUELTA 1: Trabajar 12 p.a. dentro del anillo - leer TIP PARA LA REALIZACIÓN DEL TRABAJO VUELTA 2: Trabajar 2 p.a. en cada p.a. = 24 p.a. VUELTA 3: Trabajar *1 p.a. en el 1er p.a., 2 p.a. en el sig p.a.*, repetir de * a * la vta entera = 36 p.a. VUELTA 4: Trabajar *1 p.a. en cada uno de los primeros 2 p.a., 2 p.a. en el sig p.a.*, repetir de * a * la vta entera = 48 p.a. RECUERDE MANTENER LA MISMA TENSIÓN DEL TEJIDO. VUELTA 5-10: Continuar con los aum y el patrón como antes, es decir en cada vta trabajar 1 p.a. más entre los aum = 120 p.a. VUELTA 11: Continuar trabajando en redondo pero sin aum y trabajar según el diagrama A.2 (= 4 repeticiones en el ancho). En la vta con flechas trabajar como sigue: *1 p.a. en cada uno de los primeros/siguientes 3 p.a., 1 p.de cad, saltar 1 p.a.*, repetir de * a *. Continuar hasta completar A.2, asegurar el hilo. ASAS: Cortar 18 hilos de cada color de 120 cm cada uno = 36 hilos. Colocarlos juntos y hacer un nudo flojo, dejar aprox 12 cm después del nudo. Repartirlos en tres grupos de 12 hilos cada uno. Hacer una trenza de aprox 68 cm de largo. Dividir todos los hilos ahora en dos grupos. Pasar las 2 mitades a través del bolso por la vta con agujeros y con una separación de 3 p.a., tomar el nudo del inicio de la trenza y asegurarlo al lado opuesto del bolso del mismo modo. Trabajar otra trenza de la misma manera - ver foto. |
|||||||
Explicaciones del diagrama |
|||||||
|
|||||||
 |
|||||||
¿Terminaste este patrón?Entonces, etiqueta tus fotos con #dropspattern #santafebag o envíalas a la galería #dropsfan. ¿Necesitas ayuda con este patrón?Encontrarás 7 videos tutoriales, un espacio para comentarios/preguntas y más visitando la página del patrón en garnstudio.com © 1982-2026 DROPS Design A/S. Todos los derechos reservados. Este documento, incluyendo todas sus sub-secciones, está protegido por los derechos de autor (copyright). Lee más acerca de lo que puedes hacer con nuestros patrones en la parte de abajo de cada patrón de nuestro sitio. |
|||||||


Con más de 40 años en el diseño de modelos de punto y de ganchillo, DROPS Design ofrece una de las más vastas colecciones de patrones gratuitos en el internet - traducidos en 17 idiomas. Al día de hoy, contamos con 324 catálogos y 12290 patrones - de los cuales 11673 están traducidos en español.
Nosotros trabajamos con mucho esmero para brindarte lo mejor que las labores de punto y ganchillo tienen para ofrecer,inspiración y consejos, así como hilos de magnífica calidad a precios increíbles! Te gustaría usar nuestros patrones para otro fin además del uso personal? Puedes leer acerca de lo que estás permitida a hacer en el texto de Copyright en la parte de abajo de todos nuestros patrones. Felices labores!
Escribe un comentario sobre DROPS 173-1
¡Nos encantaría saber qué piensas acerca de este patrón!
Si quieres escribir una pregunta referente al patrón, por favor asegúrate de elegir la categoría correcta en el formulario debajo, para acelerar el proceso de respuesta. Los campos obligatorios están marcados con un *.