
Categorías populares
¿Buscas un hilo?


Comentarios / Preguntas (17)
![]() Natalia escribió:
Natalia escribió:
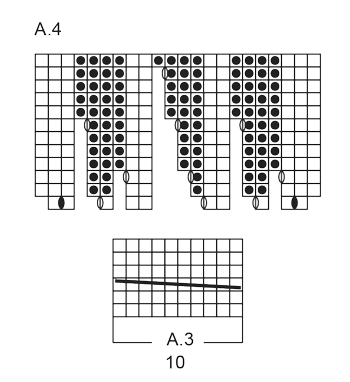
I don't understand A3 schema, and do not see any video how to do it. Tried multiple variants and still do not know how should it be done: "zdjąć 5 o. na drut pomocniczy przed robótką, 5 o.p., 5 o. z drutu pomocniczego przer. na prawo"
28.10.2025 - 16:32DROPS Design respondió:
Hi Natalia, Here is a link to a video showing you how to work cables (which is what A.3 is describing): https://www.garnstudio.com/video.php?id=19&lang=en Regards, Drops Team.
29.10.2025 - 07:04
![]() Charmain escribió:
Charmain escribió:
Can I have this pattern in downloadable form in PDF please
26.03.2021 - 16:19DROPS Design respondió:
Dear Chairman, to have the pattern as a PDF please click on the print icon, and select "print as PDF". Happy Crafting!
27.03.2021 - 02:11
![]() Helena escribió:
Helena escribió:
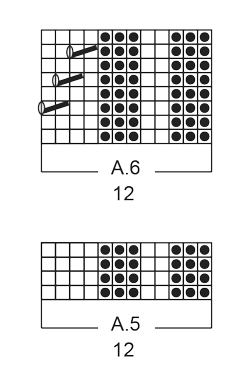
Another question - neck warmer, it says "when piece measures 20-24cm adjust after one whole repetition of A6", what is meant by 'adjust'? What adjustment is required, other than just to repeat once more A6 before finishing it with A5?
30.01.2021 - 01:37DROPS Design respondió:
Dear Helena, this means that you should emphasize pattern more than height in cm. You can stay with 19 cm or with 25 - important is knit up whole repetition of A.6. Height in cm may vary slightly depends on your personal gauge. Happy knitting!
30.01.2021 - 09:36
![]() Helena escribió:
Helena escribió:
Hi, my question refers to the neck warmer; in the photo, the neck warmer seems to have holes where the yarn overs are, but in the instructions it says to knit yo twisted to avoid holes. I get it for the headband as there should not be holes. But the neck warmer looks like it has holes left where the yo were made. Can you please clearify? Thank you
30.01.2021 - 00:37DROPS Design respondió:
Hi Helena, there is a mistahe here. I'll report it. Thank you. Happy knitting!
30.01.2021 - 19:20
![]() Simone escribió:
Simone escribió:
Hallo! Leider verstehe ich beim Stirnband nicht, wie das Muster A.3 gestrickt wird. Ich stricke zuerst eine Hinreihe rechts und eine Rückreihe links. Dann ziehe ich die Hälfte der Maschen (5 Maschen) auf eine andere Nadel. Aber wie stricke ich dann weiter? Danke im Voraus für die Antwort.
10.11.2020 - 20:55DROPS Design respondió:
Liebe Simone, ja genau die 5 ersten Maschen legen Sie vor die, dann stricken Sie die 5 letzten Maschen und stricken jetzt die 5 Maschen von der Hilfsnadel - dieses Video zeigt, wie man einen (anderen) Zopf über alle Maschen auf der Nadel strickt, es kann Ihnen sicher weiterhelfen. Viel Spaß beim stricken!
11.11.2020 - 08:41
![]() Mari Gjerdåker escribió:
Mari Gjerdåker escribió:
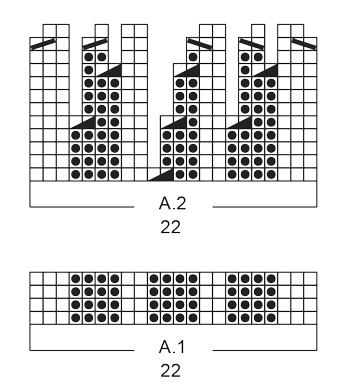
Hei! Jeg lurer på hva de diagonale stripene på nest siste pinne på A2 betyr? Regner med at de kal settes på hjelpepinne, men har det noe å si hvilken vei diagonalen er?
24.07.2020 - 20:01DROPS Design respondió:
Hej Mari, du finder symbolerne i symbolforklaringen: 2 r sammen og ta 1 m løst av p, 1 r, løft den løse m over. God fornøjelse!
03.08.2020 - 14:47
![]() Mallory escribió:
Mallory escribió:
Hi there, although this is a beautiful pattern, I feel like it was poorly written and drawn out in the diagrams. Multiple times I would look at the diagram and then my stitches. There where stitches that would disappear on the diagram (still on my needle) and then reappear on another row. As well as the twist, if you K5 from your working and K5 from the new, it will NOT come out right. Beautiful pattern, Horrible instructions.
11.01.2020 - 18:01
![]() Sondra escribió:
Sondra escribió:
Working the headband (straight needles) and confused by “missing boxes” in pattern A.2. Row 1, for example, appears to start on 2nd stitch and skip 4th and 5th, 7th (ie boxes missing). How do I interpret the empty spaces? Also not sure how to interpret heavy short diagonal line intermittent across second row. Nothing in diagram key matches exactly. Thabks
10.01.2019 - 01:23DROPS Design respondió:
Dear Sondra, start reading the diagram from the bottom corner on the right side towards the left from RS (and from the left towards the right from WS), working A.2 you will then dec 1 st (= P2 tog) in the middle of A.2, on next row the missing stitch is matching the st you decreased before. Happy knitting!
10.01.2019 - 10:03
![]() Monica Panera escribió:
Monica Panera escribió:
Buongiorno , Volevo fare un'ultima domanda. Ogni riga di uno schema è un ferro e rappresenta i punti da fare sul diritto del lavoro ,ciò significa che ogni riga è un ferro diritto è un ferro rovescio? Spero di essere stata chiara.Grazie dell'aiuto.
14.12.2018 - 07:38DROPS Design respondió:
Buongiorno Monica. Nel diagramma trova tutti i ferri da lavorare seguendo il motivo stesso. Quindi: primo ferro (dal basso) si lavora sul diritto del lavoro; secondo ferro si lavora sul rovescio del lavoro; terzo ferro sul diritto e così via. Buon lavoro!
14.12.2018 - 08:29
![]() Monica Panera escribió:
Monica Panera escribió:
Buonasera, non riesco a capire lo schema A3 della fascia per capelli modello Warm Lavender. Non capisco perché devo mettere 5 punti su un ferro ausiliario e come procedere con il lavoro. Ho un buio totale. Grazie per il vostro aiuto. Panera Monica
13.12.2018 - 19:05DROPS Design respondió:
Buonasera Monica, le 5 maglie vengono messe in sospeso per creare la treccia. Deve metterle su un ferro ausiliario sul davanti del lavoro, lavorare 5 maglie a diritto e lavorare le 5 maglie in sospeso a diritto, creando così la treccia. Buon lavoro!
13.12.2018 - 22:22
|
|||||||||||||||||||||||||
Warm Lavender |
|||||||||||||||||||||||||
|
|
|||||||||||||||||||||||||
Conjunto de: Banda para la cabeza y cuello DROPS con resorte, en “Snow”.
DROPS Extra 0-1234 |
|||||||||||||||||||||||||
|
PT MUSGO (de ida y vuelta): Tejer todas las hileras de derecho. 1 surco = 2 hileras tejidas de derecho. PATRÓN: Ver diagramas A.1 a A.6. Los diagramas muestran todas las hileras en el patrón vistas por el LD. ------------------------------------------------------ BANDA PARA LA CABEZA: Tejida de ida y vuelta en la ag. Montar 22 pts en ag tamaño 7 mm con Snow. Tejer 1 surco en PT MUSGO – ver explicación arriba. Después tejer A.1 (= 22 pts). RECORDARSE DE MANTENER LA MISMA TENSIÓN DE TEJIDO DE LA MUESTRA! Repetir A.1 hasta que la pieza mida 14-15-16 cm (ajustar para que la hilera siguiente sea por el LD). Tejer A.2 sobre A.1. Cuando A.2 ha sido tejido 1 vez verticalmente, hay 10 pts en la ag. Tejer A.3 1 vez verticalmente. Tejer A.4 sobre A.3. Tejer las HEBs (lazadas) retorcidas dentro del patrón. Cuando A.4 ha sido tejido 1 vez verticalmente, hay 22 pts en la ag. Tejer A.1 hasta que la pieza mida 48-50-52 cm. Tejer 1 surco. Rematar. Coser la orilla de montaje a la orilla de remate. ------------------------------------------------------ CUELLO: Tejido en redondo en ag circular. Montar 72-84 pts en ag circular tamaño 8 mm con Snow. Tejer A.5 (= 12 pts) 6-7 veces a lo ancho en total. Cuando la pieza mida 4 cm, tejer A.6 sobre A.5. RECORDARSE DE MANTENER LA MISMA TENSIÓN DE TEJIDO DE LA MUESTRA! Cuando la pieza mida 20-22 cm, ajustar después de 1 repetición completa de A.6, tejer A.5 sobre A.6. Rematar cuando la pieza mida 24-26 cm. |
|||||||||||||||||||||||||
Explicaciones del diagrama |
|||||||||||||||||||||||||
|
|||||||||||||||||||||||||
 |
|||||||||||||||||||||||||
 |
|||||||||||||||||||||||||
 |
|||||||||||||||||||||||||
¿Terminaste este patrón?Entonces, etiqueta tus fotos con #dropspattern o envíalas a la galería #dropsfan. ¿Necesitas ayuda con este patrón?Encontrarás 19 videos tutoriales, un espacio para comentarios/preguntas y más visitando la página del patrón en garnstudio.com © 1982-2026 DROPS Design A/S. Todos los derechos reservados. Este documento, incluyendo todas sus sub-secciones, está protegido por los derechos de autor (copyright). Lee más acerca de lo que puedes hacer con nuestros patrones en la parte de abajo de cada patrón de nuestro sitio. |
|||||||||||||||||||||||||


Con más de 40 años en el diseño de modelos de punto y de ganchillo, DROPS Design ofrece una de las más vastas colecciones de patrones gratuitos en el internet - traducidos en 17 idiomas. Al día de hoy, contamos con 324 catálogos y 12290 patrones - de los cuales 11685 están traducidos en español.
Nosotros trabajamos con mucho esmero para brindarte lo mejor que las labores de punto y ganchillo tienen para ofrecer,inspiración y consejos, así como hilos de magnífica calidad a precios increíbles! Te gustaría usar nuestros patrones para otro fin además del uso personal? Puedes leer acerca de lo que estás permitida a hacer en el texto de Copyright en la parte de abajo de todos nuestros patrones. Felices labores!
Escribe un comentario sobre DROPS Extra 0-1234
¡Nos encantaría saber qué piensas acerca de este patrón!
Si quieres escribir una pregunta referente al patrón, por favor asegúrate de elegir la categoría correcta en el formulario debajo, para acelerar el proceso de respuesta. Los campos obligatorios están marcados con un *.