
Categorías populares
¿Buscas un hilo?


Comentarios / Preguntas (45)
![]() Annemarie escribió:
Annemarie escribió:
Hallo, Hilfe; ich habe folgendes Problem. Ich häkle die Jacke in L/XL und habe mit 229 LM begonnen. Nun bin ich am Anfang des rechten Oberteils. Wenn ich richtig gezählt habe, hat das rechte Oberteil 64 M, und das linke Oberteil ebenfalls. D.h. 2 x 64 = 128 M für die beiden Oberteile. Wenn man von total 229 M 128 M abzieht, bleiben noch 101 M für das Rückenteil. Gemäss Anleitung vom Rückenteil sollten es aber nur 57 M sein, habe ich da irgendwo einen Fehler gemacht?
25.01.2025 - 17:43DROPS Design respondió:
Liebe Annemarie, am anfang hat man 229 Luftmaschen aber bei der 1. Reihe wird man regelmäßig verteilt abnehmen, so hat man 183 Stäbchen nach der 1. Reihe. Beim jedem Vorderteil sind es dann 63 Maschen (4 M A.1, 6 M A.2, 42 M A.3, 7 M A.4, 4 M A.5) und 57 M beim Rückenteil (4 M A.1, 6 M A.2, 36 M A.3, 7 M A.4 und 4 M A.5) = 63+57+63=183. Viel Spaß beim Häkeln!
27.01.2025 - 09:11
![]() Nunzia escribió:
Nunzia escribió:
Ho finito la giacca, molto bella, ho un problema sulla diminuzione della manica:Lavorare 1 m.b attorno all’arco di cat successivo ma aspettare con l’ultimo passaggio, lavorare la m.b successiva attorno all’arco di cat successivo (non lavorare 5 cat tra la m.b), sull’ultimo passaggio, far passare il filo attraverso le 3 m sull’uncinetto. Cioè devo saltare le 5 catenelle tra un m. b. e l altra? Come faccio ad avere 3 m sulla uncinetto? Grazie
09.09.2024 - 17:34DROPS Design respondió:
Buongiorno Nunzia, ha lavorato 1 m.b, gettato il filo e lavorato un'altra m.b, quindi farà passare il filo attraverso 3 maglie. Buon lavoro!
02.11.2024 - 12:45
![]() Mariangela escribió:
Mariangela escribió:
Buonasera, vorrei cambiare il filato per questo modello, anzichè Paris utilizzare Muskat. Come posso calcorare la quantità per una taglia L/XL. La tensione generalmente è di mezzo numero di ferro in meno. Grazie per l'aiuto.
03.04.2022 - 19:02DROPS Design respondió:
Buonasera Mariangela, per lavorare questo capo in Muskat le serviranno circa 24 gomitoli. Buon lavoro!
05.04.2022 - 22:34
![]() Joan O’Keeffe escribió:
Joan O’Keeffe escribió:
Would like to get pattern for Granny Squares Jacket Cardigan. Could you please help.
29.08.2019 - 21:04DROPS Design respondió:
Dear Mrs O'Keeffe, make sure you are choosing the Crochet-language the most accurate for you, either US- or UK- ; there are some videos to this pattern, and maybe the FAQ can be helpful. Happy crocheting!
30.08.2019 - 09:16
![]() Lorna Espinas escribió:
Lorna Espinas escribió:
Hello, I have never worked with diagrams before but I love this design enough that I am up for the challenge. Question: when done with divided pieces, do I join them together? The next instruction was work together and I assume that this pertains to next row which links the pieces but what about the sides or am I totally wrong in reading the pattern? I’m not there yet but just looking ahead. Thanks.
24.07.2019 - 18:31DROPS Design respondió:
Hi Lorna! You divide your work in order to create armholes: dividing means that you work only above a piece of work (ex. above right front), the rest is waiting. After doing right front, back and left front, you put all pieces together like in the section FRONT AND BACK PIECE. Happy crocheting!
25.07.2019 - 18:51Renell escribió:
Hello again, I had counted the second row which is 165 do. When I work the 3 rows, it doesn't add up. I got this - 4dc + 6dc +6dc (23 times) and I got 2 =4 not 3 = 6 7dc +4 dc = 159 not 165. I had repeatedly 3 times and didn't get it right. What I am doing wrong? Thank you!
01.10.2018 - 02:04DROPS Design respondió:
Dear Mrs Renell, after you have the 165 dc, work pattern as follows: A.1 (= 4 dc), A.2 (= over next 6 dc), repeat A.3 (= over 6 sts) a total of 24 times and finish with A.4 (= over the next 7 dc) and A.5 (= 4 dc) : 4+6+ 24x6 + 7 + 4 = 165 sts. Do not hesitate to add markers between each repeat to make sure you are crocheting the correct number of repeats in width. Happy crocheting!
01.10.2018 - 09:55Renell escribió:
Hi there. Can you help me with this one please. I am doing this pattern. Please see on page 2 - jacket. I had done 207 chains and work 1dc in the 4th ch from hook and that make 2 dc. Now I don't understand the first two sentences saying 'Read crochet info, 1 dc in each 3,5,3,1 ch'. I ended up 166 dc not 165 doc. What I am doing wrong and can you explain. Thank you!
23.09.2018 - 05:34DROPS Design respondió:
Dear Mrs Renell, in the first size crochet 207 chains, then crochet 1 dc in 4th ch from hook (= 2 dc = as under CROCHET INFO you replace first dc with 3 ch), then crochet 1 dc in each of the next 4 ch (= 4 dc over 4 ch) repeat a total of 40 times (skip 1 ch, 1 dc in each of the next 4 ch) (= you work 4 dc over 5 chains): 2 dc + 4 dc + (40 x 4 dc ) = 165 dc. Happy crocheting!
24.09.2018 - 09:19Penny escribió:
Hi there. Love the pattern. My question is beginning the 2nd row, the pattern says to follow the chart at the arrow. The arrow is at the TOP of the chart? How can this be correct? It also states to repeat A.3 until 11 trebles remain, work A.4 over the next 7 tr, and finish A.5. A.4 has 9 tr and A.5 has 4tr. It doesn't add up. What am I missing.
13.12.2017 - 22:10DROPS Design respondió:
Dear Penny, you are right number of sts may have to be checked, just work: A.1, A.2, repeat A.2 until 13 sts remain and finish with A.4 and A.5, number of sts will add up. Happy crocheting!
14.12.2017 - 08:51
![]() J. T. escribió:
J. T. escribió:
I have done first row and have 165 double crochets. I started with second row by the arrow and had to repeat A3 more often than 25 times. What am I doing wrong?
02.10.2017 - 14:20DROPS Design respondió:
Dear J.T., A.3 is worked over 6 dc, so that in the first size you will repeat A.3 a total of 24 times in other words over the next 144 dc. So that you will have from the beg: A.1 over the first 4 dc, A.2 over the next 6 dc, A.3 a total of 24 times over the next 144 dc, A.7 over the next 7 dc and A.5 over the last 4 dc = 4 + 6 + 144 + 7 + 4 = 165 dc. Happy crocheting!
03.10.2017 - 08:47
![]() Name escribió:
Name escribió:
How to know how many skeins of yarn to purchase to make any/all of the sizes?? P.S. - I love the design & the sleeves, not as easy to find nice crochet tops that include the sleeves
05.07.2017 - 18:36DROPS Design respondió:
Dear Sender, The original modell is made of DROPS Paris yarn, which comes in 50 gramm skeins, therefore you would need 13 skeins for size S/M, 16 skeins for size L / XL, 18 skeins for size xxl, and 20 skeins for size XXXL. I hope this helps. Happy Crocheting!
06.07.2017 - 00:44
|
|||||||||||||||||||||||||||||||||||||
Peach Dream#peachdreamjacket |
|||||||||||||||||||||||||||||||||||||
 |
 |
||||||||||||||||||||||||||||||||||||
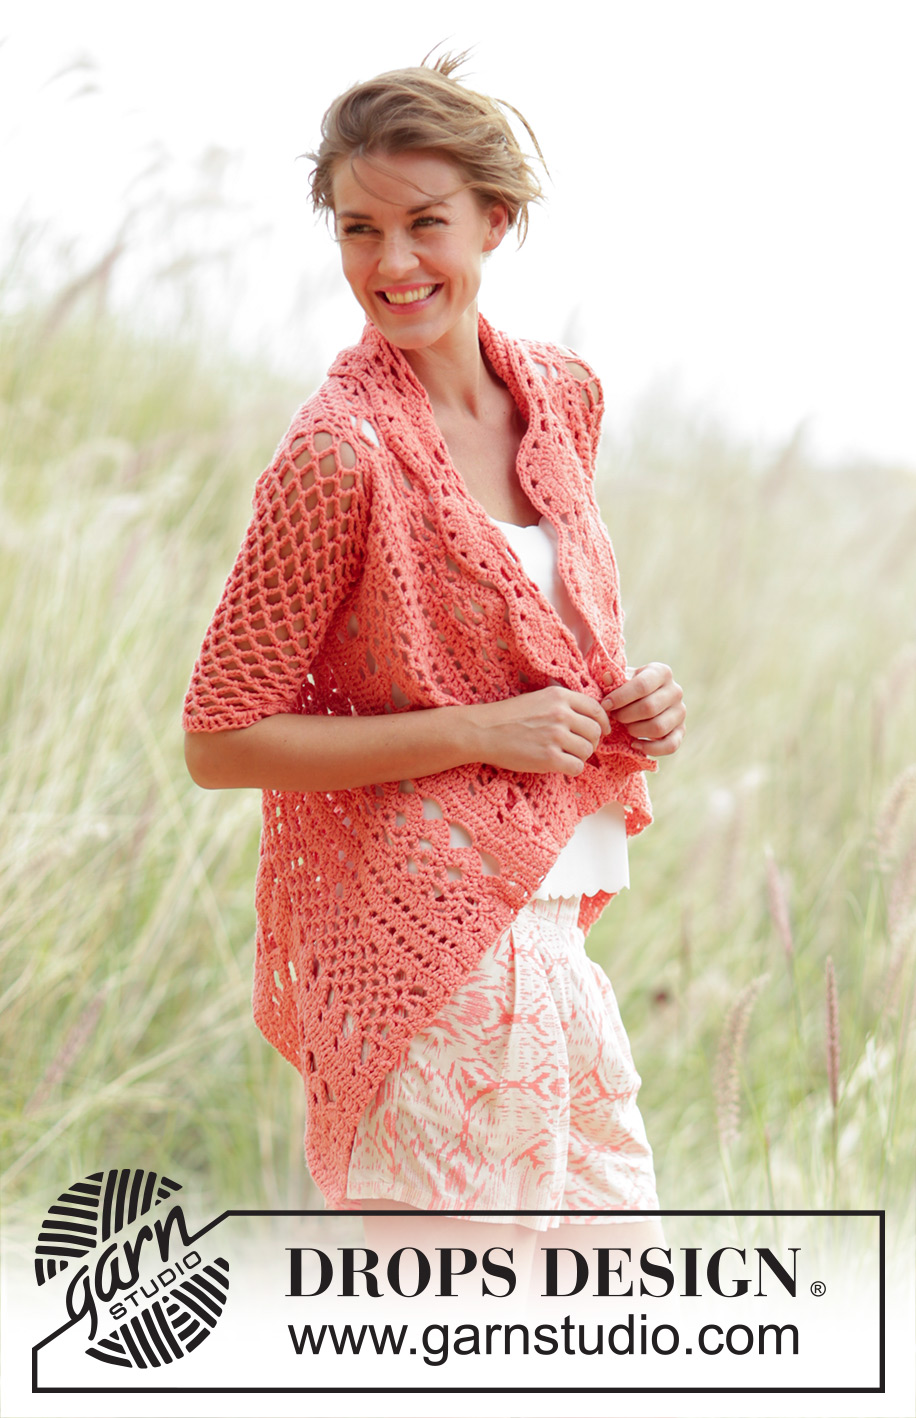
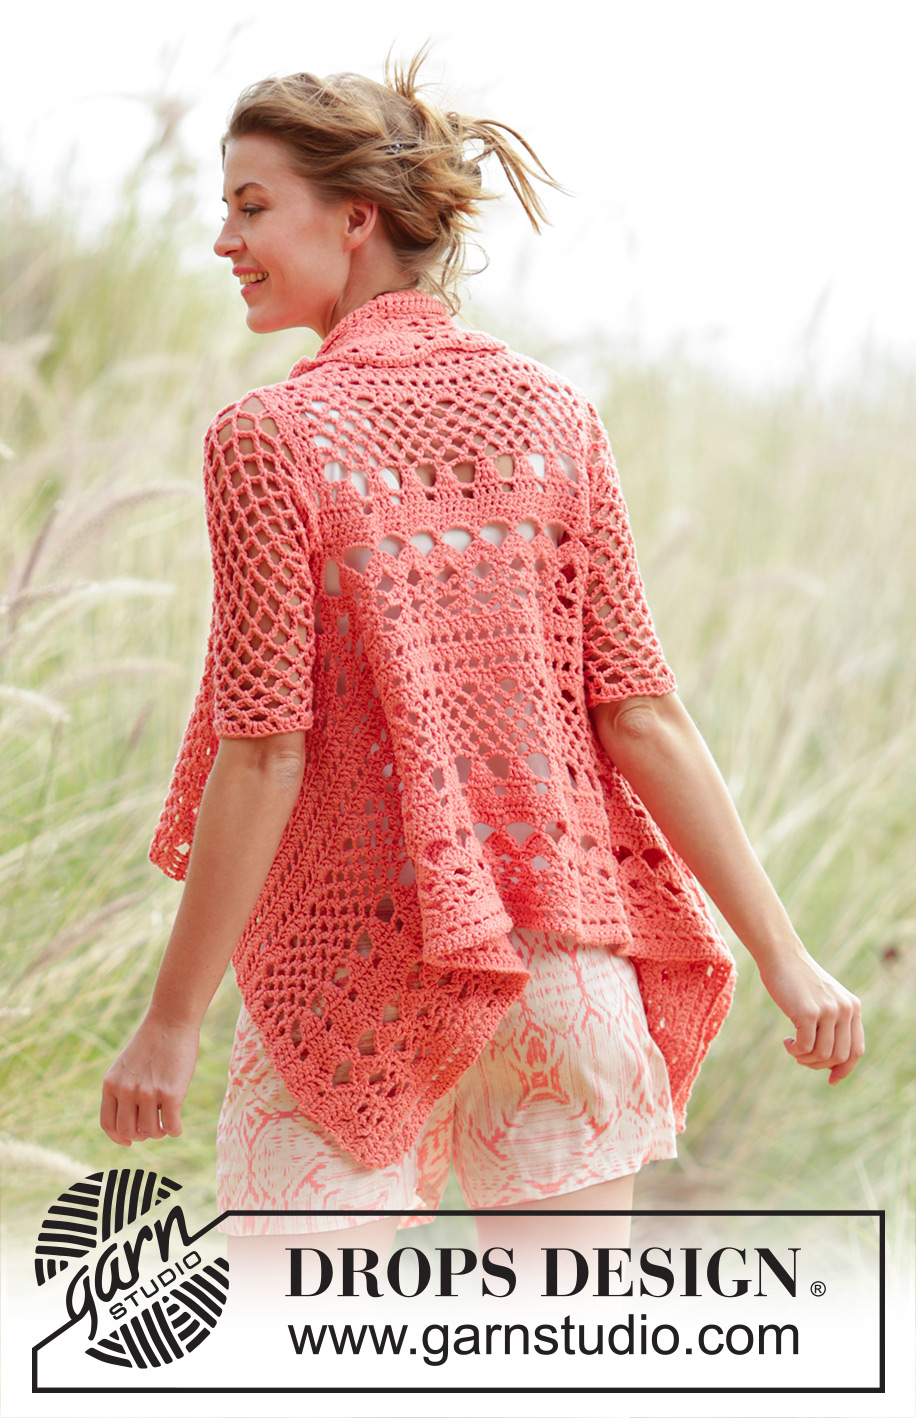
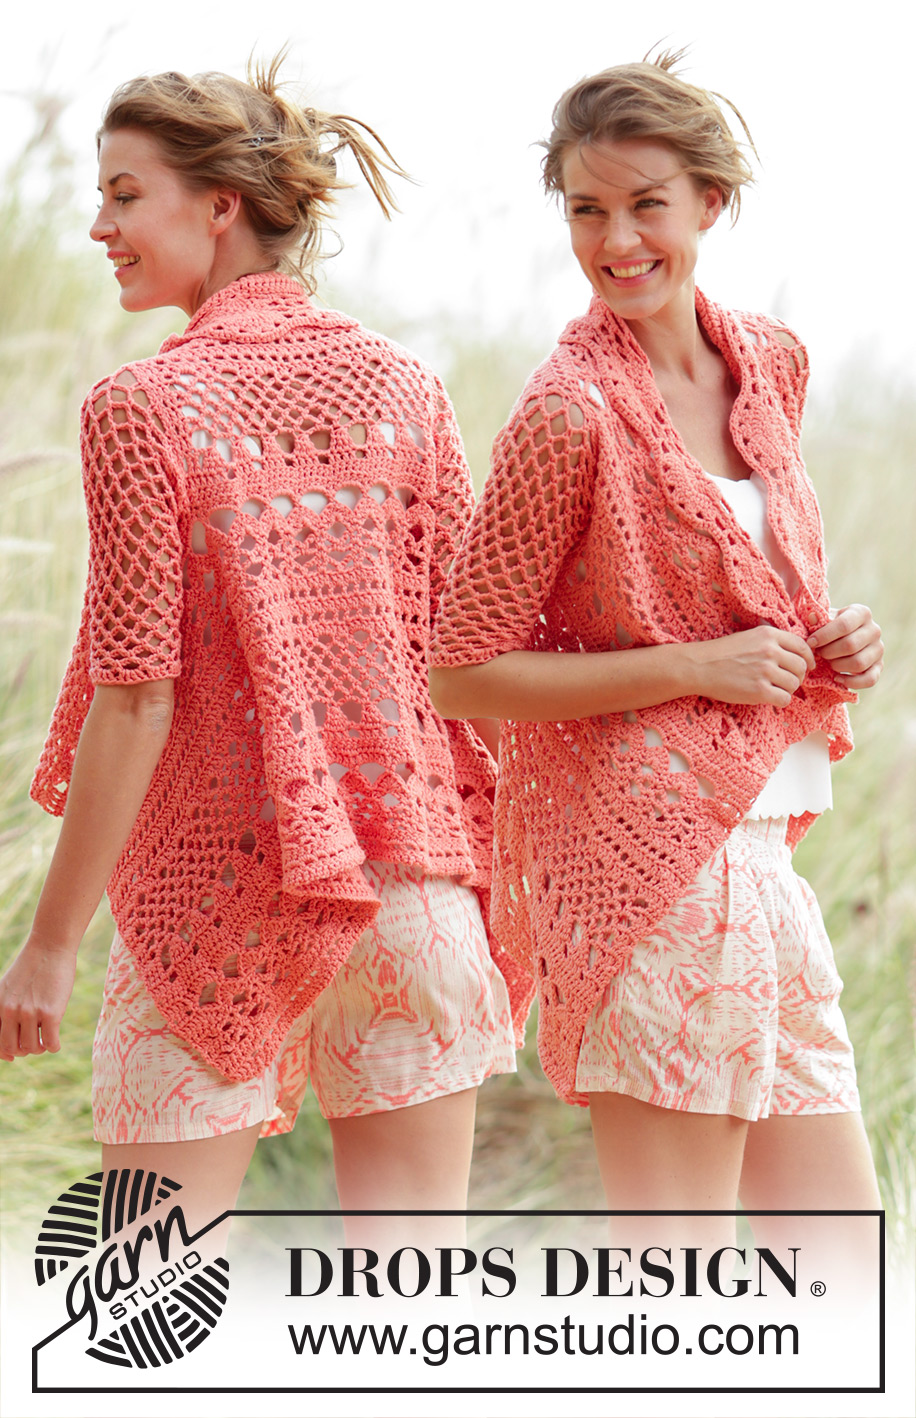
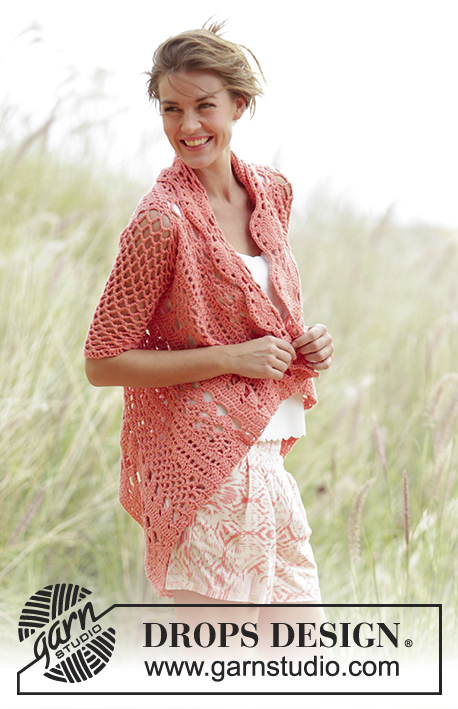
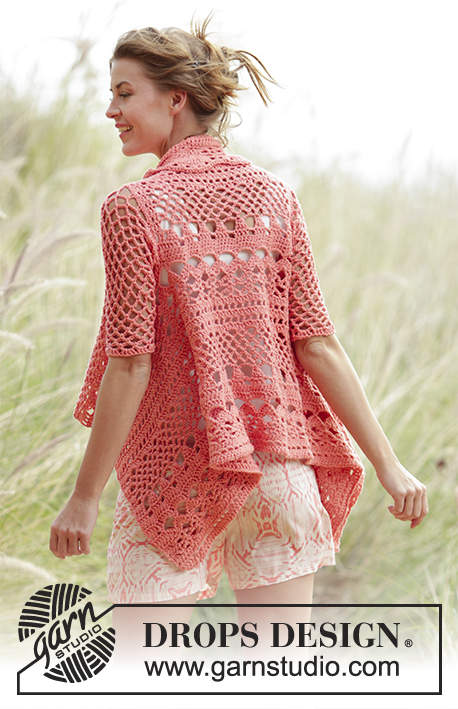
Chaqueta a ganchillo DROPS tejida en un cuadrado con patrón de calados en "Paris". Talla S-XXXL
DROPS 170-26 |
|||||||||||||||||||||||||||||||||||||
|
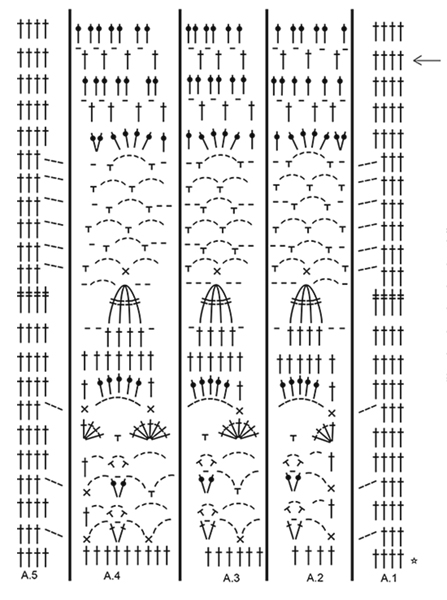
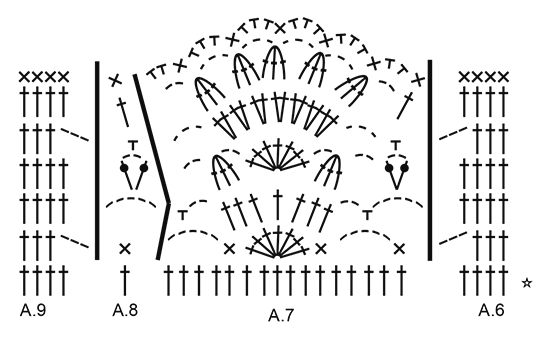
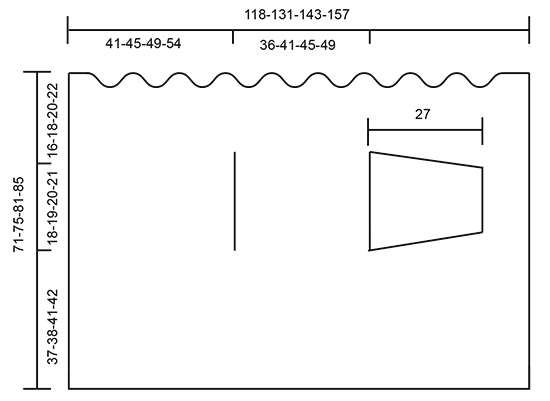
PATRÓN: Ver los diagramas A.1-A.9. INFORMACIÓN PARA REALIZAR EL TRABAJO: Comenzar cada fila de p.b. con 1 p.de cad (para sustituir al primer p.b.) Comenzar cada fila de p.a. con 3 p.de cad (para sustituir al primer p.a.) Comenzar cada fila de p.a.d. con 4 p.de cad (para sustituir al primer p.a.d.) TIP PARA LOS AUMENTOS: Aum 1 p.a. trabajando 2 p.a. en/dentro del mismo pt. TIP PARA REALIZAR EL TRABAJO (aplicar a las mangas): Después del último p.b. de la vta pasar a la sig vta con 1 p.b. en el sig arco (= primer arco de la sig vta). ATENCIÓN: Insertar un MP (marcapuntos) al inicio de la vta entre el último p.de cad y el primer p.b. de la vta, ir moviendo el MP hacia arriba según avance la labor. ATENCIÓN: TENER CUIDADO DE NO DESPLAZAR EL MP. TIP PARA LAS DISMINUCIONES: Trabajar 1 p.b. dentro del sig arco pero sin hacer la última lazada, trabajar el sig p.b. dentro del sig arco (no trabajar los 5 p.de cad entre los p.b.), pasar la última lazada por los 3 bucles en el ganchillo. -------------------------------------------------------------------------------------- CHAQUETA: Trabajar 207-229-252-275 p.de cad. con ag de ganchillo tamaño 5 mm y con Paris. Trabajar 1 p.a. en el 4º p.de cad. del ganchillo (= 2 p.a.) - LEER INFORMACIÓN PARA REALIZAR EL TRABAJO, 1 p.a. en cada uno de los sig 3-5-3-1 p.de cad., *saltar 1 p.de cad, 1 p.a. en cada uno de los sig 4 p.de cad.*, repetir de * a * en toda la fila = 165-183-201-219 p.a. Ahora trabajar la ANTEÚLTIMA fila del diagrama A.1-A.5 - ver la flecha en el diagrama - como sigue: Trabajar A.1 sobre los primeros 4 p.a., A.2 sobre los sig 6 p.a., repetir A.3 hasta que queden 11 p.a. (= un total de 24-27-30-33 vcs en el ancho), trabajar A.4 sobre los sig 7 p.a. y finalizar con A.5. Trabajar la última fila de A.1-A.5. RECUERDE MANTENER LA MISMA TENSIÓN DEL TEJIDO. Ahora repetir A.1-A.5 en vertical. ATENCIÓN: No trabajar la primera fila del diagrama, esta fila muestra cómo hay que trabajar la siguiente fila en los pts de la fila anterior. Cuando la labor mida 37-38-41-42 cm, ajustar para que la sig fila sea una fila con p.a. y por el LD (cortar el hilo si la sig fila es por el LR), dividir la labor. DELANTERO DERECHO: Continuar de la siguiente manera por el LD: Trabajar A.1 y A.2 como antes, repetir A.3 sobre los sig 36-42-48-54 p.a. (= un total de 6-7-8-9 vcs en el ancho), trabajar A.4 y después A.5, girar la labor. Continuar con el patrón de la misma manera sobre estos pts hasta que la labor mida 18-19-20-21 cm desde donde fue dividida, ajustar para que la sig fila sea de p.a. y por el LR (cortar el hilo si la sig fila es por el LD). ESPALDA: Trabajar de la siguiente manera por el LD: Trabajar A.1, A.2, repetir A.3 sobre los sig 30-36-42-48 p.a.(= un total de 5-6-7-8 vcs en el ancho), A.4, finalizar con A.5. Continuar con el patrón de la misma manera sobre estos pts hasta que la labor mida 18-19-20-21 cm, ajustar el patrón con el delantero derecho. DELANTERO IZQUIERDO: Trabajar como el delantero derecho. DELANTERO Y ESPALDA: Ahora unir las dos partes por el LR (es decir, trabajar desde el delantero izquierdo, por la espalda y el delantero derecho) con el patrón como antes, es decir, trabajar de la siguiente manera por el LR: Trabajar A.5 y A.4 como antes, A.3 un total de 24-27-30-33 vcs en el ancho, A.2, finalizar con A.1. Continuar el patrón de la misma manera. Cuando la labor mida un total de 63-67-73-77 cm, ajustar para que la sig fila sea una fila con p.a., aum 4-2-0-14 p.a. repartidos - LEER TIP PARA LOS AUMENTOS = 169-185-201-233 p.a. Ahora trabajar la sig fila de la siguiente manera: A.6 sobre los primeros 4 p.a., repetir A.7 hasta que queden 5 p.a. (= 10-11-12-14 vcs en el ancho), A.8 sobre el sig p.a., finalizar con A.9 sobre los últimos 4 p.a. Cuando se hayan trabajado de A.6-A.9 una vez en vertical, la labor mide aprox 71-75-81-85 cm. Rematar. MANGA: La manga se trabaja en redondo, de arriba abajo. Trabajar 78-78-83-83 p.de cad con ag de ganchillo tamaño 5 mm y Paris. VUELTA 1: Trabajar 1 p.b. en el 13º p.de cad desde el ganchillo, *5 p.de cad., saltar 4 p.de cad, 1 p.b. en el sig p.de cad*, repetir de * a * sobre la fila de p.de cad., trabajar 1 p.b. dentro de los primeros 3 p.de cad = 14-14-15-15 arcos - LEER TIP PARA REALIZAR EL TRABAJO. Continuar trabajando 5 p.de cad y 1 p.b. dentro de cada arco. Cuando la labor mida 4 cm, dism 1 arco antes del MP - LEER EL TIP PARA LAS DISMINUCIONES. Repetir las dism alternando a cada lado del MP cada 4 cm, 4 vcs más = 9-9-10-10 arcos. Cuando la labor mida 26 cm, finalizar la vta con 1 p.e. en el último p.de cad. en el centro bajo la manga. Continuar en redondo como sigue: VUELTA 1: Trabajar 3 p.de cad., * 4 p.a. dentro del primer/sig arco, 3 p.a. dentro del sig arco*, repetir de * a * en toda la vta, finalizar con 1 p.e. en el 3er p.de cad. del inicio de la vta = 32-32-35-35 p.a. Rematar. Trabajar la otra manga de la misma manera. TERMINACIÓN: Montar las mangas, coserlas dentro del bucle exterior del pt orillo y asegurarse de que la costura no quede muy tensa. |
|||||||||||||||||||||||||||||||||||||
Explicaciones del diagrama |
|||||||||||||||||||||||||||||||||||||
|
|||||||||||||||||||||||||||||||||||||
 |
|||||||||||||||||||||||||||||||||||||
 |
|||||||||||||||||||||||||||||||||||||
 |
|||||||||||||||||||||||||||||||||||||
¿Terminaste este patrón?Entonces, etiqueta tus fotos con #dropspattern #peachdreamjacket o envíalas a la galería #dropsfan. ¿Necesitas ayuda con este patrón?Encontrarás 8 videos tutoriales, un espacio para comentarios/preguntas y más visitando la página del patrón en garnstudio.com © 1982-2026 DROPS Design A/S. Todos los derechos reservados. Este documento, incluyendo todas sus sub-secciones, está protegido por los derechos de autor (copyright). Lee más acerca de lo que puedes hacer con nuestros patrones en la parte de abajo de cada patrón de nuestro sitio. |
|||||||||||||||||||||||||||||||||||||


Con más de 40 años en el diseño de modelos de punto y de ganchillo, DROPS Design ofrece una de las más vastas colecciones de patrones gratuitos en el internet - traducidos en 17 idiomas. Al día de hoy, contamos con 324 catálogos y 12290 patrones - de los cuales 11685 están traducidos en español.
Nosotros trabajamos con mucho esmero para brindarte lo mejor que las labores de punto y ganchillo tienen para ofrecer,inspiración y consejos, así como hilos de magnífica calidad a precios increíbles! Te gustaría usar nuestros patrones para otro fin además del uso personal? Puedes leer acerca de lo que estás permitida a hacer en el texto de Copyright en la parte de abajo de todos nuestros patrones. Felices labores!
Escribe un comentario sobre DROPS 170-26
¡Nos encantaría saber qué piensas acerca de este patrón!
Si quieres escribir una pregunta referente al patrón, por favor asegúrate de elegir la categoría correcta en el formulario debajo, para acelerar el proceso de respuesta. Los campos obligatorios están marcados con un *.