
Categorías populares
¿Buscas un hilo?


Comentarios / Preguntas (173)
![]() Coosje Schol escribió:
Coosje Schol escribió:
Of is het meteen 11steken en een omslag aan beide kanten? Dus meteen het telpatroon? Alvast bedankt , Groetjes Coosje
14.07.2016 - 18:51DROPS Design respondió:
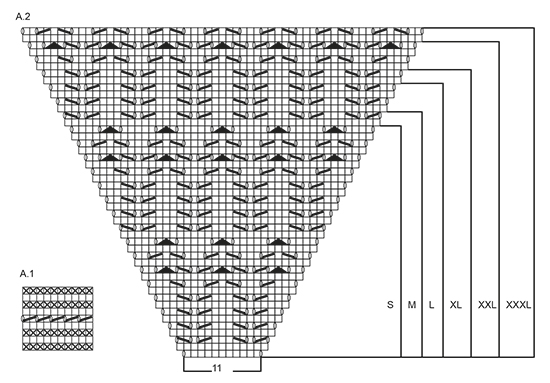
Hoi Coosje. Je breit de raglanmeerdering als volgt: begin 3 st voor elke A.2 aan elke kant en brei als volgt: 1 omsl, 1 r, 1 omsl, 2 r (markeerder staat in midden tussen deze st), A.2 (= 11 st = 1 omslag, 11 r, 1 omslag = dus volgende nld heb je hier 13 st), 2 r (markeerder staat in midden tussen deze st), 1 omsl, 1 r, 1 omsl.
15.07.2016 - 16:15
![]() Coosje Schol escribió:
Coosje Schol escribió:
Prachtig patroon, alleen begrijp ik de eerste toer waarbij je de markeerders plaatst niet helemaal. Als ik het volgens de beschrijving doe kom ik op 8 meerderingen uit maar bij de beschrijving van de raglan begin je met 12?
14.07.2016 - 17:41DROPS Design respondió:
Hoi Coosje. Ja, maar je meerdert meer op de voorpanden dan op de mouwen = 4 st op elke pand en 2 op elke mouw.
15.07.2016 - 16:13
![]() EVEN escribió:
EVEN escribió:
Merci de ne plus tenir compte de mon message du 09/07, en poursuivant mon tricot j'ai résolu mon problème.
11.07.2016 - 14:29
![]() EVEN escribió:
EVEN escribió:
Bonjour, encore moi, les diminutions du diagramme 3 sont inversées par rapport a celui du 2, ça commence par un jeté puis une maille glissée, est-ce que j'aurai la même continuité de dessin qu'au début de ma manche? D'autre part me conseillez vous de finir ma manche en diagramme 2 ne Serait-ce pas plus logique?Merci encore bon week-end
09.07.2016 - 11:10DROPS Design respondió:
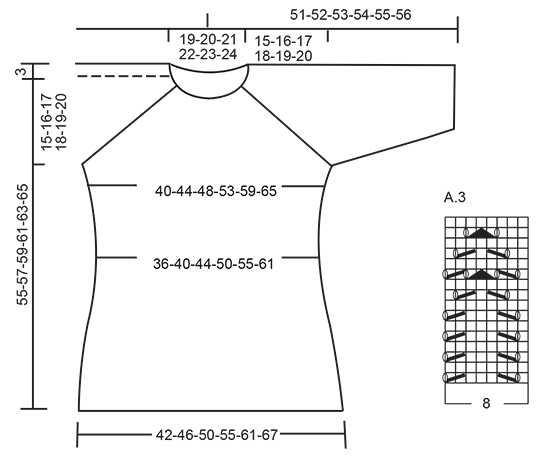
Bonjour Mme Even, il vous faut effectivement commencer A.3 en fonction de là où vous avez arrêté A.2 pour que le motif se suive à la transition empiècement/manche. A.3 est le même motif que A.2 mais sans les augmentations du raglan, ajustez simplement pour commencer A.3 sur le nbe de m indiqué pour votre taille tout en continuant le motif des manches de l'empiècement. Bon tricot!
11.07.2016 - 09:03
![]() EVEN escribió:
EVEN escribió:
Bonjour, les 8 Mailles reprise sous les manches doivent elles être tricotées en jersey ou Continuer les jours, diagramme 3 qui correspond aux nombres de mailles. Merci
08.07.2016 - 14:57DROPS Design respondió:
Bonjour Mme Even, en fonction de la taille, les 8 m sous la manche vont se tricoter soit en jersey, soit en point fantaisie (A.2), c'est-à-dire que l'on a, à partir du milieu sous la manche: 6-7-1-2-4-6 m jersey, A.3 et on termine par 7-8-2-3-5-7 m jersey. Soit 13-15-3-5-9-13 m jersey au milieu sous la manche, les autres mailles se tricotent en A.3. Bon tricot!
08.07.2016 - 15:07
![]() Toetie escribió:
Toetie escribió:
Ik heb dit truitje een maand geleden gemaakt en ben er enorm blij mee. Muscat is zalig om te breien, gemakkelijk om te wassen en het model is erg leuk om te dragen. Groetjes .
07.07.2016 - 22:09
![]() Hanna escribió:
Hanna escribió:
Hei! Ohjeessa on selitetty sanallisesti A2-kuvion ensimmäinen kerros. Lisääntyykö silmukoiden lukumäärä 8:lla vai 12:lla? Minä en saanut lisättyä kuin 8s ja raglan lisäys-ohjeessa sanotaan, että pitäisi lisätä 12s. Onko A2:n ensimmäisellä rivillä siis vain 11 oikeaa silmukkaa, vai pitääkö mallikuvion molemmin puolin tehdä langankierrot? Näin saisin silmukkamäärän täsmäämään. Kiitoksia avusta!!! Ihana malli :)
27.06.2016 - 10:14DROPS Design respondió:
Hei! Ohjeessa selitetään vain etu- ja takakappaleen raglanlisäykset. Lisäksi kumpaankin hihaan lisätään 2 s, eli juuri nämä 2 langankiertoa, joita näet piirroksen reunoissa. Kaikki hihojen lisäykset on merkitty piirrokseen.
29.06.2016 - 17:02
![]() Aud Berge escribió:
Aud Berge escribió:
Har strikket første omg.etter A1. Skal da neste omg strikkes rett.alle masker. Syns det var mye uklart i denneoppskriften
23.06.2016 - 20:05DROPS Design respondió:
Hei Aud. Der staar i opskriften: "Videre strikkes det slik – fra midt bak: Strikk 17-18-19-20-21-22 m rett, 1 kast, 1 m rett, 1 kast, 2 m rett (sett en merketråd mellom disse m), A.2 (= 11 m), 2 m rett (sett en merketråd mellom disse m), 1 kast, 1 m rett, 1 kast, 34-36-38-40-42-44 m rett, 1 kast, 1 m rett, 1 kast, 2 m rett (sett en merketråd mellom disse m), A.2, 2 m rett (sett en merketråd mellom disse m), 1 kast, 1 m rett, 1 kast, 17-18-19-20-21-22 m rett. Fortsett dette mønsteret, og øk til RAGLAN som forklart over..." Du kan se hvordan du strikker diagrammene i symbolforklaringen nederst. Og husk naar du strikker rett rundt som her = glatstrikk
24.06.2016 - 10:42
![]() Humbert escribió:
Humbert escribió:
Bonjour, Explications raglan compliquées. À chaque rang pair, tous les jetés sont tricotés à l'endroit quand on augmente pas les 4m dos et devant ou faut il faire avec torse Merci d'avance
08.06.2016 - 16:39DROPS Design respondió:
Bonjour Mme Humbert, quand on augmente 4 m pour le dos et le devant, on tricote ainsi: 1 jeté (à tricoter torse au tour suivant), 1 m end, 1 jeté (à tricoter à l'end au tour suivant = jour), 2 m end (le marqueur est entre ces m), A.2, 2 m end (marqueur), 1 jeté (à tricoter à l'end au tour suivant = jour), 1 m end, 1 jeté (= à tricoter torse au tour suivant). c'est-à-dire que les jetés les plus près des marqueurs vont se tricoter à l'endroit pour former des jours, les 2 autres se tricoteront torse à l'end pour éviter les trous. Pour les manches, on tricote les jetés à l'end = jours. Bon tricot!
08.06.2016 - 18:52
![]() Mariolina Motta escribió:
Mariolina Motta escribió:
Buongiorno, sono arrivata alle maniche, ma non riesco a capire come fare: una volta riprese le 8 maglie sotto la manica e rimesse sul ferro le maniche già lavorate, da dove comincio a lavorare? Io sto lavorando la taglia L e quindi dovrei cominciare a lavorare una maglia dritta (dopo ilsegnapunti?) e poi A3, ma così A3 comincia 3maglie prima di A2 (manicha già lavorata) e non è quindi dove comincia A2 (come è scritto nelle spiegazioni)... Non riesco proprio a capire....
04.06.2016 - 13:09DROPS Design respondió:
Buongiorno Mariolina. Posiziona il segnapunti al centro delle 8 m riprese e inizia il giro dalla m dopo il segnapunti. Lavora 1 m dir e poi inizia il diagramma A3. Deve sovrapporre il diagramma A3 con il diagramma A2 iniziando il diagramma A3 da dove ha finito il diag A2, in modo che il motivo prosegua correttamente in verticale. Buon lavoro!
04.06.2016 - 14:18
|
|||||||||||||||||||
Sea Nymph#seanymphsweater |
|||||||||||||||||||
 |
 |
||||||||||||||||||
Pulóver de punto DROPS con raglán, patrón de calados y mangas ¾, en “Muskat”. Tejido de arriba para abajo. Talla: S – XXXL.
DROPS 168-1 |
|||||||||||||||||||
|
PT MUSGO (tejido en redondo): 1 surco = 2 vtas. * 1 vta de derecho y 1 vta de revés *, repetir de *a*. PATRÓN: Ver diagramas A.1 a A.3. Ver el diagrama que corresponda a la talla que se está tejiendo! RAGLÁN: Aumentar a cada 2 vtas de la manera siguiente: Aumentar 4 pts en la pieza de la espalda, 4 pts en la pieza del frente y 2 pts en cada manga (= 12 pts aumentados, los aumentos en la manga están dibujados en el patrón) – comenzar 3 pts antes de cada A.2 y tejer de la manera siguiente: 1 HEB (lazada), 1 d, 1 HEB, 2 d (el marcapuntos está en el centro de estos pts), A.2, 2 d (el marcapuntos está en el centro de estos pts), 1 HEB, 1 d, 1 HEB. Tejer las HEBs más próximas a los marcapuntos de derecho en la hilera siguiente para crear agujeros, tejer las HEBs en el lado de la espalda/del frente retorcidas de derecho para evitar agujeros. Aumentar 12 pts de esta manera 0-2-3-7-10-14 veces más (= 1-3-4-8-11-15 veces en total, el primer aumento está explicado en el texto). Después aumentar a cada 2 vtas de la manera siguiente: Aumentar 2 pts en la pieza de la espalda, 2 pts en la pieza del frente y 2 pts en cada manga (= 8 pts aumentados, los aumentos en la manga están dibujados en el patrón) – comenzar 2 pts antes de cada A.2 y tejer de la manera siguiente: 1 HEB, 2 d (el marcapuntos está en el centro de estos pts), A.2, 2 d (el marcapuntos está en el centro de estos pts), 1 HEB. Tejer las HEBs de derecho en la vta siguiente para crear un agujero. Aumentar 8 pts de esta manera 16-15-16-13-12-9 veces en total. ------------------------------------------------------ PULÓVER: Tejido en redondo en ag circular, de arriba para abajo. PECHERA: Montar 87-91-95-99-103-107 pts en ag circular tamaño 4 mm con Muskat. Tejer 1 vta de derecho, después tejer A.1, en la última vta en A.1 aumentar 15 pts distribuidos equitativamente = 102-106-110-114-118-122 pts. Después tejer de la manera siguiente a partir del centro de la espalda: 17-18-19-20-21-22 pts derechos, 1 HEB, 1 d, 1 HEB, 2 d (insertar un marcapuntos entre estos pts), A.2 (= 11 pts), 2 d (insertar un marcapuntos entre estos pts), 1 HEB, 1 d, 1 HEB, 34-36-38-40-42-44 pts derechos, 1 HEB, 1 d, 1 HEB, 2 d (insertar un marcapuntos entre estos pts), A.2, 2 d (insertar un marcapuntos entre estos pts), 1 HEB, 1 d 1 HEB, 17-18-19-20-21-22 pts derechos. Continuar este patrón, y aumentar para el RAGLÁN como está explicado arriba, el primer aumento ahora está hecho. ¡RECORDAR MANTENER LA MISMA TENSIÓN DE TEJIDO DE LA MUESTRA! Cuando A.2 ha sido tejido verticalmente – ver la marca que corresponda a tu talla, hay 242-262-286-314-346-374 pts en la vta, los aumentos ahora están hechos. Tejer la vta siguiente de la manera siguiente: Tejer 38-42-46-52-58-64 pts (= mitad pieza de la espalda), deslizar los 45-47-51-53-57-59 pts siguientes en un gancho auxiliar (= manga), montar 8 pts bajo la manga, tejer los 76-84-92-104-116-128 pts siguientes (= pieza del frente), deslizar los 45-47-51-53-57-59 pts siguientes en un gancho auxiliar (= manga), montar 8 nuevos pts bajo la manga, tejer los últimos 38-42-46-52-58-64 pts (= mitad pieza de la espalda). CUERPO: Ahora hay 168-184-200-224-248-272 pts en el cuerpo. Continuar en pt jersey. Insertar un marcapuntos de cada lado, en el centro de los 8 nuevos pts que fueron montados. ¡AHORA MEDIR LA PIEZA A PARTIR DE AQUÍ! Cuando la pieza mida 4 cm, disminuir 1 pt de cada lado de los marcapuntos (= 4 pts disminuidos), repetir las disminuciones a cada 4-4-4-5-5-5 cm 3 veces más = 152-168-184-208-232-256 pts. Cuando la pieza mida 22-23-24-25-26-27 cm, aumentar 1 pt de cada lado de cada marcapuntos (= 4 pts aumentados), repetir los aumentos a cada 2 cm 5 veces más = 176-192-208-232-256-280 pts. Cuando la pieza mida 36-37-38-39-40-41 cm, tejer 2 surcos en PT MUSGO – ver explicación arriba, sobre todos los pts. Rematar con 1 d/1 r (para evitar una orilla de remate ondulada), la pieza mide aprox 55-57-59-61-63-65 cm a partir de la orilla de montaje. MANGA: Tejida en redondo. Deslizar los pts de la manga en las ag de doble punta tamaño 4 mm, levantar 1 pt en cada uno de los 8 pts bajo la manga = 53-55-59-61-65-67 pts. Insertar 1 marcapuntos al centro bajo la manga = principio de la vta. ¡AHORA MEDIR LA PIEZA A PARTIR DE AQUÍ! Después tejer de la manera siguiente: 6-7-1-2-4-5 pts en pt jersey, A.3 sobre los 40-40-56-56-56-56 pts siguientes (comenzar A.3 donde A.2 termina de acuerdo a tu talla), 7-8-2-3-5-6 pts en pt jersey. Cuando la pieza mida 4 cm, disminuir 1 pt de cada lado del marcapuntos. Los pts que no calcen en el patrón tejerlos en pt jersey, asegurarse que el número de disminuciones y aumentos en el patrón esté correcto. Repetir las disminuciones a cada 7-7-5-5-3-3 cm 2-2-3-3-4-4 veces más = 47-49-51-53-55-57 pts. Cuando la pieza mida 24-23-23-22-22-21 cm, tejer A.1 sobre todos los pts, después rematar. Tejer la otra manga de la misma manera. |
|||||||||||||||||||
Explicaciones del diagrama |
|||||||||||||||||||
|
|||||||||||||||||||
 |
|||||||||||||||||||
 |
|||||||||||||||||||
¿Terminaste este patrón?Entonces, etiqueta tus fotos con #dropspattern #seanymphsweater o envíalas a la galería #dropsfan. ¿Necesitas ayuda con este patrón?Encontrarás 25 videos tutoriales, un espacio para comentarios/preguntas y más visitando la página del patrón en garnstudio.com © 1982-2026 DROPS Design A/S. Todos los derechos reservados. Este documento, incluyendo todas sus sub-secciones, está protegido por los derechos de autor (copyright). Lee más acerca de lo que puedes hacer con nuestros patrones en la parte de abajo de cada patrón de nuestro sitio. |
|||||||||||||||||||


Con más de 40 años en el diseño de modelos de punto y de ganchillo, DROPS Design ofrece una de las más vastas colecciones de patrones gratuitos en el internet - traducidos en 17 idiomas. Al día de hoy, contamos con 324 catálogos y 12290 patrones - de los cuales 11675 están traducidos en español.
Nosotros trabajamos con mucho esmero para brindarte lo mejor que las labores de punto y ganchillo tienen para ofrecer,inspiración y consejos, así como hilos de magnífica calidad a precios increíbles! Te gustaría usar nuestros patrones para otro fin además del uso personal? Puedes leer acerca de lo que estás permitida a hacer en el texto de Copyright en la parte de abajo de todos nuestros patrones. Felices labores!
Escribe un comentario sobre DROPS 168-1
¡Nos encantaría saber qué piensas acerca de este patrón!
Si quieres escribir una pregunta referente al patrón, por favor asegúrate de elegir la categoría correcta en el formulario debajo, para acelerar el proceso de respuesta. Los campos obligatorios están marcados con un *.