
Categorías populares
¿Buscas un hilo?


Comentarios / Preguntas (20)
![]() Marianne Gaarder escribió:
Marianne Gaarder escribió:
: Jeg har et spørgsmål til: Morning at Home by DROPS Design - Bluse Strikkeopskrift str. S - XXXL (KIT-168-28) Når der skal tages ud til raglan der hvor der skal strikkes dobbelt perlestrik på ryg og forstykke, skal udtagningerne så følge ret og vrang eller er alle udtagningerne i ret?
26.09.2020 - 09:30DROPS Design respondió:
Hei Marianne. Du fortsetter slik at de nye maskene passer med dobbelt perlestrikk. God Fornøyelse!
28.09.2020 - 11:40
![]() Franziska escribió:
Franziska escribió:
Kann ich den Pullover auch ohne Knopfleiste stricken (beide Seiten wie rechts), oder ist er dann zu eng zum anziehen?
27.02.2020 - 17:02DROPS Design respondió:
Liebe Franziska, wahrscheinlich können Sie diesen Pullover so anpassen - hier können Sie andere top down gestrickte Pullover (mit 21 M = 10 M) finden und vergleichen. Viel Spaß beim stricken!
28.02.2020 - 07:41
![]() Waveney Croft escribió:
Waveney Croft escribió:
I want to knit this pattern for my daughter, but she is extremely petite: I think approx 80cm bust. Do you have any suggestions? Would the small size be way too big on her? Would it be problematic if I cast on fewer stitches for the body of the sweater?
01.01.2020 - 17:42DROPS Design respondió:
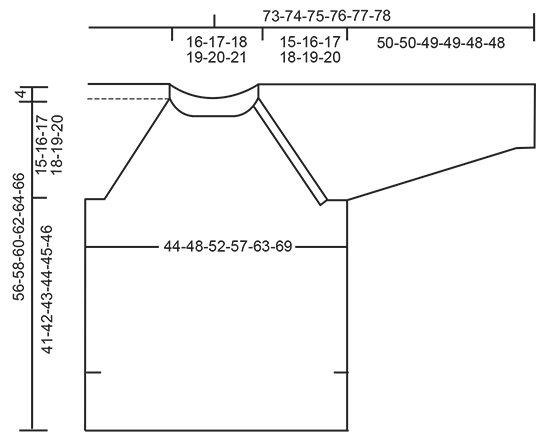
Dear Waveney, this sweater is designed with a bit of positive ease, so it should sit somewaht loose on the wearere. You can find the measurements of the finished sweater on the schematics drawing at the bottom of the page. We usually suggest that you take a swetaer that is comfortable (and possibly similar style) and compare the measurements. Happy Knitting!
01.01.2020 - 21:48
![]() Gladys Malcomson escribió:
Gladys Malcomson escribió:
Just started this pattern. Can you please explain why the two sleeves have a different number of stitches, i.e. 16 and 14, and the back and front are different, 36 and 38, when placing the stitch markers at beginning of yoke.
26.10.2019 - 18:23DROPS Design respondió:
Dear Gladys, the difference is due to the buttonband, which is added to the left shoulder. Happy Knitting!
27.10.2019 - 01:45
![]() Päivi Anttila escribió:
Päivi Anttila escribió:
Kaunis malli ja lanka tekee pinnasta elävän ja nätin
28.07.2019 - 10:36Donna Hale escribió:
Hello I have just started the Morning at Home sweater. I am knitting the large size and after the first increase I have 132 stitches on the needle. When I piece for the next step, the pieces are 4, 46, 16, 48, 14, 4 which adds to 134 stitches. Please explain. Thank you
12.10.2017 - 03:27DROPS Design respondió:
Dear Mrs Hale, 4 + 46 + 16 + 48 + 14 + 4 = 132. Happy knitting!
12.10.2017 - 09:19
![]() Sarah escribió:
Sarah escribió:
Just wondering how to do increases in yoke when the front and back are supposed to be in double seed st. The increases will give 4 knit sts in a row, which will mess up the k2p2 pattern of the double seed st. Please advise.
02.01.2017 - 16:31DROPS Design respondió:
Dear Sarah, the increases have to be worked in double moss stitch on the body, double moss stitch shouldn't be displaced and new sts will be worked continuously following the pattern. Happy knitting!
02.01.2017 - 17:00
![]() Anja Simonsen escribió:
Anja Simonsen escribió:
Jeg skal strikke 4 ret som kantmasker i hver side - når jeg har lavet overdelen skal jeg lukke 2 masker af i hver side - hvad skal jeg med de sidste 2 masker i hver side? Altså har jeg 4 masker i overskud - skal jeg bare putte dem på henholdsvis det ene ærme og forstykket eller hvad? vh Anja Simonsen
13.10.2016 - 21:02DROPS Design respondió:
Hej Anja, De er talt med i de 84-92-102-112-124-136 m du har til forstykket og i de 62-66-70-74-78-82 m du har til ærmet. God fornøjelse!
29.03.2017 - 15:20
![]() Martha Klein escribió:
Martha Klein escribió:
After increasing to 320 sts, the next row says to work the front piece, then slip three different sections to three different holders, then bind off 2 sts. Do you work the sts first before slipping them to the holders or not? If you work the sts, the live yarn is on the end away from the section to be worked. I you don't work the sts, how do you bind off the two at the end of the row? I appreciate any help you can give. Thanks.
28.06.2016 - 07:18DROPS Design respondió:
Dear Mrs Klein, when there are 320 sts cast off the first 2 sts, then work the next 92 sts (= front piece) and keep them on needle, work the next 66 sts and slip them on a st holder (= 1st sleeve), work the next 92 sts (= back piece) and slip them on a st holder, work the next 66 sts and slip them on a st holder (= 2nd sleeve), cast off the last 2 sts = 92 sts on needle for front piece. Each piece will be now worked separately, starting with front piece. Happy knitting!
28.06.2016 - 08:35
![]() Kerstin Bergen escribió:
Kerstin Bergen escribió:
Liebes DROPS-Team, eine tolle Anleitung und ein leicht zu strickender Pullover. Es hat mir sehr viel Spaß gemacht, und ich konnte die Arbeit immer nur schwer weglegen. Das DROPS Belle ist ein sehr schönes Garn, was sich gut verstricken lässt. Da ich sehr fest stricke, musste ich die Nadelstärke 5 nehmen, und das war perfekt.
12.06.2016 - 21:59
|
|
Morning at Home#morningathomesweater |
|
|
|
|
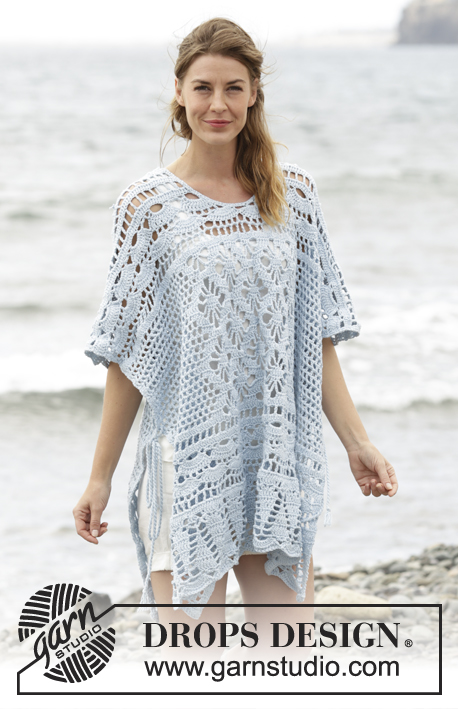
Jersey de punto DROPS en punto arroz doble con raglán en ”Belle”. Tejido de arriba abajo. Talla: S - XXXL.
DROPS 168-28 |
|
|
PUNTO MUSGO (de ida y vta en ag): Trabajar todas las filas de derecho. 1 pliegue = 2 filas de derecho. PUNTO MUSGO (en redondo): 1 pliegue = 2 vtas. *1 vta de derecho y 1 vta de revés*, repetir de * a * PUNTO ARROZ DOBLE: Fila 1: *2 d., 2 r.*, repetir de * a *. Fila 2: derecho sobre derecho y revés sobre revés. Fila 3: Revés sobre derecho y derecho sobre revés Fila 4: Como la 2ª fila Repetir las filas 1 a 4. TIP PARA LOS AUMENTOS (aplicar al raglán): Aum 16 pts como sigue: Aum 2 pts después del primer MP (marcapuntos), 2 pts a cada lado del 2º, 3º y 4º MP y 2 pts antes del 5º MP AUMENTAR COMO SIGUE ANTES DEL MP: Comenzar 2 pts antes del MP: Trabajar 2 d. en el 1er pt, 1 HEB (lazada), 1 d., MP. AUMENTAR COMO SIGUE DESPUÉS DEL MP: MP, 1 d., 1 HEB y 2 d. en el sig pt En la sig vta trabajar las HEB del revés para que se forme un agujero. Aumentar 8 pts como sigue: Aumentar 1 pt después del 1er MP, 1 pt a cada lado del 2º, 3º y 4º MP y 1 pt antes del 5º MP. AUMENTAR COMO SIGUE ANTES DEL MP: Comenzar 1 pts antes del MP: Trabajar 1 HEB , 1 d., MP. AUMENTAR COMO SIGUE DESPUÉS DEL MP: MP, 1 d., 1 HEB En la sig vta trabajar las HEB de revés para que se forme un agujero. OJALES: Cerrar los ojales en la cenefa derecha. 1 ojal = trabajar juntos de derecho el 2º y 3er pt desde el borde y hacer 1 HEB. Cerrar para los ojales cuando la labor mida (medir desde el borde de montaje): TALLA S: 2, 6, 10 y 13 cm TALLA M: 2, 6, 10 y 14 cm TALLA L: 2, 6, 10 y 15 cm TALLA XL: 2, 6, 10 y 16 cm TALLA XXL: 2, 7, 12 y 17 cm TALLA XXXL: 2, 7, 12 y 18 cm ----------------------------------------------------------------------- JERSEY: Se trabaja de ida y vta en ag circular, de arriba abajo. CANESÚ: Mont 104-108-116-120-124-132 pts (incl 4 pts a cada lado para la cenefa) con ag circular tamaño 4 mm con Belle. Trabajar 2 pliegues en PUNTO MUSGO - ver las explicaciones arriba. Trabajar 1 fila de derecho por el LD, al mismo tiempo aum 8-12-16-24-36-44 pts repartidos - ATENCIÓN: Trabajar de derecho los 4 pts más externos a cada lado hacia el centro del delantero y no hacer aum en estos pts (= pts de la cenefa) = 112-120-132-144-160-176 pts en ag. La labor comienza en el lado izquierdo, entre la manga y el delantero. Insertar 5 MP en la labor como sigue (por el LR): 4 d. (= cenefa), insertar 1 MP, 36-40-46-52-60-68 r. (= delantero), insertar 1 MP, 16 r. (= manga), insertar 1 MP, 38-42-48-54-62-70 r. (= espalda), insertar 1 MP, 14 r. (= manga), insertar 1 MP y finalizar con 4 d. (= cenefa). Cerrar para los OJALES en la cenefa derecha - ver las explicaciones arriba. Ahora trabajar con PUNTO ARROZ DOBLE sobre los pts del delantero y la espalda, trabajar los pts de la manga en pt jersey. Continuar trabajando los pts de la cenefa en pt musgo, AL MISMO TIEMPO aum para el RAGLÁN - LEER TIP PARA LOS AUMENTOS. Aumentar cada 2ª fila (= cada fila por el LD) como sigue: aum 16 pts 2-2-3-4-4-5 vcs, después aum 8 pts 19-21-21-21-23-23 vcs. RECUERDE MANTENER LA MISMA TENSIÓN DEL TEJIDO. Después de completar todos los aum para el raglán hay 296-320-348-376-408-440 pts en la fila y la labor mide aprox 15-16-17-18-19-20 cm desde el borde de montaje. Trabajar la sig fila como sigue por el LR: Cerrar los primeros 2 pts en la ag, trabajar 84-92-102-112-124-136 pts (= delantero), desl los sig 62-66-70-74-78-82 pts a 1 gancho aux (= manga), desl los sig 84-92-102-112-124-136 pts a 1 gancho aux (= espalda), desl los sig 62-66-70-74-78-82 pts a 1 gancho aux (= manga), cerrar los últimos 2 pts. DELANTERO: Se trabaja de ida y vta en ag. = 84-92-102-112-124-136 pts. AHORA MEDIR LA LABOR DESDE AQUÍ. Continuar con pt arroz doble, en las primeras 2 filas montar 4 pts nuevos a cada lado = 92-100-110-120-132-144 pts. Continuar con pt arroz doble y 4 pts en pt musgo a cada lado. Cuando la labor mida 40-41-42-43-44-45 cm, trabajar 2 pliegues sobre todos los pts, después rematar. ESPALDA: Desl 84-92-102-112-124-136 pts desde el gancho aux de vta a la ag circular tamaño 4 mm, trabajar como el delantero. MANGA: Se trabaja en redondo en ag de doble punta. Desl los 62-66-70-74-78-82 pts de vta a ag de doble punta tamaño 4 mm y mont 8 pts bajo la manga = 70-74-78-82-86-90 pts. Insertar 1 MP en el centro de los 8 pts nuevos montados. Continuar en pt jersey, AHORA MEDIR LA LABOR DESDE AQUÍ! Cuando la labor mida 3 cm dism 1 pt a cada lado del MP, repetir las dism cada 2½-2½-2-2-2-2 cm 14-15-16-17-18-19 vcs más = 40-42-44-46-48-50 pts. Cuando la labor mida 49-49-48-48-47-47 cm, trabajar 2 pliegues en PT MUSGO - ver las explicaciones arriba! Rematar. Trabajar otra manga de la misma manera. TERMINACIÓN: Coser la abertura bajo las mangas. Colocar los 4 pts de la cenefa de la manga bajo los 4 pts del delantero y asegurar. Coser los lados dentro del bucle exterior del pt orillo dejando 16 cm abiertos en la parte inferior = aberturas laterales. Coser los botones en la cenefa de la manga izquierda. |
|
 |
|
¿Terminaste este patrón?Entonces, etiqueta tus fotos con #dropspattern #morningathomesweater o envíalas a la galería #dropsfan. ¿Necesitas ayuda con este patrón?Encontrarás 28 videos tutoriales, un espacio para comentarios/preguntas y más visitando la página del patrón en garnstudio.com © 1982-2026 DROPS Design A/S. Todos los derechos reservados. Este documento, incluyendo todas sus sub-secciones, está protegido por los derechos de autor (copyright). Lee más acerca de lo que puedes hacer con nuestros patrones en la parte de abajo de cada patrón de nuestro sitio. |


Con más de 40 años en el diseño de modelos de punto y de ganchillo, DROPS Design ofrece una de las más vastas colecciones de patrones gratuitos en el internet - traducidos en 17 idiomas. Al día de hoy, contamos con 324 catálogos y 12290 patrones - de los cuales 11685 están traducidos en español.
Nosotros trabajamos con mucho esmero para brindarte lo mejor que las labores de punto y ganchillo tienen para ofrecer,inspiración y consejos, así como hilos de magnífica calidad a precios increíbles! Te gustaría usar nuestros patrones para otro fin además del uso personal? Puedes leer acerca de lo que estás permitida a hacer en el texto de Copyright en la parte de abajo de todos nuestros patrones. Felices labores!
Escribe un comentario sobre DROPS 168-28
¡Nos encantaría saber qué piensas acerca de este patrón!
Si quieres escribir una pregunta referente al patrón, por favor asegúrate de elegir la categoría correcta en el formulario debajo, para acelerar el proceso de respuesta. Los campos obligatorios están marcados con un *.