
Categorías populares
¿Buscas un hilo?


Comentarios / Preguntas (166)
![]() Janet Konecne escribió:
Janet Konecne escribió:
I am working on a Medium size - This is to answer the question you had in response to my question about the errata....Thank you.
07.01.2019 - 17:18DROPS Design respondió:
Dear Mrs Konecne, in size M you start yoke with 286 sts and decrease for raglan on sleeve: 17 + 4 times 2 sts on each sleeve = 84 sts in total on both sleeves and on body: 2 + 16 times 2 sts on back piece + 1 st on each front piece = 72 sts in total. There were 286 sts - (84 sts dec on sleeves + 72 sts dec on body) = 130 sts. Happy knitting!
08.01.2019 - 09:38
![]() Janet Konecne escribió:
Janet Konecne escribió:
I have just finished this sweater and wonder if there is an errata for the top portion of the sweater. I have followed the decreases correctly (even made a chart to keep track of the different decreases in sleeve and body), but the stitch count is not correct and it is a very wide neck line! Am I missing something in the count? I look forward to a response as I LOVE this pattern, but am so dissappointed in the finish at the top....
04.01.2019 - 17:08DROPS Design respondió:
Dear Mrs Konecne, can you please tell us the size you are working ? Thank you!
07.01.2019 - 08:18
![]() MARISOL escribió:
MARISOL escribió:
¿EN MEXICO, DONDE COMPRO LOS DROPS?
29.12.2018 - 00:32DROPS Design respondió:
Hola Marisol. Aquí tienes el línk para los envíos internacionales: https://www.garnstudio.com/findastore.php?s=w&cid=23
30.12.2018 - 15:25
![]() Nathalie escribió:
Nathalie escribió:
Bonjour, pour les 5 premiers cm avant les diminutions, comment se tricote le deuxième rang ? faut-il inverser les mailles ? Si on a fait 8 mailles envers 8 mailles endroit au premier rang on inverse en faisant 8 mailles endroits 8 mailles envers pour créer un jersey ? Merci Nathalie
24.08.2018 - 08:39DROPS Design respondió:
Bonjour Nathalie, au deuxieme rang, il faut inverser les mailles, cela veut dire que sur l'envers vous tricotez les mailles comme elles se presentent. Bon tricot!
24.08.2018 - 10:18
![]() Therese escribió:
Therese escribió:
Zou u de instructie onder het kopje PAS wat meer uitgebreid kunnen uitleggen, zodat ik beter begrijp hoe ik de raglan in het breiwerk kan verwerken? Zie voorgaande vraag!
15.08.2018 - 12:50DROPS Design respondió:
Dag Therese, Bij de uitleg voor RAGLAN bovenaan het patroon staat hoe je moet minderen. Dus welke techniek je gebruikt voor de raglan afhankelijk van waar je bent; na de raglan op de goede/verkeerde kant van het werk of voor de raglan op de goede/verkeerde kant van het werk. Daarnaast staat in de uitleg bij het patroon hoe vaak je moet minderen; dit is voor de mouw en het lijf namelijk verschillend.
20.08.2018 - 10:05
![]() Therese escribió:
Therese escribió:
Sorry, het breien van de raglan was mij duidelijk alleen begrijp ik niet hoe ik dit in het breiwerk moet verwerken. Zoals ik het lees (op de goede kant): raglan mouw breien op de laatste steken van de mouw/ markeerder 2 en de eerste twee steken achterpand en de tweede bij markeerder 4 in overgang mouw met voorpand. Om de naald breien, zodat je steeds op dezelfde plek mindert. Volgens mij wordt de raglan op het linker- en rechtervoorpand en aan de beide zijde van het achterpand dan verschillend.
13.08.2018 - 10:31DROPS Design respondió:
Om de hoeveel naalden je mindert staat aangegeven in het patroon, dit is voor de mouwen en de panden verschillende, dus je mindert niet persé steeds op dezelfde plek (lees tegelijkertijd op mouwen en lijf.)
20.08.2018 - 10:09
![]() Therese escribió:
Therese escribió:
Hallo, ik wil aan de raglan beginnen, maar begrijp de uitleg niet. Voor welke markeerders brei je twee samen en de overige steken voor de mouw en voor welke markeerders voor het lijf. De eerste 16 minderingen voor de mouw minder je om de naald. Je mindert dus steeds op dezelfde plek, terwijl bij de andere markeerders niet geminderd wordt. Lijkt mij niet kloppen. Zou je een meer uitgebreide uitleg kunnen geven over het maken van de raglan?
11.08.2018 - 20:42DROPS Design respondió:
Dag Therese, Omdat je inderdaad verschillend op het lijf en de mouwen mindert bij de raglan heb ik de instructie voor het minderen voor de raglan aangepast, zodat het wat duidelijker is. Hopelijk kom je er nu uit.
12.08.2018 - 17:54
![]() Van Hyfte escribió:
Van Hyfte escribió:
Hallo , ik probleem met de mouwen , hoe krijg ik ze in de het briewerk ? mvg Christine
19.07.2018 - 20:48DROPS Design respondió:
Dag Christine, Deze hoef je er niet in te zetten of aan te naaien, maar je zet ze samen met het lijf op dezelfde rondbreinaald, zodat je daarna de pas kunt breien. Op de plek op het lijf waar afgekant is voor de armsgaten, zet je de mouwen op dezelfde rondbreinaald als het lijf.
07.08.2018 - 09:54Nicola Robinson escribió:
I've cast on 32 stitches as required and I have a total of 4 double pointed needles. Do I somehow get 10 stitches on one needle and 11 stitches on each of the other 2 needles, using the fourth needle to knit with??
19.05.2018 - 06:06Nicola Robinson escribió:
Susan I am extremely confused. I still have NO idea how to get from knitting with two needles to knitting with four!! I've never done this before and I can't find any explanations how to do this, so that video is completely useless to me. Secondly, that video (which shows knitting already on four needles) has no sound.
19.05.2018 - 05:50DROPS Design respondió:
Hi Nicola, To work the sleeves in the round with double pointed needles, cast on all stitches with 2 needles and then divide all the stitches between 4 of the double pointed needles leaving you with 1 free needle to work with. The first row is a bit tricky as you have to make sure that the work is not twisted, but you work on from the last cast-on stitch (where the strand is) to the first cast on stitch, so that you get a round. Work to end of first needle and then use the new free needle to work needle 2 and so on. I hope this helps. Happy knitting!
22.05.2018 - 08:19
|
||||||||||
Romantic Twist#romantictwistcardigan |
||||||||||
 |
 |
|||||||||
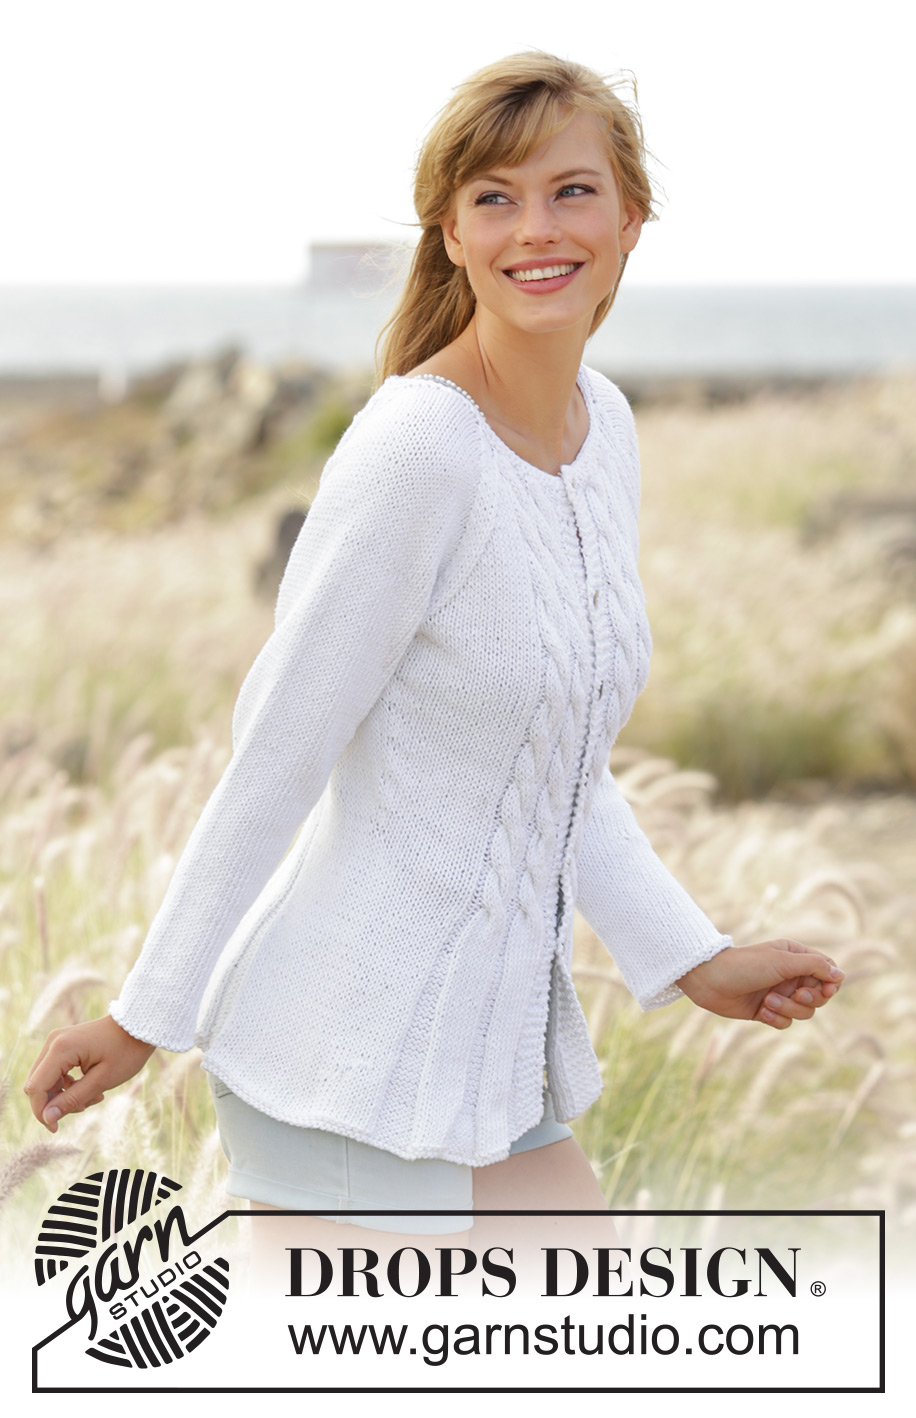
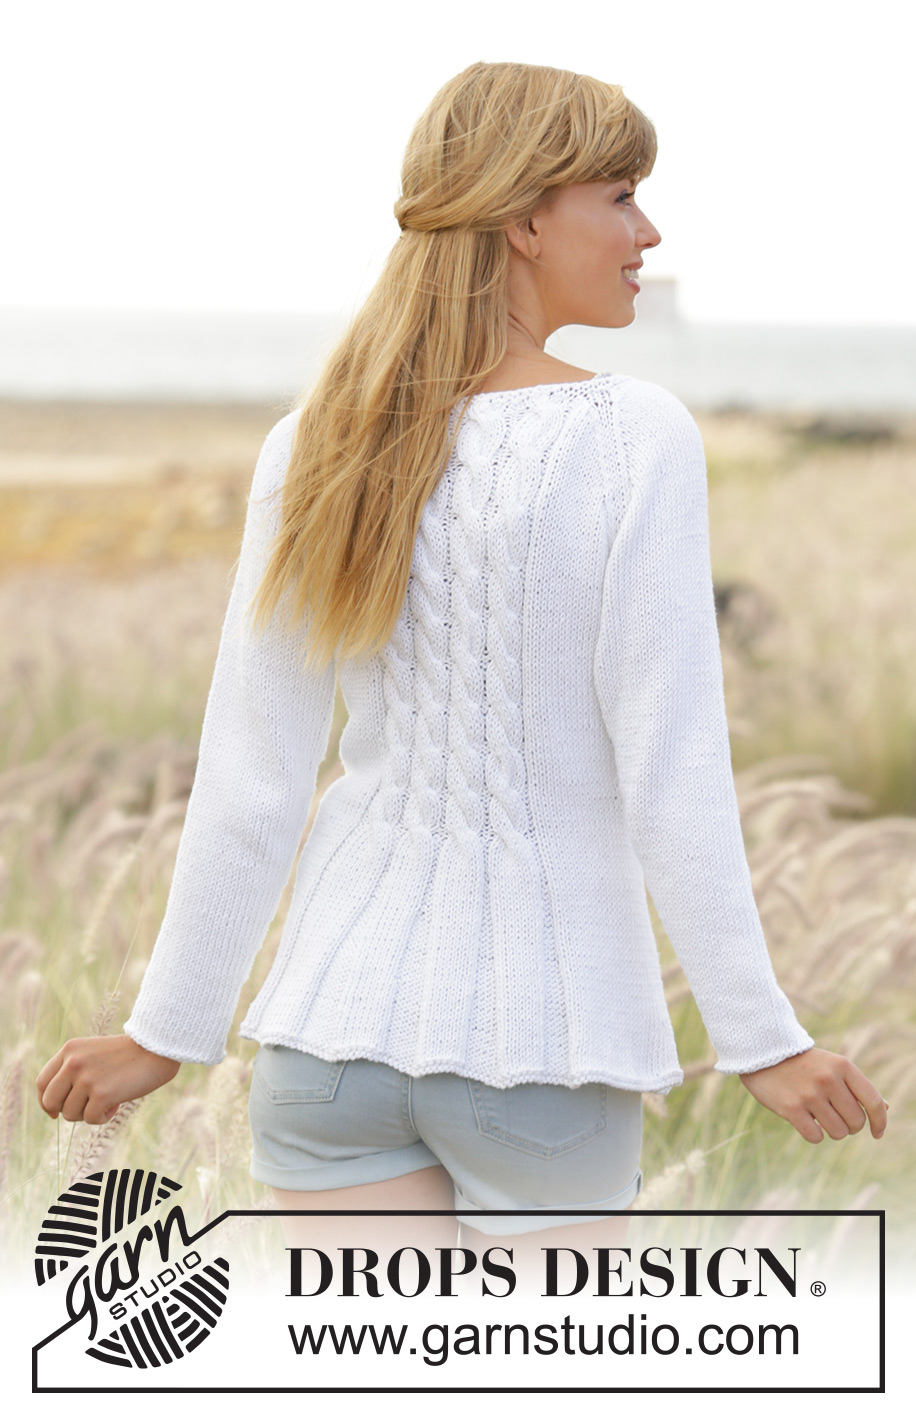
Chaqueta de punto ajustada DROPS con patrón de trenzas y raglán en ”Paris”. Talla: S - XXXL.
DROPS 169-1 |
||||||||||
|
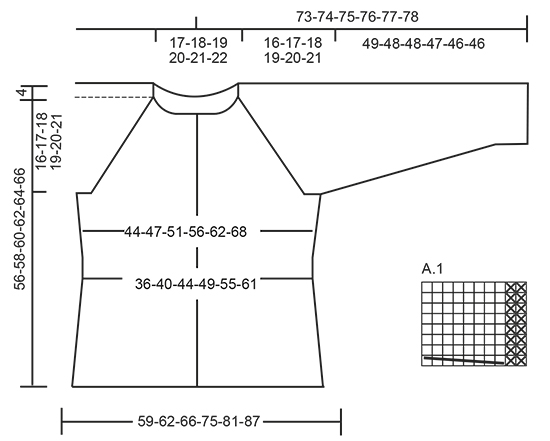
PUNTO MUSGO (de ida y vta en ag): Trabajar todas las filas de derecho. 1 pliegue = 2 filas de derecho. PUNTO MUSGO (se trabaja en redondo): 1 pliegue = 2 vueltas. * 1 vta de derecho, 1 vta de revés*, repetir de * a *. TIP PARA LAS DISMINUCIONES: Dism 1 pt trabajando 2 pjr. Trabajar las disminuciones de modo alterno al inicio y al final de la sección de revés. PATRÓN: Ver el diagrama A.1 El diagrama muestra todas las filas del patrón visto por el LD. RAGLÁN: Dism 2 pts en cada transición entre el cuerpo y la manga. Dism como sigue por el LD: 2 pjd, 2 d. (el MP (marcapuntos) queda entre estos pts), desl 1 pt como de derecho, 1 d., pasar el pt desl por encima. Dism como sigue por el LR: 2 pjr retorcido, 2 r. (el MP queda entre estos pts), 2 pjr TIP PARA LA REALIZACIÓN DEL TRABAJO: Si la tensión del tejido no corresponde en altura y el tejido está muy prieto, las dism del raglán quedarán muy cortas y las sisas muy pequeñas. Esto se puede ajustar tejiendo filas extra sin dism, distribuidas equitativamente entre las filas con dism. OJALES: Cerrar para los ojales en la cenefa derecha. 1 ojal = trabajar juntos de derecho el 2º y 3er pt desde el centro del delantero y hacer 1 HEB (lazada). Cerrar para los ojales cuando la labor mida: TALLA S: 19, 26, 33, 40, 47 y 54 cm. TALLA M: 19, 26, 33, 40, 48 y 56 cm. TALLA L: 19, 26, 34, 42, 50 y 58 cm. TALLA XL: 19, 28, 36, 44, 52 y 60 cm. TALLA XXL: 19, 26, 33, 40, 47, 54 y 62 cm TALLA XXXL: 19, 26, 33, 40, 48, 56 y 64 cm ---------------------------------------------------------------------- CUERPO: Se trabaja de ida y vta en ag circular desde el centro del delantero. Mont 216-228-240-266-286-306 pts (incl los 5 pts de la cenefa a cada lado del centro del delantero) con ag circular tamaño 5 mm y Paris. Trabajar 1 pliegue en PUNTO MUSGO - ver las explicaciones arriba, después trabajar como sigue - por el LD: 5 pts en pt musgo, * 8 r., 8 d*, repetir de * a * un total de 2 vcs, 8 r., 27-33-39-44-54-64 pts en pt jersey, * 8 r., 8 d.*, repetir de * a * un total de 4-4-4-5-5-5 vcs, 8 r., 27-33-39-44-54-64 pts en pt jersey, * 8 r., 8 d.*, repetir de * a * un total de 2 vcs, 8 r., 5 pts en pt musgo. Continuar con este patrón hacia arriba. RECUERDE MANTENER LA MISMA TENSIÓN DEL TEJIDO. Cuando la labor mida 5 cm, dism 1 pt en todas las secciones de revés (= 11-11-11-12-12-12 dism por fila) - LEER EL TIP PARA LAS DISMINUCIONES. Repetir las dism cada 3 cm 5 vcs más = 150-162-174-194-214-234 pts. Cerrar para los OJALES en la cenefa derecha - ver las explicaciones arriba. Cuando la labor mida 21 cm trabajar como sigue: 5 pts en pt musgo. A.1 dos vcs, 2 r., pt jersey sobre los sig 27-33-39-44-54-64 pts, A.1 4-4-4-5-5-5 vcs, 2 r., pt jersey sobre los sig 27-33-39-44-54-64 pts, A.1 2 vcs, 2 r., 5 pts en pt musgo. Insertar 2 MP en la labor a 40-43-46-51-56-61 pts de cada lado (espalda = 70-76-82-92-102-112 pts). Cuando la labor mida 23 cm aum 1 pt a cada lado de cada MP (= 4 pts aum), repetir los aum cada 2.5-3-3-3.5-3.5-4 cm 5 vcs más =174-186-198-218-238-258 pts. Cuando la labor mida 40-41-42-43-44-45 cm , trabajar la sig fila (por el LD) como sigue: 43-46-49-54-59-64 pts, cerrar los 6 pts sig, trabajar 76-82-88-98-108-118 pts, cerrar los 6 pts sig y trabajar los 43-46-49-54-59-64 pts restantes. Dejar la labor en espera y trabajar las mangas. MANGA: Se trabaja en redondo con ag de doble punta. Mont 32-34-36-38-40-42 pts con ag de doble punta tamaño 5 mm con Paris. Trabajar 1 pliegue, después continuar en pt jersey. Insertar 1 MP al inicio de la vta (= centro bajo la manga). Cuando la labor mida 8 cm, aum 2 pts en el centro bajo la manga. Trabajar los aum cada 3-2.5-2.5-2.5-2-2 cm 13-13-14-15-16-16 vcs más = 60-62-66-70-74-76 pts. Cuando la labor mida 49-48-48-47-46-46 cm (medidas más cortas en las tallas más grandes debido a la mayor copa de la manga), cerrar 6 pts bajo la manga = 54-56-60-64-68-70 pts. Dejar la labor en espera y trabajar la otra manga. CANESÚ: Desl las mangas a la misma ag circular que el cuerpo, donde se cerró para las sisas = 270-286-306-334-362-386 pts. Insertar un MP en cada transición entre las mangas y el cuerpo. Continuar con el patrón como antes y AL MISMO TIEMPO dism para el RAGLÁN - ver explicaciones arriba. Trabajar las disminuciones para el cuerpo y para la manga de modo diferente. DISMINUCIONES DEL RAGLÁN EN LA MANGA: Dism cada 2ª fila 16-17-17-18-18-19 vcs, después cada fila 4-4-6-7-9-9 vcs (= un total de 20-21-23-25-27-28 vcs). DISMINUCIONES DEL RAGLÁN EN EL CUERPO: Dism cada 4ª fila 4-2-0-0-0-0 vcs, cada 2ª fila 11-16-19-21-19-16 vcs y después cada fila 0-0-2-0-7-15 vcs (= un total de 15-18-21-21-26-31 vcs). Después de completar todas las dism quedan 130-130-130-150-150-150 pts en la ag. En la sig fila dism 2 pts sobre cada trenza de A.1 = 114-114-114-132-132-132 pts. Trabajar 2 pliegues sobre todos los pts, en la 1ª fila dism 20-16-12-26-22-18 pts repartidos = 94-98-102-106-110-114 pts. Rematar. TERMINACIÓN: Coser las aberturas bajo las mangas. Coser los botones en la cenefa izquierda. |
||||||||||
Explicaciones del diagrama |
||||||||||
|
||||||||||
 |
||||||||||
¿Terminaste este patrón?Entonces, etiqueta tus fotos con #dropspattern #romantictwistcardigan o envíalas a la galería #dropsfan. ¿Necesitas ayuda con este patrón?Encontrarás 26 videos tutoriales, un espacio para comentarios/preguntas y más visitando la página del patrón en garnstudio.com © 1982-2026 DROPS Design A/S. Todos los derechos reservados. Este documento, incluyendo todas sus sub-secciones, está protegido por los derechos de autor (copyright). Lee más acerca de lo que puedes hacer con nuestros patrones en la parte de abajo de cada patrón de nuestro sitio. |
||||||||||


Con más de 40 años en el diseño de modelos de punto y de ganchillo, DROPS Design ofrece una de las más vastas colecciones de patrones gratuitos en el internet - traducidos en 17 idiomas. Al día de hoy, contamos con 324 catálogos y 12290 patrones - de los cuales 11674 están traducidos en español.
Nosotros trabajamos con mucho esmero para brindarte lo mejor que las labores de punto y ganchillo tienen para ofrecer,inspiración y consejos, así como hilos de magnífica calidad a precios increíbles! Te gustaría usar nuestros patrones para otro fin además del uso personal? Puedes leer acerca de lo que estás permitida a hacer en el texto de Copyright en la parte de abajo de todos nuestros patrones. Felices labores!
Escribe un comentario sobre DROPS 169-1
¡Nos encantaría saber qué piensas acerca de este patrón!
Si quieres escribir una pregunta referente al patrón, por favor asegúrate de elegir la categoría correcta en el formulario debajo, para acelerar el proceso de respuesta. Los campos obligatorios están marcados con un *.