
Categorías populares
¿Buscas un hilo?


Comentarios / Preguntas (10)
![]() Emma escribió:
Emma escribió:
Hej! Jag förstår inte början. Jag ska först göra en ring med 4 luftmaskor med dubbel tråd. Sen ska jag på något sätt virka fm så att 4 blir 6. Hur? Menar ni att man virkar 2 gånger fm i varannan? Eller menar ni att man ska sluta ha dubbel tråd efter att man slutit cirkeln och sen på något sätt virka 6 stycken fm? På videon ser det ut som att ni virkat botten men bara en tråd men det står aldrig att man ska ändra till enkel. Tacksam för svar.
02.10.2020 - 17:33DROPS Design respondió:
Hei Emma. Du skal hekle med 2 tråder (i videoen hekler vi med en tykkere tråd, derfor bare 1 tråd). Du starter med 4 luftmasker og setter disse sammen til en ring med en kjedemaske i første luftmaske. Så hekler du 6 fastmasker om denne ringen slik at du har en sirkel på 6 fastmasker ,deretter hekler du 2 fastmasker i hver av disse 6 fastmaskene = 12 fastmasker. Deretter øker du slik det står i oppskriften. God Fornøyelse!
05.10.2020 - 11:24
![]() Paola escribió:
Paola escribió:
Bellissimo questo cestino ma non sarebbe meglio lavorarlo tutto a spirale invece che chiudere tutti i giri? Il disegno si apprezza ugualmente....
19.12.2018 - 14:28DROPS Design respondió:
Buongiorno Paola. Può lavorare anche in spirale se preferisce. Buon lavoro!
20.12.2018 - 08:27Laura escribió:
I do agree with Sissy, one of my crochet students is working on this pattern and if the 3ch do not count as a dc, then the last one is an extra stitch.
22.04.2017 - 14:52
![]() Sissy escribió:
Sissy escribió:
The first round has the last stitch with an X in it. Your video shows the last stitch worked as the empty box color, the chart shows an X so technically you must stop before the end of the chart. That is fine when the first and last stitches are to be done in the same color. But for rows 4 & 6 the chain will not be the correct color. I have made the adjustments, but am writing to you for others who may not be able to make it work.
11.04.2017 - 22:21
![]() Sissy escribió:
Sissy escribió:
Yes, but then what happens when you come to the end of the chart on the last repeat? What is the last stitch?
10.04.2017 - 05:11DROPS Design respondió:
Dear Sissy, after the last repeat, you close the round with a slip stitch, which you crochet into the top of the 3 treble, the round was started with. I hope this helps. Happy chrocheting!
10.04.2017 - 23:08
![]() Sissy escribió:
Sissy escribió:
Hi, in the notes section of the pattern it says the ch 3 that replaces the first dc of every round does not count in the number of dc for the round. I believe as the pattern is written and as the video shows, it is counted.
01.04.2017 - 19:42DROPS Design respondió:
Dear Sissy, you can see in the first round in the video that the first 3 ch are worked extra to the first 2 sts worked in green (in the video / dark grey in the pattern). Happy crocheting!
03.04.2017 - 13:33Yasyas escribió:
Thank you so much for the pattern, I love the colours used for this basket.
13.10.2016 - 23:54
![]() Lauren McRoberts escribió:
Lauren McRoberts escribió:
Love this unique basket!
23.12.2015 - 17:53
![]() Sigi escribió:
Sigi escribió:
Würde ich gerne nach häkeln, ist auch ein schönes Geschenk.
18.12.2015 - 16:54
![]() Michelle Winther escribió:
Michelle Winther escribió:
Passar bra till inredningen.
13.12.2015 - 14:45
|
||||||||||
Quito#quitobasket |
||||||||||
|
|
||||||||||
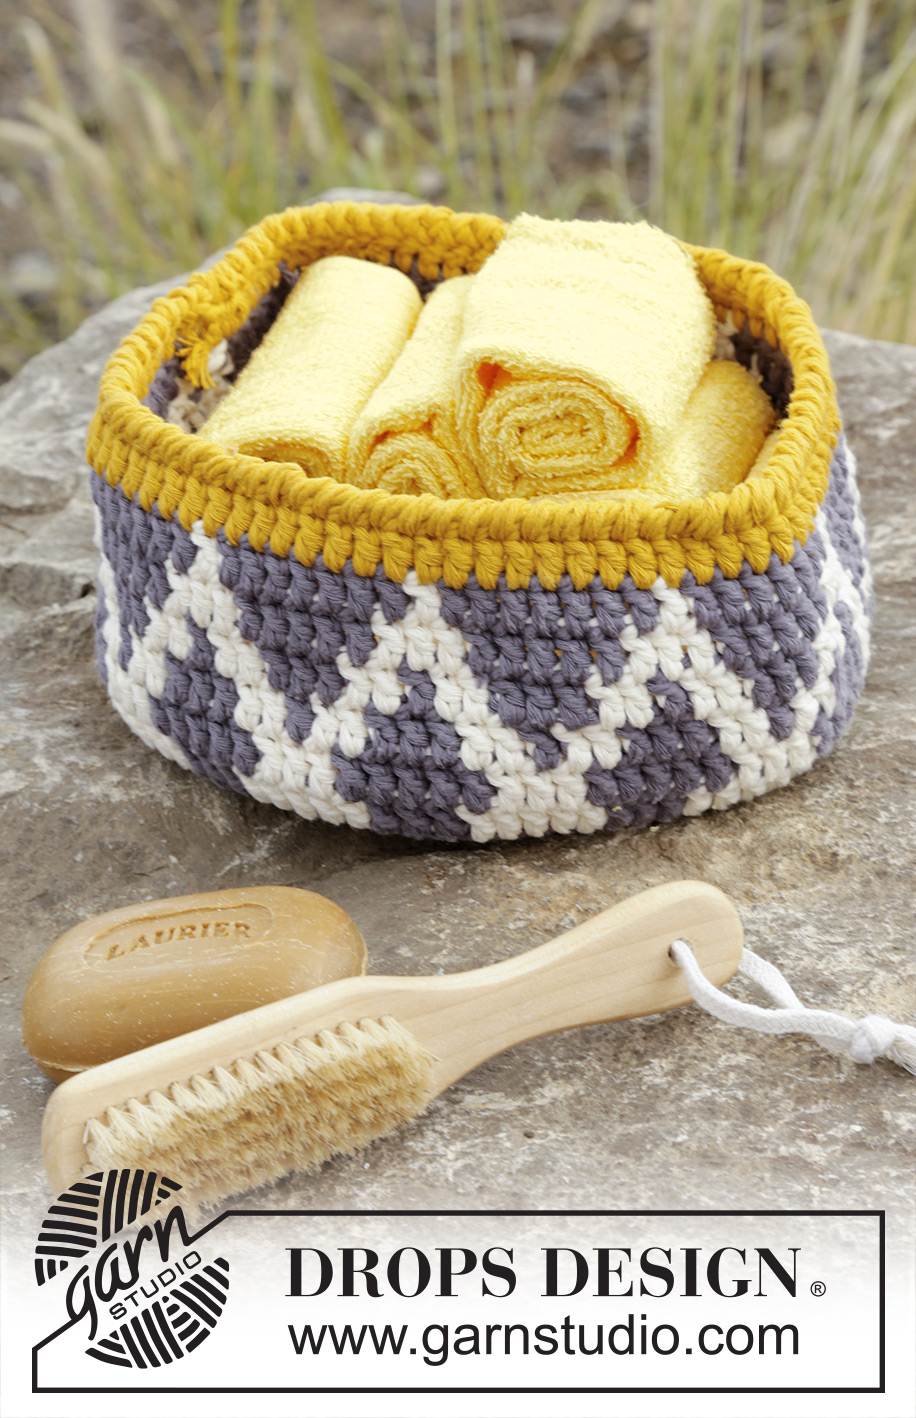
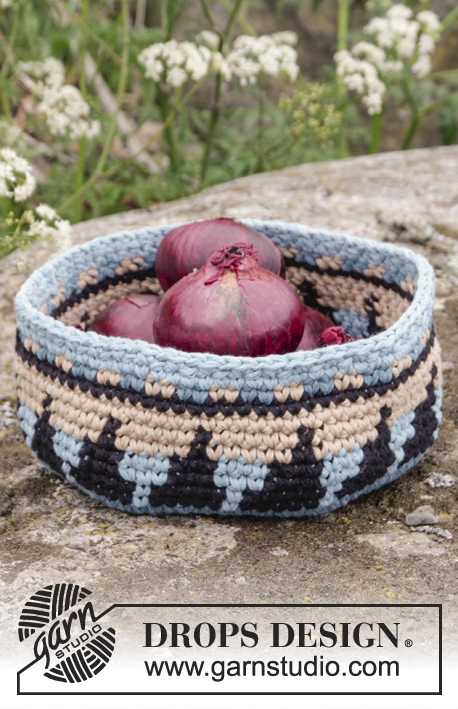
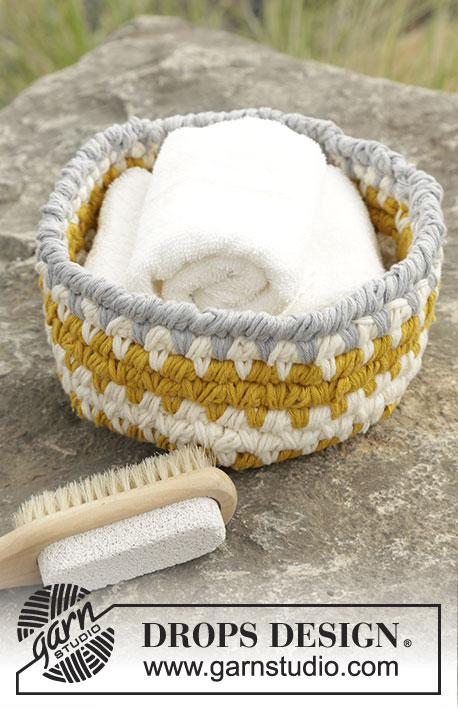
Cesto de ganchillo DROPS con patrón de colores en 2 hilos "Paris".
DROPS 170-40 |
||||||||||
|
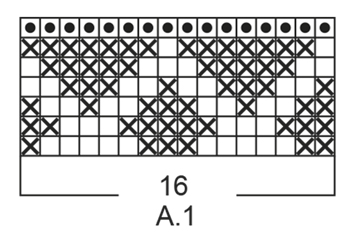
PATRÓN: Ver el diagrama A.1. Trabajar el diagrama con p.a., es decir 1 cuadrado del diagrama = 1 p.a. con 2 hilos. PATRÓN DE COLORES (trabajar en redondo): Al cambiar el color trabajar como sigue: Trabajar el último p.a. con el primer color pero sin hacer la última lazada, cambiar al sig. color y trabajar la última lazada, ahora trabajar el sig. p.a. Al trabajar con dos colores colocar el hilo del color que no se trabaja encima de los pts de la vta anterior, trabajar alrededor de los hilos para que queden escondidos mientras siguen la vta. TIP PARA REALIZAR EL TRABAJO: Comenzar cada vta de p.b. con 1 p.de cad, finalizar con 1 p.e. en el primer p.de cad. del inicio de la vta (este p.de cad. no se cuenta como p.b.) Comenzar cada vta de p.a. con 3 p.de cad, finalizar con 1 p.e. en el 3er p.de cad. del inicio de la vta (estos p.de cad. no se cuentan como p.a.) TIP PARA TRABAJAR CON DOBLE HILO: Usar hilo de ambos extremos (de dentro y de fuera) del ovillo. Al cambiar a un nuevo ovillo asegúrate de cambiar ambos hilos al mismo tiempo - para evitar tener demasiado hilos al rematar. PUNTO CANGREJO: Trabajar p.b. pero hacia atrás, es decir de izquierda a derecha. ----------------------------------------------------------------------- CESTA: Trabajar 4 p.de cad. con ag de ganchillo tamaño 5.5 mm y 2 hilos color gris oscuro y formar un anillo con 1 p.e. en el primer p.de cad - LEER EL TIP PARA TRABAJAR CON DOBLE HILO. VUELTA 1: LEER EL TIP PARA REALIZAR EL TRABAJO! Trabajar 6 p.b. dentro del anillo. VUELTA 2: Trabajar 2 p.b. en cada p.b. = 12 p.b. VUELTA 3: Trabajar * 2 p.b. en el 1er/sig p.b., 1 p.b. en el sig p.b.*, repetir de * a * la vta entera = 18 p.b. RECUERDE MANTENER LA MISMA ATENCIÓN DEL TEJIDO! VUELTA 4: Trabajar * 2 p.b. en el 1er/sig p.b., 1 p.b. en cada uno de los sig 2 p.b.*, repetir de * a * la vta entera = 24 p.b. VUELTA 5: Trabajar * 2 p.b. en el 1er/sig p.b., 1 p.b. en cada uno de los sig 3 p.b.*, repetir de * a * la vta entera = 30 p.b. VUELTA 6: Trabajar * 2 p.b. en el 1er/sig p.b., 1 p.b. en cada uno de los sig 4 p.b.*, repetir de * a * la vta entera = 36 p.b. Continuar trabajando de la misma manera hasta haber completado 12 vtas = 72 p.b. en la última vta. Trabajar la sig vta como sigue: Trabajar * 2 p.b. en el 1er/sig p.b., 1 p.b en cada uno de los sig 8 p.b.*, repetir de * a * la vta entera = 80 p.b. La labor mide aprox 20 cm de diámetro. AHORA MEDIR LA LABOR DESDE AQUÍ!. Trabajar el borde. BORDE: Se trabaja con el patrón con 2 colores al mismo tiempo. Trabajar el borde como sigue: Recuerde el TIP PARA REALIZAR EL TRABAJO! Trabajar repeticiones de A.1 (= 16 p.a.) en toda la vta - LEER EL PATRÓN DE COLORES. Cuando se ha completado A.1 en vertical, trabajar 1 vta con 2 hilos de color mostaza como sigue: Trabajar 1 PUNTO CANGREJO en cada p.a. - ver las explicaciones arriba. Asegurar los hilos. |
||||||||||
Explicaciones del diagrama |
||||||||||
|
||||||||||
 |
||||||||||
¿Terminaste este patrón?Entonces, etiqueta tus fotos con #dropspattern #quitobasket o envíalas a la galería #dropsfan. ¿Necesitas ayuda con este patrón?Encontrarás 10 videos tutoriales, un espacio para comentarios/preguntas y más visitando la página del patrón en garnstudio.com © 1982-2026 DROPS Design A/S. Todos los derechos reservados. Este documento, incluyendo todas sus sub-secciones, está protegido por los derechos de autor (copyright). Lee más acerca de lo que puedes hacer con nuestros patrones en la parte de abajo de cada patrón de nuestro sitio. |
||||||||||


Con más de 40 años en el diseño de modelos de punto y de ganchillo, DROPS Design ofrece una de las más vastas colecciones de patrones gratuitos en el internet - traducidos en 17 idiomas. Al día de hoy, contamos con 324 catálogos y 12290 patrones - de los cuales 11673 están traducidos en español.
Nosotros trabajamos con mucho esmero para brindarte lo mejor que las labores de punto y ganchillo tienen para ofrecer,inspiración y consejos, así como hilos de magnífica calidad a precios increíbles! Te gustaría usar nuestros patrones para otro fin además del uso personal? Puedes leer acerca de lo que estás permitida a hacer en el texto de Copyright en la parte de abajo de todos nuestros patrones. Felices labores!
Escribe un comentario sobre DROPS 170-40
¡Nos encantaría saber qué piensas acerca de este patrón!
Si quieres escribir una pregunta referente al patrón, por favor asegúrate de elegir la categoría correcta en el formulario debajo, para acelerar el proceso de respuesta. Los campos obligatorios están marcados con un *.