
Categorías populares
¿Buscas un hilo?


Comentarios / Preguntas (24)
![]() Carol escribió:
Carol escribió:
Er staat dat het patroon voor het hoedje te vinden is bij Model 69-10. Maar dat model kan ik nergens meer vinden. Zouden jullie alsnog het patroon voor het hoedje hierbij kunnen doen?
30.03.2026 - 14:52DROPS Design respondió:
Dag Carol,
Het patroon voor het hoedje kun je hier vinden.
30.03.2026 - 18:31
![]() GUILAINE escribió:
GUILAINE escribió:
Bonjour, je ne comprend pas l'explication pour le bord du chapeau, aprés avoir effectuer 19-20 cm "2ms dans les 2 m suivantes, 2ms dans la m suivante" et répéter ce qui pour moi voudrait dire qu'il faudrait faire 2ms dans CHAQUE m tous le tour? c'est confus .. merci de me répondre
14.11.2025 - 16:10DROPS Design respondió:
Bonjour Guilaine, effectivement, on va ici crocheter 2 ms soit 1 ms dans chacune des 2 ms suivantes et 2 ms dans la ms suivante = on augmente 1 ms toutes les 3 m, je modifie le texte pour qu'il soit plus facile à comprendre. Bon crochet!
14.11.2025 - 16:26
![]() Thierry Florence escribió:
Thierry Florence escribió:
Bonjour je ne trouve pas les explications du chapeau. Cordialement Florence
25.07.2025 - 16:40DROPS Design respondió:
Bonjour Florence, les explications du chapeau se trouvent en bas, apres le pull, a voir ICI. Bon crochet!
25.07.2025 - 17:20
![]() Anette escribió:
Anette escribió:
Undrar var mönstret till hatten finns?
06.03.2025 - 17:28
![]() Marquita escribió:
Marquita escribió:
I can’t understand the structured pattern. The YOs double the number of stitches and there are no ‘knit 2 tog’ to compensate. What is 1YO, rather than simply YO? I’m obviously missing something!
12.07.2024 - 15:26DROPS Design respondió:
Dear Marguita, the annswer to your question is there in the pattern desrcipton in the 3d and the 5th row... (3rd row: *K 1, SLIP yo from previous row *). In other words the yarnpovers should be slipped off in the next row/round thus creating looser, elongated stitches. Happy Stitching!
16.07.2024 - 00:43
![]() Britt Hagstrand escribió:
Britt Hagstrand escribió:
Hej, enligt omvandlaren skulle 600 gr räcka i BomullLin. Stämmer det med tanke på att det står 17x22 på det garnet och i mönstret 69-21, Ribbon, 650 gr och 13x22v.?
29.06.2021 - 13:49DROPS Design respondió:
Hej Britt, det skall räcka om du håller samma stickfasthet som det står i mönstret. Mönstret är glest med endast 13 m på 10 cm :)
30.06.2021 - 13:44
![]() Maren escribió:
Maren escribió:
Hallo liebes Team, Ich Häkel gerade den Hut und bin fast fertig. Meine Fragen: was sind Rückwendlichstiche ? Verstehe ich es richtig, dass man die Hutkrempe am Ende (nach dem häkeln) nach außen Klappt und den dann äußeren Rand mit diesen rückwendlichstichen bearbeitet? Dann stößt aber die ursprünglich letzte Reihe (krausrippen) an den äußeren Hutrand und dort ist es offen. 🤔 Bitte um Hilfe. Dankeschön. Herzliche Grüße Maren
24.01.2021 - 08:31DROPS Design respondió:
Liebe Maren, die Anleitung für den Hut wurde noch mal neu übersetzt, vielleicht wird es dadurch klarer. Sie schlagen an der Hutkrempe nur die letzten 2 Rd nach oben um und nähen diese dann im Steppstich fest (mit "Rückwendlingsstichen" in der alten Übersetzung ist der Steppstich gemeint). Gutes Gelingen weiterhin!
25.01.2021 - 10:50
![]() Jan C escribió:
Jan C escribió:
Hi, I am still working on the sweater, I am at the sleeve cap, making a size medium. The directions say to bind off 2 stitches every other row 2 times, which is 8 stitches total, then to bind off 1 stitches every other row 11 times, which is 22 stitches at this point my length is around what you indicate as the total length and I have not bound off the next part(2 stitches every other row) I have 22 stitches left on the needle. I think where the directions say 5-11-14 is confusing? HELP
04.04.2020 - 22:41DROPS Design respondió:
Hi Jan, You bind off 2 stitches x 2 = 4 and 1 stitch x 11 = 11. Then you bind off 2 stitches every other row to the correct length. Happy knitting!
06.04.2020 - 07:57
![]() Christine Sherriffs escribió:
Christine Sherriffs escribió:
Thank you GarnStudio for all of your answers. Since I had to rip out both the front and the back because of doing the decrease rows incorrectly. I am now knitting with kinky cotton and it is clearly stretched and you can see the difference where I did not have to rip out. Will the kinky cotton relax once the sweater is blocked? Or should I just shelve this project? Thank you for your honesty. I’m working with the Drops Paris 100% cotton. Again. Thank you for your help.
04.03.2020 - 23:09DROPS Design respondió:
Dear Christinge, wet blocking will even out your knitting. Soak the piece into lukewarm water, press the water out and then pull the piece into shape, and let it completely dry. Happy Kntiing!
05.03.2020 - 01:59
![]() Christine Sherriffs escribió:
Christine Sherriffs escribió:
So sleeve cap decrease. S/b dec 2 stitches at each end of row 3 times and 1 stitch at each end 5 times I’m sorry to be a pain and I truly appreciate your responses.
03.03.2020 - 17:23DROPS Design respondió:
Dear Mrs Sherriffs, if you are working 1st size you will cast off: 2 stitches at the beg of next 6 rows (= 2 sts 3 times on each side), then 1 stitch at the beg of next 10 rows (= 1 st 5 times on each side) then cast off 2 stitches at the beg of every row until sleeve measures 54 cm (number of times will depend on your tension in height, just make sure you cast off the same number of times from RS + from WS). Then cast off remaining stitches. Hope this helps :) Happy knitting!
04.03.2020 - 08:42
|
|
DROPS 69-21 |
|
|
|
|
Jersey DROPS en Ribbon. Sombrero a ganchillo en Muskat.
DROPS 69-21 |
|
|
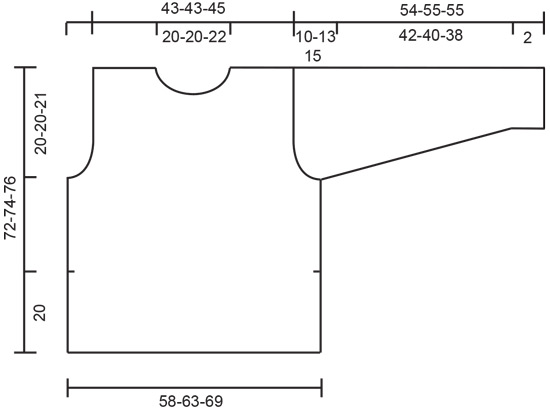
Tensión: 13 pts x 22 filas del patrón = 10 x 10 cm. Patrón: Fila 1 (LD): trabajar de revés Fila 2 (LR): *1 r., 1 HEB (lazada)*, repetir de * a *. Fila 3: *1 d., dejar caer la HEB de la fila anterior*, repetir de * a *. Fila 4: trabajar todos los pts de derecho Fila 5: *1 d., 1 HEB*, repetir de * a *. Fila 6: *1 r., dejar caer la HEB de la fila anterior*, repetir de * a *. Repetir las filas 1 - 6. Pt musgo (de ida y vta): Trabajar todas las filas de derecho Pt musgo (en redondo): *Vta 1: de derecho, Vta 2: de revés* Repetir de * a *. Tip para las disminuciones: El Ribbon tiene tendencia a retorcerse. Para un mejor resultado ir enderezando el hilo según se avanza. ATENCIÓN: Todas las medidas del diagrama corresponden a la prenda suspendida o puesta. Esto se debe a que este tipo de patrón se expande. ------------------------------------------------------------------------ Delantero: Mont 76-82-90 pts con las ag más pequeñas y trabajar 6 filas en pt musgo. Pasar los 5 pts de cada lado a 2 ganchos aux (estos 5 pts se trabajan en pt musgo y se cosen al cuerpo posteriormente) = 66-72-80 pts en aguja. Continuar con el patrón - ver explicaciones arriba. Cuando la labor mida aprox 20 cm mont 6 pts a cada lado = 78-84-92 pts. Continuar con el patrón sobre todos los pts. Cuando la labor mida 52-54-55 cm cerrar para la sisa a cada lado cada 2ª fila: 3 pts 1-1-1 vez, 2 pts 2-4-5 vcs, 1 pt 4-3-4 vcs = 56-56-58 pts. Cuando la labor mida 65-66-67 cm cerrar los 12 pts centrales para el escote. Ahora cerrar a cada lado del escote cada 2ª fila: 2 pts 1-1-1 vez y 1 pt 5-5-6 vcs. Cuando la labor mida 71-73-75 cm trabajar 2 filas en pt musgo sobre todos los pts y rematar todos los pts. La labor mide aprox 72-74-76 cm. Espalda: Mont pts y trabajar como el delantero. Cerrar para la sisa como en el delantero y continuar hasta que la labor mida aprox 70-72-74 cm. Cerrar los 22-22-24 pts centrales para el escote. En la sig fila cerrar 2 pts a cada lado del escote. Trabajar 2 filas en pt musgo cuando la labor mida 71-73-75 cm y después rematar los 15 pts restantes en cada hombro. La labor mide aprox 72-74-76 cm. Manga: Mont 30-32-34 pts. Trabajar 6 filas en pt musgo, después cambiar al patrón. Cuando la labor mida 9 cm aum 1 pt a cada lado 11-10-10 vcs cada 3 cm = 52-52-54 pts. Cuando la manga mida 44-42-40 cm cerrar para la copa de la manga a cada lado cada 2ª fila: 2 pts 3-2-1 vcs, 1 pt 5-11-14 vcs, después cerrar 2 pts a cada lado cada 2ª fila hasta que la labor mida 54-55-55 cm. Rematar los pts restantes. Terminación: Pasar los 5 pts desde los ganchos aux de vta a la ag. Trabajar en pt musgo sobre todos los pts aprox 20 cm (ajustar al largo de la abertura lateral). Rematar. Coser la cenefa en pt musgo al cuerpo. Repetir en otro lado. Coser el hombro derecho. Recoger aprox 75-80 pts alrededor del escote. Trabajar 4 filas en pt musgo, rematar. Coser el hombro izquierdo subiendo por la cenefa. Montar las mangas. Coser las mangas y los lados dentro del pt orillo - comenzar la costura lateral sobre la abertura. SOMBRERO A GANCHILLO EN MUSKAT: Tallas: S/M - M/L Medida de la cabeza: 55 - 57 cm Materiales: Garnstudio MUSKAT de Garnstudio 100% algodón egipcio, 50 g./100 m 200-200 g. color nº 61, beige claro. Aguja de ganchillo DROPS tamaño 3 mm, o el tamaño necesario para obtener la tensión correcta. Tensión: 21 p.b. x 24 filas = 10 x 10 cm Pt cangrejo: Trabajar p.b. por el LD de izquierda a derecha sin girar la labor. Trabajar 1 p.b. en cada p.b. de la vta anterior. ----------------------------------------------------------------------- Sombrero: Trabajar 4 p.de cad, unir formando un anillo con 1 p.e. 1 p.de cad, 6 p.b. dentro del anillo, 1 p.de cad. 1ª vta: 2 p.b. en cada p.b. de la vta anterior = 12 p.b., insertar 1 MP al inicio de la vta. 2ª vta: * 1 p.b. en el primer p.b., 2 p.b. en el sig p.b. *, repetir de * a * = 18 p.b. 3ª vta: * 1 p.b. en cada uno de los primeros 2 p.b., 2 p.b. en el sig p.b. *, repetir de * a * = 24 p.b. 4ª vta: * 1 p.b. en cada uno de los primeros 3 p.b., 2 p.b. en el sig p.b. *, repetir de * a * = 30 p.b. 5ª vta: * 1 p.b. en cada uno de los primeros 4 p.b., 2 p.b. en el sig p.b. *, repetir de * a * = 36 p.b. Continuar de la misma manera aumentando 6 p.b. por vta - trabajando 1 p.b. más entre cada aumento en las sucesivas vtas - hasta que la labor mida 9.5-10.5 cm desde el anillo (la circunferencia aumenta aprox 2 cm cada vta - continuar hasta que la circunferencia sea de aprox 55-57 cm). Ahora continuar con p.b. sin aumentos hasta que la labor mida aprox. 19-20 cm desde el centro. En la sig vta aumentar como sigue:*2 p.b., 2 p.b. en el sig p.b.*, repetir de *a*. Ahora trabajar 22 vtas sin aumentos = ala del sombrero. Trabajar 1 vta en pt cangrejo - ver instrucciones arriba. Cortar y asegurar el hilo. Terminación: Trabajar un borde en la parte exterior del sombrero arriba: con el LD hacia fuera, en el punto donde se dejó de aumentar, formar un pliegue y trabajar 1 vta de p.b. pinchando las 2 capas. Trabajar sobre 2 vtas de p.b. a cada lado del pliegue, de modo que quedan 4 vtas de p.b. dentro del borde. Doblar el ala del sombrero (últimas 22 vtas) por la mitad hacia el LD. Fijar el borde al sombrero sobre 2 vtas de p.b. del mismo modo que en la parte superior. |
|
 |
|
¿Terminaste este patrón?Entonces, etiqueta tus fotos con #dropspattern o envíalas a la galería #dropsfan. ¿Necesitas ayuda con este patrón?Encontrarás 21 videos tutoriales, un espacio para comentarios/preguntas y más visitando la página del patrón en garnstudio.com © 1982-2026 DROPS Design A/S. Todos los derechos reservados. Este documento, incluyendo todas sus sub-secciones, está protegido por los derechos de autor (copyright). Lee más acerca de lo que puedes hacer con nuestros patrones en la parte de abajo de cada patrón de nuestro sitio. |


Con más de 40 años en el diseño de modelos de punto y de ganchillo, DROPS Design ofrece una de las más vastas colecciones de patrones gratuitos en el internet - traducidos en 17 idiomas. Al día de hoy, contamos con 324 catálogos y 12290 patrones - de los cuales 11685 están traducidos en español.
Nosotros trabajamos con mucho esmero para brindarte lo mejor que las labores de punto y ganchillo tienen para ofrecer,inspiración y consejos, así como hilos de magnífica calidad a precios increíbles! Te gustaría usar nuestros patrones para otro fin además del uso personal? Puedes leer acerca de lo que estás permitida a hacer en el texto de Copyright en la parte de abajo de todos nuestros patrones. Felices labores!
Escribe un comentario sobre DROPS 69-21
¡Nos encantaría saber qué piensas acerca de este patrón!
Si quieres escribir una pregunta referente al patrón, por favor asegúrate de elegir la categoría correcta en el formulario debajo, para acelerar el proceso de respuesta. Los campos obligatorios están marcados con un *.