
Categorías populares
¿Buscas un hilo?


Comentarios / Preguntas (16)
![]() Sharon escribió:
Sharon escribió:
Any suggestion on how I could make this a bit wider? This was a funn project. Instruction was easy to follow. S
06.12.2021 - 16:33DROPS Design respondió:
Hi Sharon, If you cast on more stitches then the head band will be wider. Just make sure the number of stitches is divisible by 3 + 2. Happy knitting!
07.12.2021 - 07:03
![]() Stephanie Bedard escribió:
Stephanie Bedard escribió:
Hi there, I am stuck at the middle part! Here’s the part of the pattern I’m having issues with: ROW 5: K 1 edge st, * 1 YO, K 2 in next st *, repeat from *-* 4 times in total and finish with K 1 edge st = 14 sts on needle I had 6 sts on my needle as mentioned after decreasing on row 1 as expected, but when increasing at row 5, I am left with only 11 sts and not 14. Is there any troubleshooting possible here ? Thank you!!
03.12.2021 - 18:29DROPS Design respondió:
Dear Stephanie, you have 2 edge stitches on each side + 4 YO + 2x4=8 sts. So in total you have 14 stitches. You k2 in each of the 4 sts between the edge stitches, so you increase one stitch in each stitch. Happy knitting!
05.12.2021 - 17:27
![]() Sharon escribió:
Sharon escribió:
What is the correct size needles to make the headband. A size 10,75 give a head band hard like a board. This cannot be the correct needles. Is the size give in the pattern correct.
26.11.2021 - 18:29DROPS Design respondió:
Dear Sharon, everyone knits with a different gauge, Pleade make a swatch and use the needles with which you can achieve the knitting tension goven in the pattern. Happy Stitching!
28.11.2021 - 00:26
![]() Sharon escribió:
Sharon escribió:
Hi, looking to start the headband an am confused on how to join the back invisible using kitichner stitch. The first time I made this 3 needle bind off was the solution but it was not invisible and an unhappy with the results. The one am working on now is a Christmas gift so it has to be prefect. So my question again is how do I kitichner the back to make it invisible? Thanks for your response.
26.11.2021 - 09:33DROPS Design respondió:
Dear Sharon, this video shows how to sew together patterns such as rib in this pattern and should help you to finish your piece. Happy finishing!
26.11.2021 - 15:46
![]() Pru escribió:
Pru escribió:
Hello- on knitting the headband as per the instructions...i get a 'seed stitch' pattern...ive ripped out and started 5 times now...am i reading this wrong? please help me...thank you!!
07.12.2019 - 22:19DROPS Design respondió:
Dear Pru, check your number of stitches (you should have 14) and remember to work with 1 edge stitch in garter stitch in each side.On row 1, work: K1 (edge st), then (K1, P1, K1) until 1 stitch remain, K the last st. On row 2, work: K1 (edge st), then repeat: (P1, K1, P1) until last st remain, K last st. Repeat rows 1 and 2. Happy knitting!
09.12.2019 - 08:54
![]() Tanja Kroczek escribió:
Tanja Kroczek escribió:
Hallo Zusammen! Ich stricke gerade das Stirnband. Nach dem 1. Absatz "Wie folgt weiterstricken" steht unter dem 1. Punkt: 6 Maschen übrig, was passiert damit?
02.02.2019 - 12:16DROPS Design respondió:
Liebe Frau Kroczek, bei der 1. Hin-Reihe hier nehmen Sie Maschen ab (= 2 M so abheben als würden sie re zusgestr, 1 M re, die 2 abgehobenen M überziehen), am Ende dieser Reihe sind es nur noch 6 Maschen auf der Nadel. Viel Spaß beim stricken!
04.02.2019 - 11:06
![]() Nagymama escribió:
Nagymama escribió:
Pedig automatával könnyebb és mindenekelőtt pontosabb lenne a fordítás! Egyszer kell jól beprogramozni, és onnantól kezdve nem hibázik. Nem úgy, mint... na mindegy, szóval a leírás még mindig nem jó, mert van ám 6. meg 7. sora is. Hogy a helyesírásról meg az elírásokról ne is beszéljünk. :(
01.10.2018 - 09:39
![]() Nagymama escribió:
Nagymama escribió:
Már megint rossz a magyar leírás. Nem ez az első eset. Tessenek már végiggondolni, hogy ha a fejpántnál ezt a két sort váltogatjuk, akkor abból milyen minta lesz!
30.09.2018 - 09:34DROPS Design respondió:
Kedves Nagymama! Köszönjük, hogy felhívta a figyelmünket a hibára, ami így javításra is került. A fordításokat nem automata készíti, így sajnos, a legnagyobb odafigyelés mellett is előfordulhatnak hibák. Célunk, hogy minél pontosabb minták legyenek a weboldalon, ezért mindig köszönettel vesszük, ha jelzést kapunk egy-egy javítani valóról. Sikeres kézimunkázást!
30.09.2018 - 14:52
![]() Gail Thorpe escribió:
Gail Thorpe escribió:
Thank you for your help on pattern #164-27. The tutorial is very helpful. I have another question. I knit the piece in Polaris yarn. Should I block it before I sew it together? The yarn is so plush and heavy that it seems daunting to plunge it under water. Will it be okay to do so? Please give me some detailed instructions. Thank you.
16.06.2017 - 01:11DROPS Design respondió:
Dear Mrs Thorpe, some knitters block every piece, some others don't. Feel free to contact your DROPS store even per mail or telephone they will have some more individual tipps for you. Happy knitting!
16.06.2017 - 09:12
![]() Anne escribió:
Anne escribió:
Que veux dire, pour le rang 2 du tour de cou: i m lis à l'end. Que veux dire lis???je n'ai jamais pu trouver l'explication! Merci
01.03.2017 - 19:52DROPS Design respondió:
Chere Anne, 1 maille lis est la premiere maille du rang. Parfois elle est tricotee autrement que les autres mailles pour que le bord du tricot soit esthetique et facile a assemler a la fin. Bon tricot!
01.03.2017 - 20:27
|
|
What A Sight!#whatasightset |
|
|
|
|
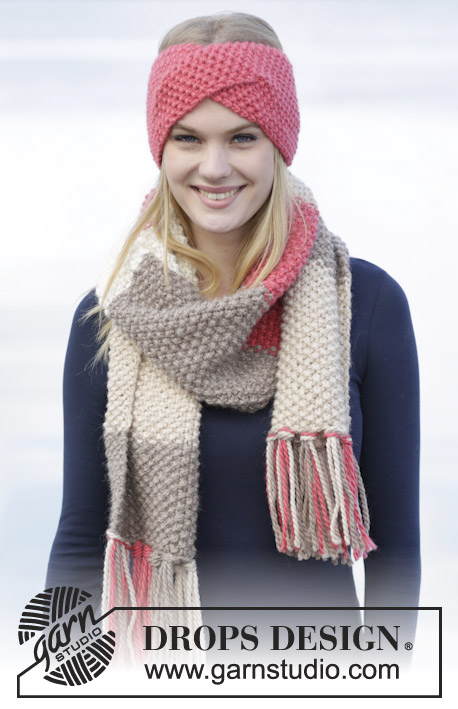
Conjunto DROPS de: Banda para la cabeza y cuello en resorte, en “Polaris”.
DROPS 164-27 |
|
|
BANDA PARA LA CABEZA: Montar 14 pts en ag tamaño 7 mm con Polaris y tejer de la manera sig: HILERA 1 (= LR): 1 pt de orillo de derecho, * 1d, 1r, 1d *, repetir de *a* 4 veces en total y terminar con 1 pt de orillo de derecho. HILERA 2 (= LD): 1 pt de orillo de derecho, * 1r, 1d, 1r *, repetir de *a* 4 veces en total y terminar con 1 pt de orillo de derecho. Repetir la 1ª y la 2ª hilera hasta que la pieza mida aprox 23 cm, ajustar para que la hilera sig sea por el LD. RECORDARSE DE MANTENER LA MISMA TENSIÓN DE TEJIDO DE LA MUESTRA! Después tejer de la manera sig: HILERA 1 (= LD): 1 pt de orillo de derecho, * deslizar 2 pts como si se fuesen a tejer juntamente de derecho, 1d, pasar los 2 pts por encima *, repetir de *a* 4 veces en total y terminar con 1 pt de orillo de derecho = 6 pts restantes en la ag. HILERA 2 (= LR): Tejer todos los pts de derecho. HILERA 3: Tejer todos los pts de derecho. HILERA 4: Tejer todos los pts de derecho. HILERA 5: 1 pt de orillo de derecho, * 1 HEB, tejer 2d en el pt sig *, repetir de *a* 4 veces en total y terminar con 1 pt de orillo de derecho = 14 pts en la ag. HILERA 6: 1 pt de orillo de derecho, * 1d, 1r, 1d *, repetir de *a* 4 veces en total y terminar con 1 pt de orillo de derecho – NOTA: Tejer las HEB retorcidas en la hilera sig para evitar agujeros. HILERA 7: 1 pt de orillo de derecho, * 1r, 1d, 1r *, repetir de *a* 4 veces en total y terminar con 1 pt de orillo de derecho. Repetir la 6ª y la 7ª hilera hasta que la pieza mida aprox 48 cm (o el largo deseado) y rematar con derecho sobre derecho y revés sobre revés. Unir la banda para la cabeza al centro de la parte de atrás con puntadas de “grafting” para que la costura sea invisible. ----------------------------------------------------- CUELLO: PT MUSGO (de ida y vuelta): Tejer todas las hileras de derecho. 1 surco = 2 hileras tejidas de derecho. TIP PARA CAMBIAR DE OVILLO: Para cambiar de ovillo con Polaris, separar el hilo viejo en 2 en los últimos 15 cm – cortar una de las dos partes, hacer lo mismo en el hilo del nuevo ovillo. Colocar los primeros y los últimos 15 cm, uno por encima del otro, para que el hilo tenga un grosor normal y continuar a tejer – esto se hace para obtener un cambio de ovillos invisible y que no haya cabos de hilo que entretejer. ----------------------------------------------------- CUELLO: Tejido de ida y vuelta y unido con una costura cuando está terminado. Montar 18-21 pts en ag tamaño 10 mm con Polaris. Tejer 2 surcos en PT MUSGO – ver explicación arriba. Después tejer en resorte de la manera sig: HILERA 1 (= LD): 2d, * 2r, 1d *, repetir de *a* hasta que reste 1 pt en la hilera y terminar con 1d. HILERA 2 (= LR): 1 pt de orillo de derecho, * 1r, 2d *, repetir de *a* hasta que resten 2 pts, terminar con 1r y 1 pt de orillo de derecho. Repetir la 1ª y la 2ª hilera. RECORDARSE DE MANTENER LA MISMA TENSIÓN DE TEJIDO DE LA MUESTRA Y LEER TIP PARA CAMBIAR DE OVILLO. Cuando la pieza mida 23-26 cm, insertar 1 marcapuntos en el primer pt en la ag (visto por el LD). Tejer hasta que la pieza mida 86-88 cm, tejer 2 surcos y rematar de derecho por el LD. ENSAMBLAJE: Doblar el cuello para que la orilla de remate esté contra la orilla de montaje y el marcapuntos. Coser entre sí, orilla con orilla, con una puntada en cada pt. |
|
¿Terminaste este patrón?Entonces, etiqueta tus fotos con #dropspattern #whatasightset o envíalas a la galería #dropsfan. ¿Necesitas ayuda con este patrón?Encontrarás 19 videos tutoriales, un espacio para comentarios/preguntas y más visitando la página del patrón en garnstudio.com © 1982-2026 DROPS Design A/S. Todos los derechos reservados. Este documento, incluyendo todas sus sub-secciones, está protegido por los derechos de autor (copyright). Lee más acerca de lo que puedes hacer con nuestros patrones en la parte de abajo de cada patrón de nuestro sitio. |


Con más de 40 años en el diseño de modelos de punto y de ganchillo, DROPS Design ofrece una de las más vastas colecciones de patrones gratuitos en el internet - traducidos en 17 idiomas. Al día de hoy, contamos con 324 catálogos y 12290 patrones - de los cuales 11675 están traducidos en español.
Nosotros trabajamos con mucho esmero para brindarte lo mejor que las labores de punto y ganchillo tienen para ofrecer,inspiración y consejos, así como hilos de magnífica calidad a precios increíbles! Te gustaría usar nuestros patrones para otro fin además del uso personal? Puedes leer acerca de lo que estás permitida a hacer en el texto de Copyright en la parte de abajo de todos nuestros patrones. Felices labores!
Escribe un comentario sobre DROPS 164-27
¡Nos encantaría saber qué piensas acerca de este patrón!
Si quieres escribir una pregunta referente al patrón, por favor asegúrate de elegir la categoría correcta en el formulario debajo, para acelerar el proceso de respuesta. Los campos obligatorios están marcados con un *.