
Categorías populares
¿Buscas un hilo?



























Comentarios / Preguntas (164)
 Kathy Dean escribió:
Please I need help. I am working the M. 1 = 24, have got to row 8,it is not working out right. I have worked from charts before but this one has got me confused. I have just been repeating the pattern for each row, can't figure out what has gone wrong. Making this for a gift. Would appreciate your help. I have gone to your chart section but it doesn't help. Thank you.
26.10.2023 - 22:16DROPS Design respondió:
Dear Mrs Dean, tricky to find any mistake without seing your project, maybe add markers between each repeat can help to keep tracking on each row. Show your work to your store (maybe even per mail), can also help to find together with you where it went wrong. Happy crocheting!
27.10.2023 - 09:20
 Krista escribió:
How do I start and end a row with a chain? It occurs in multiple rows through out the pattern but I don’t understand how to make this work. Please help me. I’ve tried to check through the other comments, I’m sorry if I missed it but I can’t find the answer.
24.08.2023 - 22:07DROPS Design respondió:
Dear Krista, you replace 1 sc with 1 chain and 1 dc with 2 chains at the beginning of every row. When the row start with 1 chain, crochet 2 chain to replace first stitch and then continue diagram with 2nd stitch in diagram, and finish with 1 dc in last stitch. Happy crocheting!
25.08.2023 - 08:24
 Julia escribió:
Danke liebes Team für die Antwort, bei der Anleitung hat M2 aber keine 36 M sondern nur 20M, wo finde ich die anderen 16? Bitte um weitere Hilfe
07.08.2023 - 21:48DROPS Design respondió:
Liebe Julia, die restlichen 16 Maschen häkeln Sie genau wie die ersten 20 Maschen, das Muster einfach so über die ersten/letzten 36 Maschen häkeln. Viel Spaß beim häkeln!
08.08.2023 - 09:16
Julia escribió:
Ich habe M1 gehäkelt, M2 und M3 auch ( Größe s), M4 geht sich aber nicht aus , habe immer 20 Maschen zuviel, häkle es bereits das 2x, es wird aber nichts anders
05.08.2023 - 21:08DROPS Design respondió:
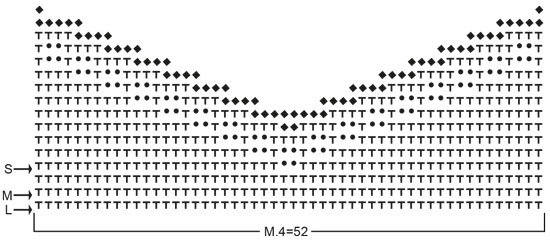
Liebe Julia, in S sind es 172 Maschen und so häkeln Sie die Diagramme: 36 Maschen M.2 + 24 Maschen M.3 + 52 Maschen M.4 + 24 Maschen M.3 + 36 Maschen M.2 = 36+24+52+24+36=172. Viel Spaß beim häkeln!
07.08.2023 - 10:01
 Esme escribió:
I am getting to the top of pattern 4 where the three squares join but I have 5 stitches not 4 so the middle square is wider. I\'ve undone and redone this several times. I\'m definitely working with 196 stitches but just can\'t calculate where this additional stitch comes from. Please can you help? Thanks
31.07.2023 - 23:38
 Broeckhoven Gonda escribió:
Ik weet het begin n iet van patroon 1. groetjes,
24.06.2023 - 12:51DROPS Design respondió:
Dag Gonda,
Je leest het patroon van onder naar boven en je begint de eerste naald rechts onderaan. Je haakt naar links en dan lees je op de volgende toer het patroon weer terug van links naar rechts. En zo ga je steeds verder.
25.06.2023 - 18:00
 Maria Maltese escribió:
Se si può avere lo schema e le catinelle che ci vogliono per le taglie S-M-L grazie
20.05.2023 - 15:28DROPS Design respondió:
Buonasera Maria, le spirgazioni sono gratutite per tutte e 3 le taglie. Buon lavoro!
22.05.2023 - 16:34
 Monika escribió:
Das Diagramm M1 fängt in der zweiten Reihe mit einer Luftmasche an oder muss ich zwei Luftmaschen für ein Stäbchen ersetzen ?
17.05.2023 - 19:45DROPS Design respondió:
Liebe Monika, ja bei der 2. Reihe häkeln Sie 2 Luftmaschen für 1 Stäbchen am Anfang der Reihe. Viel Spaß beim häkeln!
19.05.2023 - 07:53
Sarah Lampitt escribió:
Do I complete each side of M4 separately?
17.04.2023 - 21:19DROPS Design respondió:
Dear Mrs Lampitt, yes, to shape V-neck you will have to finish each side separately. Happy crocheting!
18.04.2023 - 10:05
 Jenny Johansson escribió:
Vad menas med virknål nummer 3 och 5? Är det 3 mm och 5 mm rundnålar?
16.03.2023 - 15:12
|
|||||||||||||
Sidney |
|||||||||||||
 |
 |
||||||||||||
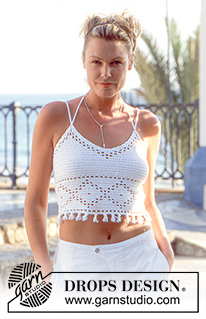
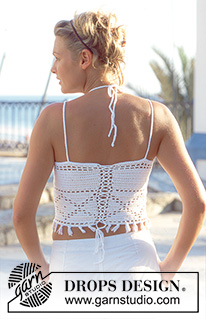
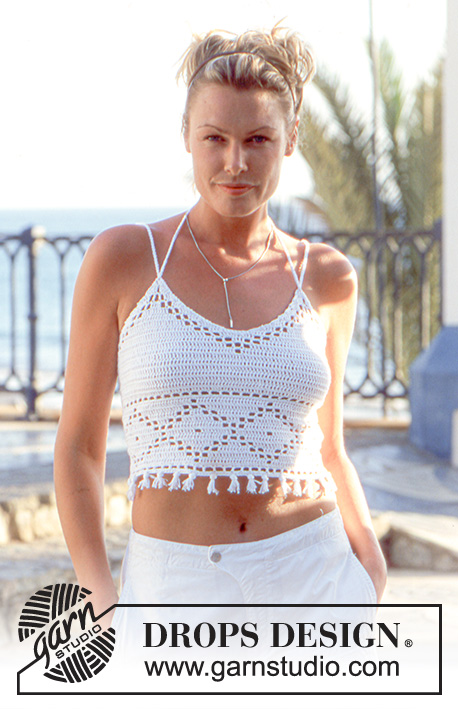
Top DROPS a ganchillo en Safran.
DROPS 69-1 |
|||||||||||||
|
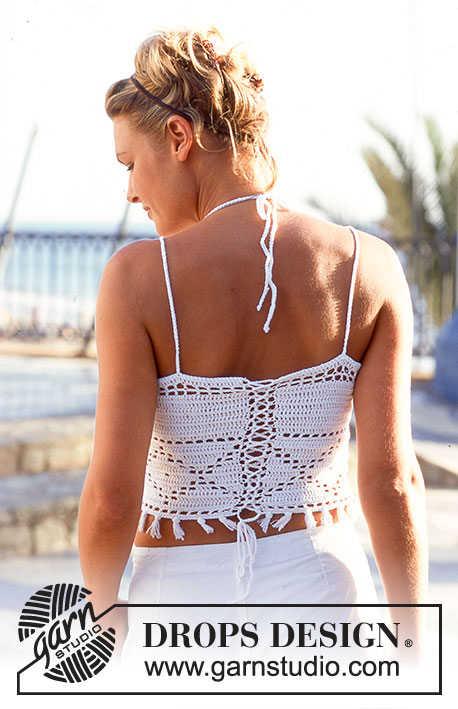
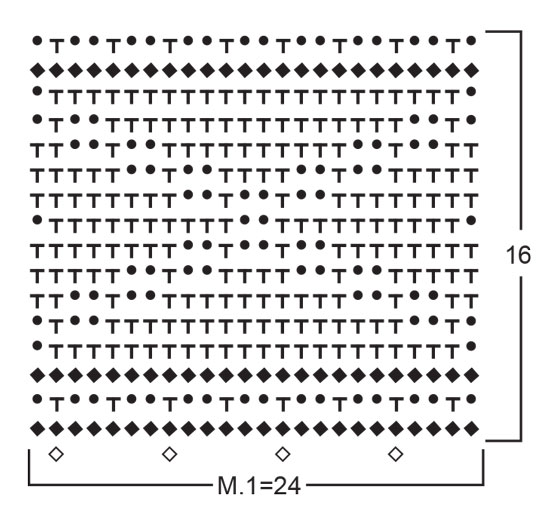
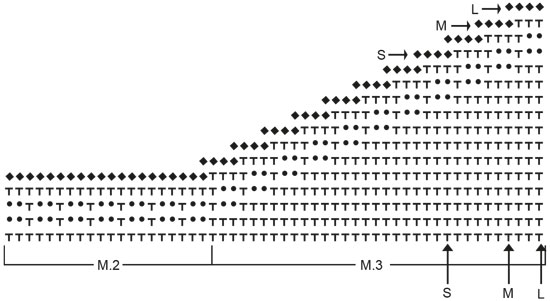
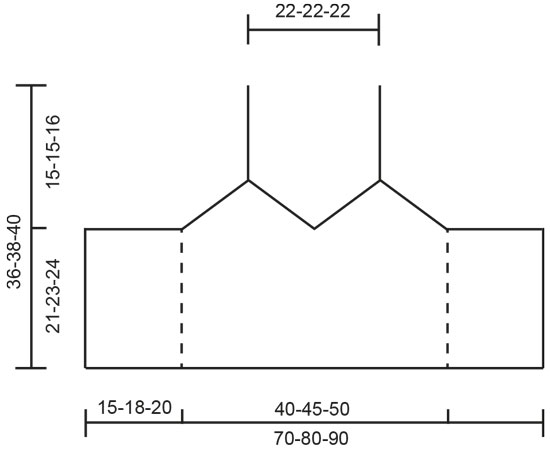
TENSIÓN DE LA MUESTRA : 24 p.a. x 12 filas del patrón con las ag de ganchillo del tamaño más pequeño = 10 x 10 cm PATRÓN: Ver los diagramas. Diagramas del Patrón 1 y el Patrón 2 = 1 repetición. Los diagramas del Patrón 3 y del Patrón 4 tienen flechas para cada talla. TIP PARA LA REALIZACIÓN DEL TRABAJO: Para girar en cada fila trabajar como sigue: sustituir 1 p.a. por 2 p.de cad y 1 p.b. por 1 p.de cad. -------------------------------------------------------- TOP: Trabajar 169-193-217 p.de cad con el ganchillo de tamaño más pequeño. Girar y trabajar el Patrón 1 - ver TIP PARA LA REALIZACIÓN DEL TRABAJO = 168-192-216 pts. Después del Patrón 1 continuar con p.a. sobre todos los pts, pero: Para las tallas S y M: aum 4 pts repartidos en la 1ª fila después del Patrón 1. Para la talla L: dism 2 pts repartidos en la 1ª fila después del Patrón 1. = 172-196-214 pts. Ahora hay un total de 22-24-25 filas trabajadas (incl el Patrón 1) y la labor mide aprox 18-20-21 cm Continuar como sigue: Trabajar el Patrón 2 - comenzar en el borde inferior del lado izquierdo del diagrama y trabajar hacia el lado derecho - sobre 36-42-48 pts, después el Patrón 3 que se comienza en el borde inferior del lado izquierdo del diagrama y se trabaja hacia el lado derecho - sobre 24-30-33 pts, posteriormente el Patrón 4 (52-52-52 pts), después el Patrón 3 - comenzar en el borde inferior del lado derecho del diagrama según la talla y trabajar hacia el lado izquierdo - sobre 24-30-33 pts, el Patrón 2, comenzar en el borde inferior del lado derecho del diagrama y trabajar hacia el lado izquierdo - sobre los últimos 36-42-48 pts. Continuar con el patrón de esta manera. Después de 5 filas el Patrón 2 está terminado - continuar con el Patrón 3 y el Patrón 4 hasta completar el diagrama. TERMINACIÓN: TIRANTES: comenzar a aprox 9 cm del borde superior en el lado derecho de la labor (= en la espalda). Hacer una cadeneta de aprox 90 cm de largo con doble hilo y la ag de ganchillo del tamaño más grande. Pasar por la punta superior del delantero. Repetir en el otro lado. El largo de la tira se ajusta cuando se ata en la espalda en la parte posterior del cuello. CIERRE: Trabajar ojales a lo largo de cada lado de la pieza (centro de la espalda). Comenzar en la parte superior y trabajar como sigue: * 1 p.b., 3 p.de cad., saltar 1 cm*, repetir de * a * hasta finalizar en la parte inferior. Hacer una cadeneta de aprox 150 cm de largo. Pasarla por los ojales - comenzar en la parte superior y cruzar hacia abajo, atar abajo. FLECOS: 1 fleco = 4 hilos de 8 cm de largo, doblar los hilos y pasar el bucle por la primera fila en el borde inferior, pasar los extremos de los hilos por el bucle - ver el Patrón 1. Trabajar 28-32-36 flecos. |
|||||||||||||
Explicaciones del diagrama |
|||||||||||||
|
|||||||||||||
 |
|||||||||||||
 |
|||||||||||||
 |
|||||||||||||
 |
|||||||||||||
¿Terminaste este patrón?Entonces, etiqueta tus fotos con #dropspattern o envíalas a la galería #dropsfan. ¿Necesitas ayuda con este patrón?Encontrarás 8 videos tutoriales, un espacio para comentarios/preguntas y más visitando la página del patrón en garnstudio.com © 1982-2026 DROPS Design A/S. Todos los derechos reservados. Este documento, incluyendo todas sus sub-secciones, está protegido por los derechos de autor (copyright). Lee más acerca de lo que puedes hacer con nuestros patrones en la parte de abajo de cada patrón de nuestro sitio. |
|||||||||||||






Con más de 40 años en el diseño de modelos de punto y de ganchillo, DROPS Design ofrece una de las más vastas colecciones de patrones gratuitos en el internet - traducidos en 17 idiomas. Al día de hoy, contamos con 333 catálogos y 12532 patrones - de los cuales 12026 están traducidos en español.
Nosotros trabajamos con mucho esmero para brindarte lo mejor que las labores de punto y ganchillo tienen para ofrecer,inspiración y consejos, así como hilos de magnífica calidad a precios increíbles! Te gustaría usar nuestros patrones para otro fin además del uso personal? Puedes leer acerca de lo que estás permitida a hacer en el texto de Copyright en la parte de abajo de todos nuestros patrones. Felices labores!
Escribe un comentario sobre DROPS 69-1
¡Nos encantaría saber qué piensas acerca de este patrón!
Si quieres escribir una pregunta referente al patrón, por favor asegúrate de elegir la categoría correcta en el formulario debajo, para acelerar el proceso de respuesta. Los campos obligatorios están marcados con un *.